13.1. Customizing Forms in Design View In the previous chapter, you learned how to quickly create different forms using the ribbon's buttons and the Form wizard. But serious form gurus take a different approachthey build a form by hand. There are two ways you go about this task:
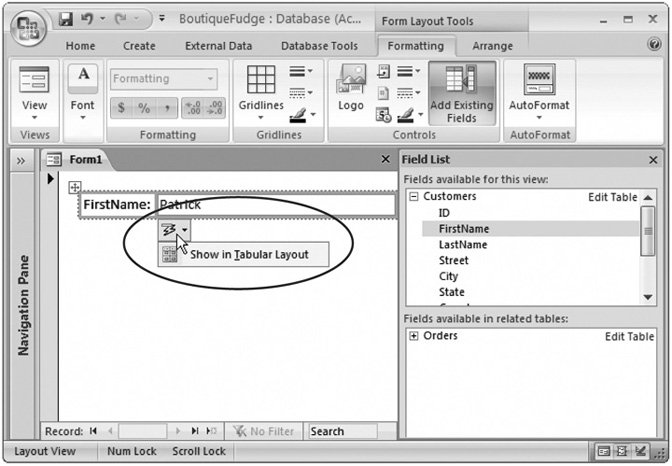
Note: If you don't see the Field List pane, then choose Form Layout Tools Formatting  Tools Add Existing Fields (in Design view) or Form Design Tools Design Controls Add Existing Fields (in Layout view). Tools Add Existing Fields (in Design view) or Form Design Tools Design Controls Add Existing Fields (in Layout view).
Tip: Remember, you can move a free-floating field into a layout after the fact by dragging it into place. Figure 12-13 (Section 12.3.3) shows how.
There's another, more important difference between Layout view and Design view. In Design view, you can add one of over a dozen fancy controls, like buttons, boxes, and labels. These controls make the difference between the cookie- cutter forms Access creates automatically, and forms that exhibit your own personal style. 13.1.1. Form Sections: The Different Parts of Your Form In Chapter 12, you learned that a report's divided into separate sections (like a report header, a details section, a report footer, and so on), each of which appears in a specific place. The same's true for forms. However, newly created forms start life with only one section: the details section, which defines the content for each record. If you want to add a title or logo at the top of your form, or some sort of summary information or message at the bottom, you'll want to include a header and footer section. To add these elements to your form, right-click anywhere on the form's surface, and then choose Page Header/Footer. When working with form sections, remember to keep them small (as shown in Figure 13-2). Each form section should be just large enough to fit the content you're displaying. If you create an oversized form with a lot of blank space, the results look unprofessional. You'll get unnecessary scroll bars on your form's sides, which let you scroll off into nothingness .
Tip: You can't make a form smaller than the controls it contains. This fact's the source of a frequent stumbling block for form designers. If Access doesn't let you resize a form, then something, somewhere, is still too big. (If all else fails, check that you don't have a large box in the form header or form footer sections.)
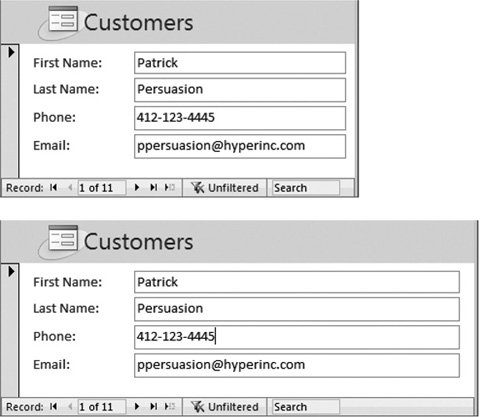
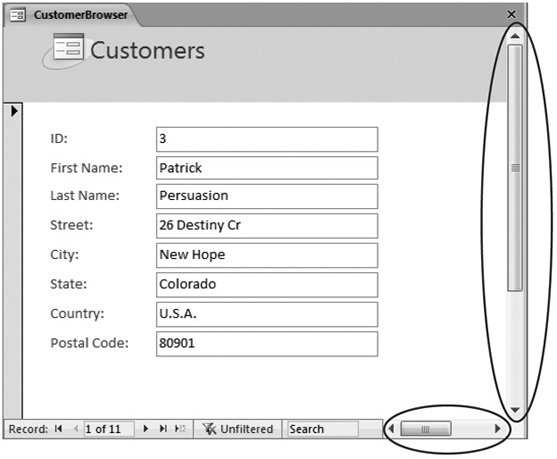 | Figure 13-2. Even though this form easily fits all its fields in the display area, it still has scroll bars. If you switch to Design view, you'll see whythe form's wider and longer than it needs to be. | |
Note: If your database is set to use overlapping windows instead of tabs (Section 1.3.6), then you'll see a slightly different problemyour form windows are unnecessarily large. In fact, they may not even fit in the main Access window, in which case Access chops off the edges.
13.1.2. Adding Controls to Your Form You first learned about controlsgraphical widgets like labels and text boxeswhen you created advanced reports in Chapter 12. Access gives you the same ability to use controls with forms. In fact, you use the same ribbon section to add them. However, many of the controls that didn't make much sense with reports really shine with forms.
Note: Behind the scenes, everything on a form's actually a control. Each time you add a field, you end up with two linked controls: a label that displays the field name , and a text box that holds the field value.
One of the simplest and most useful controls is the humble label. Using the label, you can add formatted text anywhere on your form. You could choose to use labels to highlight additional instructions, as shown in Figure 13-3. 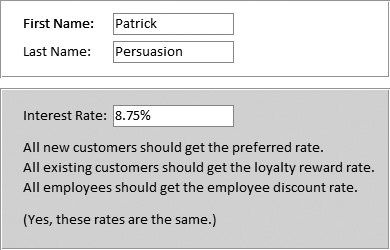 | Figure 13-3. Use labels to add helpful instructions (or cheeky commentary ) to your forms. Line and rectangle controls add a little polish. | |
To add a control, follow these steps: -
Head to the ribbon's Form Design Tools Design Controls section . The Controls section has one-stop shopping for all the controls you can use. -
Optionally, switch on the Use Control Wizards button. This button activates the wizards for controls . Some types of controls, like buttons and lists, come equipped with helpful wizards. As soon as you drop one on your form, the wizard pops up to help you perfect it. Ordinarily, wizards are switched on. However, control experts who know exactly what they want may find that the wizards just slow them down. When the Use Control Wizards button (found the Form Design Tools Design Controls sections far-right side) is not highlighted, the Control wizards leave you alone. -
Click the icon for the control you want . On most people's screens, Access can't fit the control name on the ribbon's control button. (Thirty-inch monitor owners , congratulate yourselves and skip to the next paragraph.) Hover over each control icon for a moment, and Access displays the control name in a tooltip. Once you click your icon, it remains highlighted. Your mouse cursor changes to a cross with a small picture of the control superimposed. That change is your indication that your control's ready and waiting for you to drop it onto the form.
Tip: If this is your first time experimenting with controls, why not try the labelit 's easy to master, and genuinely useful.
-
To place your control on the form, drag the mouse to draw the control on the form . If you don't get it right the first time, then you can always drag a control to a new position, or drag its borders to resize it. If you decide that you don't want to add the control you picked, then just click the Select button (at the far right of the Form Design Tools Design Controls section). It looks like a mouse pointer. When you click Select, your mouse pointer returns to normal. You can now click on the form to select an existing control. You dont create a new one.
Tip: For an even faster shortcut, just hit Esc to back out of control creation after you've selected a control.
-
If your control has a Control wizard and you choose to use Control Wizards (see step 2), the wizard appears now . Answer all the questions to configure your control, or just hit Esc to skip out of the wizard and do all the configuration on your own. -
If you're adding a label, supply some text for the control . After you drop a label onto your form, Access waits for you to type in some text (which is set in the Caption property). If you don't type anything for your label, Access assumes you don't really want the label, and just gets rid of it. -
If the Property Sheet isn't already visible (at the right side of the window), click Form Design Tools Design Tools Property Sheet to show it . To configure the control's many settings, or properties, you need to use the Property Sheet. -
Change the appropriate settings in the Property Sheet . If you've added a bound control (see the box "Bound Controls), select the Data tab, and then set the Control Source field to the name of the field you want to display.
Tip: If you have a label control that doesn't fit all the text you've entered, you can bump its size up in one step. Just right-click the control, and then choose Size To Fit. Access resizes the label so its just large enough to fit all its content. Don't try this with other controls like text boxesit won't work.
UP TO SPEED
Bound Controls | | A bound control's a control that displays the value in a database field. (It's called a bound control because it's "bound"tightly linkedto the appropriate field in your table.) The most familiar example's the text box, but other bound controls include the checkbox, the list box, and so on. When you add a bound control, you need to specify the linked field so Access knows what to display. You can most easily add a bound control by dragging a field from the Field List pane and letting Access create the control for you. However, there's no reason you can't choose to create a bound control by hand. Begin by dropping the right control type (like a text box) onto your form. Then, select the Data tab and look for the Control Source setting. This setting's where you fill in the corresponding field. For example, a text box with a Control Source set to ProductName displays the contents of the ProductName field on your form. Of course, this procedure works only if the form's data sourcethe table or query on which you're building the formhas the field you want to use. To change a form's data source, select Form in the Property Sheet, click the Data tab, and then look for the Record Source property. The Record Source property has the name of the linked table or query or an SQL SELECT command (Section 6.2.3) that gets the records you need. To choose a different table or query, type in its name. Or, click the ellipsis button in the Record Source box to open a query window that lets you pick and choose exactly the fields you want to use, from as many linked tables as necessary, with the exact filtering and sorting options you want. | -
Optionally, give your control a better name by setting the Name property (in the Other tab) . If you've just created a new label, Access bestows a name like Label46. If you want to honor your control with something more becoming, just change the text in the Name property. You'll have an easier time finding your control in the drop-down list in the Property Sheet next time you want to change it. -
Format your control . Although you can adjust many formatting details via the Property Sheet, the ribbon's much easier to use. Use the Form Design Tools Design Font section for basic font and color formatting, and use the Form Design Tools Design Controls chunk to add a stylized border around your control.
Controls Special Effect list. This methods a great way to make a basic rectangle control look a little different.
GEM IN THE ROUGH
Reusing Your Favorite Border Settings | | On the Controls section, there's an often overlooked button named Set Control Defaults. This button lets you reuse border settings over and over again. That way, if you come up with a nifty border for one control, you can quickly apply it to others. Here's how it works. Suppose you create a label and use the buttons in the Controls chunk to apply a carefully formatted border around it, with just the right thickness ( hairline ), color (fuchsia), and line style ( dotted ). You can reuse these settings by selecting the newly created label control and then clicking Set Control Defaults. Now, the next time you add a label to this form, it'll automatically have the same border settings. The Set Control Defaults command works on a per-control basis, so you can store different border settings for labels, pictures, text boxes, and so on. Although it's an interesting frill, many Access experts prefer to apply the same formatting to several controls by selecting them all at once, and then choosing the border options. | 13.1.3. The Control Gallery: A Quick Tour Later in this chapter, you'll consider how to create some popular form designs with controls. But first, it's worth taking a quick overview of all the controls on the rib-bon so you can see exactly what's available (and what isn't). Table 13-1 introduces you to every member of the control family. Table 13-1. Form Controls | Control | Description | | Label | Displays fixed text. Perfect for captions, notes, and helpful instructions. | | Text Box | Displays the value of a field from a record. You can also use a text box to show the result of an expression, as described in Section 11.5. | | Check Box | Displays the value of a Yes/No field. If it's Yes, the check box has a checkmark. | | Toggle Button | Shows a button that can be in two different states: normal and pressed. You switch it from one state to the other by clicking it. The toggle button's a rarely used oddity, but you can substitute it for the check box to display the value of a Yes/No field. In this case, the button's depressed if the field value is Yes. | | Combo Box | Displays a list that pops into view when you click the drop-down arrow. This list can be a list of values you supply, or it can be drawn from another table. Access automatically uses a combo box for lookup fields or linked tables. | | List Box | Displays a large box with a list of items. This list can be a list of values you supply, or it can be drawn from another table. You can use list boxes and combo boxes interchangeablythe key difference is the fact that list boxes take more space and combo boxes let you type in your own values that aren't in the list. | | Attachment | Shows the first file in an attachment field. If this file's a picture, the picture's displayed directly on the form. Otherwise, all you see's a small icon that indicates the file type. If the attachment field holds more than one file, then you can step through each one using the arrows in the minibar (which appears when you click this field), as described in Section 12.1.2.3. | | Option Group and Option Button | The option group's a rectangular container that holds one or more option buttons. | | Hyperlink | Displays a fixed hyperlinkblue underlined text that, when clicked, transports the clicker to a specific Web page. Section 13.2.5 shows how it works. | | Line and Rectangle | The line and rectangle controls are just decoration. Skillful designers use them to separate sections and highlight important information. | | Image | Displays a picture that you supply. Perfect for logos and eye candy that sets your form apart. Set the Size Mode property to determine whether your picture's chopped down to fit its box (Clip), stretched to fit (Stretch), or resized without changing the shape (Zoom, which is the standard setting). You can even use the Picture Tiling property to repeat a picture over a larger surface. To keep your pictures (and database files) small, use compact .jpg files rather than bloated .bmp files. | | Tab Control | Displays several tabs of information. You can see the content in one tab at a timeyou click to pick which tab you want. This Windows staple allows you to pack more information into a smaller space. Section 13.2.4 shows an example. | | Subform | Displays a form inside a form. Usually, a subform shows linked records from a related table. You'll see how this works in Section 13.3.1. | | Chart | Creates a basic chart using the Chart wizard that's included with Office. Alas, charts aren't very well integrated into Access. If you want to provide a graphical view of your data, then you're better off using a pivot chart (see Chapter 9) or just exporting your raw data to Excel, which is much more capable. | | Unbound Object Frame | Shows content, which is known as an object , from another program using a somewhat old-fashioned standard called OLE. You can use this control to do things like embed a spreadsheet, audio file, or Word document within your form. Most folks resist the urge, because the results tend to be awkward and confusing. | | Bound Object Frame | Similar to the unbound object frame, but this control retrieves the object you want to display from a field in the current record. This feature seems nifty, but the quirky and outdated OLE standard causes more trouble than it's worth. If you want this sort of feature, then you're far better off using an attachment field with an attachment control (Section 2.3.8), with an attachment control, which is designed to solve these problems. | | Page Break | Indicates where a page break should fall. This control has an effect only when you usfe your form to create a printout. Usually, you should steer clear of this control in forms and use it exclusively in reports, which are tailor-made for printing. | | ActiveX Control | ActiveX is a control building standard that's supported by many different programming platforms. If there's a specialized widget that you need to use in Access, you may be able to buy an ActiveX control from a component company, and then drop it onto your forms. Beware, thoughusing ActiveX controls often requires hefty amounts of code, and it's beyond the scope of this book. |
FREQUENTLY ASKED QUESTIONS
The Windows Control Face-Lift | | Why do my controls look so old fashioned ? Most people know Windows XP as the operating system that ushered in a whole new era of slightly different-looking buttons. Microsoft, in its relentless drive to make minor cosmetic changes, used Windows XP to redesign the visual appearance of common controls like buttons and checkboxes. To the untrained eye, the differences between Windows XP design frills and its predecessors are slight . For example, Microsoft replaced boxy grey buttons with carefully rounded buttons that glow with a hint of yellow shading when the mouse hovers over them. Most Windows pro-grams take advantage of the new look, but some are still trapped in the past. In previous versions of Access, it didn't matter whether you were using Windows XP or an earlier version of the operating system. Either way, your controls had the old styling. In Access 2007, your forms automatically get the new Windows XP look ( assuming you're running Windows XP or Windows Vista as your operating system). However, there's a possible exception. If you open a database that you created with an older version of Access, then your forms keep their original outdated appearance. Access doesn't want to tamper with any aspect of your form's appearance, in case it throws off your whole design. Fortunately, you can have the final say. If you've opened an old database, here's how to get the new look: -
Choose Office button Access Options. The Access Options dialog box appears. -
In the list on the left, choose Current Database. Access displays settings that pertain to the currently open database file. -
In the "Application Options" section, find the setting "Use Windows-themed Controls on Forms". If you want the Windows XP styles, then turn on the check-box here. If you don't, then remove the checkmark. -
|
13.1.4. Arranging Controls on Your Form By now, you're probably comfortable working with controls in Design view. Here's a quick refresher if your memory needs a little jump start: -
Create a control . Use the ribbon to pick the control you want, and then draw it in the right place. -
Move a control . Just drag. You can also move several controls at once, as explained in Figure 13-4. -
Resize a control . Drag the edges of the rectangle that surrounds it. If you have a linked label-and-text-box combination (which Access creates when you add a field), then be careful to click the right part. Figure 11-9 (Section 11.1.5) shows where to click to move just the caption, just the field value box, or both. -
Modify a control . Select it, and then, in the Property Sheet, find the setting you want to change. -
Delete a control . Select it, and then hit Delete to wipe it out forever. 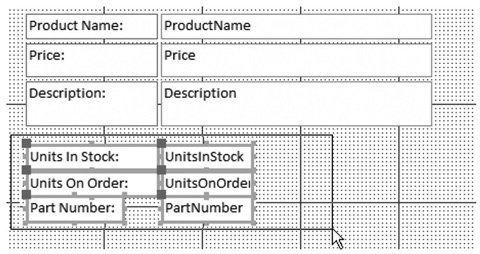 | Figure 13-4. To move multiple controls at once, start by clicking somewhere on the form surface. Drag a selection box around all the controls you want to move, as shown here. Then, once all the controls are highlighted, drag any one of them. All the controls move as a unit. (You could also hold down Shift, and click each control one by one.) | |
If your controls aren't contained in a layout, it can be difficult to get them neatly arranged. In an effort to help, Access supplies some shortcuts that can line up rogue controls and iron out minor variances. The following sections provide a few useful tips for using these features. POWER USERS' CLINIC
Breaking Free From the Grid | | When you place or move a control in Design view, Access always lines it up with the nearest part of the grid. (The grid lines are represented by all those dots that appear underneath your controls in Design view.) Access does this lining up because it makes it easier to create a consistent form. If controls were completely free-floating, it would be difficult to line two controls up next to each other. Even if you don't have shaky hands, it's hard to control the mouse that precisely! However, in some situations, you may want to nudge a control just between the grid dots. Usually, it's because your form includes pictures, and you're trying to create a snazzy effect. In such cases, Access lets you free yourself from the grid. Just choose Form Design Tools Arrange Control Layout Snap to Grid. Ordinarily, this buttons highlighted to indicate that controls are always lined up with the grid. To turn it off, click it. You can turn it back on when you're finished by clicking it again. Incidentally, if you find that the grid dots are distracting, you can hide them using Form Design Tools Arrange Show/ Hide Show Grid. And if you decide that you do want your controls to line back up with the grid, then just select them all, right-click the selection, and then choose Align To Grid. Access bumps each control over to the nearest grid line. Use Size To Grid to make sure their heights and widths also fit the grid. |
13.1.4.1. Aligning controls If you have a group of controls that needs to be neatened up, select them all (by drawing a selection box, as shown in Figure 13-4), right-click the selection, and then choose an option in the Align submenu. Use the ever-popular "left" option to line all the controls up along their left edges. You can also line up controls on the right (see Figure 13-5), top, or bottom edges. 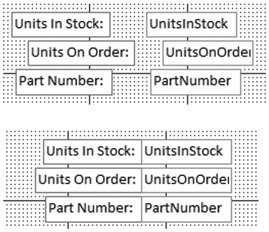 | Figure 13-5. Top: These controls look messy.
Bottom: Even though the controls aren't in a layout, you can line them up properly using the Align options. Here, someone used the Align Right command to pull them together against the right edge. | |
13.1.4.2. Sizing controls If you have controls of different sizes, then you can tell Access to make them all the same size. Select them all, right-click the selection, and then choose an option from the Size menu. Use To Widest to make all the controls as wide as the widest one of the bunch (see Figure 13-6). Alternatively, you can shrink controls down by choosing To Narrowest, or change their heights with To Tallest and To Shortest. 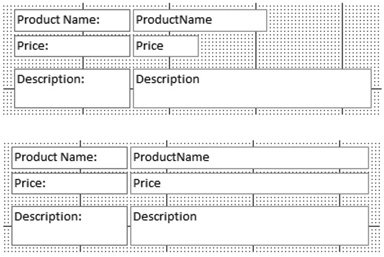 | Figure 13-6. The To Widest command makes all these text boxes (top) the same width (bottom), which creates a cleaner and more visually pleasing form. | |
13.1.4.3. Spacing controls If you have controls that are scattered unevenly over the form, you can reposition them so that a consistent amount of space appears between them. To do so, select all the controls, and then head to the ribbon's Form Design Tools Arrange Position section. In the Position section, youll find several buttons to adjust the spacing between controls: -
Make Vertical Spacing Equal spaces out controls so they're an even distance apart (from top to bottom). -
Make Horizontal Spacing Equal spaces out controls so they're an even distance apart (from side to side). -
Increase Vertical Spacing and Increase Horizontal Spacing add a bit more space between all the controls you've selected. -
Decrease Vertical Spacing and Decrease Horizontal Spacing remove a bit of space between all the controls you've selected. 13.1.4.4. Controls that overlap If you have overlapping controls, you may want to decide which one's placed on top and which one on the bottom. To do so, select one of the controls, head to the ribbon's Form Design Tools Arrange Position section, and then choose Bring to Front (to move the control to the top) or Send to Back (to banish it to the background). It goes without saying that most forms don't have overlapping controls. The exception's if you're aiming for a unique graphical effect, or if you're trying to use a rectangle to frame a bunch of controls (in which case the rectangle needs to sit behind the other controls). 13.1.5. Anchoring: Automatically Resizing Controls Ordinarily, your controls have a fixed, unchanging size. This characteristic lets you precisely arrange a large number of controls next to each other. However, fixedsize controls also have a downside. If you resize the Access window to make it very large, then the controls can't use the extra space. Conversely, if you make the Access window very small, then you're sure to cut off part of your form. In other words, fixed-size controls make for easy design, but they're inflexible . Most people don't worry too much about these limitations. They design their forms to fit comfortably on an average- sized screen (see the box "How Big Is Your Screen?" in Section 13.1.5.1). However, if you have one or more fields that display a large amount of datalike a memo field (Section 2.3.1.1) that's chock-full of textyou might want to get a bit more ambitious. Access 2007 introduces a feature called anchoring , that lets you create controls that can grow to fill extra space when the Access window's resized. Anchoring's a little tricky to get right, but if you have huge text fields, it's worth the trouble. Essentially, anchoring lets you attach a control to the sides of the form. As a result, when the form changes size, the control's dragged to a new position or resized. Figure 13-7 shows an ordinary form that uses standard anchoring settings. Nothing happens when this form's resized. 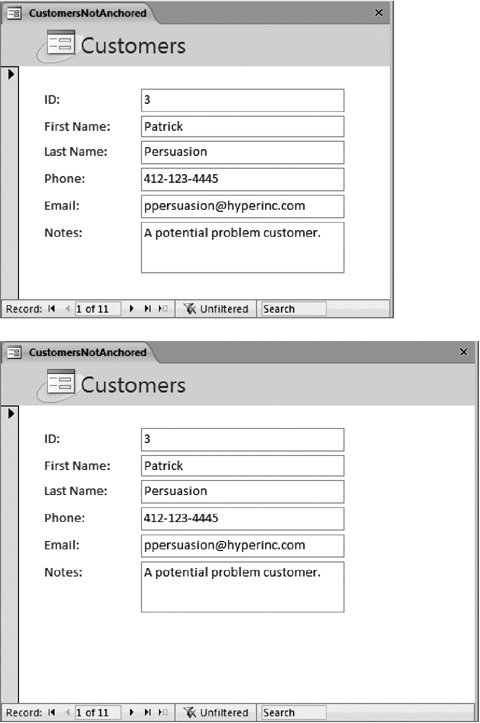 | Figure 13-7. Ordinarily, all controls are anchored to the form's top-left corner (top). If the form window changes size, nothing happens to the controls, because the top-left corner never moves (bottom). | |
If you anchor a control to a form's right side, it's a different story. As the form's resized wider, the control hugs the right side, moving to a new position. Similarly, if you attach a control to the bottom of the window and make it taller, then the control keeps close to the bottom, no matter how small or large the window becomes. The really exciting bit's what happens when you anchor a control to opposite sides. In this case, its position doesn't change, but its size does. If you anchor a control to a form's left and right sides, then the control widens as the form widens. Figure 13-8 shows how life changes when you anchor your control to different sides.
Tip: The amount of space between the control and the anchored side always remains the same.
 | Figure 13-8. This form includes controls that are anchored to different sides. The ID and Email fields are anchored to the top right, and the Notes field is anchored to the bottom right. As the form grows, the controls change position. | |
Theoretically, you can use anchoring to create all kinds of bizarre effects. You could anchor controls to all different sides of the form, so they move and overlap as the form changes size, scrambling the form in complete confusion. More realistically , people use anchoring to achieve two effects, which are demonstrated in the following two sections. UP TO SPEED
How Big Is Your Screen? | | When it comes to monitors , size doesn't matter (really). What is important is your monitor's resolution . Resolution measures how many pixels (tiny dots) your monitor displays. If you have a larger resolution, then you can fit more content into view. The only drawback's that everything onscreen appears smaller. If you maximize the Access window and open a datasheet, then you see more rows and columns at once on a high-resolution screen than a lowresolution one. Ordinary people tend to use a resolution of 800 x 600 or 1024 x 768, although higher resolutions aren't unusual. (A resolution of 800 x 600 is 800 pixels wide and 600 pixels tall.) Your specific resolution isn't all that important. But if you plan to share your Access database with other people, then you may want to check that your forms look respectable at other common resolutions . To check what resolution you're currently using, minimize all your programs. Then, right-click the Windows desktop, and then choose Properties. The Display Properties window appears. Choose the Settings tab to find out your current resolution, and to try out other resolutions to see how they affect your forms' usability. |
13.1.5.1. Making controls as wide as the form Ordinarily, you size a text box, and its size never changes. But with anchoring, you can make controls stretch wider or narrower to match your Access window's size. And as long as you don't put any other controls in the way, you don't have a problem with overlapping controls. Just follow these steps: -
First, make sure your form doesn't have extra blank space. In Design view, shrink the width of the details section so it's just wide enough to fit your controls . If you leave extra blank space, then it's harder to see anchoring at work. Flip back to Figure 13-2 for a quick review of how to size forms properly. -
Choose the controls that you want to expand along with the window's size . If you have the form shown in Figure 13-7, you may choose all the text boxes. Hold down the Shift key while you click to select them all. Figure 13-9 shows the final result you're after.
Note: If your controls are in a layout (Section 12.3), you need to remove them from the layout before you apply anchoring. Although you can apply anchoring settings to an entire layout container, they won't work the way you want them too because they'll influence the size of both the field value boxes and the field captions.
 | Figure 13-9. Top: These text boxes could stand to grow so they can accommodate long names and email addresses. But you don't want them to be so wide that people need to scroll from side to side if their monitors have a lower resolution than yours.
Bottom: The solution's anchoring, so the text boxes always use the available space, and not one whit more. | | -
13.1.5.2. Making a single control as large as possible In the previous example, you saw how to use anchoring to make a control grow horizontally. You can also use anchoring to make a control grow vertically, but there's a catch. In most forms, you have several controls placed one on top of the other. If you're not careful, when a control gets taller, it starts blotting out the control underneath it. The solution's to make sure that only one control on the form can grow vertically. This control (probably a large field that's stuffed with text) then expands to consume all the extra space. All the controls above this control must be anchored to the top of the form. All the controls underneath it must be docked to the bottom so they stay out of the way. Here's how to put this model into practice: -
In Design view, shrink the width of the details section so it's just wide enough to fit your controls . As with all types of anchoring, extra space is your enemy. -
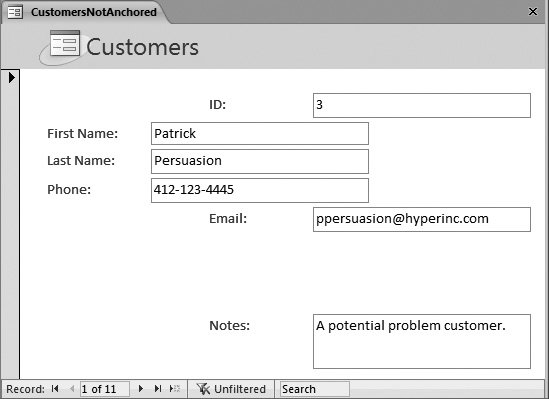
Select the control that you want to grow vertically to get the extra space . Consider the form in Figure 13-9, which shows customers. In this case, it's the Notes field that has the most text and would benefit most from the extra space. Even if you anchor the Notes field to both sides, you'll still get only a bit of extra space. Better to use whatever blank space you can get at the bottom of the form. -
-
Bottom Left. This action anchors the control to the left and bottom sides. That way, as the form's heightened, the control drops down to make space for the one above. -
You could also use the Stretch Across Bottom option. In this case, the control's still anchored to the bottom, but it grows horizontally to fit the width of the form.
Note: In the previous example, you didn't need to anchor the labels in front of every field, because they stayed fixed in place. However, in this example, you do need to use Bottom Left anchoring for all the labels that appear underneath the control that stretches vertically. (Otherwise, this label doesn't line up with its value box.) You never use one of the stretch anchoring options with a label, because you don't want your label to change size.
-
Repeat step 4 for each control underneath . If you forget a control, you see a telltale sign. When you resize the form window smaller, some controls overlap because the different anchoring settings don't agree. Assuming you anchor everything correctly, you get the result that's shown in Figure 13-10. 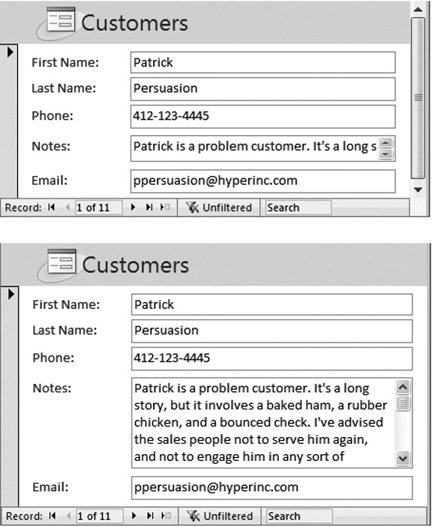 | Figure 13-10. Now, when the form gets taller, the Notes field gets the extra room. | | 13.1.6. Tab Order: Making Keyboard Navigation Easier When you're using a form to edit a record, you need to skip from one field to another. You can jump anywhere you want by using your mouse, but hard- core keyboard jockeys don't want to waste time raising their fingers from the keys. Here's where the Tab key comes into the picture. You probably already know that the Tab key lets you move from one control to another in any Windows application. The Tab key also works in the datasheet, letting you skip from one column to the next. So it should come as no surprise that the Tab key also works in your forms. The first time you press Tab in a form, you may be in for an embarrassing surprise. If you've spent a fair bit of time fiddling with your controls and rearranging them, then the Tab key doesn't necessarily take you to the control you expect. Figure 13-11 illustrates the problem. 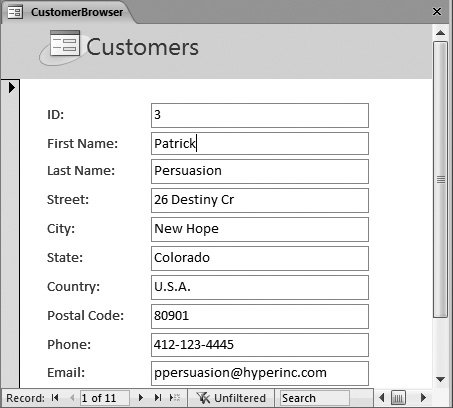 | Figure 13-11. You'd expect that you could press the Tab key here to jump from the FirstName field to the LastName field. But try it and you wind up in the Country field instead, halfway down the form. | |
Note: The Tab key always works correctly if you're using a tabular or stacked layout, because Access keeps it up to date as you move the controls around. It's only when you've taken your controls out of a layout that you'll see the problem described here.
Getting a form straightened out so that the Tab key moves from one control to the next in an orderly fashion is called setting the tab order . Essentially, every control that supports tabbing has three important properties (which you can find in the Other tab in the Property Sheet). These properties are: -
Tab Stop determines whether a control supports tabbing. If set to Yes, you can tab to this control. If you change this setting to No, then it doesn't matter how much tabbing you doyou'll never get here. When you first add a control, this property's always set to Yes. -
Auto Tab has an effect only if the control's using an input mask (see Section 4.2). If you set Auto Tab to Yes, then as soon as you type the last character into the mask, you're automatically tabbed to the next control. This feature's handy for really fast data entry, but it can be annoying if you make a mistake, because you're tabbed out of the control before you can fix it. -
Tab Index controls the tab orderin other words, where you go each time you hit Tab. When you first open a form, you start at the control that has a tab index of 0. When you hit Tab, you then move to the control with the next highest tab index (like 1). This process continues until you reach the control with the highest tab index. Hit Tab again, and you'll start back at the beginning.
Note: The only controls that have these properties are controls that can accept focus in other words, controls you can click and interact with. Obviously, text boxes, checkboxes, and buttons support tabbing. However, labels and pictures don't, because there's no way to interact with these items.
Every time you add a new control, Access gives it a new, higher tab index. Even if you drop a new control at the top of the form, Access puts it at the end of the tab order. To fix this problem, you could select each control in Design view, and then change the Tab Index setting by hand. However, a much less time-consuming alternative lets you set the tab order for the entire form in one go. Here's how it works: -
Right-click a blank spot on the form design surface, and then choose Tab Order . The Tab Order dialog box appears. It lists all the controls on your form that support tabbing, from lowest to highest Tab Index. -
In the Selection list, choose the section of your form you want to work with. It's almost always the details section . The Tab Order dialog box lets you set the tab order separately for each section of your form. If your form includes a header and footer, you can choose to work with the header, footer, or details section. However, it's very rare to find a form that has controls to support tabbing outside the details section. -
If you want to let Access take a crack at setting the correct tab order, then click Auto Order . When you click Auto Order, Access sets the tab order based on the controls' position. The order goes from left to right, and then from top to bottom. Most of the time, the Auto Order feature gets you the right tab order (or at least gets you closer to it). -
To move a single control to a new position in the tab order, drag it . This step's a bit tricky. Figure 13-12 shows how it works. 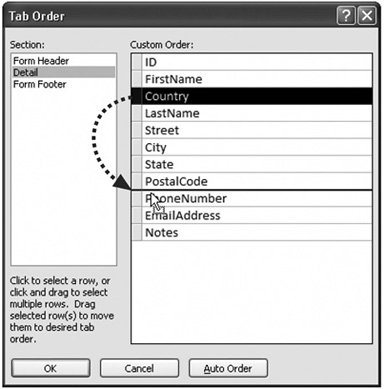 | Figure 13-12. To reposition a control in the tab order, begin by clicking the gray margin that's just to the left of the control. The entire row's selected. Next, drag the control to a new position on the list. In this example, the Country field's being moved down the tab order. | | -
Click OK when you've got the tab order perfected .
Tip: The tab order goes both ways. You can move one step forward in the tab order by pressing Tab, and you can move one step backward by pressing Shift+Tab.
|