21.2. Setting Up SharePoint Now that you know what SharePoint is, you're ready to take it for a whirl. Every SharePoint server starts out with one home site. Although you can use the home site for collaboration, most people prefer to create additional sites for each separate team. (Your company can have as little as one team site or as many as several thousand.)
Tip: You see the home site appear, in Internet Explorer, at the end of the setup process.
21.2.1. Creating a Team Site Here's how you create a new team site: -
Surf to your SharePoint home site . Remember, SharePoint gives you the home site URL at the end of the setup process. Or, if you've signed up for a hosted SharePoint site, the hosting company will give you the URL. -
Click the Site Actions button (see Figure 21-3), and then choose Site Settings . The site management page appears, with a huge list of options you can change.  | Figure 21-3. The Site Actions button is located at the top-right corner of every SharePoint page. It gives you a quick way to configure the site or create a new item (like a list or a Web page). | | -
In the Site Administration section, click the "Sites and workspaces" link . A page appears that lists all the sites and document workspaces on your current SharePoint server. ( Document workspaces let people share files, like Word documents and Excel spreadsheets. Sites have this feature too, but they also have additional frills, like lists of announcements and a shared calendar.) You can use this page to view one of the other sites or to remove it. Initially, the list of sites is empty, because a new SharePoint installation starts out with nothing but a home site. -
Click Create to build a new site . A page appears where you can configure your new site (Figure 21-4). 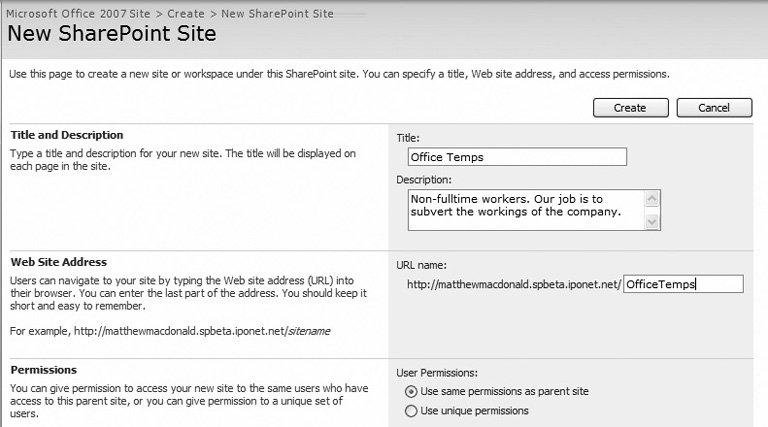 | Figure 21-4. Here's where you fill in the information for the new Office Temps team site. | | -
Fill in all the site information, and then click Create . -
The Title and Description section determines how your site appears on the main page. -
The Web Site Address section lets you pick the URL that people will use to get to this team site. This address has two parts : the home site URL (which usually includes the server name ), plus a customizable bit at the end that identifies the team. -
The Permissions section lets you choose how people are authenticated (in other words, how SharePoint decides whether it should allow them in). Choose "Use unique permissions" if you want to control exactly who can access this team site (which is the most flexible approach). Otherwise, the permissions for your new site will be the same as the permissions for the home site. -
The Navigation section lets you choose whether a link for this site appears in the home site. -
The Template section lets you choose a starting point for the layout of your site. The Team Site template is a good choice. Once you've created the site, you can tweak it to your heart's content. -
Click Create . You see an "Operation in Progress" message while the site is being created. If you chose "Use unique permissions" in step 3, SharePoint shows a new page where you can choose the people who are allowed to use your site. -
Choose the groups that are allowed to use the site (Figure 21-5) . Three levels of people can use a SharePoint site: -
Visitors can read information left by other people, but they can't change anything. -
Members are a part of the team. They can edit information in existing lists, but they can't create new ones. -
Owners are super-members. They add and remove other users, create lists, and change site settings. To assign these different levels of permission to different people, you use groups . Groups are a Windows security concept that lets you manage large numbers of people at once. The basic idea is that a single group can contain as many people as you need. Best of all, groups are super flexible. When someone new joins the company, you don't need to modify your SharePoint site settings. Instead, you simply add that person to the right group , and SharePoint knows exactly what they should be allowed to do. 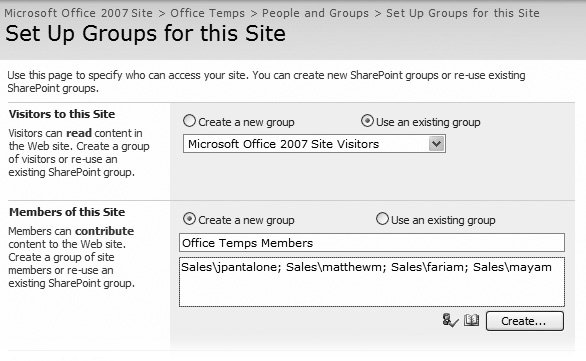 | Figure 21-5. If you already have a group for visitors, choose "Use an existing group," and then fill in the group name. Otherwise, choose "Create a new group," and then supply a list of user names , separated by semicolons. In this example, a new group named Office Temps Members is being created with four users. | |
Note: Getting the correct user names and group names is important; Once again, you may need to call in a network administrator. You probably need to indicate the computer or domain that each person uses to log in. So if user jpantalone logs in to the Sales domain, you'd need to add the user name Sales\jpantalone to make that clear to SharePoint.
-
Once you've finished filling in the user information, click OK . This completes the process. Congratulations! You have a brand new SharePoint team site to play with (Figure 21-6). 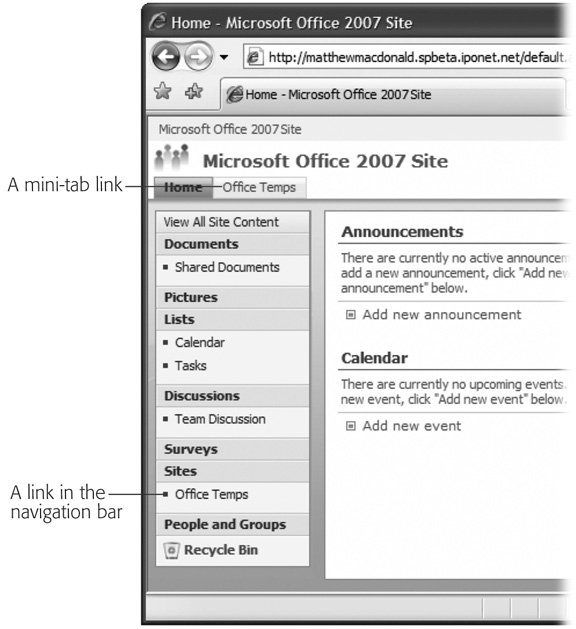 | Figure 21-6. Depending on the options you chose in the Navigation section (Section 21.2.1), your site may appear in the mini tabs at the top of the SharePoint pages for quick access. | |
Tip: You can create a new Windows user without leaving the SharePoint setup page. Just click the Create button under one of the user lists. For added convenience, SharePoint can automatically send an invitation email to the lucky new team member, as long as you provide the email address.
21.2.2. Customizing Your Site SharePoint sites are ridiculously customizable. That's because they're actually built out of numerous self-contained components , which Microsoft calls Web Parts. If you want to change the page, you simply need to add new Web Parts, remove existing ones, or just move them around the page. To try this out, head to the home page for your team site, and click Site Actions  Edit Page. The page switches into edit mode, as shown in Figure 21-7. Edit Page. The page switches into edit mode, as shown in Figure 21-7. 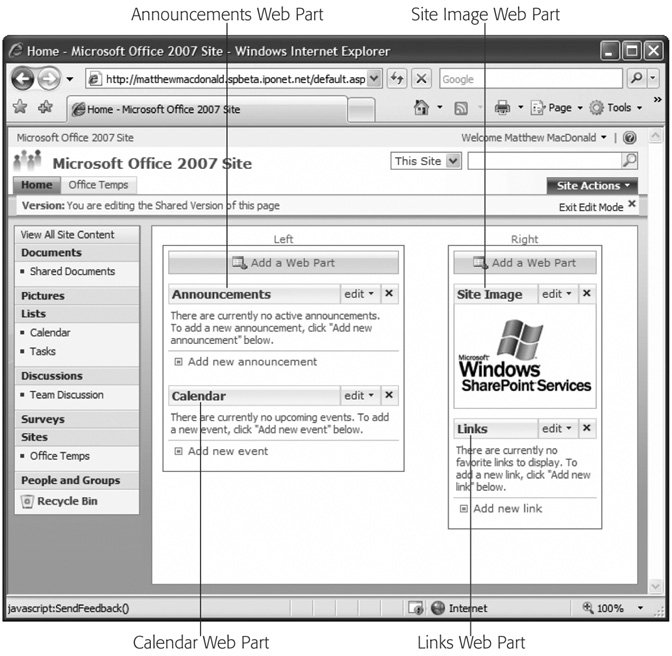 | Figure 21-7. In edit mode, you can clearly see the separate regions of your page and where each Web Part is placed. This rather unremarkable page consists of four Web Parts. | |
Note: When you modify your site in this way, your changes affect everyone. Any site owner can configure a SharePoint team site.
You can change a lot in edit mode. You can: -
Move a Web Part . Just click the title bar (for example, the text that says "Announcements"), and then drag it to a new place on the page. -
Minimize a Web Part . By minimizing a Web Part, only the title for the Web Part is shown on the page, which saves considerable space. If people using the page decide to use that Web Part, they can simply click the drop-down arrow next to the title to spring the section into view. -
Remove a Web Part . Click the X icon at the top-right corner of the Web Part box to close it. You can always add it back later. UP TO SPEED
Five Fun Features to Try Out in SharePoint | | The rest of this chapter focuses on the SharePoint features that work with Accessnamely, lists. However, you don't need to stop your SharePoint exploration here. If you're still curious , be sure to check out the following SharePoint features: -
Book a meeting with the calendar . In the Calendar Web Part, click the "Add new event" link. You can fill in the title, description, location, and time for your meeting. You can even create a workspace to store notes. -
Get immediate notifications with an alert . Alerts let you notify people when something in SharePoint changes (whether it's a new event, an assigned task, an announcement, or something else). For example, you can add an alert to the calendar. Just click the "Calendar" title to open up the calendar view, and then choose Actions Alert Me. Youll be asked to choose the type of changes you're interested in and the email addresses that SharePoint should notify. -
Share a document . Often, teams need to send specifications, reports , and other business documents through a review chain. SharePoint makes it easy. Just click the Shared Documents link in the navigation panel to head to the document center, where you can browse what's already there and upload your own work. -
Assign a task . When there's work to be done, it helps to have an efficient way to coordinate who's doing what. In SharePoint, that means clicking the Tasks link in the navigation panel to see the lists of outstanding jobs. You can create and assign new tasks with a wealth of important tracking information (like priority, status, percent complete, start date, due date, and even an attached file). -
Share contact information . Does your team need to stay in touch with the same people? SharePoint has a ready-made list, called Contacts, that's designed just for this purpose. To take a look, click Contacts in the navigation panel. If you'd like to learn more about SharePoint, you may be interested in a dedicated book on the subject, like Essential SharePoint by Jeff Webb (O'Reilly). |
-
Change a Web Part . Depending on the Web Part, you can tweak different options, including the appearance of the Web Part, the included elements, its behavior, and so on. To modify a Web Part, click the "edit" button at the top-right corner of the Web Part box, and then choose Modify Shared Web Part. ("Shared" means that a whole team of people see this Web Part, so change it at your own risk.) Figure 21-8 shows an example. -
Add a Web Part . SharePoint has a library of useful Web Parts, as shown in Figure 21-9. (And it goes without saying that enterprising programmers can also create their own.) To pick a new Web Part, click Add Web Part in the section of the page where you want it to appear. 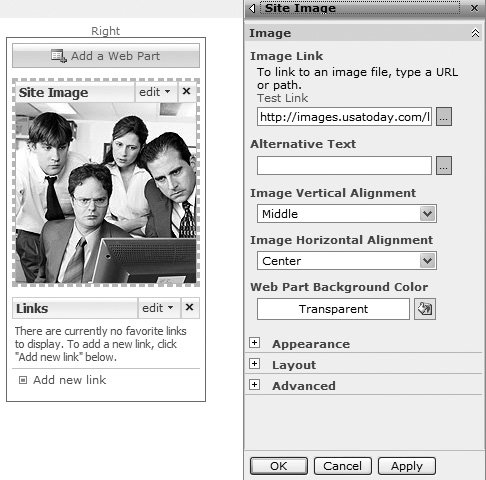 | Figure 21-8. When you modify a Web Part, a dashed border appears around it. The settings for that Web Part are shown in a panel on the right. In this example, the Site Image Web Part is being outfitted with a new graphic. | |
|