Section 6.1. Style Sheet Basics
6.1. Style Sheet BasicsStyle sheets are officially known as the cascading style sheet (CSS) standard. CSS is a system for defining rules about how one or more Web pages should be formatted. When you use CSS in a Web page, the browser reads both the page's HTML and the style sheet rules. It then uses the style sheet rules to format the page. Figure 6-1 diagrams the process.
This system gives Web weavers the best of both worldsa rich way to format pages and a way to avoid mucking up your HTML beyond recognition. In an ideal world, the HTML document describes only the structure of a Web page (what's a header, what's a paragraph, what's a list, and so on), and the style sheet explains how to give that Web page a hot new look. 6.1.1. The Three Types of StylesBefore you even get started learning how to write CSS rules, you first have to think about where you're going to place those instructions. CSS gives you three different ways to apply style sheets to a Web page:
These three levels give you the flexibility to either follow the CSS philosophy wholeheartedly (with external style sheets), or to use the occasional compromise (with internal style sheets or inline styles). Because the style sheet language is always the same, even if you use the "lazier" approach, like internal style sheets, you can always cut-and-paste your way to an external style sheet when you're ready to get more structured. 6.1.2. Browser Support for CSSBefore you embrace style sheets, you need to make sure that they work on all the browsers your visitors are using. But determining what browsers support cascading style sheets isn't as easy a question as it should be. The first problem is that there is actually more than one version of the CSS standardthere's both CSS1 and CSS2. This book concentrates exclusively on CSS1, because support for CSS2 is lacking in most browsers. (Internet Explorer is a notable laggard in this department.) But the real problem is that browsers don't necessarily support the entire CSS standard, and when they do, they don't always support it in exactly the same way. The discrepancies range from minor to troubling. As a result, in this book you'll focus on CSS properties that are known to be well supported among all the major browsers. (That said, don't forget to test your pages in a wide variety of browsers to be sure they're appearing correctly.) As a basic rule of thumb, you can count on good all-around CSS support in Netscape Navigator 6, Internet Explorer 5 for Windows, Internet Explorer 4.5 for Macintosh, Opera 3.6, and any version of Firefox or Safari. In later browser versions, the support just gets stronger. Many people who've used the Web for a few years still remember an earlier generation of browsersnamely, Netscape 4.x and Internet Explorer 4.x. Both of these browsers are unreliable when it comes to some of the fancier features in CSS. However, you're unlikely to run into these browsers anymore outside of a museum. If you're in doubt, just take a look at some recent browser statistics to see who's online. Table 6-1 shows the log resultsa record of which visitors are using which browsers over a period of several monthsat a popular HTML teaching site, W3Schools. Given the fact that W3Schools doesn't cater to power users or computer professionals, this table's a pretty good yardstick for the kinds of browsers your visitors are likely to be using. Every browser in this table supports CSS. Table 6-1. Current browser usage
Tip: For more up-to-date information, surf to www.w3schools.com/browsers/browsers_stats.asp. Of course, statistics can be misleading. Web sites can attract wildly divergent groups of people, and you know your audience best. If you're still concerned about whether a specific CSS feature is supported in a specific browser version, see the sidebar "A Browser Compatibility Reference." Also, look for the Oldest Supported Browsers column in the property tables shown throughout this chapter. For example, if the Oldest Supported Browsers column indicates Internet Explorer 5, you can bet that the property won't work (or works erratically) in Internet Explorer 4.5.
6.1.3. The Anatomy of a RuleStyle sheets contain one thing: rules . Each rule is a formatting instruction that applies to a part of your Web page. A style sheet can contain a single rule, or it can hold dozens (or even hundreds) of them. Here's a simple rule that tells the browser to display all <h1> headings in blue: h1 { color: blue } CSS rules don't look like anything you've seen in HTML. But you'll have no trouble with them once you realize all rules are built out of three ingredients : selectors, properties , and values . Here's the format that every rule follows : selector { property: value } And here's what each part means:
Of course, it's rarely enough to format just one property. Usually, you'll want to change several characteristics at the same time. You can do this with style sheets by creating a selector like this: h1 { text-align: center; color: black; } This example changes the color and centers the text inside an <h1> tag. That's why selectors use the funny curly braces ({ and })so you can put as many formatting instructions inside them as you want. Each rule is separated from the next using a semicolon (;). It's up to you whether you want to include a semicolon at the end of the last rule. Although it's not necessary, Webheads often include one so that it's easy to add another formatting property onto the end of the selector when needed. Tip: As in an HTML file, CSS files let you use spacing and line breaks pretty much wherever you want. However, people usually put each formatting instruction on a separate line (as in the example above) in order to make style sheets easy to read. Conversely, you might want to create a formatting instruction that affects several different tags. For example, imagine you want to make sure the first three heading levels all use blue formatting. Rather than writing three separate rules, you can create a selector that includes all three tags, separated by commas. Here's an example: h1, h2, h3 { color: blue } Believe it or not, selectors, properties, and values are the essence of CSS. Once you understand these three ingredients, you're on your way to style sheet gurudom. Here are a few side effects of the style sheet system that you might not have realized yet:
Don't worry about learning the specific properties and values yet. Later in this chapter, after you see how style sheets work, you'll get acquainted with all the different types of formatting instructions you can use. 6.1.4. Applying a Style SheetNow it's time to see style sheets in action. Before you go any further, dig up the resume.htm file you worked on in Chapter 2 (it's also available from the "Missing CD" page at www.missingmanuals.com). You'll use it to test out a new style sheet. Just follow these steps:
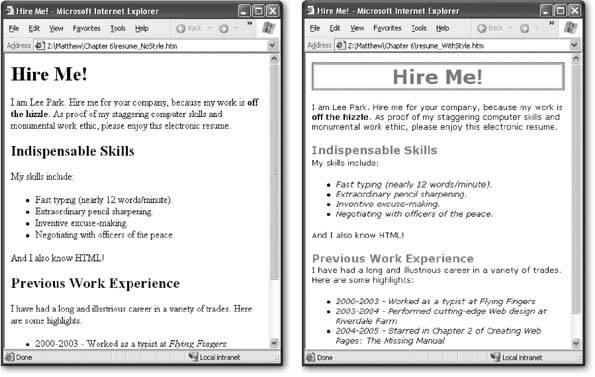
The style sheet in this example isn't terribly impressive. In fact, it probably seems like a lot of work to get a simple pink heading. However, once you've got this basic model in place, you can quickly take advantage of it. For example, you could edit the style sheet to change the color. Or, you could add new rules to format other parts of the document. Simply save the new style sheet and refresh the page to see the new rules come into effect. To see this at work, try changing the style sheet so that it has these rules: body { font-family: Verdana,Arial,sans-serif; font-size: 83%; } h1 { border-style: double; color: fuchsia; text-align: center; } h2 { color: fuchsia; margin-bottom: 0px; font-size: 100%; } li { font-style: italic; } p { margin-top: 2px; } These rules change the font style for the entire document (through the <body> tag), tweak the two heading levels, italicize the list items, and shave off some of the spacing between paragraphs. Although you won't recognize all these rules at first glance, the overall model hasn't changed. Figure 6-2 shows the result.
6.1.4.1. Internal style sheetsThe previous example demonstrated an external style sheet. External style sheets are everybody's favorite way to use CSS, because they allow you to link a single lovingly crafted style sheet to as many Web pages as you want. However, sometimes you don't have an entire Web site in mind, and you'd be happy with a solution that's a little less ambitious. An internal style sheet is a style sheet that's not linked, but instead is embedded in the <head> area of a Web page. Yes, it bulks up your Web pages and it forces you to give each Web page a separate style sheet. But occasionally, the convenience of having just one page with its own style rules makes it worthwhile. To change the earlier example so that it uses an internal style sheet, remove the <link> element and add the style rules in a <style> element inside the <head> section of the Web page, as shown here: <head> <style type="text/css"> h1 { color: fuchsia } </style> </head> To ensure optimum compatibility with really old browsers, there's another trick Web gurus often usethey put the style information in between comment tags: <head> <style type="text/css"> <!-- h1 { color: fuchsia } --> </style> </head> This way, ancient browsers that have no understanding of style sheets (like Netscape 3), won't inadvertently display the style information in the Web page because it's hidden in the page. (On the other hand, browsers that are CSS-conversant see the instructions just fine.) Of course, you're unlikely to run into this problem these days, but many Web authors still follow this best practice. 6.1.4.2. Inline stylesIf you want to avoid writing a style sheet altogether, there's another approach you can use. Inline styles allow you to insert the property and value portion of a style sheet rule right into an HTML tag. (You don't need the selector because it's obvious that you want to format the current tag.) For example, here's how you format a single heading with an inline style: <h1 style="color: fuchsia" >Hire Me!</h1> When you use this approach, it affects only the tag where the style rule is placed. If there are other <h1> headings in the Web page, they aren't affected.
Inline styles may seem appealing at first glance, because they're clear and straight-forward. You define the formatting information exactly where you want to use it. However, if you try to format a whole Web page this way, you'll realize why Web gurus universally shun them. Quite simply, the average CSS formatting rule is long. If you need to put it inside an HTML page alongside your content, and copy it each time you use the tag, you'll quickly end up with a Web page that's mangled beyond all recognition. For example, consider a more complex heading that needs several style rules: <h1 style="border-style: double; color: fuchsia; text-align: center">Hire Me!</h1> Even if this occurs only once in the document, it's already becoming a loose and baggy monstrosity. Try to avoid inline styles if you can. Note: Novice Web designers often get into trouble with inline styles when they use WYSIWYG editors like FrontPage to format their Web pages. Every time you change a formatting detail in FrontPage (like the color, alignment, and so on), it quietly adds a dollop of style information to your HTML. That makes these files quite difficult to edit (and gives FrontPage a bit of a bad reputation). Now that you know better, you'll be able to use a WYSIWIG editor and styles to make sure your HTML stays neat and tidy. 6.1.5. The CascadeBy now, you might be wondering what the "cascading" part of "cascading style sheets" means. It refers to the way the browser decides which rules take precedence in case you've got multiple sets of rules. For example, if you indicate that <h1> headings should have blue letters using an external style sheet, and then apply bold formatting with an inline style, you'll end up with the sum of both changes: a bold blue-letter heading. However, it's not as clear what happens if the rules conflictfor example, if one rule specifies blue text while another mandates red. Which color setting wins? To determine the answer, you need to consult the following list to find out which rule has highest priority. This list indicates the steps the browser follows when applying styles. The steps toward the bottom are the most powerful: they're performed after the steps at the top, and so they overwrite any earlier formatting.
So, if an external style sheet property conflicts with an internal style sheet, the internal style sheet wins. Based on this behavior, you might think that you can use this cascading behavior to your advantage by defining general rules in external style sheets, and overriding them with the occasional exception using inline styles. However, there's actually a much better option. Rather than formatting every matching tag, you can specifically format individual tags by using class selectors (see Section 6.6 for details). Note: The "cascading" in cascading style sheets is a little misleading, because in most cases you won't use more than one type of style sheet (for the simple reason that it can quickly get confusing). Most Web artistes favor external style sheets primarily and exclusively. 6.1.6. InheritanceAlong with the idea of cascading styles, there's another closely related conceptstyle inheritance . In order to understand style inheritance, you need to remember that in HTML documents, one tag can contain other tags. For example, the <ul> (unordered list) tag contains <li> (list item) tags. Similarly, a <p> paragraph tag can contain character formatting tags like <b> and <i>, and the <body> tag contains the whole document. Thanks to inheritance, when you apply formatting to an element that contains other elements, the rule is applied to everything . For example, if you set the <body> element to use a specific font (as in the r sum style sheet shown earlier), the font applies to every element inside the <body> element, including all the headings, paragraphs, lists, and so on. Note: There are some style properties that break the rules (for example, margin settings are never inherited) but most don't. Look for the Can Be Inherited column in each table in this chapter to figure out whether a property will be inherited. However, there's a trick. Sometimes, formatting rules may overlap. In this case, the most specific rulethat is, the one closest to the tagwins. For example, settings in an <h1> element override settings in a <body> element for all level 1 headings. Or consider this style sheet: body { color: black; text-align: center; } ul { color: fuschia; font-style: italic; } li { color: red; font-weight: bold; } These rules can overlap. In a typical document (see Figure 6-3) a <li> (list item) is placed inside a list tag like <ul>, which in turn exists inside the <body> tag. Crafty style sheet designers can use this behavior to their advantage. For example, you might apply a font to the <body> element so that everything in your Web pageheadings, paragraph text, lists, and so onhas the same font. Then, you can judiciously override this font for a few specific tags by applying more formatting rules. Although you probably won't see cascading styles in action very often, you'll almost certainly use style inheritance. Note: Now that you've learned how style sheets work, you're ready to start with the hard partlearning about the dozens of different formatting properties you can change. In this chapter, you won't learn about every property. For example, there are some properties that apply primarily to pictures and tables. You'll learn about these properties in later chapters. |

 New to show the "New page task window on the right. Then, click the "More page templates" link to show the Page Templates dialog box. Choose the Templates tab (which is confusingly called the Style Sheets tab in some older versions of FrontPage). You'll see a list of predefined templateschoose one of these and you'll start off with a pile of color-coordinated rules you can apply to a Web page right away. (And of course, you're free to change or replace the rules as you see fit.)
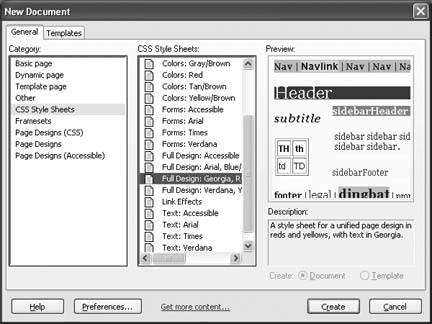
EAN: N/A
Pages: 135