Lesson 5: Automating the Installation of Windows 2000 Server
Automated installations of Windows 2000 Server involve running Setup with an answer file. You can perform automated installations on multiple computers so that Setup can take place in an unattended fashion. The following types of software can have their installations automated:
- The core Windows 2000 Server operating system
- Any application that does not run as a service
- Additional language support for Windows 2000 Server through the installation of various language packs
- Service packs for Windows 2000 Server
After this lesson, you will be able to
- Perform an unattended installation of the Windows 2000 Server operating system
Estimated lesson time: 45 minutes
Performing an Unattended Installation
To perform an unattended installation of Windows 2000 Server, you must specify the answer file when you run Setup. There are three basic types of unattended installations that you can use to set up Windows 2000 Server: the bootable CD-ROM method, the Winnt.exe method, or the Winnt32.exe method.
Bootable CD-ROM
To start Windows 2000 Setup in Unattended mode from the Windows 2000 Server installation CD-ROM, the following conditions must be met:
- The computer must support the El Torito-bootable CD-ROM (No-emulation mode) format to boot from the CD-ROM drive.
- The answer file must be named Winnt.sif and be placed on a floppy disk to be inserted into the floppy drive as soon as the computer boots from the CD-ROM.
- The answer file must contain a
[Data]section with the required keys specified.
Winnt.exe or Winnt32.exe
The following Winnt.exe command provides an example for implementing an unattended installation:
Winnt /s:Z:\i386 /u:Z:\unattend.txt /t:c
Note the use of the /u: command-line switch, which indicates an unattended installation. The /t: switch indicates which drive Setup will copy the source files to continue the installation. Z:\i386 is the network location containing the Windows 2000 installation source files. The command line example assumes the local computer has mapped the Z: drive to the network share containing the i386 subfolder.
The following Winnt32.exe command provides an example similar to the previous Winnt example for implementing an unattended installation:
Winnt32 /s:Z:\i386 /unattend 10:Z:\unattend.txt /tempdrive:C
Winnt32.exe uses /unattend: rather then /u: for running an unattended setup. The number following the /unattend: switch indicates to the setup routine how long it should wait after copying files to automatically reboot the computer and continue setup. The num command works on Windows NT or Windows 2000 but is ignored on computers running Windows 95 or Windows 98.
Figure 8.4 illustrates the steps necessary to run the sample unattended installation commands discussed earlier.
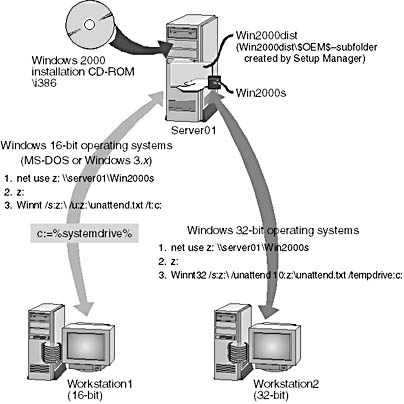
Figure 8.4 Initiating an unattended installation on computers running 16-bit and 32-bit operating systems
Automating the Installation of Windows 2000 Server
Several methods are available for creating an automated installation of Windows 2000 Server. The method you choose depends on the desired outcome. In certain situations, installation methods can be combined. For example, Syspart and Sysprep can be used together in certain setup installation scenarios.
In addition to the basic installation methods described above, you can use the following methods to perform automated installations of Windows 2000 Server:
- The Winnt32.exe Setup program along with the /syspart parameter
- The System Preparation Tool (Sysprep)
- Systems Management Server (SMS)
- Bootable CD-ROM
- Remote Installation Service (RIS)
These methods either build on or replace the over-the-network unattended installation method described above. Table 8.16 provides details about when to use each installation method.
Table 8.16 When to Use the Various Installation Methods
| Installation method | Use | Upgrade | Clean installation |
|---|---|---|---|
| Syspart | Use Syspart for clean installations to computers that have dissimilar hardware. | No | Yes |
| Sysprep | Use Sysprep when the master computer and the target computers have identical or nearly identical hardware, including the HAL and mass storage devices. | No | Yes |
| SMS | Use SMS to perform managed up- grades of Windows 2000 Server to multiple systems, especially those that are geographically dispersed. | Yes | Yes |
| Bootable CD-ROM | Use the bootable CD-ROM method with a computer whose BIOS allows it to boot from the CD-ROM. | No | Yes |
| RIS (Remote Installation Service) | Use RIS with a computer that supports PXE or a bootable RIS floppy disk. Either method allows the computer to connect to a networked RIS Server during the initial boot process and receive an installation of Windows 2000 Professional. Pre-Boot Execution Environment (PXE) allows a computer that contains a PXE ROM to boot to the network server. The PXE ROM is either coded into the system BIOS or is located on a NIC as an optional ROM. | No for Server | No for Server |
NOTE
RIS can roll out automated installations of Windows 2000 Professional only. It does not support automated installations of Windows 2000 Server. Future enhancement to RIS might allow roll-outs of Windows 2000 Server and other operating systems.
Table 8.16 also shows which installation methods can be used to perform upgrades or clean installations. Before you can automate the installation of Windows 2000 Server, you must decide if the installation will be an upgrade from Windows NT Server or a clean installation.
If you do perform a clean installation, note that because an automated installation is unattended, a clean installation can replace existing partitions or files on existing partitions. Application files and data files can still remain on partitions, although applications should be reinstalled in order to be reregistered with the new operating system installation.
Using Syspart
Syspart is executed by including it as a parameter of the Winnt32.exe Setup program. Winnt32 with the Syspart switch is run on a reference computer to complete the first phase of installation. If the reference computer and the computers on which you will complete the installation of Windows 2000 Server do not have similar hardware, you can use the Syspart method. This method reduces deployment time by completing the file-copy phase of setup on the reference computer, thereby eliminating this step on the computers targeted for installation.
Syspart requires that you use two physical disks, with a primary partition on the target hard disk. However, the target hard disk does not need to be located in the master computer. It can be in another computer on a network, as long as it is a clean disk with no operating systems installed.
If you require a similar installation and operating system configuration on hardware types in which the HALs or mass storage controllers differ, you can use Syspart to create a master set of files with the necessary configuration information and driver support. This file set can then be used on dissimilar systems to properly detect the hardware and consistently configure the base operating system.
After the reference computer is running, connect to the distribution folder and run Setup by executing the Winnt32.exe program from the command prompt:
winnt32 /unattend:unattend.txt /s:install_source / syspart:install_target /tempdrive:install_target /noreboot
After running the previous command where install_target equals D, the structure shown in Figure 8.5 is created on the D: drive.
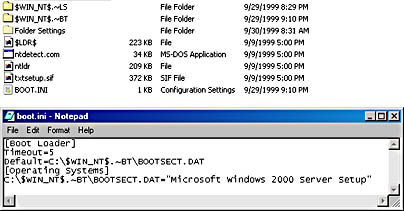
Figure 8.5 The contents of the target computer's D: drive and Boot.ini after running Syspart
There are several parameters and values you can use with the Win32.exe setup program. Using these allow you to customize the setup to your specific environment.
- The Unattend.txt value is the answer file used for an unattended setup. It provides answers to some or all of the prompts the end user normally responds to during Setup. Using an answer file is optional when creating the master file set.
- The install_source value is the location of the Windows 2000 Server files. Specify multiple /s command-line switches if you want to install from multiple sources simultaneously. Figure 8.6 shows a file copy occurring from two sources. The first source is a network drive, the second source is a local CD-ROM drive. As the figure shows, up to eight installation sources can be specified.
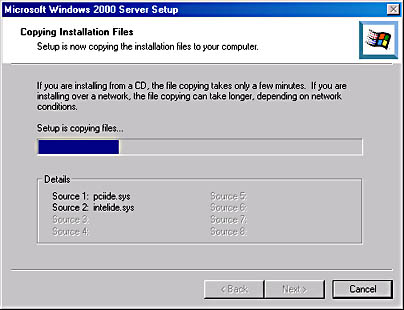
Figure 8.6 The Copy Installation Files screen showing two sources for file copy
- The /syspart and /tempdrive parameters must point to the same partition of a secondary hard disk. The Windows 2000 Server installation must take place on a primary partition of that secondary hard disk. Syspart sets the partition to active so that it is bootable.
- The /tempdrive parameter must be used for the Syspart installation to be successful. When you use the /tempdrive command-line switch, make sure you have sufficient free disk space on your second partition to install both Windows 2000 Server and the installation files it places in $WIN_NT$.~LS.
- The install_drive value is the partition that contains the preinstallation of Windows 2000 Server. The files on this drive are shown in Figure 8.5.
NOTE
Syspart will automatically mark the drive as active in preparation for moving it to the target computer.
Using Sysprep
Sysprep is a tool that facilitates creating a disk image of your Windows 2000 Server installation. Disk duplication is a good choice if you need to install an identical configuration on multiple computers. To use the Sysprep tool, you should install Windows 2000 Server on a reference computer. You should also install any other applications on the reference computer that you want installed on the target computers. Then run Sysprep followed by a third-party disk-imaging utility. Sysprep prepares the hard disk on the master computer so that the disk imaging utility can transfer an image of the hard disk to the other computers. This method decreases deployment time dramatically compared to standard or scripted installations.
TIP
Create a CD-ROM containing the disk image or move the image to a network location so that the image can be used to rapidly set up many identical or nearly identical computers.
To use Sysprep, the master computer and target computers must have identical HALs, Advanced Configuration and Power Interface (ACPI) support, and mass storage devices. Windows 2000 automatically detects Plug and Play devices, and Sysprep redetects and re-enumerates the devices on the system when the computer is turned on after Sysprep has run. This means the Plug and Play devices, such as network cards, modems, video adapters, and sound cards, do not have to be the same on the master and target computers. The major advantage of Sysprep installation is speed. The image can be packaged and compressed and only the files required for the given configuration are created as part of the image. Additional Plug and Play drivers that might be needed on other systems are also created. The image can also be copied to a CD-ROM to be distributed to remote sites that have slow links.
NOTE
Because the master and target computers must have identical HALs, ACPI support, and mass storage devices, you might need to maintain multiple images for your environment.
Sysprep allows you to configure a master image containing the necessary components for a member server and then later configure the server and optionally promote it to a domain controller. This can be done manually or by running the commands in the [GuiRunOnce] section of the Sysprep.inf file.
If your environment includes multiple types of hardware-dependent systems, you can use Syspart in conjunction with Sysprep to create a master for each type. To do this, you install Windows 2000 on one computer of each type, and then use the Sysprep utility to help create images to be used on the remaining computers of each type. For more information about Sysprep, see "Using Sysprep to Extend Disk Partitions," later in this lesson.
Before you begin, choose a computer to use as a reference computer. The reference computer must have Windows NT Server or Windows 2000 Server installed.
NOTE
Sysprep can also be used to create installations of Windows 2000 Professional.
The Sysprep Process
The following is an overview of building a source computer to use for Sysprep duplication.
- Install Windows 2000. Windows 2000 Server should be installed on a computer with hardware similar to the intended target computers. The computer should not be joined to a domain while it is being built. In addition, the local administrator password should be kept blank.
- Configure the computer. You should be logged on as the administrator when you install and customize Windows 2000 Server and the associated applications. You might include IIS or install and configure other services.
- Validate the image. You should run a client audit, based on your criteria, to verify that the image configuration is correct. Remove residual information, including anything left behind from audit and event logs.
- Prepare the image for duplication. Once you are confident the computer is configured exactly the way you want, the system can be prepared for duplication. This is accomplished by running Sysprep with the optional Sysprep.inf file, which is described later in this section. When Sysprep has completed running, the computer shuts down automatically or indicates that it is safe to be shut down.
- Duplicate the installation. At this point, the computer hard disk is prepared to run Plug and Play detection, create a unique SID, and run the Mini-Setup wizard the next time the system is started. Before continuing the next stage of installation, the system is duplicated by using a third-party imaging utility such as Norton Utilities Ghost or PowerQuest Drive Image Pro 3.0. The next time Windows 2000 Server is booted from this hard disk, or from any duplicated hard disk created from this image, the system will detect and re-enumerate the Plug and Play devices, create a unique SID, and run the Mini-Setup wizard to complete the installation and configuration on the target computer.
WARNING
Components that depend on the Active Directory services cannot be duplicated. Local users and groups should not be created on the member server because new SIDs will not be assigned to these user and group accounts.
Sysprep Files
There are three sysprep files: Sysprep.exe, Sysprep.inf, and Setupcl.exe. To use Sysprep, run Sysprep.exe manually or configure Setup to run Sysprep.exe automatically by using the [GuiRunOnce] section of the answer file. To run Sysprep, the files Sysprep.exe and Setupcl.exe must be located in a Sysprep folder at the root of the system drive (%systemdrive%\Sysprep\). To place the files in the correct location through Setup, you must add these files to your distribution folders under the $OEM$\$1\Sysprep\ subfolder.
The Sysprep files prepare the operating system for cloning and start the MiniSetup wizard. An optional answer file, Sysprep.inf, can be included in the Sysprep folder. Sysprep.inf contains default parameters that can be used to provide consistent responses where appropriate. This limits the requirement for user input, thereby reducing potential user errors. Sysprep.inf can also be placed on a floppy disk to be placed in the floppy drive after the boot loader dialog appears. This provides more customized responses and further reduces the initial boot requirement for the end user. When the MiniSetup wizard has successfully completed its tasks, the system reboots one last time, the Sysprep folder and all its contents are deleted, and the system is ready for the user to log on.
Sysprep.exe has three optional parameters, which are described in Table 8.17.
Table 8.17 Sysprep.exe Optional Parameters
| Parameter | Description |
|---|---|
| -quiet | Runs Sysprep without displaying onscreen messages. |
| -nosidgen | Runs Sysprep without regenerating SIDs that are already on the system. This is useful if you do not intend to clone the computer on which you are running Sysprep. |
| -reboot | Automatically reboots the computer after Sysprep shuts it down, eliminating the need for you to manually turn the computer back on. In addition, the -reboot parameter forces a system reboot after disk duplication is completed so that MiniSetup (the version of Setup that runs when there is a duplicated image on the hard disk) runs automatically. The only time you want to use this switch is if you are auditing the Sysprep process and want to make sure the MiniSetup wizard is working properly. |
The Sysprep.inf file is an answer file used during the cloning process to provide unique configuration information for each of the target computers. It uses the same .ini-like file syntax and key names (for supported keys) as the Setup answer file (unattend.txt). Sysprep.inf needs to be placed in the %systemdrive%\Sysprep\ folder or on a floppy disk. If you use a floppy disk, immediately after the system boots and the boot loader appears, place the floppy disk in the drive; the system will look for an updated Sysprep.inf on a floppy disk drive. Note that if you do not include Sysprep.inf when running Sysprep, the MiniSetup wizard displays all the available dialogs, which are listed in the MiniSetup wizard section later in this lesson.
If you use Sysprep.inf when creating the master computer and when running Sysprep, use the floppy disk method to provide an alternate Sysprep.inf. Locations specified for system files needed during MiniSetup, such as OEMPnPDriversPath and InstallFilesPath, must remain the same for Sysprep.inf in the distribution folder and for Sysprep.inf on the floppy disk.
The following script is a sample of a Sysprep.inf file:
[Unattended] ;Prompt the user to accept the End Use License Agreement (EULA). OemSkipEula=No ;Use Sysprep's default and regenerate the page file for the system ;to accommodate potential differences in available RAM. KeepPageFile=0 ;Provide the location for additional language support files that ;may be needed in a global organization. InstallFilesPath=%systemroot%\Sysprep\i386 [GuiUnattended] ;Specify a non-null administrator password. ;Any password supplied here will take effect only if the original source ;for the image (master computer) specified a non-null password. ;Otherwise, the password used on the master computer will be ;the password used on this computer. This can be changed only by ;logging on as Local Administrator and manually changing the password. AdminPassword=password ;Set the time zone TimeZone=20 ;Skip the Welcome screen when the system boots OemSkipWelcome=1 ;Do not skip the regional options dialog so that the user can indicate ;which regional options apply to her or him. OemSkipRegional=No [UserData] ;Prepopulate user information for the system FullName="Authorized User" OrgName="Organization Name" ComputerName=XYZ_Computer1 [GUIRunOnce] ;Promote this computer to a Domain Controller on reboot DCPromo [Identification] ;Join the computer to the domain ITDOMAIN JoinDomain=ITDOMAIN [Networking] ;Bind the default protocols and services to the network card(s) used ;in this computer. InstallDefaultComponents=Yes
You can change the administrative password by using Sysprep.inf only if the existing administrative password is null. This is also true if you want to change the administrator password through the Sysprep GUI.
The Setupcl.exe file processes Sysprep.inf to determine pages for the MiniSetup wizard and starts the MiniSetup wizard.
NOTE
The combination of Sysprep.exe and Setupcl.exe can be used to replace the Rollback.exe tool used in previous versions of Windows NT.
Mini-Setup Wizard
The MiniSetup wizard starts the first time a computer boots from a disk that has been duplicated using the Sysprep tool. The wizard gathers any information needed to further customize the target computer. If you do not use Sysprep.inf or if you leave some sections of the file blank, the MiniSetup wizard will display screens for which no answers were provided in Sysprep.inf.
The screens that the MiniSetup wizard can display include the following:
- EULA
- Regional options
- User name and company
- Computer name and administrator password
- Network settings
- Server licensing
- Time zone selection
- Finish/Restart
If you want to bypass these screens, you can specify certain parameters within the Sysprep.inf file. These parameters and their values are listed in Table 8.18.
Table 8.18 Sysprep.inf Parameters
| Parameter | Value |
|---|---|
| EULA | [Unattended] OemSkipEula=Yes |
| Regional options | [RegionalSettings] LanguageGroup=1 Language=00000409 |
| User name and company | [UserData] FullName="User Name" OrgName="Organization Name" |
| Computer name and administrator password | [UserData] ComputerName=W2B32054 [GuiUnattended] AdminPassword="password" |
| Network settings | [Networking] InstallDefaultComponents=Yes |
| TAPI settings | [TapiLocation] AreaCode=425 |
| Time zone selection | OEMSkipRegional=1 TimeZone=20 |
| Finish/Restart | NA |
Because Setup detects optimal settings for display devices, Display Settings is no longer a screen seen during Setup or during the MiniSetup wizard. You can specify display settings either in the answer file used to create the master computer or in the Sysprep.inf file used on the target computer. If the display settings are in the answer file used on the master computer, Sysprep retains those settings unless Sysprep.inf contains different settings or a different video adapter or monitor type is detected that requires different settings from the master computer.
By using OemSkipEula=Yes, you are accepting the responsibility for agreeing to all licensing stipulations within the EULA on behalf of the user.
If you run Setup from the network and intend to use Sysprep, you need to configure your network adapters differently than how it is done by the InstallDefaultComponents option. You must provide the specific networking information in Sysprep.inf. If enabling DHCP on all adapters is sufficient and installing Microsoft Client for Microsoft Networks, TCP/IP, and File and Print Sharing for Microsoft Networks on all adapters is sufficient, there is nothing additional you need to specify in Sysprep.inf.
Running Sysprep
There are two ways to run the Sysprep utility: manually or automatically.
Running Sysprep Manually
After you install Windows 2000 Server, you can use Sysprep to prepare the system for transfer to other similarly configured computers. To run Sysprep manually, you must first install Windows 2000 Server, configure the system, and install the applications. Then run Sysprep without the -reboot command-line switch. After the system shuts down, clone the image of the drive to the similarly configured computers.
NOTE
You can find the Sysprep utility in Deploy.cab, which is located in the \Support\Tools directory of the Windows 2000 Server installation CD-ROM.
When users start up their cloned computers for the first time, the MiniSetup wizard runs, allowing users to customize their systems. You can also preassign all or part of the Sysprep configuration parameters by using Sysprep.inf. The Sysprep folder (which contains Sysprep.exe and Setupcl.exe) is automatically deleted after Sysprep MiniSetup completes.
The following is an overview of preparing a Windows 2000 Server installation for duplication.
- Prepare the Sysprep folder. A Sysprep folder must be created at the root of the drive. The Sysprep.exe, the Setupcl.exe, and if applicable, the Sysprep.inf files should be copied to the Sysprep folder.
- Run the Sysprep utility. The Sysprep utility should be run from a command prompt within the Sysprep folder. One of the following commands should be used:
Sysprep Sysprep -reboot Sysprep /<optional parameter> Sysprep /<optional parameter> -reboot Sysprep /<optional parameter 1>…/<optional parameter X> Sysprep /<optional parameter 1>…/<optional parameter X> -reboot
- Run Sysprep without the -reboot switch. When a message appears saying that the computer should be shut down, select the Shut Down command from the Start menu. A third-party disk-imaging utility can now be used to create an image of the installation.
- Run Sysprep with the -reboot switch. The computer reboots automatically and the MiniSetup wizard runs. The wizard's prompts should be verified. In addition, the system and other applications can be audited. When auditing is completed, Sysprep should be run again, without the -reboot command-line switch. When a message appears saying that the computer should be shut down, select the Shut Down command from the Start menu. A third-party disk-imaging utility can now be used to create an image of the installation.
NOTE
You can add a Cmdlines.txt file to the Sysprep folder to be processed by Setup. This file runs postSetup commands, including those required for application installation.
Running Sysprep Automatically
The [GuiRunOnce] section of the answer file contains commands to be executed after Setup completes. You can use the [GuiRunOnce] section to create an installation that completes Setup, automatically logs on to the computer, runs Sysprep in quiet mode, and then shuts down the computer.
To run Sysprep automatically, the Sysprep files should be added to the distribution folders under $OEM$\$1\Sysprep\. This ensures that the files are copied to the correct location on the system drive. In addition, the last command in the [GuiRunOnce] section of the answer file should be as follows:
%systemdrive%\Sysprep\Sysprep.exe -quiet
If multiple reboots are required, this command should be added as the last item run in the last [GuiRunOnce] section used.
If the computer has Advanced Power Management (APM) or ACPI support, Sysprep automatically shuts down the computer once this process has completed.
Using Sysprep to Extend Disk Partitions
Windows 2000 is designed to extend a partition in GUI mode. This new functionality allows you to create images that can be extended to take full advantage of hard disks that might have more space than the original hard disk on the master computer. In addition, it provides a way to reduce the image size needed by not requiring that the image take up a full hard disk. This maximizes the amount of hard disk space that can be used. Because Sysprep uses GUI mode, it can take advantage of this functionality.
If your imaging tools allow you to edit the image, you can delete the Pagefile.sys, Setupapi.log, and the Hyberfil.sys (if applicable) because these files will be re-created when the MiniSetup wizard runs on the target computer. You must not delete these files on an active system because doing so can cause the system to function improperly. These files should be deleted, if desired, from the image only.
To extend a hard disk partition when using a third-party imaging product that supports NTFS, you should first configure the partition on the master computer hard disk to the minimum size required to install Windows 2000 Server with all the desired components and applications. This helps to reduce your overall image size requirements. You must also modify the answer file used to create the master image by including the FileSystem = ConvertNTFS option in the [Unattended] section. You should not include ExtendOemPartition here because you want to maintain the smallest possible image size. Then you can install Windows 2000 Server to the master computer and create an image of the drive. From there, you should place the image on the target computer where the target computer has the same size system partition as the master computer. After you reboot the target computer, the MiniSetup wizard begins and the partition is extended almost instantaneously.
Using Systems Management Server
You can use Systems Management Server (SMS) to perform managed upgrades of Windows 2000 Server to multiple systems, especially those that are geographically dispersed. Note that SMS is used only for installations to computers that contain a previously installed operating system and are running the SMS client agent responsible for receiving software installation instructions. Before you use SMS to perform an upgrade, you should assess your existing network infrastructure, including bandwidth, hardware, and geographical constraints. The primary advantage of using SMS to upgrade is that you can maintain centralized control of the upgrade process. For example, you can control when upgrades take place (such as during or after training, after hardware verification, and after user data is backed up), which computers will be upgraded, and how you will apply network constraints.
SMS 2.0 contains package definition files (with an .sms extension) that allow you to import Windows 2000 Server installation routines into SMS 2.0 Package and Program settings. After importing the package definition, provide SMS with a data source for the Windows 2000 Server installation CD-ROM or an accessible network location containing the Windows 2000 Server distribution files.
Using a Bootable CD-ROM
You can use the bootable CD-ROM method to install Windows 2000 Server on a computer whose BIOS allows it to boot from a CD-ROM. This method is useful for computers at remote sites with slow links and no local information technology (IT) department. The bootable CD-ROM method runs Winnt32.exe, which allows for a fast installation.
NOTE
You can use the bootable CD-ROM method only for clean installations. To perform upgrades, you must run Winnt32.exe from within the existing operating system.
To ensure maximum flexibility for setting up Windows 2000 Server, set the boot order in the BIOS as follows:
- Network Adapter for PXE-compliant read-only memory (ROM), this option can be used to support operating system installation from a RIS server.
- CDROM for bootable CD-ROM operating system installation.
- Hard Disk for Sysprep or Syspart prepared local disk-based operating system installation.
- Floppy Disk for floppy disk based operating system installation.
To use a bootable CD-ROM for a fully automated operating system installation, the following criteria must be met:
- Your computer's BIOS must support the El Torito-bootable CD-ROM (No-emulation mode) format.
- The answer file must contain a [Data] section with the required keys.
- The answer file must be called Winnt.sif and be located on a floppy disk.
To install Windows 2000 Server by using a bootable CD-ROM drive, complete the following steps:
- Boot the system. After the Windows 2000 Server CD has been inserted into the CD-ROM drive, the system should be rebooted.
- Load the Winnt.sif file. After the system reboots, the blue screen for Windows 2000 Setup appears. The floppy disk that contains the Winnt.sif file should be inserted into the floppy drive. Once the computer reads the floppy drive, the floppy disk should be removed. Setup will now run from the CD-ROM drive as specified by the Winnt.sif file.
NOTE
The bootable CD-ROM method requires that all necessary files be on the CD-ROM. UDFs cannot be used with this method. UDFs are not usable because a unique identifier is called for each installation when specifying a UDF file from Winnt.exe or Winnt32.exe.
Lesson Summary
There are four methods available for automating the installation of Windows 2000 Server. The first method is to run the Winnt32.exe command along with the Syspart parameter. This is the method you should use if the hardware on the target computers is not similar to the hardware on the master computer. If the hardware is similar, you can use the Sysprep utility to perform an unattended installation. Sysprep is a tool that facilitates creating a disk image of your Windows 2000 Server installation. A third option for automating installations is to use SMS to perform managed upgrades of Windows 2000 Server to multiple systems, especially those that are geographically dispersed. SMS is used only for installations to computers that contain a previously installed operating system and the appropriate SMS agent. Finally, one other method available for automated installations is the bootable CD-ROM. This method is useful for computers at remote sites with slow links and no local IT department.
EAN: N/A
Pages: 244