Lesson 4: Preparing for an Unattended Installation of Windows 2000 Server
When you perform an unattended installation of Windows 2000 Server, you create an answer file that supplies information to the setup routine. In addition, if you are going to install Windows 2000 Server on multiple computers over a network, you must create at least one set of distribution folders. This lesson describes the process of creating an answer file and setting up the distribution files necessary for a network installation.
After this lesson, you will be able to
- Create a customized answer file for an unattended installation
- Set up your distribution directory for a network installation of Windows 2000 Server
Estimated lesson time: 45 minutes
Creating the Answer File
The answer file is a customized script (usually saved as a .txt file) that allows you to run an unattended installation of Windows 2000 Server. The file, sometimes called the unattend file or the unattend script file, answers the questions that Setup normally prompts you for during installation. The \i386 directory of the Windows 2000 Server installation CD-ROM contains a sample answer file, Unattend.txt, which you can edit and use in your unattended installation. You can leave the name of the answer file as is, or you can change it according to the needs of your organization. For example, Comp1.txt, Install.txt, and Setup.txt are all valid names for an answer file, as long as those names are correctly specified in the Setup command. Being able to use different names allows you to build and use multiple answer files if you need to maintain different scripted installations for different parts of your organization.
Note that other programs, such as the Sysprep tool, which is used to facilitate the creation of a disk image of your Windows 2000 Server installation, also use answer files. Table 8.14 describes how the answer file can be named and when it is used.
Table 8.14 Appropriate Names for Answer File
| Filename | When the file is used |
|---|---|
| <filename>.txt | When performing an unattended installation. You can use any name for the .txt file. Unattend.txt is the name of the sample answer file included with Windows 2000 Server. |
| Winnt.sif | When installing Windows 2000 Server from a bootable CD-ROM drive. |
| Sysprep.inf | When using the Sysprep tool to create a disk image of your Windows 2000 Server installation. |
The same format that is used in Unattend.txt is used for the answer files listed in Table 8.14. The answer file contains multiple optional sections that you modify to supply information about your installation requirements. The file supplies Setup with answers to all the questions you are asked when you install Windows 2000 Server manually. In addition, the answer file tells Setup how to interact with the distribution folders and files that you have created. For example, in the [Unattended] section there is an OEM Preinstall entry that tells Setup whether to copy the $OEM$ subfolders from the distribution folders to the target computer.
Answer File Format
An answer file consists of section headers, keys, and the values for each key. Most of the section headers are predefined, but some can be user defined. The following information is included in the Unattend.txt file. You can copy this file from the CD-ROM to writeable media, like a fixed disk, and then edit the file as necessary to meet the needs of your unattended installation. You can also rename the file.
Microsoft Windows 2000 Professional, Server, Advanced Server and Datacenter (c) 1994 - 1999 Microsoft Corporation. All rights reserved. Sample Unattended Setup Answer File This file contains information about how to automate the installation or upgrade of Windows 2000 Professional and Windows 2000 Server so the Setup program runs without requiring user input. [Unattended] Unattendmode = FullUnattended OemPreinstall = NO TargetPath = WINNT Filesystem = LeaveAlone [UserData] FullName = "Your User Name" OrgName = "Your Organization Name" ComputerName = "COMPUTER_NAME" [GuiUnattended] Sets the Timezone to the Pacific Northwest Sets the Admin Password to NULL Turn AutoLogon ON and login once TimeZone = "004" AdminPassword = * AutoLogon = Yes AutoLogonCount = 1 For Server installs [LicenseFilePrintData] AutoMode = "PerServer" AutoUsers = "5" [GuiRunOnce] List the programs that you want to launch when the machine is logged on to for the first time [Display] BitsPerPel = 8 XResolution = 800 YResolution = 600 VRefresh = 70 [Networking] When set to YES, setup will install default networking components. The components to be set are TCP/IP, File and Print Sharing, and the Client for Microsoft Networks. InstallDefaultComponents = YES [Identification] JoinWorkgroup = Workgroup
You do not need to specify all the possible keys in an answer file if the installation does not require them. Invalid key values generate errors or can cause incorrect behavior after setup.
The answer file is broken into sections. A section name is enclosed in brackets, as in the following example:
[UserData]
Sections contain keys and the corresponding values for those keys. Each key and value are separated by a space, an equal sign, and a space:
BitsPerPel = 8
Values that have spaces in them require double quotes around them:
OrgName = "Microsoft Corporation"
Some sections have no keys and merely contain a list of values:
[OEMBootFiles] Txtsetup.oem
Comment lines start with a semicolon:
;Setup program runs without requiring user input.
Answer File Keys and Values
Every key in an answer file must have a value assigned to it; however, some keys are optional, and some keys have default values that are used if the key is omitted. Key values are strings of text, unless a numeric string is specified. If a numeric string is specified, the value is decimal unless otherwise noted.
NOTE
Keys are not case sensitive; they can be uppercase or lowercase.
The Unattend.doc file has detailed information about the answer file keys and values. You can find Unattend.doc in the Deploy.cab file on the Windows 2000 Server installation CD-ROM, under the \Support\Tools folder. To extract or view the contents of the Deploy.cab file, use Windows Explorer. For more details about opening the Unattend.doc file, see the Sreadme.doc file on the Windows 2000 Server installation CD-ROM.
IMPORTANT
Running Setup.exe or 2000rkst.msi from the \Support\Tools folder installs the Windows 2000 Support Tools in Support.cab, but it does not extract the Unattend.doc file or any of the other compressed files in Deploy.cab.
Methods for Creating an Answer File
You can create an answer file by using Setup Manager or by creating the file manually.
Creating the Answer File by Using Setup Manager
To help you create or modify the answer file, an application called Setup Manager is available on the Windows 2000 Server installation CD-ROM in the Support\Tools\Deploy.cab file.
You can use Setup Manager to perform the following tasks:
- Specify the platform for the answer file (Windows 2000 Professional, Windows 2000 Server, Remote Operating System Installation, or Sysprep)
- Specify the level of automation for Unattended Setup mode (Provide Defaults, Fully Automated, Hide Pages, Read Only, and GUI mode attended Setup)
- Specify default user name and organization information
- Define one computer name or many computer names to support multiple unattended installations
- Configure up to 99 automatic administrator logons to complete setup
- Configure display settings
- Configure network settings
- Configure joining a workgroup or domain and automatically add a computer account to the domain
- Create distribution folders
- Add a custom logo and background files
- Add files to the distribution folders
- Add commands to the
[GuiRunOnce]section of the answer file - Create Cmdlines.txt files
- Specify code pages and other language-specific settings
- Specify regional settings
- Specify a time zone
- Specify Telephony Application Programming Interface (TAPI) information
- Customize browser and shell settings
- Define the installation folder name. The boot partition (the partition containing the operating system files) is specified with the /t: or /tempdrive: switch
- Add printers
- Add mass storage device drivers and a custom HAL to be used during an unattended installation
- Create a distribution folder and share for the distribution or specify that the unattended installation will run from the Windows 2000 Server CD-ROM
With Setup Manager, you can add consistency to the process of creating or updating the answer file. However, you cannot use Setup Manager to specify all answer file settings, optional components, create Txtsetup.oem files, or create subfolders in the distribution folder.
After you use Setup Manager to create an answer file, add more settings by using a text editor. Refer to Unattend.doc and Readme.txt included in the Deploy.cab for a comprehensive list of available settings.
Table 8.15 describes the most commonly used Setup Manager specifications.
Table 8.15 Common Setup Manager Specifications
| Parameter | Purpose |
|---|---|
| Upgrade option | Specifies whether to install Windows 2000 Professional or Windows 2000 Server |
| Target computer name | Specifies the user name, organization name, and computer names to apply to the target computers |
| Product ID | Specifies the product license number obtained from the product documentation |
| Workgroup or domain | Specifies the name of the workgroup or domain to which the computer should be added |
| Time zone | Specifies the time zone for the computer |
| Network configuration information | Specifies the network adapter type and configuration information, including network protocols |
Creating the Answer File Manually
To create the answer file manually, you can use a text editor such as Notepad. In general, an answer file consists of section headers, parameters, and values for those parameters. Although most of the section headers are predefined, you can also define additional section headers. Note that it is not necessary to specify all the possible parameters in the answer file if the installation does not require them.
Creating the Distribution Folders
To install Windows 2000 Server on multiple computers over a network, you must create at least one set of distribution folders. The distribution folders typically reside on a server to which the destination computers can connect. This allows users to install Windows 2000 Server by running Winnt.exe or Winnt32.exe on those computers. You can use one set of distribution folders and multiple answer files for different system implementations. Even if you intend to use disk imaging as your installation method, starting with distribution folders helps to provide consistent implementations for a variety of system types. In addition, distribution folders allow you to update future images by editing the files in the distribution folders to generate updated images without having to start from the beginning.
To help load balance the servers and to make the file-copy process of Windows 2000 Setup faster, you can create distribution folders on multiple servers to support the installation process on computers that are running Windows 95, Windows 98, Windows NT, or Windows 2000. You can run Winnt32.exe with up to eight sets of distribution folders. Each set of distribution folders contains the Windows 2000 Server installation files as well as any device drivers and other files needed for installation.
To create a distribution folder manually, connect to the network server on which you want to create the distribution folder, and create a \W2kdist folder on the network share. To help differentiate between multiple distribution shares for the different editions of Windows 2000 (Windows 2000 Professional, Windows 2000 Server, and Windows 2000 Advanced Server), choose different names for each folder. If you need localized language versions of Windows 2000 to meet requirements for international branches of your organization, you can create separate distribution shares for each localized version. For each edition of Windows 2000, copy the contents of the \i386 folder to the distribution share created for it. For instance, if you are preparing a distribution for Windows 2000 Server, create and share a folder named \W2kdists and copy the \i386 directory on the Windows 2000 Server installation CD-ROM to the folder.
NOTE
The distribution share to support a default installation of Windows 2000 Server requires approximately 313 megabytes (MB) of disk space.
You can also use Setup Manager to automatically create and share a distribution folder.
Structuring the Distribution Folder
The distribution folder (usually called i386 for Intel systems) consists of various folders and subfolders of information used during the installation of Windows 2000 Server. This folder needs to be organized in the appropriate order. Figure 8.3 illustrates how these folders should be structured.
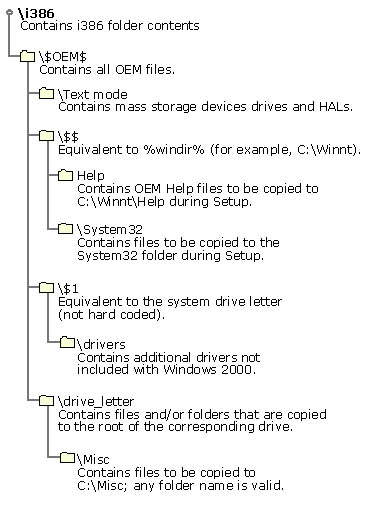
Figure 8.3 Example of a structure for the distribution folders
\i386 (On Windows 2000 Installation CD-ROM Copied to Distribution Share)
This is the primary distribution folder. It contains all the files required to install Windows 2000 Server. You copy the contents of this folder from the Windows 2000 Server installation CD-ROM to the root of the distribution share.
\$OEM$ (On Distribution Share and Copied to $WIN_NT$.~LS)
The \$OEM$ subfolder is located directly beneath the primary distribution folder. During Setup you can automatically copy directories, standard Microsoft format 8.3 files, and any tools needed for your automated installation process to \$OEM$. Note that if you use the OEMFILESPATH key in the answer file, you can create the \$OEM$ subfolder outside of the distribution folder.
\$OEM$ provides the necessary folder structure for supplemental files to be copied to the target computer during setup. These files include drivers, utilities, applications, and any other files required to deploy Windows 2000 Server within your organization.
\$OEM$ can contain the optional file Cmdlines.txt, which contains a list of commands to be run during the Setup wizard of setup. These commands can be used to install optional components, such as tools and utilities. Commands contained in Cmdlines.txt are run before the computer is logged on to the network.
As long as Setup finds \$OEM$ in the root of the distribution point, it copies all the files found in this directory to the $WIN_NT$.~LS temporary directory created during the completing phase of setup. During completing phase, subfolders of \$OEM$ are copied to the corresponding location on the target computer. At setup completion, $OEM$ and all subfolders are deleted along with $WIN_NT$.~LS.
NOTE
All folders described next are located on the distribution share below \$OEM$ and are copied to various locations on the computer running Setup.
\$OEM$\textmode (Copied to $WIN_NT$.~BT)
The \$OEM$\textmode subfolder contains new or updated files for installing mass storage device drivers and HALs. These files can include oem HALs, drivers for SCSI devices, and the Txtsetup.oem file, which directs the loading and installing of these components.
All files placed in the \$OEM$\textmode subfolder (HALs and drivers) must be listed in the [OEMBootFiles] section of the answer file.
\$OEM$\$$ (Copied to %windir% and Subfolders of %windir%)
The \$OEM$\$$ subfolder corresponds to the contents of the %windir% environment variable. The subfolder contains the operating system files (either new files or replacements for retail files) that are copied to the various subfolders when Windows 2000 is installed. The structure of this subfolder must match the structure of a standard Windows 2000 installation, where \$OEM$\$$ matches %windir%, \$OEM$\$$\System32 matches %windir%\System32, and so on. Each subfolder must contain the files that will be copied to the corresponding operating system folder on the target computer.
NOTE
In Windows 2000, %systemroot% is equivalent to %windir%.
\$OEM$\$1 (Copied to $systemdrive$)
The \$OEM$\$1 subfolder, which is new for Windows 2000, corresponds to the drive on which Windows 2000 is installed. $1 is equivalent to the %systemdrive% environment variable. For example, if you are installing Windows 2000 on the D: drive, \$OEM$\$1 corresponds to the D: drive. This makes it possible to install Windows 2000 to drives other than the C: drive.
\$OEM$\$1\Drivers (Copied to $systemdrive$\Drivers and Subfolders of $systemdrive$\Drivers)
The \$OEM$\$1\Drivers subfolder, which is new for Windows 2000, allows you to place new or updated Plug and Play device drivers and their supporting files (catalog files and .inf installation files) in and below the Drivers subfolder. These folders and their contents are copied to the %systemdrive%\ Drivers folder on the target computer. Adding the OemPnPDriversPath parameter to your answer file will tell Windows 2000 where to look for the new or updated Plug and Play drivers. When searching for appropriate Plug and Play device drivers to install during setup or afterward, Windows 2000 looks at the files in the folders you created as well as those originally included with the system. Note that you can replace Drivers with a name of your own choosing that follows the 8.3 MS-DOS naming convention.
NOTE
The \$OEM$\$1\Drivers subfolder replaces the \Display and \Net subfolders used in Windows NT installation.
\$OEM$\$1\Sysprep (Copied to %systemdrive%\Sysprep)
The \$OEM$\$1\Sysprep subfolder contains the files needed to run the Sysprep utility. Sysprep.exe and Sysprepcl.exe must be in %systemdrive%\Sysprep folder for Sysprep to function properly.
TIP
Add Sysprep.inf (created by Setup Manager or written manually) to the \$OEM$\$1\Sysprep directory on the distribution share. Otherwise, a floppy disk containing the Sysprep.inf file is necessary to complete a Sysprep setup.
\$OEM$\drive_letter
During the Text-mode portion of setup, the structure of each \$OEM$\drive_letter subfolder is copied to the root of the corresponding drive in the target computer. For example, files that you place in the \$OEM$\D subfolder are copied to the root of the D: drive. You can also create subfolders within these subfolders. For example, \$OEM$\E\Misc causes Setup to create a \Misc subfolder on the E: drive.
Files that have to be renamed must be listed in the $$Rename.txt file. Note that the files in the distribution folders must have short file names (format 8.3).

Practice: Preparing and Running an Automated Installation
In this exercise, you create and run an automated installation of Windows 2000 Server on Computer 2. To prepare for the automated installation, you use the Windows 2000 Server Setup Manager to create an answer file and a distribution share on Server01.
WARNING
Do not customize the desktop or any of the Windows 2000 applications on Server01. If you do, the steps in this exercise may not work. For example, this exercise is designed for the double-click behavior of the default desktop, so you must not have customized your desktop settings to alter this.
Exercise 1: Running Setup Manager
Complete this exercise on a Server01 with the Windows 2000 Server installation CD-ROM inserted.
- Create a folder named Deploy underneath C:\Program Files.
- Using Windows Explorer, locate the \Support\Tools folder on the Windows 2000 Server installation CD-ROM.
- Select the TOOLS folder in the Folders pane and then double-click the DEPLOY file in the right pane.
The contents of the Deploy.cab file appears.
- From the Edit menu, choose Select All.
- From the File menu, choose Extract.
A Browse For Folder window appears.
- Click on the + sign to the left of Local Disk (C:) to expand the C: drive.
- Click on the + sign to the left of Program Files to expand the Program Files folder.
- Click on the Deploy folder.
The Deploy folder opens.
- Click OK.
A Copying message box appears momentarily as the files in the Deploy.cab file are extracted to C:\Program Files\Deploy.
- From the C:\Program Files\Deploy folder, double-click setupmgr.
Setup Manager starts, and the Windows 2000 Setup Manager wizard appears.
- Read the descriptive text, and then click Next.
The New Or Existing Answer File screen appears, and the Create A New Answer File radio button is selected.
- Click Next.
The Product To Install screen appears, and the Windows 2000 Unattended Installation radio button is selected.
- Click Next.
The Platform screen appears, and the Windows 2000 Professional radio button is selected.
- Select the Windows 2000 Server radio button, and click Next.
The User Interaction Level screen appears, and the Provide Defaults radio button is selected.
- Select the Fully Automated radio button, read the Description text, and then click Next.
The License Agreement screen appears.
- Read the text on this screen, select the I Accept The Terms Of The License Agreement check box, and then click Next.
The Customize The Software screen appears.
- In the Name text box, type your name and press the Tab key.
- In the Organization text box, type your organization name or MSPress Self-Study and click Next.
The Licensing Mode screen appears, and the Per Server radio button is selected.
- Select the Per Seat radio button, and click Next.
The Computer Names screen appears.
- Insert the Windows 2000 Training Supplemental CD-ROM into Server01, and click Import.
The Open window appears.
- In the File Name drop-down list box, type <cdrom_drive:>\chapt03\ex1\ computer names.txt and then click Open.
The Computer Names screen appears showing a list of computers to be installed.
- Click Next.
The Administrator Password screen appears.
- In the password text boxes, type password , and select the check box named When The Computer Starts, Automatically Log On As Administrator.
The Number of times to Auto Logon is set to 1.
- Click Next.
The Display Settings screen appears.
- Leave all text box values set to Use Windows Default, and click Next.
The Network Settings screen appears, and the Typical Settings radio button is selected.
- Click Next.
The Workgroup Or Domain screen appears and the Workgroup radio button is selected.
Server01 is currently configured as a member of a workgroup named WORKGROUP. Do not change the values appearing on the Workgroup Or Domain screen. When the automated installation is run on Computer 2, it will become a member of the same workgroup. Later in this self-paced study, Server01 will become a domain controller and the computer you are preparing an answer file for will join that domain.
NOTE
The answer file you are preparing now can be modified later to automatically join a domain and create computer accounts in the domain. These modifications are made by using either Setup Manager or a text editor. - Click Next.
The Time Zone screen appears.
- From the Time Zone drop-down list box, select your time zone and click Next.
The Additional Settings screen appears, and the Yes, Edit The Additional Settings radio button is selected.
- Click Next.
The Telephony screen appears.
- You may type in your country/region area code or city code, and any other settings you require to dial out. If Computer 2 does not have dial-out access, you can ignore this screen and continue.
- Click Next.
The Regional Settings screen appears, and the Use The Default Regional Settings For The Windows Version You Are Installing radio button is selected.
- Click Next.
The Languages screen appears.
- Select any additional language support you want to have available for the operation of Windows 2000 Server, and then click Next.
The Browser And Shell Settings screen appears, and the Use Default Internet Explorer Settings radio button is selected.
- Click Next.
The Installation Folder screen appears, and the A Folder Named Winnt radio button is selected.
- Click Next.
The Install Printers screen appears.
- Click Next.
The Run Once screen appears.
- In the Command To Run text box, type Notepad.exe and click Add.
Typically, the Command To Run text box contains a script or other executable program to further configure the user's environment. For the purpose of training, running Notepad is sufficient for configuration.
Notice that if you added a printer on the previous screen, the AddPrinter command runs to add your printer to the list of installed printers.
- Click Next.
The Distribution Folder screen appears.
- Select the Yes, Create Or Modify A Distribution Folder radio button, and click Next.
The Distribution Folder Name screen appears, and the Create A New Distribution Folder radio button is selected.
The Distribution folder text box contains C:\win2000dist, and the Share As Text box contains win2000dist.
- Click Next.
The Additional Mass Storage Drivers screen appears.
- Read the screen, and click Next.
The Hardware Abstraction Layer screen appears.
- Read the screen, and click Next.
The Additional Commands screen appears.
- Read the screen, and click Next.
Commands entered here are written to Cmdlines.txt. This file is created under the distribution folder in the $OEM$ subfolder.
The OEM Branding screen appears.
- Click Next.
The Additional Files Or Folders screen appears.
- Browse the folders by clicking on them and reading the information that appears under Description.
Click Next.
The Answer File Name screen appears showing a path and file name located on the CD-ROM in the Location And File Name text box.
- Verify the path and file name to C:\Win2000dist\Unattend.txt and click Next.
The Location Of Setup Files screen appears, and the Copy The Files From CD radio button is selected.
- Remove the Windows 2000 Server Training Supplemental CD-ROM, and insert the Windows 2000 Server installation CD-ROM.
After the Windows 2000 Server installation CD-ROM is read, the Microsoft Windows 2000 CD screen appears.
- Close the Microsoft Windows 2000 CD screen.
- Click Next on the Location Of Setup Files screen.
The Copying Files screen appears as the files are copied from the \i386 directory on the installation CD-ROM to C:\Win2000Dist.
- Allow the file copy to complete before continuing to the next exercise.
At the completion of Setup Manager's tasks, a Completing The Windows 2000 Setup Manager Wizard screen appears.
- Read what appears on the screen, and then click Finish.
Exercise 2: Inspecting the Distribution Folder Created by Setup Manager
In this exercise you inspect the folder structure created by Setup Manager, an answer file (Unattend.txt), a UDF file (Unattend.udf), and a batch file (Unattend.bat).
- Click Start and then Run.
The Run dialog box appears.
- In the Open text box, type C:\Win2000dist and click OK.
The Win2000dist window appears.
- Open another window to the following directory on the Windows 2000 installation CD-ROM: <cd-rom drive:>\i386.
The i386 window appears.
- Arrange the windows so that you can see both the Win2000dist window and the i386 window.
What folder appears directly under the Win2000dist folder that does not appear in the i386 folder?
Answer
- Examine the directory structure below $OEM$, and review Figure 8.3. You will be asked a question about this structure in the "Review" section of this chapter.
- Return to the Win2000dist folder, and locate the three Unattend files.
Notice that two of the Unattend files do not appear with extensions.
- To show file extensions for all files, select Tools and choose Folder Options.
The Folder Options dialog box appears.
- Click the View tab.
- From the Advanced Settings box, clear the Hide File Extensions For Known File Types check box, and click OK.
- Locate the Unattend files again.
The Unattend files appear with their file extensions showing.
Select Unattend.txt, and from the File menu, choose Open.
Unattend.txt appears in Notepad.
- Locate the
[User Data]section and add an additional line named ProductID+<your_product_key>. For the value of ProductID, type the Product Key provided with your copy of Windows 2000 Server. - Save and close Unattend.txt.
- For an explanation of any sections in this file, refer to Unattend.doc located in the C:\Program Files\Deploy folder you created at the start of this exercise. Unattend.doc can be opened in Microsoft Wordpad, Microsoft Word, or any word processor capable of reading Microsoft Word files.
- Close Unattend.doc.
- From the Win2000dist window, select Unattend.udf; and from the File menu choose Open With.
The Open With dialog box appears.
- Select Notepad from the Choose The Program You Want To Use box, and click OK.
Notice that the 12 computer names imported during the operation of Setup Manager appear here.
What is the purpose of the UDF file?
Answer
- Close the UDF file.
- From the Win2000dist window, select Unattend.bat; and from the File menu, choose Edit.
The contents of the batch file appear in Notepad.
- Notice that the batch file sets variables, and then the variables are used to run Winnt32 with switches. Notice also that you must specify the computer name when calling the batch file since a UDF file is involved in the setup routine.
- Close the Unattend.bat window.
Exercise 3: Running an Unattended Setup of Windows 2000 Server from Computer 2
Computer 2 must already be running a Windows 32-bit operating system, such as Windows 95 or Windows NT. In addition, Server01 must be connected to the same network as Computer 2. All requirements for the exercises are outlined in "About This Book."
CAUTION
If Computer 2 is running Windows NT, the boot partition is C:\ and the operating system directory is Winnt, change the name of the installation directory in Unattend.txt. The directory name listed in Unattend.txt is found under the Unattended section, and the valuename is TargetPath. For example, change the value so that TargetPath=\WIN2000S.
- From Computer 2, connect a drive letter (H: will be used throughout this exercise), to \\Server01\Win2000dist. You can connect to Server01 by using the Administrator username and the password of "password."
NOTE
If you are running Windows 95 or Windows 98 and are having trouble connecting to Server01, make sure the computer is a member of WORKGROUP and logon as Administrator with a password of "password." - Open a command prompt and type cdh:.
CAUTION
If you have upgraded from Windows 95 or Windows 98, you might find that Setup can't find the .udf file. If this happens, open Unattend.txt on Server01 and specify the full path to the .udf file. - From the command prompt, type H:\Unattend Server02.
- The Copying Installation Files screen appears as Windows 2000 Server runs an automated installation over the network.
At the conclusion of this phase, a warning screen will inform you that the computer will be restarted.
NOTE
This pre-Text-mode phase of setup can be completed using the \syspart switch with Winnt32.exe. - Allow the computer to restart.
Upon reboot, the Windows 2000 boot menu appears and Microsoft Windows 2000 Server Setup continues to Text mode.
The computer reboots again, and the boot menu appears showing Windows 2000 Server.
Windows 2000 installation continues the Graphics-mode portion of setup. The Installing Devices And Installing Components screens take time to complete. The Performing Final Tasks screen appears as Windows 2000 Server completes the setup routine. When setup is completed, the Windows 2000 Setup screen announces that the computer will restart.
- After the computer restarts, notice that it automatically logs on as Administrator as specified in Setup Manager. The printer is installed and Notepad.exe runs.
- Close Notepad.
The Windows 2000 Configure Your Server screen appears.
- Select the I Will Configure This Server Later radio button, and click Next.
The Configure Your Server screen appears.
- Clear the Show This Screen At Startup check box, and close the screen.
CAUTION
If you are upgrading from Windows 95 or Windows 98, check to see if your partition is NTFS. If not, you must convert it. You can do this by typing convert c: /fs:ntfs at the command prompt.
Lesson Summary
Before you can perform an unattended installation of Windows 2000 Server, you must create an answer file, which is a customized script file that contains multiple optional sections that you modify to supply information about your installation requirements. The file supplies Setup with answers to all the questions you are asked when you install Windows 2000 Server manually. In addition, the answer file tells Setup how to interact with the distribution folders and files that you have created. You must create at least one set of distribution folders to install Windows 2000 Server over a network. Use Setup Manager to create a distribution folder and an answer file manually or automatically. To further customize the answer file, refer to the Unattend.doc file located on the Windows 2000 Server installation CD-ROM.
EAN: N/A
Pages: 244