Lesson 7: Administering RIS
This lesson discusses the tasks necessary to administer RIS, including managing client installation images, managing RIS client computers, and managing RIS security.
After this lesson, you will be able to
- Manage RIS client installation images
- Manage RIS client computers
- Manage RIS security
Estimated lesson time: 20 minutes
Managing RIS
Managing RIS includes the following tasks:
- Managing RIS client installation images
- Managing RIS client computers
- Managing RIS security
Managing RIS Client Installation Images
Managing RIS client installation images includes the following tasks:
- Adding new client OS installation images
- Associating unattended setup answer files
Follow these steps to add a new client OS installation image:
- Click Start, point to Programs, point to Administrative Tools, and then click Active Directory Users And Computers.
- In the console tree, right-click the applicable RIS server, and then click Properties.
- In the Properties dialog box for the server, click the Remote Install tab, and then click Advanced Settings.
- In the Remote Installation Services Properties dialog box, click the Images tab.
- Click Add to start the Add wizard.
- On the New Answer File Or Installation Image page, click Add A New Installation Image, and then click Next to start the Add Installation Image wizard.
- On the Welcome To The Add Installation Image Wizard page, click Next.
- On the Installation Source Files Location page, type the location of the Windows 2000 Professional installation image, and then click Next. The location can be either a CD-ROM or network share.
- On the Windows Installation Image Folder Name page, type a name for the Windows installation image, and then click Next.
- On the Friendly Description And Help Text page, enter the friendly description and help text for the installation image, and then click Next.
- If a previous set of Client Installation wizard screens exists, the Previous Client Installation Screens Found page appears. Select the Client Installation wizard screen you want to use for this image, and then click Next.
- On the Review Settings page, review the installation summary, and then click Finish.
The Remote Installation Setup wizard completes the addition of the new client installation image.
Follow these steps to associate unattended setup answer files:
- Click Start, point to Programs, point to Administrative Tools, and then click Active Directory Users And Computers.
- In the console tree, right-click the applicable RIS server, and then click Properties.
- In the Properties dialog box for the server, click the Remote Install tab, and then click Advanced Settings.
- In the Remote Installation Services Properties dialog box, click the Images tab.
- Click Add to start the Add wizard.
- On the New Answer File Or Installation Image page, click Associate A New Answer File To An Existing Image, and then click Next.
- On the Unattended Setup Answer File Source page, click the source that contains the unattended setup file you want to copy:
- Windows Image Sample Files
- Another Remote Installation Server
- An Alternate Location
- Click Next.
- On the Select An Installation Image page, select the installation image the answer file will be associated with, and then click Next.
- On the Select A Sample Answer File page, select a sample unattended setup answer file, and then click Next.
- On the Friendly Description And Help Text page, enter the friendly description and help text for the installation image, and then click Next.
- On the Review Settings page, review the settings summary, and then click Finish.
Managing RIS Client Computers
Managing RIS client computers includes the following tasks:
- Prestaging RIS client computers
- Finding RIS client computers
Prestaging RIS Client Computers
Prestaging an RIS client computer is the process of creating a valid client CAO within Active Directory. By prestaging the client computer account in Active Directory, you can configure the RIS servers to respond only to prestaged client computers. This ensures that only those client computers that have been prestaged as authorized users are allowed to install an OS from the RIS server. Prestaging can save time and money by reducing, and in some cases eliminating, the need to fully preinstall the computer.
When you prestage a client computer, you can define a specific computer name and optionally specify the RIS server to service the computer. This information is used to identify and route the client computers during the network service boot request. Make sure you set the appropriate access permissions for users of the prestaged client computer. When prestaging a client computer into a domain with multiple domain controllers, the replication delay of the client CAO information can cause a client computer to be serviced by another RIS server.
Follow these steps to prestage a client computer:
- Click Start, point to Programs, point to Administrative Tools, and then click Active Directory Users And Computers.
- In the console tree, right-click the applicable OU that will contain the new client computer, click New, and then click Computer.
- In the New Object-Computer dialog box (see Figure 20.31), type the client computer name, authorize domain join permissions for the user or security group containing the user that will receive the physical computer this computer account represents, and then click Next.

Figure 20.31 New Object-Computer dialog box
- In the Managed dialog box (see Figure 20.32), click This Is A Managed Computer, type the client computer GUID into the text entry field, and then click Next. See "Locating the GUID for Client Computers" later in this lesson for details.
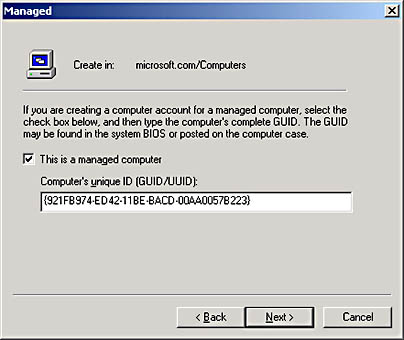
Figure 20.32 Managed dialog box
- In the Host Server dialog box (see Figure 20.33), click one of the following options to determine which server will support this client computer:
- Any Available Remote Installation Server. Selecting this option indicates this client computer can be serviced by any RIS server.
- The Following Remote Installation Server. Selecting this option allows you to designate a specific server.
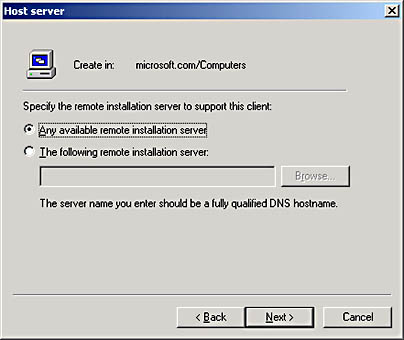
Figure 20.33 Host Server dialog box
You can use the options in the Host Server dialog box to manually set clients across the available RIS servers within your organization and to segment the network traffic, if you know the physical location of the specific RIS server and where this computer will be delivered. For example, if an RIS server is located on the fifth floor of your building and you are delivering these computers to users on that floor, you could choose to assign this computer to the RIS server on the fifth floor.
- Click Next.
- Review the settings on the New Object-Computer dialog box, and then click Finish.
Finding RIS Client Computers
You can search Active Directory for RIS client computer accounts using their computer name or GUID. The Show Clients feature searches for all client computers that are prestaged for this RIS server. The search process can include the entire Active Directory structure or be limited to a specific domain. The search process returns a list of the client computers and displays them by their computer name and GUID.
The Show Clients search process uses a wildcard search attribute appended to the current RIS server computer name. For example, if the RIS server is named RISsvr1, the Show Clients feature will use RISsvr1* for the server name. When you use the Show Clients feature in multiple RIS server environments, the search result might contain client computers from multiple servers. For example, if you have multiple RIS servers with computer names such as RISsvr1, RISsvr10, and RISsvr100, the search will return, from each of the servers, client computers that begin with the same computer name.
Locating the GUID for Client Computers
The computer's GUID appears on the following:
- The label on the side of the computer case
- The label inside the computer case
- The BIOS of the client computer
The manufacturer supplies the computer's GUID. The GUID must be in the form {dddddddd-dddd-dddd-dddd-dddddddddddd}, where d is a hexadecimal text digit. For example, it could be eight hexadecimal text digits, followed by four, then four, then four, then twelve, as in the following: {921FB974-ED42-11BE-BACD-00AA0057B223}
Valid entries for the client GUID are restricted to the following digits and characters:
0 1 2 3 4 5 6 7 8 9 a b c d e f - A B C D E F
Dashes are optional and spaces are ignored. Brackets {} must be included.
Follow these steps to find RIS client computers:
- Click Start, point to Programs, point to Administrative Tools, and then click Active Directory Users And Computers.
- In the console tree, right-click the applicable RIS server, and then click Properties.
- In the Properties dialog box for the server, click the Remote Install tab.
- In the Remote Install dialog box, click Show Clients.
- In the Find Remote Installation Clients dialog box (see Figure 20.34), in the GUID box, enter the client computer's GUID, and then click Find Now.

Figure 20.34 Find Remote Installation Clients dialog box
NOTE
You can limit the client computer search to a specific RIS server by entering the server name in the RI server box. - The RIS client computers appear in the Name and GUID columns in the lower portion of the Find Remote Installation Clients dialog box.
- Close the Find Remote Installation Clients dialog box.
- Close the Properties dialog box for the server.
Managing RIS Security
Managing RIS security includes the following tasks:
- Setting permissions for creating prestaged and user-created computer accounts
- Setting permissions for joining computers created in the Computers container and OUs to the domain
Setting Permissions for Creating Computer Accounts
To create new computer accounts in Active Directory, users need to have permissions and rights assigned to them. You must determine which users will be creating new client computer accounts and modify the users' rights and privileges accordingly.
Follow these steps to set permissions for creating prestaged computer accounts:
- Click Start, point to Programs, point to Administrative Tools, and then click Active Directory Users And Computers.
- On the View menu, enable Users, Groups And Computers As Containers and Advanced Features.
- In the console tree, right-click the applicable client computer account, and then click Properties.
- In the Properties dialog box, click the Security tab, and then click Add.
- In the Select Users, Computers, Or Groups dialog box, select the user or group from the list, click Add, and then click OK.
- In the Properties dialog box, click the user or group you have added.
- In the Permissions box, click the Read, Write, Change Password, and Reset Password permissions, and then click OK.
If a group is allowed to have these permissions, remember to add users to that group.
For client computer accounts that are prestaged in another Active Directory folder location, expand the Active Directory Users and Computer console and select the appropriate client computer account.
Follow these steps to set permissions for creating user-created computer accounts:
- Click Start, point to Programs, point to Administrative Tools, and then click Active Directory Users And Computers.
- In the console tree, right-click the applicable domain, and then click Delegate Control to start the Delegation Of Control wizard.
- On the Welcome To The Delegation Of Control Wizard page, click Next.
- On the Users Or Groups page, click Add.
- In the Select Users, Computers, Or Groups dialog box, click the user account or security group (preferred) containing the users you are setting permissions for, click Add, and then click OK.
- On the Users Or Groups page, click Next.
- On the Tasks To Delegate page, click Delegate The Following Common Tasks, click Join A Computer To The Domain, and then click Next.
- Review the delegation of control summary information, and then click Finish.
Setting Permissions for Joining Computer Accounts to a Domain
To join new computer accounts to the domain, users need to have permissions and rights assigned to them. You must determine which users will be joining new client computer accounts to a domain and modify the users' rights and privileges accordingly.
Follow these steps to set permissions for joining computer accounts created in the Computers container to the domain:
- Click Start, point to Programs, point to Administrative Tools, and then click Active Directory Users And Computers.
- In the console tree, right-click the applicable domain, and then click Delegate Control to start the Delegation Of Control wizard.
- On the Welcome To The Delegation Of Control Wizard page, click Next.
- On the Users Or Groups page, click Add.
- In the Select Users, Computers, Or Groups dialog box, click the user account or security group (preferred) containing the users that will be joining client computers to the domain, click Add, and then click OK.
- On the Users Or Groups page, click Next.
- On the Tasks To Delegate page, click Delegate The Following Common Tasks, click Join A Computer To The Domain, and then click Next.
- Review the delegation of control summary information, and then click Finish.
Follow these steps to set permissions for joining computer accounts created in OUs to the domain:
- Click Start, point to Programs, point to Administrative Tools, and then click Active Directory Users And Computers.
- In the console tree, right-click the applicable OU, and then click Properties.
- In the Properties dialog box for the OU, in the Group Policy tab, click the GPO in the Group Policy Object Links box, and then click Edit.
- In the Group Policy snap-in, open Computer Configuration, click Windows Settings, click Security Settings, click Local Policies, and then click User Rights Assignment.
- Double-click Add Workstations To Domain.
- In the Security Policy Setting dialog box, click Add.
- In the Add User Or Group dialog box, type or use the Browse button to enter the names of the user accounts or security groups (preferred) containing the users who will be adding client computers to the domain in the User And Group Names box, and then click OK.
- In the Security Policy Setting dialog box, click OK.
- Close the Group Policy snap-in.
- In the Properties dialog box for the OU, click OK.
NOTE
Because the changes that you make to RIS policy take effect only when the policy is propagated (applied) to your computer, do one of the following to initiate policy propagation:
- Type secedit /refreshpolicy machine_policy at the command prompt, and then press Enter.
- Restart your computer.
- Wait for automatic policy propagation, which occurs at regular, configur-able intervals. By default, policy propagation occurs every 8 hours.
Lesson Summary
In this lesson you learned about the tasks necessary to administer RIS, including managing RIS client installation images, managing RIS client computers, and managing RIS security.
EAN: N/A
Pages: 244