Lesson 3: Installing and Configuring NWLink
In this lesson, you learn how to install NWLink, which is included in all varieties of Windows 2000 to support connectivity to computers running NetWare and other compatible systems.
After this lesson, you will be able to
- Install the NWLink protocol in Windows 2000
- Configure the NWLink protocol in Windows 2000
- Identify the purpose of a frame type and network number
Estimated lesson time: 30 minutes
Windows 2000 Professional and NetWare Connectivity
Windows 2000 Professional uses Client Service for NetWare and the NWLink protocol to provide connectivity between Windows 2000 Professional and servers running Novell NDS or NetWare bindery-based servers. NWLink is the Windows component that includes the IPX/SPX protocol.
With Windows 2000 Professional, you can leave the Novell Client 32 on the operating system while upgrading from Windows 95, Windows 98, or Windows NT 4.0 Workstation. Windows 2000 Professional upgrades computers running versions of Novell Client 32 earlier than 4.7. During the upgrade to Windows 2000 Professional, Novell Client 32 version 4.51 is installed. This process allows for a seamless upgrade of Novell Client 32 with no loss in functionality. To obtain a full version of Novell Client for Windows 2000, contact Novell directly.
Configuring Client Service for NetWare
When you install Client Service for NetWare on Windows 2000 Professional, the NWLink IPX/SPX/NetBIOS Compatible Transport Protocol (NWLink) is automatically installed.
Follow these steps to install Client Service for NetWare:
- Open the Network And Dial-Up Connections Control Panel applet.
- Right-click the local area connection for which you want to install Client Service for NetWare, and then click Properties.
- In the General tab, click Install.
- In the Select Network Component Type dialog box, click Client, and then click Add.
- In the Select Network Client dialog box, click Client Service For NetWare, and then click OK.
NOTE
To install Client Service for NetWare, you need Administrator rights to the computer running Windows 2000 Professional.
Installing NWLink
Unlike TCP/IP, the NWLink protocol is not installed by default during Windows 2000 setup. However, you have the option of installing NWLink during Setup, along with other protocols, or you can install it later.
Follow these steps to install NWLink:
- Open the Network And Dial-Up Connections Control Panel applet.
- Right-click a local area connection, then click Properties.
- In the General tab, click Install.
- In the Select Network Component Type dialog box, click Protocol, and then click Add.
- In the Select Network Protocol dialog box, click NWLink IPX/SPX/NetBIOS Compatible Transport Protocol, then click OK.
To confirm that NWLink is working properly, at a command prompt, type ipxroute config. You will see a table with information about the bindings for which NWLink is configured, as illustrated in Figure 9.12.
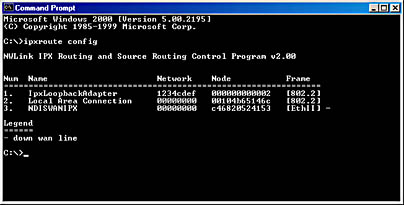
Figure 9.12 NWLink binding information
Internal Network Number
An internal network number is used for internal routing purposes when a computer running Windows 2000 also hosts IPX services. When calculating the best possible route for transmitting packets to a specified computer, multiple routes with the same route metrics can present ambiguity to computer hosts. When you specify a unique internal network number, you create a virtual network inside the computer. This allows for a singular optimum path to be calculated from the network to the services running on the computer.
Follow these steps to change the internal network number:
- In Control Panel, double-click Network And Dial-Up Connections.
- Right-click a local area connection, then click Properties.
- In the General tab, click NWLink IPX/SPX/NetBIOS Compatible Transport Protocol, then click Properties.
- Type a value in the Internal Network Number box, which is illustrated in Figure 9.13, and then click OK.

Figure 9.13 NWLink IPX/SPX/NetBIOS Compatible Transport Protocol dialog box
Frame Type and Network Number
A frame type defines the way in which a network adapter in a computer running Windows 2000 formats data to be sent over a network (specifically the header and footer formats used by the different data-link layer protocols). For example, to communicate between a computer running Windows 2000 and NetWare servers, you need to configure NWLink on the computer running Windows 2000 with the same frame type as that used by the NetWare servers. Table 9.2 lists the topologies and frame types supported by NWLink.
Table 9.2 NWLink Frame Types
| Network type | Supported frame types |
|---|---|
| Ethernet | Ethernet II, 802.2, 802.3, 802.2 Subnetwork Access Protocol (SNAP) |
| Token Ring | 802.5 and 802.5 SNAP |
| Fiber Distributed Data Interface | 802.2 and SNAP |
NWLink will try to automatically identify the frame type. During this auto detect process, NWLink tries each available frame type in the list for the associated medium access type. For example, on an Ethernet network, Ethernet 802.2, Ethernet 802.3, Ethernet II, and Ethernet Subnetwork Access Protocol (SNAP) are tested to see which frame types NWLink can communicate with. When NWLink receives a response from a NetWare server with one of the frame types, it also receives the network number associated with the frame type for the network segment where the client resides. NWLink then rebinds using the frame type(s) from which it received responses.
The external network number is a unique number that represents a specific network segment and associated frame type. All computers on the same network segment that use a given frame type must have the same external network number, which must be unique for each network segment.
The IPX frame type and network number are set during the initial NetWare server configuration. The Windows 2000 NWLink Auto Detect feature then detects the frame type and network number that were configured on the NetWare server(s). NWLink Auto Detect is the recommended option for configuring both the network number and the frame type.
Occasionally, Auto Detect selects an inappropriate network number and frame type combination for the adapter. Because Auto Detect uses the responses it receives from computers on the same network segment, Auto Detect might select an incorrect frame type and network number if computers respond with incorrect values. This is usually caused by an incorrect manual setting on another computer in the network. If the Auto Detect feature selects an inappropriate frame type and network number for a particular adapter, you can manually reset an NWLink frame type or network number for that given adapter. The frame type and network number on Windows 2000 Professional need to match the frame type and network number configured on the NetWare server. You can specify a frame type and network number of 00000000 to have the network number of the network segment automatically detected.
Follow these steps to change the network number and frame type:
- Open the Network And Dial-Up Connections Control Panel applet.
- Right-click a local area connection, and click Properties.
- In the General tab, click NWLink IPX/SPX/NetBIOS Compatible Transport Protocol, then click Properties.
- In the Frame Type drop-down list box, select a frame type.
- In the Network Number text box, type a network number, and then click OK.
CAUTION
In most cases, you should not need to change the network number and frame type, because Auto Detect should correctly detect the frame type and network number. If you choose an incorrect setting, the client cannot connect to NetWare servers.
Configuring NWLink
To configure NWLink, you must first install the NWLink IPX/SPX/NetBIOS Compatible Transport Protocol and be a member of the Administrators group. You can use the following procedure if you want to bind NWLink to a different network adapter or to manually change the frame type.
Follow these steps to configure NWLink:
- Open the Network And Dial-Up Connections Control Panel applet.
- Right-click a local area connection, then click Properties.
- In the General tab, click NWLink IPX/SPX/NetBIOS Compatible Transport Protocol, and then click Properties.
- In the General tab, type a value for Internal Network Number or leave this setting at the default value of 00000000.
- If you want Windows 2000 to automatically select the frame type, click Auto Frame Type Detection, and then click OK. Skip Steps 6 through 10.
By default, NWLink automatically detects the frame type used by the network adapter to which it is bound. If NWLink detects no network traffic or if multiple frame types are detected in addition to the 802.2 frame type, NWLink sets the frame type to 802.2.
- To manually set the frame type, click Manual Frame Type Detection.
- Click Add.
- In the Manual Frame Detection dialog box, in Frame Type, click a frame type.
You can determine which external network number, frame type, and internal network number your routers are using by typing ipxroute config at a command prompt.
- In Network Number, type a network number, and then click Add.
- Repeat these steps for each frame type you want to include, and then click OK.

Practice: Installing and Configuring NWLink
In this practice, you install and configure the NWLink IPX/SPX/NetBIOS Compatible Transport Protocol. You will also change the binding order of the NWLink protocol.
Exercise 1: Installing and Configuring NWLink
In this exercise, you will install NWLink and configure the appropriate frame detection.
- On Pro1, Open the Network And Dial-Up Connections Control Panel applet.
- Right-click a local area connection, and then click Properties.
The Local Area Connection Properties dialog box appears.
- Click Add.
The Select Network Component Type dialog box appears.
- Click Protocol, and then click Add.
- Select NWLink IPX/SPX/NetBIOS Compatible Transport Protocol, and then click OK.
The Local Area Connection Properties dialog box appears.
- Select NWLink IPX/SPX/NetBIOS Compatible Transport Protocol, and then click Properties. At this point, you can select either auto or manual frame type detection.
Exercise 2: Modifying the NWLink Protocol Bindings Order
In this exercise, you will move the NWLink binding down in the protocol binding order list.
- On Pro1, open the Network And Dial-Up Connections Control Panel applet.
- Click the connection you want to modify and, on the Advanced menu, click Advanced Settings.
- In the Adapters And Bindings tab, in Bindings For Adapter Name, click the NWLink protocol and move it down in the list by clicking the Down button, as illustrated in Figure 9.14.
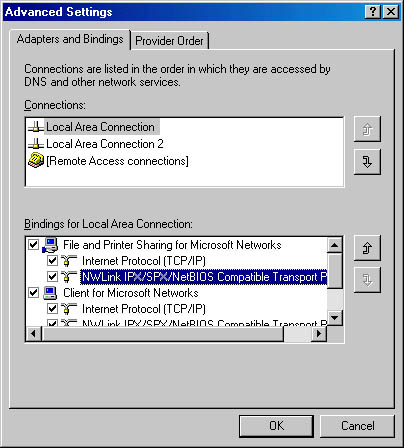
Figure 9.14 The Advanced Settings dialog box
Lesson Summary
IPX/SPX is a protocol stack that is used in Novell networks. The NWLink IPX/SPX/NetBIOS Compatible Transport Protocol (NW Link) allows Windows 2000-based computers to communicate with Novell networks. When you install Client Service for NetWare on Windows 2000, NWLink is automatically installed.
To configure NWLink, you must first install NWLink and be a member of the Administrators group. The internal network number is used for internal routing purposes when the computer running Windows 2000 is also hosting IPX services. The frame type defines the way in which the network adapter, in a computer running Windows 2000, formats data to be sent over a network. The external network number is a unique number that represents a specific network segment and associated frame type. All computers on the same network segment that use a given frame type must have the same external network number, which must be unique for each network segment.
EAN: N/A
Pages: 244