Creating the Web Service Consumer
Now that you've created a Web service, you should create a client to use it. In this tutorial, you'll create an ASP.NET Web Form application that accesses the Web service to retrieve an order. The client will then display the order in a DataGrid.
First, create an ASP.NET Web project by going to File New Project and choosing the ASP.NET Web Application template. For this example, we'll create the application on the localhost default Web server. If you're creating your application on a remote server, you may want to use the server name and an appropriate directory where you have read and write permissions. Call the Web application OrderLookupApp.
Creating a Web application adds a Web page to the project, which is the default gateway when VS .NET is done creating the project. As you saw in Chapter 14, you can use Web pages as Windows Forms. You can add Web and HTML controls to Web pages by simply dragging controls from Toolbox to the Web page.
In this example, add a Label, a TextBox, a Button, and a DataGrid control by dragging them from the ToolBox's Web Forms tab to the WebForm1.aspx Design View. Next, set the controls' properties. Figure 15-5 shows the final page after setting the properties.

Figure 15-5: Design View for searching for and displaying an order
To use the Web service in the client application, you need to add a Web reference to the service. In the Solution Explorer, right-click the References option and choose Add Web Reference. This brings up the Add Web Reference page, as shown in Figure 15-6.
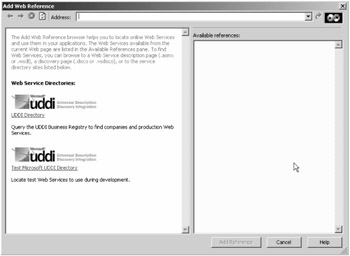
Figure 15-6: The Add Web Reference locator
As you can see from Figure 15-6, you can choose from any existing Web service. Those Web services can exist on your local Web server, in the Microsoft Universal Description, Discovery, and Integration (UDDI) Business Registry, or somewhere on the Internet. You just need to provide the URL of the service in the Address text box. In this case, you need to provide the URL of the OrderRetrieval-WebService service's .asmx page and then add ?wsdl at the end of URL. You can specify the .asmx file and URL path where the service entry point is located in the Address field of the wizard. As you can see, Figure 15-7 passes the URL of the service with localhost as the server. (You need to replace server name if you're accessing a remote server.) The contents of the service looks like Figure 15-7.

Figure 15-7: Web services available on the local server
Now you need to click the Add Reference button. To access Web services on the server, you need to use the server name as a namespace. You can even rename the namespace by right-clicking and choosing the Rename option. As you can see in Figure 15-8, the Web server name is localhost.
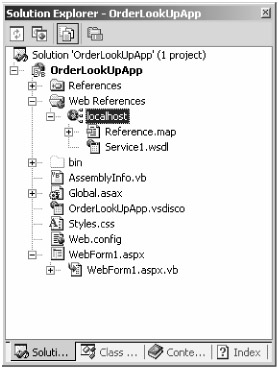
Figure 15-8: Adding Web references
Clicking the Add Reference button causes VS .NET to generate three files for referencing the service:
-
A discovery file (Service1.disco)
-
A WSDL file (Service1.wsdl)
-
A proxy file (Service1.vb)
As already discussed, the discovery file is an XML file that helps the client to find the service. The WSDL file describes the methods and classes supplied by the service in XML and defines the format that messages need to adhere to when exchanging information with the client. The proxy file, although not displayed in the Solution Explorer, is a VB stub file generated so that the programmer can call the methods in the Web service with the same method names and method parameter structure as the Web service contains. These proxies wrap the method calls to the Web service so that the convoluted exchange of parameter passing and method invocation to the remote service is transparent to the programmer. If you expand the Web References node, you can see the files belong to a service. You can expand the server reference to see its files. Some files are hidden by default, but you can use the Show All button of the Solution Explorer to see all the files (see Figure 15-9).
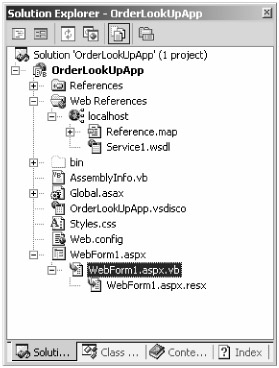
Figure 15-9: Files generated by the Web References Wizard to access the Web service
Now, everything is all set, and you're ready to call the Web service's method. In this sample, you'll call the GetOrderFromDatabase method from the Fill Order button click. So, double-click the button to write a click event handler for the button. As you probably noticed, the class in this example is Service1. So, that's the class of which you'll be creating an instance.
Once you have an instance to the service, you can call GetOrderFromDatabase in the service and assign it to a DataSet reference. To display the DataSet in a DataGrid, simply assign the DataSet to the DataGrid's DataSource and call DataBind on the DataGrid. Listing 15-3 shows the code for Fill the Order button-click handler.
Listing 15-3: Button-Click Event Handler That Calls the Order Retrieval Web Service
Private Sub Button1_Click(ByVal sender As System.Object, _ ByVal e As System.EventArgs) Handles Button1.Click ' construct and call the web service with the order 'id in the textbox Dim myWebService As localhost.Service1 = New localhost.Service1() Dim ds As DataSet = myWebService.GetOrderFromDatabase _ (Convert.ToInt32(Me.TextBox1.Text)) ' bind the data to the grid DataGrid1.DataSource = ds DataGrid1.DataBind() End Sub
As you can see, Listing 15-3 called GetOrderFromDatabase through localhost.Service1, which returns a DataSet. You use this database and bind to the DataGrid control and call DataGrid's DataBind method.
Compile and run the Web application. Enter an order ID of 10248 and click the Fill Order button. Figure 15-10 shows the resulting output in Internet Explorer.
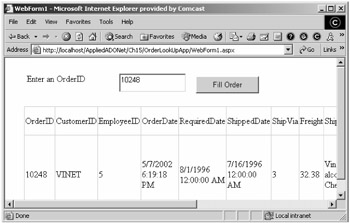
Figure 15-10: Result of the Fill method in a DataGrid
Actually, VS .NET takes away a lot of the WSDL, proxy, and discovery file coding so that you can concentrate on what you do best: coding the service. The truth is that without knowing anything about SOAP, XML, or even HTTP, you were able to develop this Web service. In the next section you'll create a Web service for entering an order into the database using this knowledge and what you know about ADO.NET.
Adding Data to a Database Through a Web Service
Now, why don't you ask the Web service to do some more than just return data from a database table?
This time you'll write to a database. You'll read data from a client in the form of an array, place it in a DataSet, and then add the data to the Orders table of the Northwind database.
Now, you add a new Web method called InsertOrder (see Listing 15-4). In this method, you read data from a database using a DataAdapter and fill a DataSet from the DataAdapter. As you can see, Listing 15-4 uses a SELECT * query with ORDER BY for the OrderId column value.
Listing 15-4: Web Service Method for Populating an Order in the Database
<WebMethod(Description:="Insert Order from an Array")> _ Public Function InsertOrder(ByVal OrderInfo As String()) As Integer ' Create a new connection conn = New SqlConnection(ConnectionString) ' Open the connection If (conn.State <> ConnectionState.Open) Then conn.Open() End If 'Create a DataSet Dim ds As DataSet = New DataSet() sql = "SELECT * FROM Orders ORDER BY OrderID" ' Create a data adapter with already opened connection Dim adapter As SqlDataAdapter = New SqlDataAdapter(sql, conn) ' Fill DataSet adapter.Fill(ds, "Orders") ' Get the last row Dim drLast As DataRow = _ ds.Tables(0).Rows(ds.Tables(0).Rows.Count - 1) Dim LastOrderID As Integer = Convert.ToInt32(drLast("OrderID")) ' Create a new DataRow Dim row As DataRow = ds.Tables(0).NewRow() ' Set data row values row("OrderID") = LastOrderID + 1 row("OrderDate") = Convert.ToDateTime(OrderInfo(0)) row("ShipName") = OrderInfo(1) row("ShipAddress") = OrderInfo(2) row("ShipCity") = OrderInfo(3) row("ShipCountry") = OrderInfo(4) row("ShipPostalCode") = OrderInfo(5) ' Add DataRow to the collection ds.Tables(0).Rows.Add(row) ' Save changes back to data source adapter.Update(ds, "Orders") ' Return OrderID Return row("OrderID") End Function It gets the last OrderID in the table to determine what is the next available OrderID value. Then it creates a new DataRow in the dataset and populates the row with data passed in from the client. Finally, it calls the Update method of the DataAdapter to save the new row into the database.
Now build and test the service. This service now has two methods, as shown in Figure 15-11.

Figure 15-11: The InsertOrder and GetOrderFromDatabase methods of OrderRetrievalWebService
Now it's time to test your newly added Web method InsertOrder. To test this service, follow the same steps as previously when testing your GetOrderFromDatabase method.
Create a Web application project using VS .NET, or you can use the same client you used to test the GetOrderFromDatabase method. Create a new project called AddOrderClientApp.
The next step is to add a reference to the Web service by right-clicking the References node of a project in the Solution Explorer and clicking the Add Web Reference option.
| Note | If you're using the same client application you used last time, you need to remove the namespace and then add it again by using Add Web Reference option to get the latest updated Web service contents. |
Again, follow the same steps as in the last example. Type the URL of your service in the Address text box and click the Add Reference button, which adds localhost (or YourRemoverServer if you're not using the default localhost as Web server) namespace to the project. The Add Reference option also generates the *.disco, *.wsdl, and proxy files. Now you can call your Web service. Add some controls to the page to make it look like Figure 15-12. We added six edit boxes to accept the order date, name, address, city, country, and zip of a customer. The Enter Order button submits the order to the service.
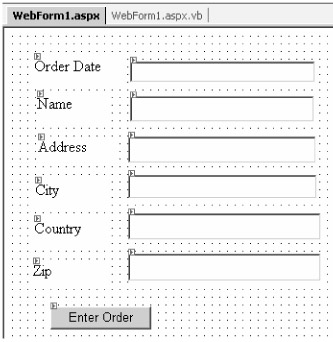
Figure 15-12: Design View of the order customer entry Web service
Again, double-click the Enter Order button and use the code in Listing 15-5 to populate the order array and pass it to the Web service. The Enter Order button event handler looks like Listing 15-5.
Listing 15-5: Client Event Handler for Executing the Web Service
Private Sub Button1_Click(ByVal sender As System.Object, _ ByVal e As System.EventArgs) Handles Button1.Click Dim orderData() As String = New String(6) {} orderData(0) = TextBox1.Text orderData(1) = TextBox2.Text orderData(3) = TextBox4.Text orderData(4) = TextBox5.Text orderData(5) = TextBox6.Text ' Create Web serice instalce and call InsertOrder Dim myWebService As localhost.Service1 = New localhost.Service1() myWebService.InsertOrder(orderData) End Sub The button event handler assigns a string array with information typed into the order form. You can create an instance of the service by direct using mcb.Service1 and calling the InsertOrder method.
Now build and run the application. The output looks like Figure 15-13. Now you enter customer data and clicking the Enter Order button adds the data to the Orders table.
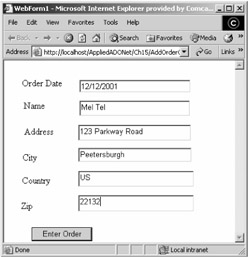
Figure 15-13: Adding an order to the database using Enter Order
Adding More Functionality to the Web Service
Now you've got a pretty good idea of how to develop a Web service and consume it in client applications. What else can a database Web service do? When it comes to databases, the only thing you can do is retrieve, add, update, and delete data. Earlier in this chapter, you saw how to retrieve and add data to a data source through Web service methods.
Now you just need to add functionality to update and delete data and you'll have a complete database Web service.
Actually, updating and deleting data is pretty simple. What you need to do is just create a new method for the Web service, which executes SQL statements. In the client application, you need to get data from the users, construct SQL UPDATE and DELETE statements, and then send this statement as a string to the Web service and let the Web service execute the SQL statement.
Listing 15-6 shows a method that executes a SQL statement by creating a SqlCommand and calling the ExecuteNonQuery method.
Listing 15-6: ExecuteQuery Method
' SaveChanges method saves a DataSet <WebMethod(Description:="Exceute SQL Statement")> _ Public Function ExecuteQuery(ByVal sql As String) As Integer Dim affectedRows As Integer = 0 ' Open connection if already not open If conn.State <> ConnectionState.Open Then conn.Open() End If ' Create a SqlCommand and execute it Dim cmd As SqlCommand = New SqlCommand() cmd.Connection = conn cmd.CommandText = sql affectedRows = cmd.ExecuteNonQuery() ' Close and dispose connection If conn.State = ConnectionState.Open Then conn.Close() End If Return affectedRows End Function
EAN: 2147483647
Pages: 214