Flylib.com

Books Software


Moving Beyond the Loop


Moving Beyond the Loop

You've now learned how to build up a basic pattern from scratch, how to copy and paste material to create a new section without reinventing the wheel, and how to alter the existing material to create new material.

Assuming that you don't want to simply repeat your existing rhythm track throughout the rest of your song, it's time to move forward into some new material. You'll start by creating a new loop.

If you haven't already created a clear plan for your song, it may help if you consider these simple categories:

  • Intensification : Continue with the current feel, either to extend or build toward a section later on.

  • Breakdown : Create a sparse open section that introduces a new pattern or basic idea.

  • Transition : Add a short break for a drum fill or other instrument, to propel the song into another feel or go back into a refrain of the previous section.

Though there is no "right" way to build a song, these examples will help you work loops to your advantage and write music that fits together as a whole.

To intensify a previous section

1.

In the Sequencer, copy-drag an earlier section into a new loop area ( Figure 4.44 ).

Figure 4.44. Clone the previous section to create a new one using the copy-drag function.
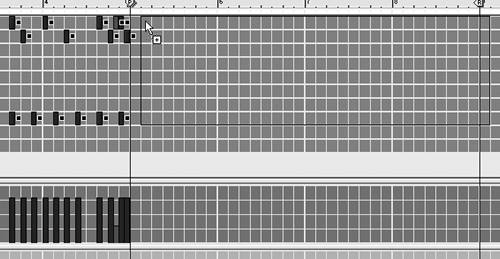

2.

Add new notes or drum sounds ( Figure 4.45 ).

Figure 4.45. Alter and add to cloned material to differentiate the new section from the old. Here, new material intensifies the old section.
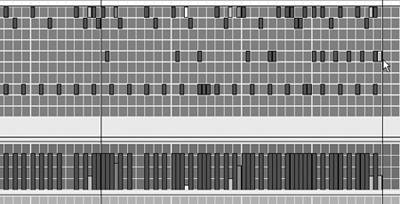

3.

Consider introducing a longer drum phrase that builds up to a new section.

In this example, the Pencil tool was changed to the Line tool ( Figure 4.46 ) to draw a one-measure velocity ramp that peaks at the end of the measure.

Figure 4.46. The Line tool is handy for drawing straight lines across dense sections of datain this case, velocity bars.


To add a breakdown section

1.

Make a new loop area.

2.

Create a new basic pattern using sounds not emphasized in the earlier section.

In this example, I dropped out the beat, created a four-note (one beat) hi-hat pattern, cloned it to last four bars, and altered the note velocities for accents ( Figure 4.47 ). Through the introduction of additional layers (the clap part), the new section begins to build.

Figure 4.47. In this breakdown example, the beat drops out completely, leaving only a heavily accented hi-hat. The new section builds through the introduction of additional layers (claps).
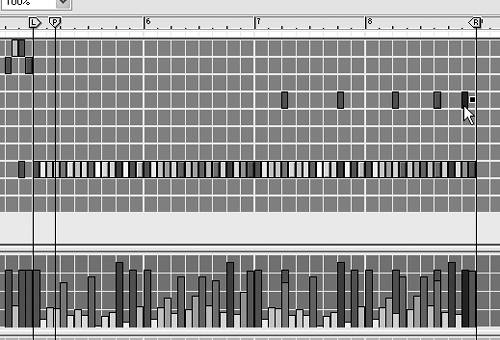

Tip

  • Breakdowns work on the principle of contrast to the previous section. Using sounds not emphasized in the previous section can increase contrast.


To add a transition

1.

Make a new loop area in the Sequencer.

2.

Write a fill or short pattern to use as a break or a bridge between sections ( Figure 4.48 ).

Figure 4.48. A transition section serves as a bridge from one section into another. This transition section is a break beat using a short, repeating phrase.
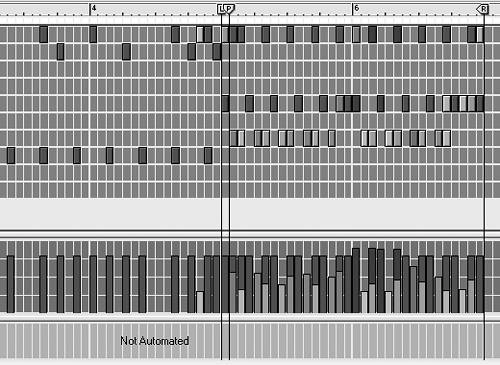


Editing Timing in Reason

If you are performing on a MIDI keyboard to record tracks, you may want to clean up the timing of your performance. In the old days, this task was a nightmare and usually meant either retaking an entire part, or splicing multiple takes together with tape and a razor blade .

Using quantization, Reason makes it easy to input perfectly timed notes or to alter mistimed notes without any fuss. Quantization corrects timing, conforming it to a grid that's set to a specific value, such as eighth notes, sixteenth notes, or quarter notes.

Notes that do not fall precisely on a grid boundary are moved to the nearest grid slot, or "time-corrected."

Tip

  • Adjusting grid resolution can be a powerful tool for writing parts with your mouseit's easy to switch from one grid value to another for more complex drum parts .


Understanding Note Values

A note's "value" is simply its percentage of a four-beat measure. For example, a whole note lasts one measure (four beats), a half note lasts half a measure (two beats), a quarter note lasts a quarter measure (one beat), and so on.

So when you count the beats of a measure, you are counting quarter notes.

There is, however, still the matter of triplets, which break the rules a bit. A triplet is three notes that get squashed into the space of twothe triplet still carries the same note value but is slightly faster. Thus, quarter-note triplets are faster than quarter notes but slower than eighth notes.

Understanding note values doesn't mean you have to do math on-the-fly ! Just remember that the higher the number, the more rapid the note. The rest will become clear as you work more with various notes.


Snap-to-Grid and Quantization

To help make timing adjustments easy, Reason has a number of quantization controls located on top of the Sequencer window.

Reason has three ways of cleaning up timing: snapping notes to a grid, record quantize, and quantization edit. Let's look at snap-to-grid first.

Snapping notes to a grid allows you to input perfectly timed notes with the mouse. The timing of your notes is set in the grid resolution menu. By default, Reason snaps all the notes you input to the nearest sixteenth note. At most tempos, sixteenth notes are rapid and a challenge for most performers to execute with precision. For sequencing notes in time, it is a good middle-of-the-road value for beat making.

To snap a note to grid using the mouse

1.

In Edit mode in the Sequencer, open up a track and select the Pencil tool.

2.

Make sure that the Snap to Grid button is enabled ( Figure 4.49 ).

Figure 4.49. Reason's quantization controls


3.

Click the mouse anywhere on the grid to make the note fit perfectly on the grid. Perfect timing!

4.

Select a different value in the grid resolution pull-down menu, such as 1/8 (eighth notes). You will see the grid changethe slots for notes will now be longer.

5.

Click the Pencil tool anywhere on the grid to see what a longer-duration eighth note looks like.

6.

To turn off grid snapping, click the Snap to Grid button again.

To add triplets

1.

With your Sequencer track open, make sure the Pencil tool is selected.

2.

Change the grid resolution to 1/16 T (sixteenth-note triplets) and watch how the grid changes ( Figure 4.50 ).

Figure 4.50. Triplet values for grid resolution are marked with a T.


3.

Click the Pencil tool anywhere on the grid, and click the play button to hear what a shorter-duration sixteenth-note triplet sounds like.

Tip

  • Once you get the hang of switching note values and hearing the result, you'll be able to use Reason's Snap to Grid function to write parts quickly.


The record quantize method fixes notes to a grid during recording with a MIDI keyboard, cleaning up timing before notes are written to a track. (You'll read more about this in the next section, "Using an External MIDI Input Device.")

And lastly, quantize edit is a clean-up method for notes that are already written to a track. It has the advantage of working only on the note or series of notes you select. You can record performances exactly as played and then quantize only those notes that need it.

To quantize edit

1.

With grid snapping turned off, use the Pencil tool to input notes randomly on the grid.

2.

Drag-select the notes you want to quantize.

3.

Click the Quantize Notes button above the Sequencer ruler and watch your notes snap to grid.