| There are many different types of reverb, and although each has a basic characteristic effect on sound, the final result depends a lot on the dry signal. Perhaps the easiest way to learn what to expect is to try out the different types on a fairly simple instrument, such as the SubTractor we'll use for these exercises. Each type of reverb uses its own sound model and set of parameter knobs. As we move through the reverb types, we'll skip those parameters that we've already covered unless it makes sense to adjust them sequentially with other controls. Small Space reverb We'll start with the Small Space reverb. This is a lot like the Small Room algorithm in the RV-7, but you can adjust it more precisely in the RV7K. To adjust the Small Space algorithm 1. | With a Mixer and a SubTractor in your Rack, select the Mixer and choose Create > RV7000 Advanced Reverb to make it a master effect.
| 2. | In the Sequencer or using a Matrix, write a simple test loop with a couple of notes at the beginning and plenty of space for reverb.
| 3. | With your loop playing, open the RV7K's Remote Programmer and set the Algorithm knob to Small Space (Figure 8.26).
Figure 8.26. In the Remote Programmer, set the Algorithm knob to Small Space. 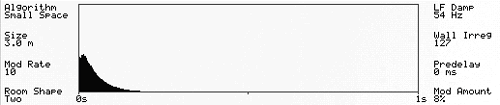
| 4. | Use the Size knob to set the room size (the range is 0.9 meters to 9.7 meters). Notice how the display changes as the knob moves.
Like on the RV-7, Size is your most powerful reverb quality knobit affects all the other parameters.
| 5. | Use the Mod Rate and Mod Amount knobs to pitch-modulate the reverb sound.
Reverb modulation creates a synthetic shimmer, or noise effect, at high Amount settings.
| 6. | Use the Room Shape knob to pick the more subtle reverb characteristics.
| 7. | Use the LF Damp knob to cut out deep frequencies by specifying the frequency at which lows fade out (the range is 20 Hz to 1,000 Hz).
| 8. | Set the Wall Irreg (wall irregularity) knob to move progressively from 0, a basic opposing-wall model with a clear sonic backlash, to 127, a very complex and diffuse room containing many walls and angles.
| 9. | Turn the Predelay knob to increase or decrease the time lapse between the input signal and the reverb.
Long predelays can make a reverb more dramatic and the input signal sound more distant.
|
 Tip Tip
Room and Hall reverbs You've already heard Room and Hall reverb types, but the RV7K gives you some additional ways to adjust them. To adjust the Room or Hall algorithm 1. | In the RV7K Remote Programmer, select the Room or Hall algorithm (Figure 8.27).
Figure 8.27. The Room and Hall reverb control knobs are the same. 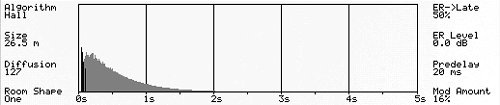
| 2. | Set the Diffusion knob to a low setting if you want to hear the distinct reflec-tion events, or set it high if you want a smoother, more blended reverb.
| 3. | Use the ER->Late knob to specify what percentage of the reverb occurs early. Low knob values place more reflections at the reverb tail, and can lead to some interesting results.
| 4. | If you want to amplify or de-emphasize the early reflection effect, turn the ER Level knob up or down to change the ER volume.
|
Arena reverb Arenas reflect sound off larger structures over wider distances, creating large time discrepancies from multiple positions. The Arena algorithm addresses this divergence by generating three separate reverbsone for left, one for right, and one in the center (mono)and allowing you to mix them manually. To adjust the Arena algorithm 1. | With your loop playing, set the Algorithm knob in the RV7K Remote Programmer to Arena (Figure 8.28).
Figure 8.28. The Arena algorithm generates three separate reverbs and allows you to mix them manually using these control knobs. 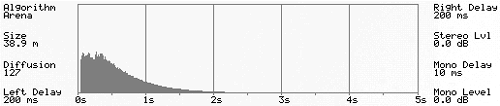
| 2. | Set the Size and Diffusion knobs as preferred.
| 3. | Now set the predelay time for the left and right reverb signals using the left and right delay knobs, respectively.
| 4. | Adjust the volume level of the left and right reverb signals together by using the Stereo Level knob.
| 5. | Set the predelay time and level for the center (mono) reverb using the Mono Delay and Mono Level knobs, respectively.
|
Calculating Point of Origin Basic stereo reverbs are not true 3D, because they only allow you to place an object left to right, with the dry signal acting as the point of origin (POO). The POO is always dry or, geographically speaking, "close." For close sounds, adding a center signal allows you to simulate four POOs: the dry sound, and the reflected left, right, and center sounds. For distant POO, eliminate the dry sound altogetherthis means using the Pre-fader function of the Mixer's Aux 4 channel or using the RV7000 as an insert effect. In this case the shortest predelay time and the loudest signal represent the POO, while the other two reverb signals decrease in predelay time and volume in order of proximity. |
Plate and Spring reverbs Reason has two reverb types that simulate simulators: the Plate and Spring reverbs. Both are metal resonators used to emulate sound reflection in early recordings. The Plate algorithm is well suited for vocals or other instruments that sit in the front of a mix, because its rich decay and expansive tone fill lots of space (Figure 8.29). It works especially well on high-profile parts in songs with just a few tracks. Figure 8.29. The Plate algorithm has few control knobs. 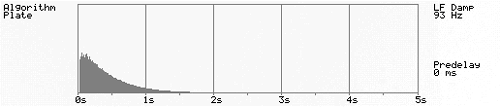
Plates don't create discrete reflections, but they sound uniquely warm. Most of the "magic" is in the algorithm itself: The Decay knob functions like a "plate size" knob and the only other knobs are LF Damp and Predelay. You already know those parameters, so we'll continue on to the Spring reverb. Spring reverbs were known as the "traveling man's plates" because they could be mounted in a portable cabinet. They create distinctive pulses as they resonate, and they ring a bit. This ringing is called dispersion. Sims Squared The Plate and Spring reverb types both simulate simulators, but what are they exactly? In the case of a Spring reverb, an actual spring is inserted into an audio path and loaded into a chamber to block out external noise. Sound travels through the spring coils, imitating sound reflection with economy of space and cost. Plate reverbs use the same principle except that instead of a spring a large metal plate is used as a resonator. The plate is typically suspended from a frame and mounted inside a soundproofed wall. Electronic pickups or contact mics are attached to the plate to transmit sound back out to the studio. Plate reverbs are still popular because of their high-fidelity resonance quality. They can be recognized in the vintage vocal tracks of the 1950s and '60s, especially styles like country and Motown that used lots of reverb. |
To adjust the Spring algorithm 1. | With your loop playing, set the RV7K Remote Programmer's Algorithm knob to Spring (Figure 8.30).
Figure 8.30. In the Remote Programmer, set the Algorithm knob to Spring. 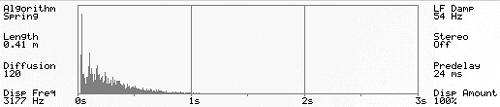
| 2. | To better hear (and see on your display) what the model does, set the Disp Amount knob to 0%.
| 3. | Adjust the spring's "size" using the Length parameter. Though longer lengths will reverberate longer, this is different from the Decay sustain. Think of Length as how fast sound goes through the spring.
| 4. | Both the Disp knobs stand for "dispersion," or the "spring ring." Turn the Disp Amount knob to 100% so you can hear the other dispersion control better.
| 5. | Now use the Disp Freq knob to set the spring's dispersion tone.
The knob sets a center frequency between 741 Hz and 7,470 Hz.
|
How Spring Length and Diffusion Interact At long spring lengths, the reverb pattern takes place slowly for pulsing (high-diffusion), tremolo (medium-diffusion), or delay (low-diffusion) effect results. At short lengths, these "pulses" remain but are too rapid to distinguish, sounding like a small, bright room. |
Echo As you may remember from the beginning of this chapter, the DDL-1 produces a simple echo effect. However, using the RV7K gives you stereo echo, as well as much finer control. To use the RV7K for echo 1. | With your loop playing, set the RV7K Remote Programmer's Algorithm knob to Echo (Figure 8.31).
Figure 8.31. Set the Algorithm knob to Echo. 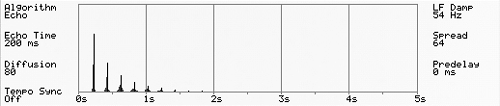
| 2. | Set the Diffusion parameter to 0.
This will give you "pure" repeat of the dry signal, appearing as vertical lines diminishing to the right across your display (Figure 8.32).
Figure 8.32. Set the Diffusion parameter to 0 for the Echo algorithm. 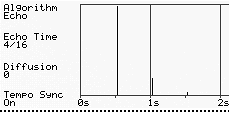
| 3. | Turn the Tempo Sync knob to On if you want to synchronize the delay time to your song tempo.
| 4. | Adjust the Echo Time parameter to a tempo subdivision such as 3/16 or pick a millisecond time value if you want to keep Tempo Sync off.
| 5. | Set the LF Damp knob high if you don't want low frequencies in your delay; set the knob low if you do (the range is 20 Hz to 1,000 Hz).
| 6. | To add reverb to your echo, boost the Diffusion knob and watch the display. Technically this knob "blurs" the echo, allowing you to hear reflections around the various echo points.
| 7. | Turn the Spread knob to further spread out or "blur" the reverb away from the echo points, and watch the display. At maximum diffusion and spread the echo is no longer an echo, but more like the Spring reverb with a longer pulse timing range.
|
Multi Tap echo The most versatile (and complicated) echo is the RV7K Multi Tap step-programmable echo. You can program up to four repeats; set a time interval, pan position, and level for each; and pick a rate at which the whole set repeats as the Decay knob is moved up and down. Multi Tap can do anything that a regular echo does and much more, but trying to get "standard" results can be frustrating if you don't know your way around. To use Multi Tap echo for a standard panning delay 1. | With your loop playing, set the RV7K Remote Programmer's Algorithm knob to Multi Tap (Figure 8.33).
Figure 8.33. Multi Tap is the most versatile (and complicated) echo algorithm. 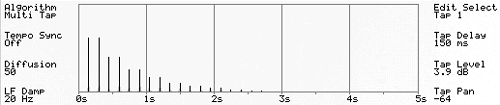
| 2. | Turn the Diffusion knob to 0.
I recommend keeping the diffusion at 0 so the echoes are clear.
| 3. | Set the Tempo Sync knob to On.
| 4. | To adjust the first tap, turn the Edit Select knob to Tap 1.
| 5. | Set the time interval for Tap 1 to 3/16 using the Tap Delay knob (the Sync range is 1/16 to 12/8T).
| 6. | Set the Tap Level knob to around 6.0 dB.
| 7. | Set the Tap Pan to 64, or hard left.
In this example, each successive tap will pan progressively to the right.
| 8. | To adjust Tap 2, turn the Edit Select knob to Tap 2 and repeat steps 57, using the following values: Delay: 6/16, Level: 4.0 dB, Pan: 63.
| 9. | Adjust Tap 3 with these values: Delay: 9/16, Level: 2.0 dB, Pan: 32.
| 10. | Adjust Tap 4 with these values: Delay: 12/16, Level: 1.0 dB, Pan: 32.
You should now hear a typical echo with regular, decrescendoing repeats that move back and forth.
| 11. | Now turn the Edit Select knob all the way right to the Repeat Tap function to set the repeat interval for all four taps.
| 12. | For a regular repeat interval, set the Repeat Time value to 12/16.
This tells the repeat function that 12/16 is the last tap in the set and to repeat at the next interval.
The graphic display should show a regular repeat interval for the tap set (Figure 8.34).
Figure 8.34. This standard Multi Tap echo has a repeat time of 12/16. 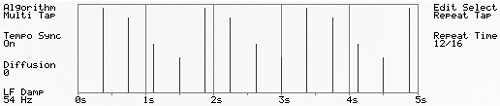
|
Diffusion and Multi Tap The Diffusion parameter works differently on Multi Tap, blurring the echoes progressively as the tap set repeats. The higher the Diffusion knob setting, the faster the effect progresses. A nice use of this feature is to set the main RV7K Decay knob high so the tap set repeats many times. A medium Diffusion setting will increase gradually for a "riding into the distance" effect, blurring and dissipating the echoes as the taps fade out. There is a trade-off between many repeats and diffusion, however. High Diffusion settings decrease the tap volume overall. Boost the Diffusion knob when the Decay knob is high to see the effect (Figure 8.35). Figure 8.35. In Multi Tap mode, diffusion increases progressively. 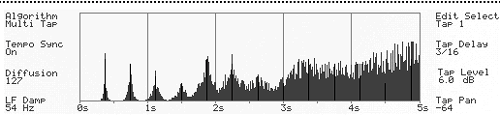
|
Reverse reverb The Reverse algorithm (Figure 8.36) plays reverb backward followed by a forward copy of the original sound. For maximum drama, use it with no dry signal, either as an insert effect or through an Aux channel that has a Pre-fader function. Figure 8.36. The Reverse reverb algorithm plays reverb backward followed by a forward copy of the original sound. 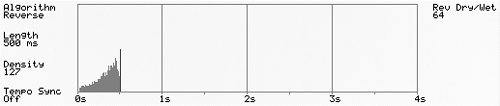
Both the Line Mixer and the 14:2 can be set up to feed a channel to an effect even when the channel fader is at 0. Here's how to set this up. To use Reverse reverb as a master effect 1. | Set up your instruments, write a test loop, and press play.
| 2. | Select your Mixer and create an RV7K.
| 3. | On the back panel, connect the RV7K to the Aux 4 inputs of a 14:2 Mixer (Figure 8.37).
Figure 8.37. Here the RV7K is connected to the Aux 4 channel of a 14:2 Mixer. 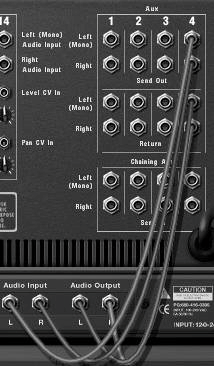
or
Connect the RV7K to the Aux channel of a Line Mixer (Figure 8.38).
Figure 8.38. Here the RV7K is connected to the Aux of a Line Mixer 6:2 with the Pre-fader function enabled. 
| 4. | Activate the Pre-fader button on the appropriate channel of your 14:2 Mixer (Figure 8.39).
Figure 8.39. Activate the 14:2 Mixer's Pre-fader button on the appropriate channel. 
or
Activate the Pre setting on your Line Mixer's back panel and turn the Aux 4 Send knob all the way to the right (Figure 8.40).
Figure 8.40. Turn the Aux 4 Send knob to the maximum value. 
| 5. | Drag the channel level fader for your instrument all the way down to 0 (Figure 8.41).
Figure 8.41. With Pre-fader settings active, you can turn your channel fader to 0 and the Aux sends will still send sound. 
| 6. | On the RV7K front panel, turn the Dry/Wet knob all the way to the right (Figure 8.42) and select the Reverse algorithm on the Remote Programmer.
Figure 8.42. Turn the Dry/Wet knob all the way to the right to return only the effect. 
| 7. | Use the Length knob to specify the length of time between your initial signal and the Reverse reverb effect (values vary according to whether Tempo Sync is on or off).
| 8. | Use the front panel Decay knob to set whether or not you want the Reverse reverb to fade in.
Fade-ins don't happen when your Decay setting exceeds the Length setting because the Reverse reverb can't fade in before its beginning! Instead, the fade-in levels out as the decay increases (Figure 8.43).
Figure 8.43. With Reverse reverb, if the decay exceeds the Length setting, there is no fade-in. 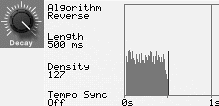
| 9. | Use the Remote Programmer Density knob to control whether the reverb sounds like ambience (high density) or discrete reflections or echoes (low density).
|
|