| If you want to use reverb on more than one instrument, you don't have to insert an RV-7 for each one. Reason will also let you set up a master effect, which is cabled to the Mixer so it can be used for any instrument in the Rack. To use an RV-7 Digital Reverb on multiple instruments 1. | Select a Mixer in your Rack and choose Create > RV7 Digital Reverb.
Reason will automatically cable the RV-7 left audio input to the first available Mixer Aux channel send (Figure 8.18).
Figure 8.18. The RV-7 is connected as a master effect here, so it can work on any instrument connected to the Mixer. 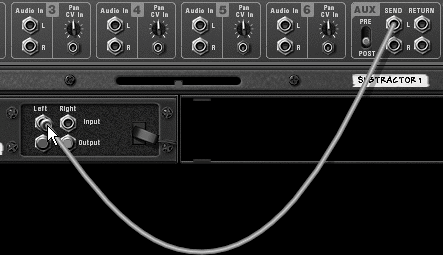
| 2. | Cable the RV-7 audio outputs to the left and right Aux channel returns.
All the Mixer channels can now feed into the Aux channel as little or as much signal as you want using the channel Aux Send knobs.
| 3. | On the RV-7, turn the Dry/Wet knob all the way to the right.
Your dry signal is in the Mixer channel, so you don't need it in your effect.
| 4. | In the Mixer, simply turn the Aux knob on any channel to feed signal to the master effect (Figure 8.19).
Figure 8.19. Feed a master effect in the Mixer using your instrument's Aux Send knob. 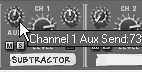
| 5. | Play your track to hear the reverb.
|
The RV7000 Advanced Reverb The RV7000 (or RV7K) uses the same principles as the RV-7 but operates in stereo, comes with more presets, gives you greater control, and allows you to save your changes as a custom patch. To use the basic RV7000 controls 1. | Select the Mixer and choose Create > RV7000 Advanced Reverb to set up an RV7000 master effect (Figure 8.20).
Figure 8.20. The RV7000, shown here front and back with cables hidden, operates in stereo. 
| 2. | Play an instrument track and use the Aux knob in the instrument's Mixer channel to feed the effect.
The RV7K init patch provides a good basic reverb sound if you want to start right in.
| 3. | With your loop playing, use the RV7K's Browse Patch button (Figure 8.21) to audition a patch from the Factory Sound Bank RV7000 Patches folder (Figure 8.22).
Figure 8.21. Use the RV7000 Browse Patch button to audition a patch. 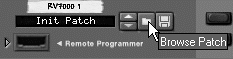
Figure 8.22. Choose a sound from the Factory Sound Bank's folder of RV7000 patches. 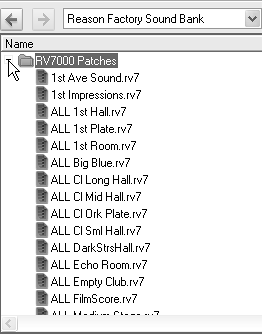
| 4. | Use the Hi EQ knob to boost the treble of the reverb sound.
| 5. | Use the HF Damp knob to filter out high frequencies, just like on the RV-7.
|
Now that you know how to use the RV7000 as a preset patch reverb, it's time to open up the advanced reverb controls. From now on you'll have a display screen to help you "see" what each control does. To select a reverb algorithm 1. | With an RV7K set up as a master effect, as in the previous exercise, click the Remote Programmer arrow on the front panel to access the RV7K's advanced controls (Figure 8.23).
Figure 8.23. The RV7000 Remote Programmer gives you access to advanced controls. 
| 2. | Turn up the Aux knob on your instrument's Mixer channel, and set up a test loop with a couple of notes at the beginning. Be sure to leave space for the RV7K's reverb to breathe (Figure 8.24).
Figure 8.24. Write a basic one-note reverb test pattern. 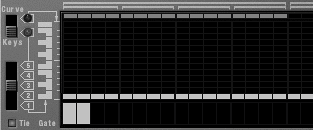
| 3. | Play your loop, and on the RV7K Remote Programmer, turn the Algorithm knob to the type of reverb you want (Figure 8.25).
Figure 8.25. Turn the Algorithm knob to change the reverb type. 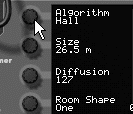
In addition to the algorithms available in the RV-7, the RV7K offers some new reverb types:
Arena (a very big room) Spring (mechanical spring reverb) Plate (classic metal plate reverb) Multi Tap (a step-programmable echo) Reverse (a backward reverb that fades into the original signal)
|
|