10.3 A Tkinter-Based GUI Editor for Managing Form Data
10.3 A Tkinter-Based GUI Editor for Managing Form Data
Let's recap: we wrote a CGI program ( feedback.py ) that takes the input from a web form and stores the information on disk on our server. We then wrote a program ( formletter.py ) that takes some of those files and generates apologies to those deserving them. The next task is to construct a program to allow a human to look at the comments and complaints, using the Tkinter toolkit to build a GUI browser for these files.
The Tkinter toolkit is a Python-specific interface to a non-Python GUI library called Tk. Tk is the de facto choice for most Python users because it provides professional-looking GUIs within a fairly easy-to-use system. The interfaces it generates don't look exactly like Windows , the Mac, or any Unix toolkit, but they look very close to each of them, and the same Python program works on all those platforms, which is basically impossible with any platform-specific toolkit. Another portable toolkit worth considering is wxPython (http://www.alldunn.com/wxPython).
Tk, then, is what we'll use in this example. It's a toolkit developed by John Ousterhout, originally as a companion to Tcl, another scripting language. Since then, Tk has been adopted by many other scripting languages including Python and Perl. For more information on Perl and Tk, see O'Reilly's Learning Perl/Tk by Nancy Walsh.
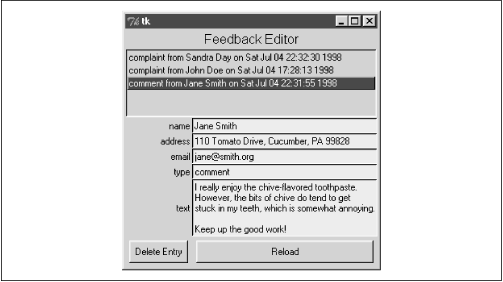
The goals of this program are simple: to display in a window a listing of all of the feedback data items, allowing the user to select one to examine in greater detail (e.g., seeing the contents of the text widget). Furthermore, Joe wants to be able to discard items that are dealt with, to avoid having an always increasing list of items. A screenshot of the finished program in action is shown in Figure 10.4.
Figure 10.4. A sample screen dump of the feedbackeditor.py program
We'll work through one possible way of coding it. Our entire program, called feedbackeditor . py, is:
from FormEditor import FormEditor from feedback import FeedbackData, FormData from Tkinter import mainloop FormEditor("Feedback Editor", FeedbackData, r"c:\Complaintdir") mainloop() This is cheating only if we don't tell you what's in FormEditor , but we will. The point of breaking these four lines out into a separate file is that we've broken out all that is specific to our form. As we'll see, the FormEditor program is completely independent of the specific CGI form. A further point made explicit by this microprogram is that it shows how to interact with Tkinter; you create widgets and windows, and then call the mainloop function, which sets the GUI running. Every change in the program that follows happens as a result of GUI actions. As for formletter.py , this program imports the class objects from the feedback module, for the same reason ( unpickling ). Then, an instance of the FormEditor class is created, passing to its initialization function the name of the editor, the class of the objects being unpickled, and the location of the pickled instances.
The code for FormEditor is just a class definition, which we'll describe in parts , one method at a time. First, the import statements and the initialization method:
from Tkinter import * import string, os, pickle class FormEditor: def __init__(self, name, dataclass, storagedir): self.storagedir = storagedir # stash away some references self.dataclass = dataclass self.row = 0 self.current = None self.root = root = Tk() # create window and size it root.minsize(300,200) root.rowconfigure(0, weight=1) # define how columns and rows scale root.columnconfigure(0, weight=1) # when the window is resized root.columnconfigure(1, weight=2) # create the title Label Label(root, text=name, font='bold').grid(columnspan=2) self.row = self.row + 1 # create the main listbox and configure it self.listbox = Listbox(root, selectmode=SINGLE) self.listbox.grid(columnspan=2,sticky=E+W+N+S) self.listbox.bind('<ButtonRelease-1>', self.select) self.row = self.row + 1 # call self.add_variable once per variable in the class's fieldnames var for fieldname in dataclass.fieldnames: setattr(self, fieldname, self.add_variable(root, fieldname)) # create a couple of buttons, with assigned commands self.add_button(self.root, self.row, 0, 'Delete Entry', self.delentry) self.add_button(self.root, self.row, 1, 'Reload', self.load_data) self.load_data() We use the sometimes dangerous from ... import * construct we warned you about earlier. In Tkinter programs, it's usually fairly safe, because Tkinter only exports variables that are fairly obviously GUI- related ( Label , Widget , etc.), and they all start with uppercase letters .
Understanding the __ init __ method is best done by comparing the structure of the code to the structure of the window screen dump. As you move down the _ _ init __ method lines, you should be able to match many statements with their graphical consequences.
The first few lines simply stash away a few things in instance variables and assign default values to variables. The next set of lines access a so-called Toplevel widget (basically, a window; the Tk() call returns the currently defined top-level widget), sets its minimum size, and sets a few properties. The row and column configuration options allow the widgets inside the window to scale if the user enlarges the window and determines the relative width of the two columns of internal widgets.
The next call creates a Label widget, which is defined in the Tkinter module, and which, as you can see in the screen dump, is just a text label. It spans both columns of widgets, meaning that it extends from the leftmost edge of the window to the rightmost edge. Specifying the locations of graphical elements is responsible for the majority of GUI calls, due to the wide array of possible arrangements.
The Listbox widget is created next; it's a list of text lines, which can be selected by the user using arrow keys and the mouse button. This specific listbox allows only one line to be selected at a time ( selectmode=SINGLE ) and fills all the space available to it (the sticky option).
The for loop block is the most interesting bit of code in the method; by iterating over the fieldnames attribute of the dataclass variable (in our example, the fieldnames class of the FeedbackData class), it finds out which variables are in the instance data, and for each, calls the add_variable method of the FormEditor class and takes the returned value and stuffs it in an instance variable. This is equivalent in our case to:
... self.name = self.add_variable(root, 'name') self.email = self.add_variable(root, 'email') self.address = self.add_variable(root, 'address') self.type = self.add_variable(root, 'type') self.text = self.add_variable(root, 'text')
The version in the code sample, however, is better, because the list of field names is already available to the program and retyping anything is usually an indicator of bad design. Furthermore, there is nothing about FormData that is specific to our specific forms. It can be used to browse any instance of a class that defines a variable fieldnames . Making the program generic like this makes it more likely to be reused in other contexts for other tasks .
Finishing off with the __ init __ method, we see that two buttons finish the graphical layout of the window, each associated with a command that's executed when it's clicked. One is the delentry method, which deletes the current entry, and the other is a reloading function that rereads the data in the storage directory.
Finally, the data is loaded by a call to the load_data method. We'll describe it as soon as we're done with the calls that set up widgets, namely add_variable and add_button .
add_variable creates a Label widget, which displays the name of the field, and on the same row, places a Label widget, which will contain the value of the corresponding field in the entry selected in the listbox:
def add_variable(self, root, varname): Label(root, text=varname).grid(row=self.row, column=0, sticky=E) value = Label(root, text='', background='gray90', relief=SUNKEN, anchor=W, justify=LEFT) value.grid(row=self.row, column=1, sticky=E+W) self.row = self.row + 1 return value
add_button is simpler, as it needs to create only one widget:
def add_button(self, root, row, column, text, command): button = Button(root, text=text, command=command) button.grid(row=row, column=column, sticky=E+W, padx=5, pady=5)
The load_data function cleans up any contents in the listbox (the graphical list of items) and resets the items attribute (which is a Python list that will contain references to the actual data instances). The loop is quite similar to that used for printcomplaints.py , except that:
-
The name of the file in which an instance is stored is attached as an attribute to that instance (we'll see why shortly)
-
The instance is added to the items instance attribute
-
The string representation of the item (note the use of the backtick ` ) is added to the listbox
-
Finally, the first item in the listbox is selected:
def load_data(self): self.listbox.delete(0,END) self.items = [] for filename in os.listdir(self.storagedir): item = pickle.load(open(os.path.join(self.storagedir, filename))) item._filename = filename self.items.append(item) self.listbox.insert('end', `item`) self.listbox.select_set(0) self.select(None) We now get to the select method we mentioned previously. It's called in one of two circumstances. The first, as we just showed, is the last thing to happen when the data is loaded. The second is a consequence of the binding operation in the __ init __ method, which we reprint here:
self.listbox.bind('<ButtonRelease-1>', self.select) This call binds the occurrence of a specific event ( '<ButtonRelease-1>' ) in a specific widget ( self.listbox ) to an action calling self.select . In other words, whenever you let go of the left mouse button on an item in the listbox, the select method of your editor is called. It's called with an argument of type Event , which can let us know such things as when the button click occurred, but since we don't need to know anything about the event except that it occurred, we'll ignore it. What must happen on selection? First, the instance corresponding to the item being selected in the GUI element must be identified, and then the fields corresponding to the values of that instance must be updated. This is performed by iterating over each field name (looking back to the fieldnames class variable again), finding the value of the field in the selected instance, and configuring the appropriate label widget to display the right text: [6]
[6] The replace operation is needed because Tk treats the \r\n sequence that occurs on Windows machines as two carriage returns instead of one.
def select(self, event): selection = self.listbox.curselection() self.selection = self.items[int(selection[0])] for fieldname in self.dataclass.fieldnames: label = getattr(self, fieldname) # GUI field labelstr = getattr(self.selection, fieldname) # instance attribute labelstr = string.replace(labelstr,'\r', '') label.config(text=labelstr)
The reload functionality we need is exactly that of the load_data method, which is why that's what was passed as the command to be called when the reload button is clicked. The deletion of an entry, however, is a tad more difficult. As we mentioned, the first thing to do when loading an instance from disk is to give it an attribute that corresponds to the filename whence it came. We use this information to delete the file before asking for a reload; the listbox is automatically updated:
def delentry(self): os.remove(os.path.join(self.storagedir,self.selection._filename)) self.load_data()
This program is probably the hardest to understand of any in this book, simply because it uses the complex and powerful Tkinter library extensively. There is documentation for Tkinter, as well as for Tk itself (see Tkinter Documentation).
Tkinter DocumentationThe documentation for Tkinter is as elusive as it is needed; it's getting better all the time, however. Tkinter was originally written by someone (Steen Lumholdt) who needed a GUI for his work with Python. He didn't write much documentation, alas. Tkinter has since been upgraded many times over, mostly by Guido van Rossum. The documentation for Tkinter is still incomplete; however, there are a few pieces of documentation currently available, and by the time you read this, much more may be available.
|
EAN: 2147483647
Pages: 156
- Chapter III Two Models of Online Patronage: Why Do Consumers Shop on the Internet?
- Chapter VI Web Site Quality and Usability in E-Commerce
- Chapter X Converting Browsers to Buyers: Key Considerations in Designing Business-to-Consumer Web Sites
- Chapter XVI Turning Web Surfers into Loyal Customers: Cognitive Lock-In Through Interface Design and Web Site Usability
- Chapter XVIII Web Systems Design, Litigation, and Online Consumer Behavior