Preparing the Project
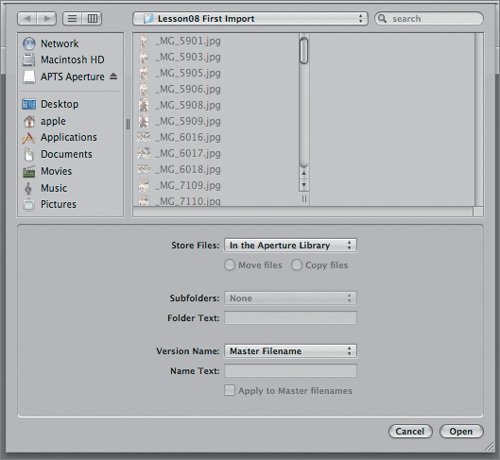
| Before we can begin working with our circus images, we need to import them. Aperture provides many options for importing images. You can import them directly from your camera or media card, from files that are already on your hard disk, or from Aperture project files. But Aperture not only lets you choose where you want to import images from, it also gives you options for where the imported images will be stored. As discussed in Lesson 1, you can import images into Aperture's Library, which copies the files, called managed images, into the Library location you've specified in the Preferences dialog. You can also choose to import images as referenced images. Choosing whether to use referenced images is not a global choice. You can make the decision on an image-by-image basis. What Happens When You Import an Image?When you import an image into your Aperture Library, the image is copied from its original location to the Aperture Library package, which is a special kind of folder. By default, the Library package is kept in the Pictures folder inside your Home folder. (In Chapter 11, you'll learn how to move the Aperture Library.) When you import an image as a reference, the original image file is left in its original location. Aperture builds a thumbnail-size image of the file and stores that in its Library, along with a large preview image, which is also stored in the Library. You can import a reference from an image stored on an external hard disk, CD or DVD, or network server. Even if you take the original volume offline, you'll still see the image in your Aperture Library, because Aperture has the preview image that it built, safely tucked away in the Library. Importing an image as a reference is analogous to making an alias of a document in the Finder. The reference is simply a pointer to the original image data. In Chapter 11, we'll explore some of the reasons you might choose to import files as references, rather than into your main Aperture Library. For now, we'll practice importing using both techniques. Importing the First BatchThree days of rehearsal shooting yielded around 1,200 images. These pictures were shot in RAW format using an 8-megapixel Canon EOS 20D. We've pared the shoot down to a selection of 53 images, which we'll import in two batches, one now and one later in this lesson. In Lesson 2, you learned how to turn on auto-stacking when importing bracketed, or burst, images. You could do that with these images, but instead we'll create the stacks manually in Aperture so that we can explore a few other organizational features first. The first batch of images that we'll use in this lesson has been saved in the Lesson08 folder, in a subfolder called Chapter 8 Part 1.
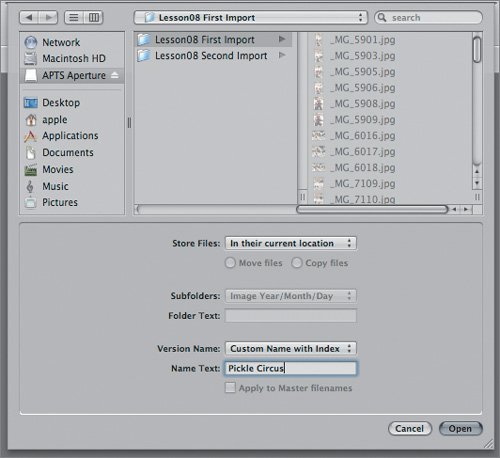
We're going to import these images directly from the DVD as referenced images to demonstrate the power of referenced import. In addition, we're going to use the "Import Folders as Projects" command to preserve the folder structure of the original folder.
Even though Aperture has successfully imported everything and is showing you thumbnails, it's most likely still doing some processing in the background. Let's take a look at what it's up to.
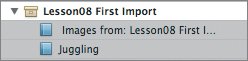
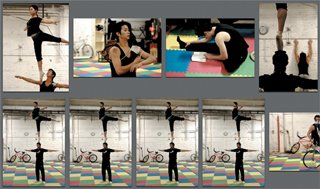
Preview images are full-resolutionthat is, they have the same resolution as your original file. They're stored inside your Aperture Library as a JPEG image. If the original image is available (in this case, it is, because the DVD is still mounted in your computer), then the original image is shown. If the file goes offline, then the preview image is shown. If you're working with a large number of very high-resolution images, it may take a while for Aperture to build all the preview images. Fortunately, Apple has very intelligently given preview building a low priority, so you can continue to work with Aperture without experiencing a big slowdown. We'll discuss preview images more in Chapter 11. Images that have been imported by as references show a small badge, very similar to the alias indicator in the Macintosh Finder. Finally, note that Aperture has automatically created two albums within our project. The first album contains the 46 images that were in our selected folder, while the second album contains the 7 images that were in the subfolder. The "Import Folders as Projects" command automatically turns subfolders into albums. Configuring the BrowserBy now, you're familiar with Aperture's Browser and Viewer, and the application's different layout configurations. As you know, thumbnails of your images are displayed in a grid or list view in the Browser. By default, however, Aperture spaces all thumbnails evenly whether they're in portrait or landscape orientation. This can result in gaps that reduce the total number of thumbnails you can see at once. With a large collectionsuch as our 53 Pickle Family Circus shotsit helps to turn on proportional spacing for the Browser display. This is an option in Aperture's Preferences.
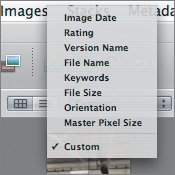
Arranging Images in the BrowserIn addition to using stacks and ratings to organize images in Aperture, there are a few convenient ways to organize images directly in the Browser: You can use the Sort pop-up menu, and you can freely drag to reposition images in any order. The Sort pop-up menu, by default, organizes images in the Browser by Image Date, but you can change that.
|


EAN: 2147483647
Pages: 190