| Light has inherent color qualities. These qualities are measured using a temperature scale. When you change the white-balance setting in your camera, you're simply letting your camera know a little more about the color of the light under which you are shooting. The information is used by your camera to calibrate its color calculations so that they will be more accurate. When you open a RAW file in Aperture, the first thing the application does is calculate the color of every pixel in your image. It uses the temperature and tint settings that you (or your camera) specified as image metadata to calibrate its settings for the color of the light you were shooting under. When you change these settings, you're doing nothing more than changing the calibration reference that Aperture uses for its calculations. In Chapter 7, you adjusted tone and contrast using the Exposure and Levels adjustments, and you neutralized color casts using the tint controls. Now you're going to work with the White Balance adjustment, one of the most powerful color correction tools in Aperture. The White Balance adjustment appears in the lower portion of your Adjustments Inspector by default. 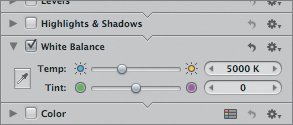 The idea behind white balance correction is that because white light contains all the other colors, if you properly represent white in your image, you'll get every other color correct. The White Balance adjustment in Aperture has two slider controls, Temp and Tint. The Temp slider adjusts color in your image from blue to yellow (left to right). The Tint slider adjusts your image from green to magenta (left to right). Most of your white balance correction is done with the Temp slider; you typically use the Tint slider sparingly to correct any green or magenta casts that the Temp slider has introduced. We'll start by correcting a JPEG image that was shot with an incorrect white balance setting on the camera. Since you weren't at the scene, we've provided a RAW file with the correct white balance to use as a color reference. 1. | With the Lesson 09 Images item selected in the Projects panel, press Command-Option-S to switch to Basic layout. Then, press Control-A to open the Adjustments Inspector.
| 2. | In the Browser, select the image dafnis for bad wb jpeg. If you can't read the image title, adjust the thumbnail size until you can. As you can see, this image has a white-balance problem. We'll try to correct it using the White Balance controls.
| 3. | Still in the Browser, Command-click the image dafnis for bad wb raw. This is a copy of the same image, but one that was shot with the correct white balance. We'll use it as a reference for our correction efforts.
 | 4. | In the Viewer, click the image dafnis for bad wb jpeg to make it the primary selection.
The image is plainly too blue, so we'll use the Temp slider to skew the image's color toward yellow.
| 5. | In the White Balance controls in the Adjustments Inspector, drag the Temp slider to the right to about 9185. This helps the image a lot, but it's getting a little too green.
| | | 6. | Move the Tint slider to the right until the Tint value field says 10. This removes some of the pink from the image, but the color is still not quite the same as in our correct image.
 | 7. | Play with the sliders some more and see how close you can get the image to the correct white balance. You'll find that it's difficult to get it there. What's more, as you get more accurate skin tones, you'll be adding a color cast to the white of the clouds and altering the blue hue of the sky.
| 8. | Now select the RAW file, and experiment with the Temp and Tint sliders to get a feel for how the white balance adjustment works on a RAW file. You will find that you can get more accurate color throughout the entire color range of the image.
In a non-RAW file, the color of every pixel is already set. The white-balance calculation was made by your camera when you took the shot, and can no longer be altered. In Aperture, therefore, when you adjust the Temp or Tint sliders while editing a non-RAW file, the application has to work with existing color information and adjust existing pixel colors.
Simply put: the White Balance controls are not nearly as effective on a non-RAW file as they are on a RAW file.
Let's take another look at how white-balance adjustments differ between RAW and non-RAW images.
| 9. | In the Browser, click to select the boat jpeg image, and then Command-click to also select the boat raw image.
Two versions of the same image appear. The image on the left is a JPEG copy of the RAW file that's shown on the right.
| 10. | In the Viewer, click the left-hand image (the JPEG file) to make it the primary selection.
| | | 11. | In the White Balance controls, drag the Temp slider all the way to the left, until the temperature value reads 2500 K.
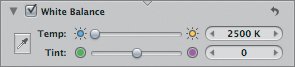 | 12. | Now click to make the right-hand image (the RAW file) the primary selection and set its temperature value to 2500 K.
 While both images now have a strong blue cast, you should see that the colors are still quite different. In the JPEG image, the blue cast doesn't go through all of the different color ranges as thoroughly as it does in the RAW file. In the JPEG image, the red on the bottom of the boat is much redder than in the RAW file. The same is true of the greens in the background.
|
What you've seen from these exercises is that the white-balance adjustment packs a lot more power when you're working with RAW files. If you're shooting RAW, then, you should be sure to make all of your white-balance adjustments in RAW format before you save to any other formats. When working with JPEGs, you may need to rely more on the Tint wheels than on the White Balance controls for your color corrections. |