| So far, we've concentrated on the administrative side of the survey: initial setup of survey and questions and their subsequent managing and editing. It's time to turn our attention to what the user sees and we'll start with the survey. Because the individual elements of the survey that is, the questions and possible answers are stored in a data source, the job of the survey page is twofold. First, the application must reconstruct the survey in a single page and handle each of the different question types as it does so. Second, the application must record all the answers chosen by the survey taker as responses to the survey. The second requirement storing the responses is fairly straightforward and can be handled by the standard Insert Record server behavior. The first requirement presenting the survey is more complex and requires a slightly different coding approach for each question type. For those of you following the recipe, all the needed code snippets are provided. Step 1: Implement Survey Design The basic layout for the survey page is simple: a survey title; an area for the questions to appear; and two form buttons, one for submitting and one for resetting the survey. Most of the logic for the page controlling the survey questions and possible answers is placed in the center Content area of the page later in this recipe. These questions are placed in a Repeat Region server behavior, so your layout should accommodate a flexible area. Create a page for the Survey Manager recipe, either from a template or from the File > New dialog.  In the SurveyBuilder folder, locate the folder for your server model and open the survey page there. In the SurveyBuilder folder, locate the folder for your server model and open the survey page there.
In the Content area of your page, create a header for the page a placeholder to display the dynamic elements and buttons. From the Snippets panel, drag the Recipes > SurveyBuilder > Wireframes > Survey Wireframe snippet into the Content editable region. In the structured data area, add a label for the survey title and a section for the questions and responses; a hidden form element is also needed. Below the labels, insert two form buttons: Submit and Reset.  Place your cursor in the row below the word SURVEY and insert the Recipes > SurveyBuilder > Forms > ASP Survey Form snippet. Place your cursor in the row below the word SURVEY and insert the Recipes > SurveyBuilder > Forms > ASP Survey Form snippet.
 Place your cursor in the row below the word SURVEY and insert the Recipes > SurveyBuilder > Forms > ASP Survey Form snippet. Place your cursor in the row below the word SURVEY and insert the Recipes > SurveyBuilder > Forms > ASP Survey Form snippet.
 Place your cursor in the row below the word SURVEY and insert the Recipes > SurveyBuilder > Forms > CFML Survey Form snippet [r5-19]. Place your cursor in the row below the word SURVEY and insert the Recipes > SurveyBuilder > Forms > CFML Survey Form snippet [r5-19].
Figure r5-19. 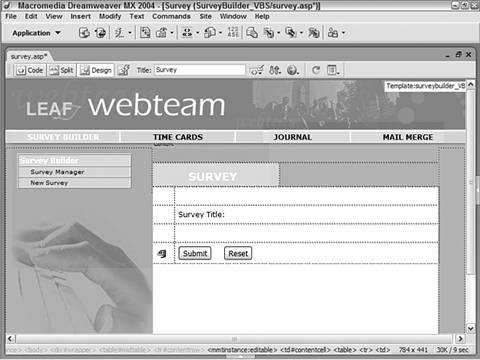
 Place your cursor in the row below the word SURVEY and insert the Recipes > SurveyBuilder > Forms > PHP Survey Form snippet. Place your cursor in the row below the word SURVEY and insert the Recipes > SurveyBuilder > Forms > PHP Survey Form snippet.
Save the page.
Step 2: Add Database Components The goal of the recordset for the Survey page is to return all the questions and related responses that are associated with a particular survey. A relatively complex SQL statement, which draws from three data tables, is used to define the recordset. The SQL statement is filtered on the URL parameter, ID, which points to a particular survey. [View full width] SELECT * FROM (SurveyQuestions INNER JOIN QuestionTypes ON SurveyQuestions.QuestionType =  QuestionTypes.TypeID) INNER JOIN Surveys ON SurveyQuestions.QuestionSurvey = Surveys.SurveyID WHERE SurveyID = IDParam QuestionTypes.TypeID) INNER JOIN Surveys ON SurveyQuestions.QuestionSurvey = Surveys.SurveyID WHERE SurveyID = IDParam
The PHP version is quite similar: [View full width] SELECT * FROM (surveyquestions INNER JOIN QuestionTypes ON surveyquestions.QuestionType = QuestionTypes.TypeID) INNER JOIN surveys ON surveyquestions.QuestionSurvey = surveys.SurveyID WHERE SurveyID = IDParam
It's important to realize that the recordset returns all the questions, regardless of their type. Each question and response is later formatted by a series of conditional statements. For ASP and PHP | | To prepare for the following series of steps, use the Copy Snippet command to copy either the Recipes > SurveyBuilder > SQL > SurveyQuestions RS - ASP SQL Statement snippet or the Recipes > SurveyBuilder > SQL > SurveyQuestions RS - PHP SQL Statement snippet, according to your server model. |
From the Bindings panel, choose Add (+) and select Recordset (Query) from the list. In the Advanced Recordset dialog, enter a name for the recordset. Enter SurveyQuestions in the Name field. Choose the data source. Select Recipes from the Connections list. In the SQL area, enter the following code: Paste the copied SQL statement into the SQL text area by pressing Ctrl-V (Command-V). In the Variable area, choose Add (+) to create a new variable. PHP developers should enter their values in the Add Parameter dialog that opens. Add an appropriate name for your variable. Enter IDParam in the Name column. Enter a default value. Enter 0 in the Default Value column. Insert a run-time value. Enter the following into the Run-Time Value column:
| Request("ID") |
| $_GET["ID"] |
PHP developers can click OK to close the Add Parameters dialog at this time. Click OK to close the dialog and insert the recordset.
For ColdFusion | | To prepare for the following steps, use the Copy Snippet command to copy the Recipes > SurveyBuilder > SQL > SurveyQuestions RS - CFML SQL Statement snippet to the Clipboard. |
From the Bindings panel, choose Add (+) and select Recordset (Query). Switch to the advanced view of the dialog and enter an appropriate name for the recordset. Enter SurveyQuestions in the Name field. Choose your data source. Select Recipes from the Data Source list. Enter a username and password if necessary. In the SQL area, enter the following code: Paste the copied SQL statement into the SQL text area by pressing Ctrl-V (Command-V). [View full width] SELECT * FROM (SurveyQuestions INNER JOIN QuestionTypes ON SurveyQuestions.QuestionType = QuestionTypes.TypeID) INNER JOIN Surveys ON SurveyQuestions.QuestionSurvey = Surveys.SurveyID WHERE SurveyID = #URL.ID#
Verify your entries in the Recordset dialog and click OK to close that dialog.
Step 3: Data Binding Process For this page, we only need to bind two data elements: one dynamic text field for the title and another for the hidden form element. After the data fields are bound, a Repeat Region server behavior is applied to handle the survey's questions and responses. From the Bindings panel, expand the SurveyQuestions recordset. Place the needed data fields on the page. Drag SurveyName to the right of the Survey Title label. Select the hidden form element. In the Property inspector, enter code to bind the passed ID parameter to the page as the form element's value. In the Value field, enter <%=Request("ID")%>. In the Value field, enter <%=Request("ID")%>. In the Value field, enter <cfoutput>#URL.ID#</cfoutput>. In the Value field, enter <?php echo $_REQUEST["ID"]; ?>. To apply the Repeat Region server behavior, select the table row that will hold the questions and responses. Although the row is currently empty, it will be filled shortly with custom code. Place your cursor in the row below the Survey Title label and select the <tr> tag from the Tag Selector. From the Server Behaviors panel, choose Add (+) and select Repeat Region from the list. Make sure that the SurveyQuestions recordset is selected in the Recordset list [r5-20].
Figure r5-20. 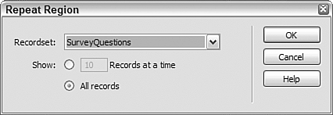
Choose the Show All Records option and click OK to close the dialog.
Step 4: Add Conditional Code for Questions and Responses This step is at the heart of the recipe. Here, we'll insert code to examine the type of question stored and parse the potential responses accordingly. For example, a question stored as one in which only one response can be selected is presented as an option button group. The code needed is a combination of HTML (to create the table rows and form elements) and server-side code (to provide the values). The Add Question page allows six different types of questions: text, essay (text area), radio button, checkbox, drop-down list (single select), and drop-down list (multiple select). Therefore, six different code formats are required; however, they all follow the same basic structure. Let's look at a pseudo-code example for one type: the radio group: Check to see if question type is #3, a radio group. If so, create a table. Create the first table row. In the table cell, write the question. Create the second row. In the table cell, write the question description. Begin a loop for each of the possible responses, converting each response to an array item. Create a table row for each response. In each table cell, create a radio form element, automatically marking the first item as selected. End loop of responses End table End of radio group code The particulars of the code, of course, depend on the server model. All the code is placed in the same area within the Repeat Region. Although including all the code for all types of questions will expand the design area significantly, because all the code is conditional, only the code pertinent to the question is executed. Place your cursor in the right cell to which the Repeat Region server behavior has been applied. In Code view, insert the following code snippets, one after another: From the Snippets panel, open the Recipes > SurveyBuilder > Custom Code folder for your server model and insert the Survey Question Type - Text snippet. From the Snippets panel, open the Recipes > SurveyBuilder > Custom Code folder for your server model and insert the Survey Question Type - Textarea snippet. From the Snippets panel, open the Recipes > SurveyBuilder > Custom Code folder for your server model and insert the Survey Question Type - Radio snippet. From the Snippets panel, open the Recipes > SurveyBuilder > Custom Code folder for your server model and insert the Survey Question Type Multi-Select snippet. From the Snippets panel, open the Recipes > SurveyBuilder > Custom Code folder for your server model and insert the Survey Question Type Drop-Down List snippet. From the Snippets panel, open the Recipes > SurveyBuilder > Custom Code folder for your server model and insert the Survey Question Type - Checkbox snippet [r5-21].
Figure r5-21. 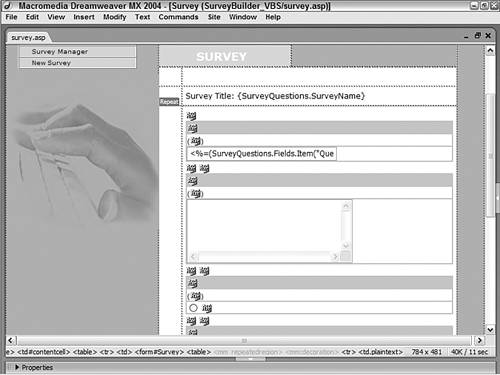
Return to Design view.
Step 5: Check and Redirect If Survey Offline We need to make sure that the user cannot take the survey if it is currently offline. At the same time, we want to ensure that a user can access an offline survey in Preview mode. To achieve both of these goals, two different conditional statements are needed. The first conditional statement merely checks the SurveyQuestions recordset; if the recordset is empty, the user is redirected to the Survey Offline page. The second statement, which ensures that the survey can be previewed, verifies that StatusLive is true and that the preview option has been selected if it hasn't, the user is redirected to the offline page. Because of the values checked in the if-then statements, the code needs to be placed after the SurveyQuestions recordset. From the Server Behaviors panel, select the SurveyQuestions recordset. Switch to Code view and locate the selected code. Position your cursor below the SurveyQuestions recordset and insert the following code: From the Snippets panel, open the Recipes > SurveyBuilder > Custom Code folder for your server model and insert the Survey Offline - Redirect snippet.
| [View full width] <% if (SurveyQuestions.EOF) then Response.Redirect("survey_offline.asp") end if if (not SurveyQuestions.Fields("SurveyLive").value AND cStr (Request("Preview")) = "") then Response.Redirect("survey_offline.asp") end if %> |
| [View full width] <% if (SurveyQuestions.EOF) { Response.Redirect("survey_offline.asp"); } if (!SurveyQuestions.Fields("SurveyLive").value && String (Request("Preview")) == "undefined") { Response.Redirect("survey_offline.asp"); } %> |
| [View full width] <cfif SurveyQuestions.RecordCount LE 0> <cflocation url="survey_offline.cfm"> </cfif> <cfif (NOT SurveyQuestions.SurveyLive AND NOT isDefined (URL .Preview))> <cflocation url="survey_offline.cfm"> </cfif> |
| [View full width] <?php if ($totalRows_SurveyQuestions <= 0) { header("Location: survey_offline.php"); } if ((!$row_SurveyQuestions['SurveyLive']) && ($_GET['Preview']=="")) { header("Location: survey_offline.php"); } ?> |
Save the page.
Step 6: Add Custom Insert Record Code The final step for this page is an essential one. So far, we've created the page dynamically and redirected the user when needed; now it's time to store all the responses selected by the user in the appropriate data source. Because the page incorporates multiple questions in different formats, a special SQL command is needed to move through all the questions and insert them according to their question type. When the submission is complete, the Survey Completed page is displayed. The code inserted can be broken down into three key functional parts: A custom insert record command/query, called ResultsCommand, is created. All the survey questions are examined and their responses placed in the appropriate variables. The insert record command is executed and the user is redirected to the Survey_Completed page.
Again, code placement is key. The custom code should be placed after the SurveyQuestions recordset is defined and the offline redirects have been executed. In Code view, place the cursor after the conditional statements inserted in the previous step. Insert the following code: From the Snippets panel, open the Recipes > SurveyBuilder > Custom Code folder for your server model and insert the Survey - Custom Insert snippet.
| [View full width] <% if (cStr(Request("SurveyComplete"))<>"") then dim theSession, theQuestionID, theAnswer, theDescription, RSFields, RSValues set ResultsCommand = Server.CreateObject("ADODB.Command") ResultsCommand.ActiveConnection = MM_Recipes_VB_STRING ResultsCommand.CommandType = 1 ResultsCommand.CommandTimeout = 0 ResultsCommand.Prepared = true while (NOT SurveyQuestions.EOF) theSession = Session.SessionID theQuestionID = SurveyQuestions.Fields("QuestionID").value theAnswer = cStr(Request("input" & SurveyQuestions .Fields("QuestionID").value)) theDescription = "" RSFields = "ResultSession,ResultQuestion,ResultAnswer" RSValues = "" if (SurveyQuestions.Fields("TypeID").value = 2) then 'TextArea theAnswer = "answered" if (cStr(Request("input"&SurveyQuestions.Fields ("QuestionID") .value)="")) then theAnswer = "blank" end if theDescription = Request("input"&SurveyQuestions .Fields ("QuestionID").value) RSFields = "ResultDescription,"&RSFields RSValues = "'" & replace(theDescription,"'","''") & "'," else if (SurveyQuestions.Fields("TypeID").value = 6) then 'Checkbox theAnswer = "yes" if (cStr(Request("input"&SurveyQuestions.Fields ("QuestionID") .value))="") then tbeAnswer = "no" end if end if end if RSValues = RSValues & "'" & Session.SessionID & "'," & theQuestionID & ",'" & Replace(theAnswer,"'","''") & "'" ResultsCommand.CommandText = "INSERT INTO SurveyResults (" & RSFields & " ) VALUES (" & RSValues & " ) " ResultsCommand.Execute() SurveyQuestions.MoveNext() wend Response.Redirect("survey_completed.asp?ID")) end if %> |
| [View full width] <% if (String(Request("SurveyComplete"))!="undefined") { var ResultsCommand = Server.CreateObject("ADODB.Command"); ResultsCommand.ActiveConnection = MM_Recipes_STRING; ResultsCommand.CommandType = 1; ResultsCommand.CommandTimeout = 0; ResultsCommand.Prepared = true; while (!SurveyQuestions.EOF) { var theSession = Session.SessionID; var theQuestionID = SurveyQuestions.Fields ("QuestionID").value; var theAnswer = String(Request("input"+SurveyQuestions .Fields ("QuestionID").value)); var theDescription = ""; var RSFields = "ResultSession,ResultQuestion,ResultAnswer"; var RSValues = ""; if (SurveyQuestions.Fields("TypeID").value == 2) { //TextArea theAnswer = ((String(Request("input"+SurveyQuestions .Fields ("QuestionID").value))!="")?"answered":"blank") theDescription = String(Request ("input"+SurveyQuestions.Fields ("QuestionID").value)); RSFields = "ResultDescription,"+RSFields; RSValues = "'"+theDescription.replace(/'/g,"''")+"',"; } else if (SurveyQuestions.Fields("TypeID").value == 6) { theAnswer = ((String(Request("input"+SurveyQuestions .Fields ("QuestionID").value))!="undefined")?"yes":"no"); } RSValues += "'" +Session.SessionID+ "',"+theQuestionID+" , '"+theAnswer.replace(/'/g,"''")+"'"; ResultsCommand.CommandText = "INSERT INTO SurveyResults ("+ RSFields + " ) VALUES ("+ RSValues + " ) "; ResultsCommand.Execute(); SurveyQuestions.MoveNext(); } Response.Redirect("survey_completed.asp?ID")); } %> |
| [View full width] <cfif isDefined("Form.SurveyComplete")> <cfloop query="SurveyQuestions"> <cfset theSession = Session.SessionID> <cfset theQuestionID = SurveyQuestions.QuestionID> <cfparam name="theAnswer" default=""> <cfif isDefined("Form.input" & SurveyQuestions.QuestionID)> <cfset theAnswer = Evaluate("Form.input" & SurveyQuestions.QuestionID)> </cfif> <cfset theDescription = ""> <cfset RSFields = "ResultSession,ResultQuestion ,ResultAnswer"> <cfset RSValues = ""> <cfif (SurveyQuestions.TypeID EQ 2)> <cfset theAnswer = "answered"> <cfif isDefined("input" & SurveyQuestions.QuestionID)> <cfset theAnswer = "blank"> </cfif> <cfset theDescription = theAnswer> <cfset RSFields = "ResultDescription,#RSFields#"> <cfelse> <cfif (SurveyQuestions.TypeID EQ 6)> <cfset theAnswer = "yes"> <cfif isDefined("input" & SurveyQuestions.QuestionID)> <cfset tbeAnswer = "no"> </cfif> </cfif> </cfif> <cfquery datasource="Recipes" name="InsertResults"> INSERT INTO SurveyResults (#RSFields#) VALUES (<cfif (SurveyQuestions.TypeID EQ 2)>'#theDescription#',</cfif> '#Session.SessionID#',#theQuestionID# ,'#theAnswer#') </cfquery> </cfloop> <cflocation url="survey_completed.cfm?ID=#Form.ID#"> </cfif> |
| [View full width] <?php session_start(); if ($_POST['SurveyComplete']!="") { do { $theSession = session_id(); $theQuestionID = $row_SurveyQuestions['QuestionID']; $theAnswer = $_POST['input'.$theQuestionID]; $theDescription = ""; $RSFields = "ResultSession,ResultQuestion,ResultAnswer"; $RSValues = ""; if ($row_SurveyQuestions['TypeID']==2) { // Text Field $theAnswer = ($_POST['input'.$theQuestionID]!="") ?"answered":"blank"; $theDescription = $_POST['input'.$theQuestionID]; $RSFields = "ResultDescription," . $RSFields; $RSValues = "'".addslashes($theDescription)."'"; } else if ($row_SurveyQuestions['TypeID']==6) { $theAnswer = ($_POST['input' .$theQuestionID]!="")?"yes":"no"; } $RSValues.= "'" . $theSession . "',".$theQuestionID.",'" .addslashes($theAnswer)."'"; $insSQL = "INSERT INTO surveyresults (".$RSFields.") VALUES (".$RSValues.")"; $insRes = mysql_query($insSQL,$Recipes_PHP); } while ($row_SurveyQuestions = mysql_fetch_assoc ($SurveyQuestions)); $url = "survey_completed.php?Location: $url"); } ?> |
Save the page.
|