Choosing from a List
Awhole category of Swing components is designed to let the user choose one or more items from a list. This chapter presents four such controls. The first three-JList, JComboBox, and JSpinner-are straightforward. The fourth-JTree-is a bit more complicated, but worth the effort.
| Warning |
If you put a JTree control on a frame, your friends will surely think you're some kind of guru. They'll start pestering you with questions and asking for your help. As a result, use this component only if your application really needs it-and if you feel up to the technical challenge of figuring out how it works. |
Using Combo Boxes
A combo box is a combination of a text field and a drop-down list from which the user can choose a value. If the text field portion of the control is editable, the user can enter a value into the field or edit a value retrieved from the drop-down list. However, making the text field uneditable is common. Then, the user must pick one of the values from the list. Figure 4-1 shows a frame with a simple combo box.
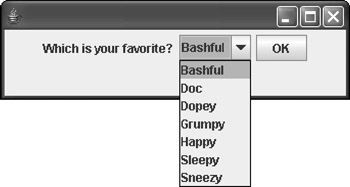
Figure 4-1: A frame with a combo box.
You use the JComboBox class to create combo boxes. Table 4-1 lists the most frequently used constructors and methods of this class.
Table 4-1: Common JComboBox Constructors and Methods
 Open table as spreadsheet
|
Constructor |
Description |
|---|---|
|
JComboBox() |
Creates an empty combo box. |
|
JComboBox(Object[] items) |
Creates a combo box and fills it with the values in the array. |
|
JComboBox(Vector[] items) |
Creates a combo box and fills it with the values in the vector. |
Open table as spreadsheet
|
Method |
Description |
|---|---|
|
void addActionListener (ActionListener listener) |
Adds an action listener to the combo box. |
|
void addItem(Object item) |
Adds the item to the combo box. |
|
void addItemListener (ItemListener listener) |
Adds an item listener to the combo box. |
|
Object getItemAt (int index) |
Returns the item at the specified index. |
|
int getItemCount() |
Returns the number of items in the combo box. |
|
int getSelectedIndex() |
Returns the index of the selected item. |
|
Object getSelectedItem() |
Returns the selected item. |
|
void insertItemAt(Object item, int index) |
Inserts an item at a specified index. |
|
Boolean isEditable() |
Indicates whether the combo box's text field is editable. |
|
void removeAllItems() |
Removes all items from the combo box. |
|
void removeItem (Object item) |
Removes the specified item. |
|
void removeItemAt (int index) |
Removes the item at the specified index. |
|
void setEditable (boolean value) |
Specifies whether or not the combo box's text field is editable. |
|
void setMaximumRowCount (int count) |
Sets the number of rows displayed when the combo box list drops down. |
|
void setSelectedIndex (int index) |
Selects the item at the specified index. Throws IllegalArgumentException if the index is less than zero or greater than the number of items in the combo box. |
|
void setSelectedItem (Object item) |
Selects the specified item. Throws IllegalArgumentException if the item is not in the combo box. |
Creating combo boxes
Creating a combo box is easy. You have three constructors to choose from. The first creates an empty combo box:
JComboBox combo1 = new JComboBox();
Then you can use the addItem to add items to the combo box:
combo1.addItem("Bashful");
combo1.addItem("Doc");
combo1.addItem("Dopey");
combo1.addItem("Grumpy");
combo1.addItem("Happy");
combo1.addItem("Sleepy");
combo1.addItem("Sneezy");
Alternatively, you can create a combo box and initialize its contents from an array, as in this example:
String[] theSeven = {"Bashful", "Doc", "Dopey",
 "Grumpy", "Happy", "Sleepy",
 "Sneezy"};
JComboBox combo1 = new JComboBox(theSeven);
Or, if you have an existing Vector object with the data you want to display:
JComboBox combo1 = new JComboBox(vector1);
If the data you want to display is in an array list or other type of collection, use the toArray method to convert the collection to an array, and then pass the array to the JComboBox constructor:
JComboBox combo1 = new JComboBox(arraylist1.toArray());
| Tip |
You can add any kind of object you want to a combo box. The combo box calls the toString method of each item to determine the text to display in the drop-down list. For example, suppose you have an array of Employee objects. If you create a combo box from this array, the string returned by each employee's toString method is displayed in the combo box. |
By default, the user is not allowed to edit the data in the text field portion of the combo box. If you want to allow the user to edit the text field, call setEditable(true). Then, the user can type a value that's not in the combo box.
To remove items from the combo box, use one of the remove methods. If you know the index position of the item you want to remove, call the removeItemAt method and pass the index number as a parameter. Otherwise, if you have the object you want to remove, call removeItem and pass the object.
| Tip |
To remove all the items in a combo box, call removeAllItems. For example, suppose you have a combo box named custCombo that's filled with Customer objects read from a file, and you need to periodically refresh this combo box to make sure it has all the current customers. Here's a method that does that:
private void fillCustomerCombo()
{
 ArrayList customers = getCustomers();
 custCombo.removeAllItems();
 for (Customer c : customers)
 custCombo.addItem(c);
}
|
In this example, a method named getCustomers is called to get an ArrayList of customer objects from the file. Then all the items currently in the combo box are deleted, and an enhanced for loop is used to add the customers to the combo box.
Getting items from a combo box
To get the item selected by the user, you use the getSelectedItem method. Unfortunately, this method returns an Object type, so you must cast the returned value to the appropriate type before you can use it. For example, here's the actionPerformed method from the event listener for the program that created the combo-box frame shown in Figure 4-1:
public void actionPerformed(ActionEvent e)
{
 if (e.getSource() == buttonOK)
 {
 String s = (String)combo1.getSelectedItem();
 JOptionPane.showMessageDialog(combo1,
 "You picked " + s,
 "Your Favorite",
 JOptionPane.INFORMATION_MESSAGE);
 }
}
Here the getSelectedItem method retrieves the selected item, casts it to a String, and saves it in a String variable named s. Then a JOptionPane message box is shown to display the user's selection.
If you prefer, you can get the index of the selected item by calling the getSelectedIndex method. You might use this method if the combo box contains string values that correspond to objects stored in an array or a collection. Then you can use the retrieved index value to get the actual object from the collection.
Handling combo box events
When the user selects an item from a combo box, an action event is generated. In most applications, you simply ignore this event. That's because you don't usually need to do anything immediately when the user selects an item. Instead, the selected item is processed when the user clicks a button.
If you want to provide immediate feedback when the user selects an item, you can handle the action event in the usual way: Create an ActionListener that handles the event in an actionPerformed method, and then call the addActionListener method of the combo box to add the action listener. The following action listener class displays a message box that says My favorite too! if the user picks Dopey:
private class ComboListener implements ActionListener
{
 public void actionPerformed(ActionEvent e)
 {
 if (e.getSource() == combo1)
 {
 String s =
 (String)combo1.getSelectedItem();
 if (s.equals("Dopey"))
 JOptionPane.showMessageDialog(combo1,
 "He's my favorite too!",
 "Good Choice",
 JOptionPane.INFORMATION_MESSAGE);
 }
 }
}
| TECHNICAL STAUFF |
Combo boxes also generate item events when the user selects an item. In fact, the combo box generates two item events when the user selects an item, which can be a little confusing. The first event is generated when the previously selected item is deselected. Then, when the new item is selected, another item event is generated. In most cases, you handle combo-box action events rather than item events. |
Using Lists
A list is a powerful Swing component that displays lists of objects within a box. Depending on how the list is configured, the user can be allowed to select one item from the list or multiple list items. In addition, you have amazing control over how the items in the list are displayed, although this isn't always an advantage. Lists are almost always used in conjunction with scroll panes (covered in the previous chapter) to allow the user to scroll the contents of the list. Figure 4-2 shows a sample frame with a list component.
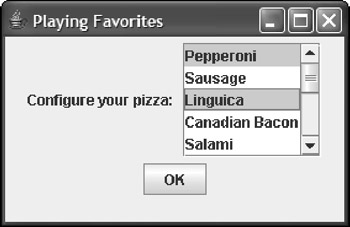
Figure 4-2: A frame with a list.
Lists and combo boxes have several important differences:
- A list doesn't have a text field the user can use to edit the selected item. Instead, the user must select items directly from the list.
- The list doesn't drop down. Instead, the list items are displayed in a box whose size you can specify.
- The list doesn't provide a scroll bar, so you almost always add the list component to a scroll pane so the user can scroll through the list.
- Lists allow you to select more than one item. By default, a list component lets you select any combination of items in the list. However, you can configure the list to allow the selection of a single range of adjacent values or just a single value.
Tip To select multiple items in a list, hold down the Ctrl key and click the items you want to select. To select a range of items, click the first item, and then hold down the Shift key and click the last item.
- You can't directly change the values in a list after you create the list. If you want to create a list whose values you can change, you must take a few extra steps (as I describe in the section "Changing list items" later in this chapter).
You use the JList class to create combo boxes. Table 4-2 lists the most frequently used constructors and methods of this class.
Table 4-2: Routine JList Constructors and Methods
Open table as spreadsheet
|
Constructor |
Description |
|---|---|
|
JList() |
Creates an empty list. |
|
JList(ListModel list) |
Creates a list that uses the specified list model. |
|
JList(Object[] items) |
Creates a list and fills it with the values in the array. |
|
JList(Vector[] items) |
Creates a list and fills it with the values in the vector. |
|
void clearSelection() |
Clears all selections. |
Open table as spreadsheet
|
Method |
Description |
|---|---|
|
int getSelectedIndex() |
Returns the index of the first selected item, or −1 if no items are selected. |
|
int[] getSelectedIndexes() |
Returns an array with the index of each selected item. The array is empty if no items are selected. |
|
Object getSelectedValue() |
Returns the first selected item, or null if no items are selected. |
|
Object[] getSelected Values() |
Returns an array with all the selected items. The array is empty if no items are selected. |
|
boolean isSelectedIndex (int index) |
Returns true if the item at the specified index is selected. |
|
boolean isSelectionEmpty() |
Returns true if no items are selected. |
|
void setFixedCellHeight (int height) |
Sets the height of each row. |
|
void setFixedCellWidth (int width) |
Sets the width of each row. |
|
void setSelectedIndex |
Selects the item at the specified index. (int index) |
|
void setSelectedIndices (int[] indices) |
Selects the items at the indices specified in the array. |
|
void setSelectionMode (int mode) |
Sets the selection mode. Allowable values are ListSelectionModel.SINGLE_SELECTION, ListSelectionModel. SINGLE_INTERVAL_SELECTION, and ListSelectionModel.MULTIPLE_ INTERVAL_SELECTION. |
|
void setVisibleRowCount (int count) |
Sets the number of rows displayed by the list. |
Creating a list
To create a list and specify its items, you pass an array to the JList constructor. Then, you call the setVisibleRowCount method to set the number of rows you want to be visible, add the list to a scroll pane, and add the scroll pane to a panel that you can later add to the frame. Here's an example:
String[] toppings = {"Pepperoni", "Sausage",
 "Linguica", "Canadian Bacon",
 "Salami", "Tuna", "Olives",
 "Mushrooms", "Tomatoes",
 "Pineapple", "Kiwi",
 "Gummy Worms"};
list1 = new JList(toppings);
list1.setVisibleRowCount(5);
JScrollPane scroll = new JScrollPane(list1);
| Tip |
For more information about the JScrollPane class, including how to specify what scroll bars you want it to display, refer to Book VI, Chapter 3. |
To control the type of selections the user can make, use the setSelectionMode method. You can pass this method one of three fields defined by the ListSelectionModel class:
- ListSelectionModel.SINGLE_SELECTION: The user can select only one item at a time.
- ListSelectionModel.SINGLE_INTERVAL_SELECTION: The user can select multiple items provided that they are all within a single range.
- ListSelectionModel.MULTIPLE_INTERVAL_SELECTION: The user can select any combination of items.
For example, this statement restricts the list to a single selection:
list1.setSelectionMode(ListSelectionModel.SINGLE_SELECTION);
Note that the default is to allow any combination of multiple selections.
Getting items from a list
For a list that allows only a single selection, you can retrieve the selected item by calling the getSelectedValue method. You have to cast the value to the appropriate type before you use it, as in this example:
String topping = (String)list1.getSelectedValue();
If the list allows multiple selections, the getSelectedValue method returns just the first selected item. To get all the selections, you have to use the getSelectedValues method instead. This method returns an array of objects that includes each item selected by the user. When you retrieve these objects, you have to cast each one to the appropriate type-Java doesn't provide any way to cast the entire array.
For example, you can use the following actionPerformed method in an action listener for the list box shown in Figure 4-2:
public void actionPerformed(ActionEvent e)
{
 if (e.getSource() == buttonOK)
 {
 String s = (String)combo1.getSelectedItem();
 JOptionPane.showMessageDialog(combo1,
 "You picked " + s,
 "Your Favorite",
 JOptionPane.INFORMATION_MESSAGE);
 }
}
Here the getSelectedItem method retrieves the selected item, casts it to a String, and saves it in a String variable named s. Then, a JOptionPane message box is shown to display the user's selection.
If you prefer, you can get the index of the selected item by calling the getSelectedIndex method. You might use this method if the combo box contains string values that correspond to objects stored in an array or a collection. Then you can use the retrieved index value to get the actual object from the collection.
public void actionPerformed(ActionEvent e)
{
 if (e.getSource() == buttonOK)
 {
 Object[] toppings = list1.getSelectedValues();
 String msg =
 "You selected the following toppings:
";
 for (Object topping : toppings)
 msg += (String)topping + "
";
 JOptionPane.showMessageDialog(list1,
 msg,
 "Your Pizza",
 JOptionPane.INFORMATION_MESSAGE);
 list1.clearSelection();
 }
}
Here the getSelectedValues method returns an array that contains the toppings selected by the user. Then an enhanced for loop is used to build a string that lists each selected topping on a separate line. Then the JOptionPane class is used to display the msg string in a message box.
Changing list items
By default, the items in a JList component can't be changed after you create the list. If you want to create a list whose items can be changed, you must use another class named DefaultListModel to create an object called a list model that contains the items you want displayed in the JList component. Then, you pass the list model object to the JList constructor. The list model is responsible for managing the list that's displayed by the JList component. As a result, you can use the list model's methods to add or remove items. The JList component then automatically updates itself to reflect the list changes. Table 4-3 shows the most commonly used constructors and methods of the DefaultListModel class.
Table 4-3: Useful DefaultListModel Constructors and Methods
Open table as spreadsheet
|
Constructor |
Description |
|---|---|
|
DefaultListModel() |
Creates a new list model object. |
Open table as spreadsheet
|
Method |
Description |
|---|---|
|
void add(Object element, int index) |
Adds an element at the specified position. |
|
void addElement (Object element)) |
Adds an element to the end of the list. |
|
void clear() |
Removes all elements from the list. |
|
boolean Contains (Object element) |
Returns true if the specified element is in the list. |
|
Object firstElement() |
Returns the first element in the list. |
|
Object get(int index) |
Returns the element at the specified location. |
|
boolean isEmpty() |
Returns true if the list is empty. |
|
Object lastElement() |
Returns the last element in the list. |
|
void remove(int index) |
Removes the element from the specified position in the list. |
|
void removeElement (Object element) |
Removes the specified element from the list. |
|
int size() |
Returns the number of elements in the list. |
|
Object[] toArray() |
Returns an array containing each element in the list. |
When you create the default data model, it's empty. But you can call the add or addElement methods to add elements to the list. For example:
String[] values = {"Pepperoni", "Sausage", "Linguica",
 "Canadian Bacon", "Salami", "Tuna",
 "Olives", "Mushrooms", "Tomatoes",
 "Pineapple", "Kiwi", "Gummy Worms"};

DefaultListModel model = new DefaultListModel();
for (String value : values)
 model.addElement(value);
Here the elements from the values array are added to the list model. Then, when you create the list control, pass the list model to the JList constructor:
list = new JList(model);
You can remove an element from the list model by calling the remove or removeElement method. And to remove all the elements from the model, call the clear method.
Using Spinners
A spinner is a text field that has two little arrows next to it. The user can click one of these arrows to increase or decrease the value in the text field. Usually, the text field contains a number, so clicking one of the little arrows increments or decrements the number. However, you can also create a spinner that displays data taken from an array or a collection. Figure 4-3 shows a frame with three spinners arranged as a simple time picker.
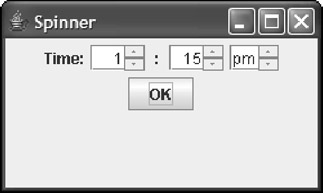
Figure 4-3: A frame with three spinners.
To create a spinner control, you use the JSpinner class, whose constructors and methods are shown in Table 4-4. Note that the second constructor accepts an object of type SpinnerModel as a parameter. This table also shows constructors for two classes that implement the SpinnerModel interface.
Table 4-4: JSpinner and Related Classes
Open table as spreadsheet
|
Constructor |
Description |
|---|---|
|
JSpinner() |
Creates a default spinner. The default spinner lets the user choose an integer that has an initial value of zero and no minimum or maximum values. |
|
JSlider(SpinnerModel model) |
Creates a spinner using the specified SpinnerModel object. |
Open table as spreadsheet
|
Method |
Description |
|---|---|
|
void addChangeListener (ChangeListener listener) |
Adds a ChangeListener to listen for change events. |
|
int getValue() |
Gets the value. |
|
void setToolTipText (String ext) |
Sets the tooltip text that's displayed if the user rests the mouse over the slider for a few moments. |
Open table as spreadsheet
|
Constructors for SpinnerModel Classes |
Description |
|---|---|
|
SpinnerNumberModel (int init, int min, int max, int step) |
Creates a number spinner model that lets the user select integer values from min to max with an increment of step. The initial value is set to init. |
|
SpinnerNumberModel (doublemax, double step) |
Creates a number spinner model that lets the user select double values from min to max with an increment of step. The initial value is set to init. |
|
SpinnerListModel (Object[]values) |
Creates a list spinner model using the values from the specified array. |
|
SpinerListModel (List collection) |
Creates a list spinner model using the values from the specified collection. The collection must implement the List interface. |
You can create a default spinner that lets the user select integer values like this:
JSpinner spinner = new JSpinner();
This spinner starts with a value of zero and increases or decreases the value by one each time the user clicks one of the spinner's arrows. You can retrieve the current value of the spinner at any time like this:
int value = spinner.getValue();
For most spinners, you want to use the second constructor, which requires that you first create an object that implements the SpinnerModel interface. Table 4-4 lists constructors for two classes that implement Spinner. The first, SpinnerNumberModel, creates numeric spinner controls that let you control the initial value, minimum and maximum values, and the step value that's added or subtracted each time the user clicks one of the arrows.
Here's how you can use the SpinnerNumberModel to create the first spinner in Figure 4-3, which accepts integers from 1 to 12, starting with 1:
JSpinner hours = new JSpinner(
 new SpinnerNumberModel(1, 1, 12, 1));
Here's the code for the second spinner in Figure 4-3, which lets the user pick numbers from 0 to 59:
JSpinner minutes = new JSpinner(
 new SpinnerNumberModel(0, 0, 59, 1));
You can also build a spinner control that selects values from a list by using the SpinnerListModel class. The constructor for this class accepts either an array or an object that implements the List interface. The ArrayList class implements this interface, which means you can use SpinnerListModel to create a spinner that selects items from an ArrayList object.
Here's the code for the third spinner in Figure 4-3, which lets the user choose am or pm:
String[] ampmString = {"am", "pm"};
ampm = new JSpinner(
 new SpinnerListModel(ampmString));
In this example, the SpinnerListModel uses an array of strings with two elements: am and pm.
Using Trees
A tree is a fancy Swing component that displays hierarchical data in outline form, which we computer nerds refer to as a tree. Trees are created from the JTree class.
The type of tree you're probably most familiar with is the directory structure of your disk drive. Figure 4-4 shows a Swing frame that has a tree control in it. In this example, I used a tree control to represent a few of my favorite TV shows-along with shows that were spun off from them.

Figure 4-4: A frame with a tree.
| TECHNICAL STAUFF |
Tree controls are probably the most difficult of all Swing controls to work with. To cover them completely, I'd have to devote a full chapter of 30 pages or more. In the few short pages that remain in this chapter, then, I'm just going to present the basics: how to create a tree component such as the one shown in Figure 4-4 and how to find out which element the user has selected. |
Before I get into the mechanics of how to create a tree control, you need to know a few terms that describe the elements in the tree itself:
- Node: Each element in the tree is called a node. Nodes in a tree must be created from a class that implements the TreeNode interface. If you want, you can create your own class that implements TreeNode. For most purposes, however, you can use the DefaultMutableTreeNode class. (Unfortunately, you have to type that class name a lot when you work with tree controls.)
- Root node: The starting node for a tree. Every tree component must have one and only one root node. When you create a tree component, you pass the root node to the JTree constructor.
- Child node: The nodes that appear immediately below a given node are called that node's child nodes. A node can have more than one child.
- Parent node: The node immediately above a given node is called that node's parent. Every node except the root node must have one and only one parent.
- Sibling nodes: Nodes that are children of the same parent.
- Leaf node: A node that doesn't have any children. These nodes represent the end of a branch.
- Path: A node and all of its ancestors-that is, its parent, its parent's parent, and so on-all the way back to the root.
- Expanded node: A node whose children are visible.
- Collapsed node: A node whose children are hidden.
Building a tree
Before you can actually create a tree control, you must build the tree it displays. The easiest way to do that is to use the DefaultMutableTreeNode class, the details of which are shown in Table 4-5.
Table 4-5: The DefaultMutableTreeNode Class
Open table as spreadsheet
|
Constructor |
Description |
|---|---|
|
DefaultMutableTreeNode() |
Creates an empty tree node. |
|
DefaultMutableTreeNode (Object userObject) |
Creates a tree node with the specified user object. |
Open table as spreadsheet
|
Method |
Description |
|---|---|
|
void add(TreeNode child) |
Adds a child node. |
|
TreeNode getFirstChild() |
Gets the first of this node's children. |
|
DefaultMutableTreeNode getNextSibling() |
Gets the next sibling. |
|
TreeNode getParent() |
Gets this node's parent. |
|
Object getUserObject() |
Gets the user object for this node. |
| REMEMBER |
The DefaultMutableTreeNode class implements the TreeNode interface. As a result, you can use DefaultMutableTreeNode objects for any of the methods listed in this table that call for TreeNode objects. |
The DefaultMutableTreeNode class provides three basic characteristics for each node:
- The user object, which contains the data represented by the node. In my example, I use strings for the user objects. However, you can use objects of any type you wish for the user object. The tree control calls the user object's toString method to determine what text to display for each node. The easiest way to set the user object is to pass it via the DefaultMutableTreeNode constructor.
- The parent of this node, unless the node happens to be the root.
- Any children of this node, unless the node happens to be a leaf node. You create child nodes by calling the add method.
| TECHNICAL STAUFF |
The DefaultMutableTreeNode class has many more methods for navigating the tree than the ones shown here. However, given a root node, you can use the getFirstChild and getNextSibling methods to "walk" the entire tree and access each node. |
In this section, I build a tree that lists spinoff shows from three popular television shows of the past:
- The Andy Griffith Show, which had two spinoffs: Gomer Pyle, U.S.M.C. and Mayberry R.F.D.
- All In the Family, which directly spawned four spinoffs: The Jeffersons, Maude, Gloria, and Archie Bunker's Place. In addition, two of these spinoffs had spinoffs of their own, involving the maids: The Jeffersons' maid became the topic of a show called Checking In, and Maude's maid became the main character in Good Times.
- Happy Days, which spun off Mork and Mindy, Laverne and Shirley, and Joanie Loves Chachi.
You can take many different approaches to building trees, most of which involve some recursive programming. (For more information about recursive programming, see Book V, Chapter 4.) I'm going to avoid recursive programming in this section to keep things simple. However, that means you'll have to hard-code some of the details of the tree into the program. Most real programs that work with trees need some type of recursive programming to build the tree.
The first step when creating a tree is to declare a DefaultMutableTreeNode variable for each node that isn't a leaf node:
DefaultMutableTreeModel andy, archie, happy,
 george, maude;
These can be local variables in the frame constructor because after you get the tree set up, you won't need these variables any more. You see why you don't need variables for the leaf nodes in a moment.
Next I create the root node:
DefaultMutableTreeNode root =
 new DefaultMutableTreeNode("Famous Spinoffs");
Now, to simplify the task of creating all the other nodes, I create a helper method called makeShow:
private DefaultMutableTreeNode makeShow(String title,
 DefaultMutableTreeNode parent)
{
 DefaultMutableTreeNode show;
 show = new DefaultMutableTreeNode(title);
 parent.add(show);
 return show;
}
This method accepts a string and another node as parameters and returns a node whose user object is set to the string parameter. The returned node is also added to the parent node as a child. Thus you can call this method to both create a new node and place the node in the tree.
Now I create some nodes. First, the nodes for The Andy Griffith Show and its spinoffs:
andy = makeShow("The Andy Griffith Show", root);
makeShow("Gomer Pyle, U.S.M.C.", andy);
makeShow("Mayberry R.F.D.", andy);
Here makeShow is called to create a node for The Andy Griffith Show, with the root node specified as its parent. The node returned by this method is saved in the andy variable. Then makeShow is called twice to create the spinoff shows, this time specifying andy as the parent node.
Because neither Gomer Pyle nor Mayberry R.F.D. had spinoff shows, I don't have to pass these nodes as the parent parameter to the makeShow method. That's why I don't bother to create a variable to reference these nodes.
Next I have to create nodes for All In the Family and its spinoffs:
archie = makeShow("All In the Family", root);
george = makeShow("The Jeffersons", archie);
makeShow("Checking In", george);
maude = makeShow("Maude", archie);
makeShow("Good Times", maude);
makeShow("Gloria", archie);
makeShow("Archie Bunker's Place", archie);
In this case, both The Jeffersons and Maude have child nodes of their own. As a result, variables are required for these two shows so they can be passed as the parent parameter to makeShow when I create the nodes for Checking In and Good Times.
Finally, here's the code that creates the nodes for Happy Days and its spinoffs:
happy = makeShow("Happy Days", root);
makeShow("Mork and Mindy", happy);
makeShow("Laverne and Shirley", happy);
makeShow("Joanie Loves Chachi", happy);
The complete tree is successfully created in memory, so I can get on with the task of creating a JTree component to show off the tree.
Creating a JTree component
You use the JTree class to create a tree component that displays the nodes of a tree. Table 4-6 shows the key constructors and methods of this class.
Table 4-6: Ordinary Constructors and Methods of the JTree Class
Open table as spreadsheet
|
Constructor |
Description |
|---|---|
|
void JTree() |
Creates an empty tree. (Not very useful if you ask me.) |
|
void JTree(TreeNode root) |
Creates a tree that displays the tree that starts at the specified node. |
Open table as spreadsheet
|
Method |
Description |
|---|---|
|
void addTreeSelectionListener (TreeSelectionListener listener) |
Adds the specified listener to listen for tree-selection events. |
|
Object getLastSelectedPathComponent() |
Gets the node that is currently selected. |
|
TreeSelectionModel getSelectionModel() |
Gets the selection model for the tree. See the text for what you can do with the TreeSelectionModel object. |
|
void setVisibleRowCount (int count) |
Sets the number of rows visible in the display. |
The first step, when creating a JTree component, is to declare a JTree variable as a class instance variable so you can access the constructor and other methods:
JTree tree1;
Then, in the frame constructor, you call the JTree constructor to create the tree component, passing the root node of the tree you want it to display as a parameter:
tree1 = new JTree(root);
By default, the user is allowed to select multiple nodes from the tree. To restrict the user to a single selection, use this strange incantation:
tree1.getSelectionModel().setSelectionMode(
 TreeSelectionModel.SINGLE_TREE_SELECTION);
Here the getSelectionModel method is called to get a TreeSelectionModel object that determines how the user can select nodes in the tree. This class provides a method named setSelectionMode that lets you set the selection mode. To limit the tree to a single node selection, you must pass this method the TreeSelectionModel.SINGLE_ TREE_SELECTION field. (I think they could have saved us all a lot of work by providing setSingleTreeSelection method for the JTree class, but nobody asked me.)
You can control the size of the tree component by calling the setVisibleRowCount method. For example:
tree1.setVisibleRowCount(12);
Here the tree is just large enough to show 12 rows at a time.
Finally, you add the tree component to a scroll pane so the user can scroll the tree if it doesn't fit in the space provided. Then you should add the scroll pane to a panel that is in turn added to the frame:
JScrollPane scroll = new JScrollPane(tree1);
panel1.add(scroll);
That's it! The tree component now appears as shown earlier in Figure 4-4.
Getting the selected node
The easiest way to determine the currently selected node in a tree control is to call the getLastSelectedPathComponent method. This method returns an object, so you want to cast it to the correct type. For example:
Object o = tree1.getLastSelectedPathComponent();
DefaultMutableTreeNode show = (DefaultMutableTreeNode) o;
Here, the selected node is retrieved and stored in the Object variable o. Then, it's cast to a DefaultMutableTreeNode object.
You can use this method in an action event listener to retrieve the selected node when the user clicks a button. But what if your program must respond immediately when the user selects a node? For example, the frame shown in Figure 4-4 has a label beneath the list box. This label is updated with the title of the selected show whenever the user selects a show in the tree. To do that, you need to install a listener to listen for tree-selection events.
To create a tree-selection listener, you provide a class that implements the TreeSelectionListener interface. This interface provides a single method named valueChanged, which receives a TreeSelectionEvent object as a parameter. Here's a sample TreeSelectionListener class that simply sets the value of a label named showName to the value of the user object of the selected item:
private class TreeListener
 implements TreeSelectionListener
{
 public void valueChanged(TreeSelectionEvent e)
 {
 Object o = tree1.getLastSelectedPathComponent();
 DefaultMutableTreeNode show;
 show = (DefaultMutableTreeNode) o;
 String title = (String)show.getUserObject();
 showName.setText(title);
 }
}
Then you can install an instance of this class to listen for tree-selection events with this statement:
tree1.addTreeSelectionListener(new TreeListener());
| TECHNICAL STAUFF |
The JTree class provides many other methods for retrieving the nodes that are selected. In addition, you can add listeners that listen for tree-selection events that are generated when the user selects nodes. These events let you create applications that display data for the selected node immediately when the user selects a node. If you want to use these features, check out the API documentation for the JTree class. |
Putting it all together
Whew! That was a lot of information to digest. To put it all together, Listing 4-1 shows the complete program that created the frame shown in Figure 4-4. This program lets the user select a show from the tree. Then, the title of the selected show is displayed in the label beneath the tree.
Listing 4-1: The Spinoff Program
import javax.swing.*;
import java.awt.event.*;
import javax.swing.tree.*;
import javax.swing.event.*;

public class SpinOffs extends JFrame
{
 public static void main(String [] args)
 {
 new SpinOffs();
 }

 private JTree tree1; → 13
 private DefaultTreeModel model;
 private JLabel showName;

 public SpinOffs()
 {
 this.setSize(225,325);
 this.setTitle("Famous Spinoffs");
 this.setDefaultCloseOperation(
 JFrame.EXIT_ON_CLOSE);

 JPanel panel1 = new JPanel();

 DefaultMutableTreeNode root, andy, archie, → 26

 happy, george, maude;

 root = new DefaultMutableTreeNode( → 29
 "Famous Spin-offs");

 andy = makeShow(
 "The Andy Griffith Show", root); → 33
 makeShow("Gomer Pyle, U.S.M.C.", andy);
 makeShow("Mayberry R.F.D.", andy);

 archie = makeShow("All In the Family", root); → 37
 george = makeShow("The Jeffersons", archie);
 makeShow("Checking In", george);
 maude = makeShow("Maude", archie);
 makeShow("Good Times", maude);
 makeShow("Gloria", archie);
 makeShow("Archie Bunker's Place", archie);

 happy = makeShow("Happy Days", root); → 45
 makeShow("Mork and Mindy", happy);
 makeShow("Laverne and Shirley", happy);
 makeShow("Joanie Loves Chachi", happy);

 tree1 = new JTree(root); → 50
 tree1.getSelectionModel().setSelectionMode( → 51
 TreeSelectionModel.SINGLE_TREE_SELECTION);
 tree1.setVisibleRowCount(12);
 tree1.addTreeSelectionListener(
 new TreeListener());

 JScrollPane scroll = new JScrollPane(tree1); → 57
 panel1.add(scroll);

 showName = new JLabel();
 panel1.add(showName);
 this.add(panel1);
 this.setVisible(true);
 }

private DefaultMutableTreeNode makeShow( → 66
 String title, DefaultMutableTreeNode parent)
 {
 DefaultMutableTreeNode show;
 show = new DefaultMutableTreeNode(title);
 parent.add(show);
 return show;
 }

private class TreeListener → 75
 implements TreeSelectionListener

 {
 public void valueChanged(TreeSelectionEvent e)
 {
 Object o = tree1.
 getLastSelectedPathComponent();
 DefaultMutableTreeNode show;
 show = (DefaultMutableTreeNode) o;
 String title = (String)show.
 getUserObject();
 showName.setText(title);
 }
 }
}
All the code in this program has been shown already in this chapter, so I just briefly point out the highlights here:
|
→ 13 |
The tree and list models are defined as class instance variables. |
|
→ 26 |
DefaultMutableTreeNode variables are defined for the root node and each show that has spinoff shows. |
|
→ 29 |
The root node is created with the text Famous Spin-offs. |
|
→ 33 |
These lines create the nodes for The Andy Griffith Show and its spinoffs. |
|
→ 37 |
These lines create the nodes for All In the Family and its spinoffs. |
|
→ 45 |
These lines create the nodes for Happy Days and its spinoffs. |
|
→ 50 |
This line creates the JTree component, specifying root as the root node for the tree. |
|
→ 51 |
These lines configure the JTree component so it allows only a single selection, shows 12 rows at a time, and has a tree-selection listener. |
|
→ 57 |
The JTree component is added to a scroll pane, which is then added to the frame. |
|
→ 66 |
The makeShow method creates a node from a string and adds the node to the node passed as the parent parameter. |
|
→ 75 |
The TreeListener class handles the valueChanged event to display the title of the selected show in the showName label. |
Open table as spreadsheet
Book I - Java Basics
Book II - Programming Basics
- Book II - Programming Basics
- Java Programming Basics
- Working with Variables and Data Types
- Working with Numbers and Expressions
- Making Choices
- Going Around in Circles (Or, Using Loops)
- Pulling a Switcheroo
- Adding Some Methods to Your Madness
- Handling Exceptions
Book III - Object-Oriented Programming
- Book III - Object-Oriented Programming
- Understanding Object-Oriented Programming
- Making Your Own Classes
- Working with Statics
- Using Subclasses and Inheritance
- Using Abstract Classes and Interfaces
- Using the Object and Class Classes
- Using Inner Classes
- Packaging and Documenting Your Classes
Book IV - Strings, Arrays, and Collections
- Book IV - Strings, Arrays, and Collections
- Working with Strings
- Using Arrays
- Using the ArrayList Class
- Using the LinkedList Class
- Creating Generic Collection Classes
Book V - Programming Techniques
Book VI - Swing
- Book VI - Swing
- Swinging into Swing
- Handling Events
- Getting Input from the User
- Choosing from a List
- Using Layout Managers
Book VII - Web Programming
Book VIII - Files and Databases
- Book VIII - Files and Databases
- Working with Files
- Using File Streams
- Database for $100, Please
- Using JDBC to Connect to a Database
- Working with XML
Book IX - Fun and Games
EAN: 2147483647
Pages: 332
