Setting Up User Management
First, you have to make some settings in the web.config configuration file before you can benefit from the user management features of ASP.NET. In addition, you need a database for storing users and roles. Instead of doing this job manually, you may use the new Web Site Administration tool I introduced you to in Chapter 1.
Using the ASP.NET Web Site Administration Tool
The Web Site Administration tool is offered to developers and administrators for setting up and configuring their applications. The tool should make the direct use of the web.config configuration file dispensable in many scenarios. It also can be expanded for custom purposes. At present, this new tool is still under construction. The administration of users and roles, however, is already integrated—which is good for us!
If you want to add user management to your new web site, you must open the configuration tool with the command ASP.NET Configuration from the Website menu in Visual Studio .NET. To save the project in your local IIS, you must enter the following address into your browser:
/webadmin.axd">http://localhost/<application>/webadmin.axd
Click the Security option on the index page and make sure the Security Setup Wizard radio button is selected. Then click the Next button, which appears in the lower right of this page. The assistant that appears will aid you in performing the whole job of configuration in six steps:
-
The first page of the assistant will give you some initial information.
-
In the second step, you can specify whether your web site is going to be used for Internet or intranet purposes. Depending on your selection, the user administration of ASP.NET or the Windows Authentication feature will be used. For the purposes of this example, I've chosen an Internet web site.
-
With the help of the wizard, you may automatically create a database at this point in the process. You have the choice between Microsoft Access or SQL Server. If you choose the first option, you must enter aspnetdb in both the Database Name and the File Name fields. Now you are asked to choose which data you want stored as shown in Figure 6-1. After this, the database will be configured. You have a choice of saving passwords as a one-way hash or as text; the latter option enables you to later send a password to a user if necessary.
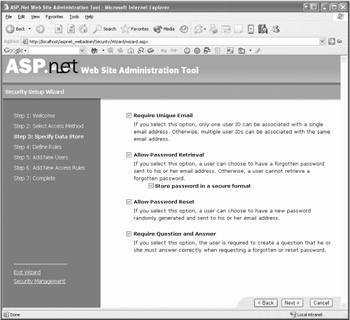
Figure 6-1: Choose which data you want to save. -
Figure 6-2 shows the fourth step of the wizard. You can decide if you want to use roles in general. If so, you can create them right here—just fill in the New Role Name field and click the Add Role button. You may change or add new roles at a later date, of course.

Figure 6-2: You can define as many custom roles as you like. -
Having finished specifying roles, you may now add an administrative user in the fifth step. Please put off the creation of additional users to a later time for this example. The dialog box shown in Figure 6-3 will appear differently depending on the options you have chosen in the third step. The combination of a question and an answer can be used to reset a forgotten password, as offered by many web sites today. If you activate the option Send Password, users will receive a small e-mail with their user data and passwords, which by default looks like this:
From: <Hoster> Subject: Account Information To: <lorenz@pgk.de> Your account name is: lorenz@pgk.de. Your password is: ***************.
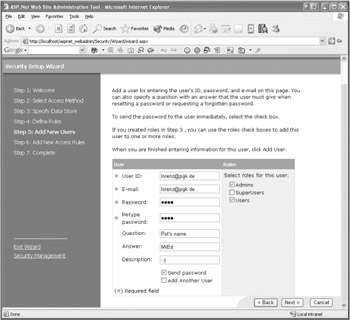
Figure 6-3: Here you can create one or more users and assign them to one or more of the created roles. -
In the last step of the wizard, things are getting interesting. You can decide in a very sophisticated way which role and/or which user should have access or not to each directory, as shown in Figure 6-4. By doing so, the corresponding web.config file(s) will be created or modified for each folder.
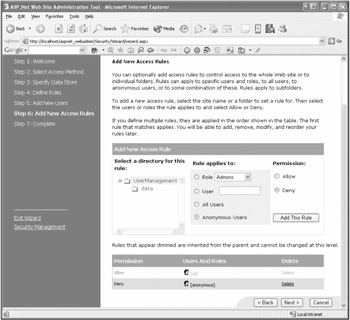
Figure 6-4: You can define which user is allowed to access what content.
| Note | Please be aware that at present the configuration of access authorization is only possible when using Internet Information Services. It isn't yet possible in combination with the integrated web server of the IDE. |
That's it! Now your page is protected! The results that the assistant produces are one or several adapted web.config files within the various directories of your web site. Additionally, a subfolder named data is created containing a preconfigured Microsoft Access database with the name of your choice (for example, aspnetdb.mdb). This database includes all data involving users and roles and can take on additional data (for example, data associated with personalization) later on.
Setting Up the Web Site
Figure 6-5 shows the Solution Explorer containing the web site structure I've chosen. As you can see, there are two protected areas: one for any authenticated user and one just for administrators. Each directory has a web.config file with the specified access rights. These are placed within <authorization> tags as shown.
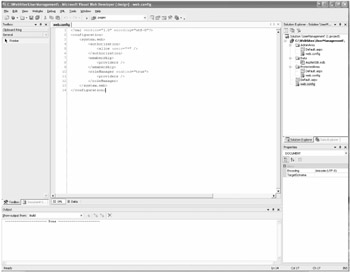
Figure 6-5: The new web site contains two protected areas, one for any users and one for administrators only.
Figure 6-5 shows the web.config file of the root directory of the application as well. Here access is allowed for all users. Additionally, Membership Management and Role Management have been activated explicitly.
Updating the Configuration
Of course, you can change the configuration, roles, users, and user rights anytime afterward initial setup. Simply start the ASP.NET Web Site Administration tool and click the Security tab. Then, you select the Security Management radio button option and click Next. Now you get a screen with three different areas: Users, Roles, and Permissions (see Figure 6-6). You can use the options associated with each area to make changes similar to the way you used the previously shown Security Setup Wizard.
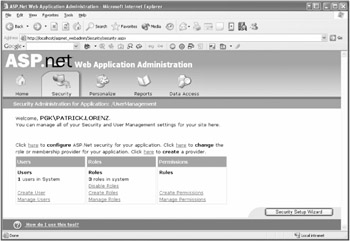
Figure 6-6: Just start the new administration tool to update the configuration.
EAN: 2147483647
Pages: 133
- Structures, Processes and Relational Mechanisms for IT Governance
- Linking the IT Balanced Scorecard to the Business Objectives at a Major Canadian Financial Group
- Measuring and Managing E-Business Initiatives Through the Balanced Scorecard
- The Evolution of IT Governance at NB Power
- Governance Structures for IT in the Health Care Industry