Fine-Tuning a Raw Image
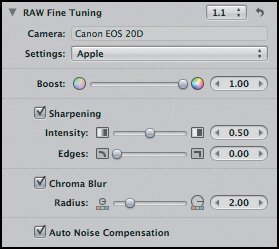
| When you select the 1.1 converter, Aperture adds a Raw Fine Tuning brick to the Adjustments panel (Figure 6.8). This adjustment gives you a little additional manual control over the conversion of the current image. Figure 6.8. When you choose to use the 1.1 converter, Aperture provides a set of Raw Fine Tuning adjustments.
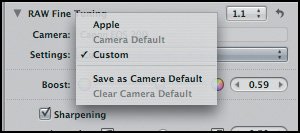
Within Raw Fine Tuning, you'll find the following parameters. Boost : When Aperture applies its gamma correction curve, some of your image's tones are pushed deeper into the shadows, while others are pushed more into the highlights. Some users feel that Apple's gamma curves are a little too aggressive and that they result in images that are little too contrasty, with colors that are oversaturated. With the Boost slider, you can control how strongly the gamma correction curve is applied to your image. By default, the Boost slider is set to 1.0, meaning that the gamma correction curve is being applied at full strength. If you move the Boost slider all the way to the left, there will be no gamma correction curve applied at all, and you'll be viewing a linear image. The values in between let you apply more or less gamma correction. If your images are slightly too contrasty, try moving the Boost slider to a lower value before performing other edits. Sharpening : Raw Fine Tuning provides a set of sharpening controls that work very much like the normal Aperture sharpening adjustment. The Intensity slider lets you specify how much sharpening to apply, while the Edges slider lets you independently sharpen edges. Sharpening here is a subtle control meant to reduce the softness introduced by your camera's low-pass filter. You'll probably later want to add a normal Sharpen adjustment as well. Chroma Blur : Digital cameras produce two kinds of noise: luminance noise, which appears as speckly white patterns, and chrominance noise, which appears as colored splotches. The Chroma Blur slider looks for areas that have a sudden color change and blurs them to reduce chrominance noise. Obviously, this effect has an impact on the sharpness of your image. You'll usually want to use Chroma Blur and Sharpening in tandem to find a good balance of noise reduction and preservation of detail. Auto Noise Compensation : This parameter reduces luminance noise in your image. When analyzing noise, the Auto Noise Compensation algorithm takes several parameters into account, including the type of camera you're using and the ISO setting you were shooting with. By default, these settings are initially configured with settings that Apple has deemed best for the type of camera that you're using. The Raw Fine Tuning adjustment identifies the type of camera that was used to take the image and loads settings from a prebuilt profile. If you find that a different configuration of noise reduction and sharpening parameters works better, then you can save your new settings in a profile by choosing Save as Camera Default from the Settings pop-up menu in the Raw Fine Tuning brick (Figure 6.9). Now any image you edit that was shot with that type of camera will receive these fine-tuning settings. In this way, you can easily define a custom raw conversion profile for your camera. You can switch back to the default conversion parameters at any time by choosing Apple from the Settings pop-up menu. Figure 6.9. After defining raw tuning settings, you can save those parameters as the defaults for your camera.
Tip Some raw converters embed their conversion parameters directly in the raw file. Files that have been modified in this way may not work with Aperture. Either switch to a pristine copy of the raw file or process it in the other converter and then import the results into Aperture. |