Going Further with Raw Controls
| Chapter 4 introduced you to Camera Raw's white balance and exposure control tools. These seven sliders are where the bulk of your raw editing work takes place. In this section, you're going to take another look at these controls, but this time framed within your new understanding of nonlinear data. Adjusting white balanceYou've already seen how to use the Temperature and Tint sliders and the White Point tool to adjust the white balance of your image. Although accurate white balance is great for achieving a faithful reproduction of the colors of a scene, sometimes an image will look better, or more evocative, if it has an extra bit of warmth or has been cooled down a little. Both of these effects are easy to achieve with temperature and tint adjustments. For example, Figure 6.12 shows three images created from the same raw file. The only thing that changed for each image was the Temperature setting in the Camera Raw dialog box. The top image uses the camera's auto white balance selection, which is fairly accurate, given that the photo was shot on a stage with very warm lighting. The middle image is much warmer, and the bottom image is very cool. Depending on the mood you are trying to evoke or the color palette of other images or graphics that you plan to use alongside your image, one white balance may be more appropriate than another. Figure 6.12. You can alter the feel of an image by changing its white balance. The top image shows the camera's automatic white balance. The middle image has had a much warmer white balance applied in Camera Raw. The lowest image shows a much cooler white balance. None of these images is "right" or "wrong," but they have very different feels.
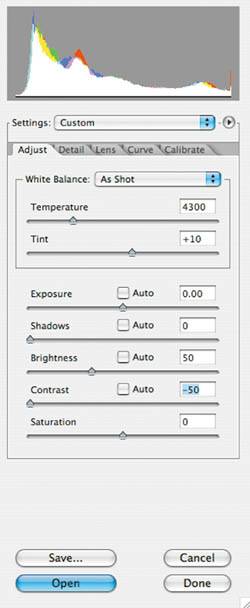
Though you can warm up images using the Curves and Hue/Saturation tools in Photoshop, the Temperature control in Camera Raw is usually a better choice because it properly adjusts all of the tones in your image. Trying to warm an image with most regular editing tools means spending some time adjusting all three areas of an image: highlights, midtones, and shadows. With a white balance adjustment, you get it all at once. Adjusting exposureChapter 4 introduced you to Camera Raw's Exposure tool, which is analogous to the white point tool in the Levels dialog box. With it, you define what the brightest point in an image is, and all of the other tones are remapped accordingly. As discussed in the previous section, the brightest stops in a raw image contain the most data. If you've done your shooting job well, then most of your Exposure slider moves will be to darken an image, because you will have tried to capture more from the brighter stops, to collect more data. If you find that you need to use the Exposure slider to brighten an image, it's not the end of the world. Your image is not useless, and it's not ruinedthere's just a better chance that your shadow detail will be posterized or noisy after your adjustments. Nevertheless, because it's your key to remapping the data-rich bright parts of your image into the midtones and shadows, the Exposure adjustment is the most critical of all of Camera Raw's controls. Throughout this book, you've been told of the horrible consequences that result from clipping your highlights and shadows, so you may find it a little odd now to be told that if you "try to expose all your shots so that they're really bright, you'll be much happier." Shouldn't you pay attention to what your light meter says? Absolutely. When taking this approach, you will run the risk of clipping your highlight values. Fortunately, Camera Raw has a fairly amazing capability that can help you with this trouble. Using the highlight recovery functionAs you saw earlier, fully clipped highlights are represented on Camera Raw's histogram by a white spike at the right edge. However, only one or two channels of a pixel may be clipped; Camera Raw displays each of these as a rightmost spike in the color of the clipped channel (Figure 6.7). First the bad news: A completely clipped highlight is often a bad thing. It will appear in your image as complete white and will contain no detail, and there's nothing you can do about it except hope that you shot an additional, properly exposed frame. A partially clipped highlight, though, is another story. If your highlights are only partially clipped, there's a good chance that Camera Raw can recover them. Consider the image in Figure 6.13. As you can see from the histogram, the blue channel is heavily clipped, the green is barely clipped, and in a few places all three channels are clipped. (The spike on the right side is blue on top, with a tiny bit of green below and then some full white.) Figure 6.13. This image has partially clipped highlights, as you can see from the right side of the histogram. In the clipping display, you can see that the clouds suffer from a lot of blue channel clipping as well as some full-blown three-channel clipping. By sliding the Exposure slider to the left, you can darken those clipped highlights back into tones that can hold detail (Figure 6.14). In other words, areas that were previously empty white now show image detail. Figure 6.14. I moved the Exposure slider to the left while keeping an eye on the histogram. When the spike completely disappeared, I let go. As you can see, the result is a 0.75-stop exposure. Though a lot of the image is darker, those areas can be brightened with the Brightness slider. The important thing to notice is how much more detail there is in the foggy areas of the sky.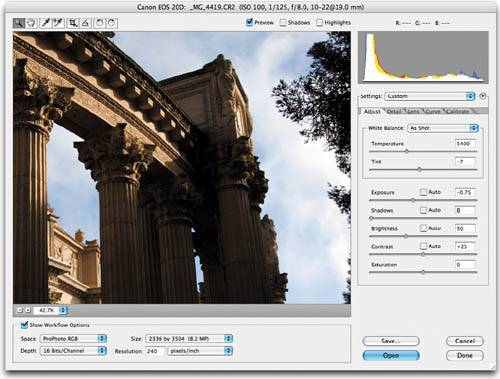 This type of highlight recovery is not possible with any of Photoshop's normal tools, and it's another advantage of shooting raw. It also provides you with a little safety when exposing. The fact that Camera Raw can recover some clipped highlights gives you a little more exposure latitude. Highlight recovery is accomplished using several techniques. Some camera manufacturers actually include a little headroom above their set white point. This means that the camera actually captures a little more data that it claims, and if this data is present, Camera Raw can simply grab it and use it to remap the clipped highlight tones. Camera Raw can also use the data in one of the surviving channels to rebuild the missing clipped channel. In the previous example, the histogram indicated that some tones were clipped in one channel, and others were clipped in all three. Fortunately, none of the clipping was so extreme that Camera Raw couldn't rebuild those areas. At other times, you may find that Camera Raw can pull back some of your clipped highlights, but not all, as shown in Figure 6.15. Figure 6.15. The upper image has badly clipped highlights. With the Exposure slider, we can recover a lot of detail in the clouds, but no matter how much we move the slider to the left, those completely blown sections of the sky will remain white and unrecoverable.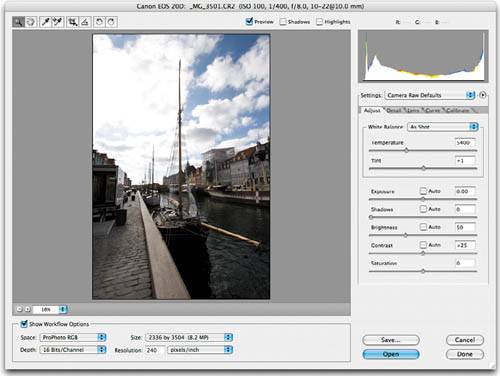 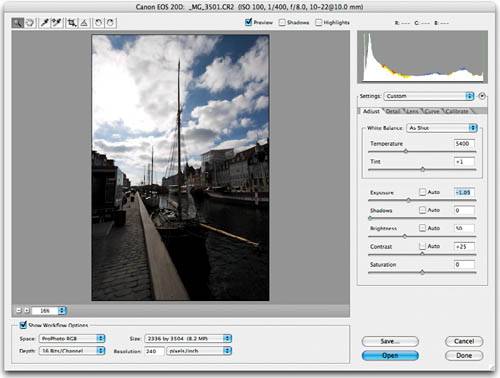 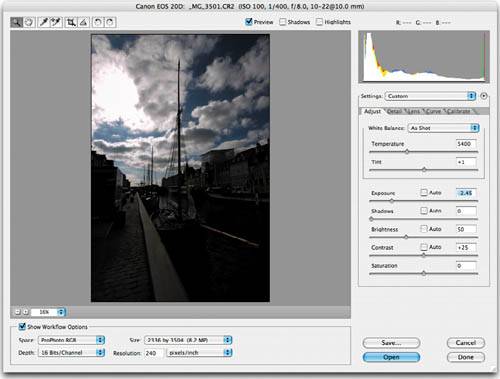 When making a big Exposure slider move to recover highlights, be sure to keep an eye on the shadow end of your histogram as well. You'll need to balance the amount of highlight information that you want to recover against how dark you're willing to let the shadows in your image go. Camera Raw's highlight recovery function is not just a handy tool for coping with highlight clipping. It's also a safety net that allows you to expose for the right end of the histogram, to try to capture as much data as possible. If you don't know how to control the exposure on your camera, don't worrywe'll cover that in detail in the next chapter. Adjusting shadowsYou previously learned that the Shadows slider works just like the Black Point slider in Levels (it defines the darkest point in the image and remaps all other tones accordingly), and your understanding of the role of the Shadows tool is hopefully a little more sophisticated now that you know more about the nonlinear nature of raw files. Generally, since the shadow areas of an image contain so little data, it's best not to make large movements of the Shadow slider lest you risk introducing posterization and noise into the shadow parts of your picture. Obviously, if you chose an exposure that yielded very low contrast, you'll have nothing to lose by darkening the blacks in your image with a Shadows adjustment. On well-exposed images, though, you should use the Shadows slider sparingly. Adjusting brightnessIf you're following this "expose for the highlights" philosophy, then you've probably started to realize that the brightness of your images will usually not be too much of an issue. The bulk of your correction will be performed with the Exposure slider, which you'll probably use to darken the image. However, if you've had to perform any highlight recovery, as discussed earlier, you'll probably end up with an image that's a little dark. As you saw in Chapter 4, the Brightness slider lets you adjust the midpoint of an image, just like the Gamma slider in the Levels dialog box; it brightens the midtones without moving the white point (Figure 6.16). Figure 6.16. After the Exposure slider was moved to the left to recover the highlights in this image, the picture was too dark overall. We can't brighten the image using the Exposure slider, or we'll reclip the highlights. Shifting the Brightness slider to the right restores brightness to the midtones. Figure 6.16 is a good example of the choices you sometimes have to make when editing. A fairly heavy Brightness adjustment is needed to restore brightness to the image. There's a good chance that this will cause some posterization in the shadows. If the negative Exposure move had been less aggressive, the image wouldn't need such a strong Brightness adjustment, but then we couldn't recover as much highlight detail in the clouds. In this case, we decided that having the well-rendered clouds is worth any damage we might be doing to the shadows in the image. In general, highlight troubles are more noticeable than shadow troubles simply because highlight troubles are easier to see. If a shadow is dark and murky, it's not too conspicuous, but a bright area that's lacking detail and is blown out to white is easy to spot. The trouble with this particular scene is that it has a huge dynamic range that's difficult for the camera to capture. Thus, we have little choice but to sacrifice either the shadows or the highlights. If you simply have an image that's too dark, then you'll need to decide if you want to brighten it with the Exposure slider or the Brightness slider. When brightening an image, you should move the Exposure slider as little as possible, to keep from brightening the shadows too much. Set the Exposure slider to get your whites adjusted properly; then use the Brightness slider to brighten your shadow tones. Though you may not be able to tell a difference in the results, the Brightness slider will probably pose less of a posterization threat to the shadow areas of your image. Adjusting contrastThe Contrast slider performs two adjustments: it brightens the tones above the midpoint, and it darkens the tones below the midpoint. (If you're used to making corrections using Photoshop's Curves controlas shown in Chapter 3this is the same type of adjustment that you get when you apply an S-shaped curve.) In general, the Brightness and Contrast sliders work very well together. Use the Brightness slider to add brightness to your image, and then use the Contrast slider to punch up the image with a little contrast (Figure 6.17). Figure 6.17. With a very slight Contrast move, we can punch up this image a little bit. We need only a small change since this image is already close to being too dark.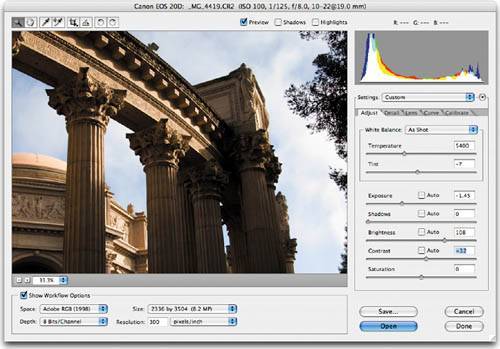
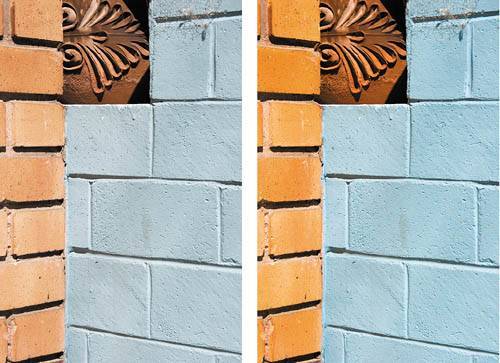
Adjusting saturationTIP You can also think of Camera Raw's sliders as controlling the shape of a tone curve. The Exposure slider represents the upper-right point, Shadows the lower-left point, and Brightness the midpoint. The Contrast slider adds two more points to the curve to create a contrast-inducing S-shape. While extreme adjustments to the Saturation slider can lead to posterization of bright colors, in general Saturation is a fairly harmless tool as far as your image data is concerned. Camera Raw's Saturation slider is not significantly different from the Saturation slider provided by Photoshop's Hue/Saturation control, so it doesn't really matter if you make your saturation adjustments in Camera Raw or in Photoshop. However, if you wait to make your saturation changes using a Hue/Saturation adjustment layer in Photoshop, you'll have a little more editing flexibility. In addition to performing your saturation change in a nondestructive manner, you'll be able to use layer masks to constrain the effects of your saturation change. You'll learn more about this later in this chapter. There are no real guidelines about saturation changes; it's purely a matter of taste. Some images are obvious candidates for saturation adjustments because they're low contrast and have weak color. Others are good saturation targets because they have strong color that can be made even stronger with a little saturation boost (Figure 6.23). Figure 6.23. The only change made to the rightmost image was an increase in the Camera Raw Saturation slider.
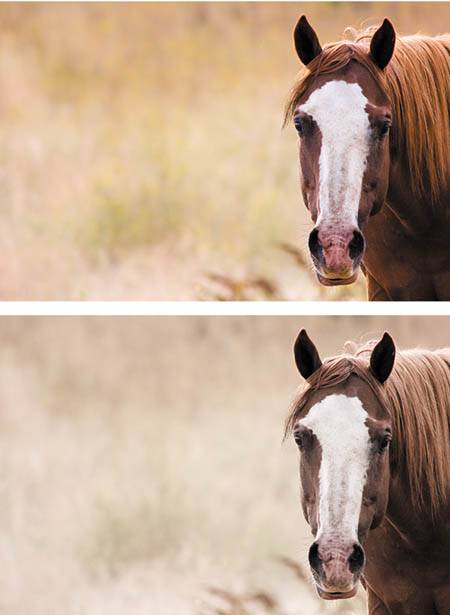
Some images benefit from a reduction in saturation. Whether the subject matter requires less garish color or you're trying to evoke a particular mood, reducing the saturation of an image can create a very different feel (Figure 6.24). Figure 6.24. This image takes on a different feel with less saturation. After reducing the saturation, I brightened the image a bit with the Brightness slider and then warmed it some with the Temperature slider. The bottom image shows the result.
|
EAN: 2147483647
Pages: 76

