Camera Raw in Action
| There's no right or wrong way to work with Camera Raw. In fact, you'll probably find that with some images, you don't need to touch certain controls. In most cases, as you work you'll find that adjustments to one control will require a readjustment of another control. The Camera Raw parameters often work in concert, so don't hesitate to move back and forth between them, tweaking and readjusting them as necessary. Following are some examples of exactly how Camera Raw was used to process some specific raw images. Processing a well-exposed imageAfter reading all these pages of explanation of all of these features and parameters, you're now going to see an example that uses hardly any of them. The fact is that most cameras these days pack extremely good light meters, white balance sensors, and autoexposure capabilities. In other words, in normal lighting situationsespecially daylight settingsyou'll almost always get very good results right out of the camera. Figure 4.43 shows the image as it appears when first opened in Camera Raw. Figure 4.43. This image is very reasonably exposed, as verified by the histogram. It won't require much adjustment in Camera Raw.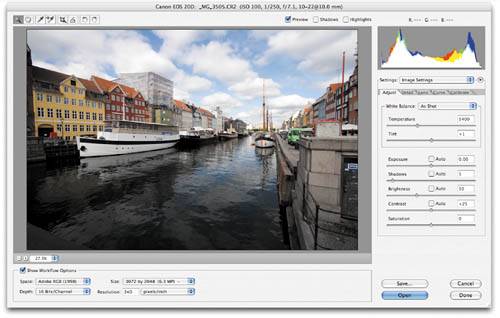 First off, notice that the image came through already tagged with the Adobe RGB color space. This is because I had my camera set to shoot in Adobe RGB. I've changed the Depth pop-up menu to 16 Bits/Channel because I want my resulting image to be a 16-bit image. This will afford me a little more editing latitude when I make further edits in Photoshop to prepare the image for printing. I've left Size and Resolution at their defaults, which will give me an image with the original, full-pixel dimensions. The default white balance is set to As Shot, and the white balance looks fineit doesn't need any adjustment. Overall, the image appears just a tiny bit dark. The histogram shows that the shadows are, in fact, clipping. Though the Exposure and Brightness sliders can be used to brighten an image, in this case the clipped shadows provide the best indication of how to proceed. In Camera Raw, the black point is controlled by the Shadows slider, and the defaults for my camera have Shadows set to 5. Since the shadows are clipping, I'm going to assume that this value is too high and slide the Shadows slider back down to 0 (Figure 4.44). Figure 4.44. Dropping the Shadows slider to 0 takes care of the shadow clipping problem and brightens the image a little bit. As you can see from the histogram, dropping the Shadows value solves the black point clipping problem. The image is still a little dark, though. Because there's no headroom above the white point, moving the Exposure slider will immediately clip the brightest part of the image: the clouds. I want to preserve as much cloud detail as possible, so I'm going to leave the Exposure slider where it is. The Brightness slider will let me shift the midtones with minimal white point movement and so will allow me to brighten the middle tones in the foreground of the image (Figure 4.45). Figure 4.45. Sliding the Brightness slider to the right brightens the image without blowing out the highlights. This is better, but now the image has lost a tiny bit of contrast, so I'm going to restore the Shadows slider to a value of 2. This will result in a tiny bit of shadow clipping under the darkest parts of the boats, but there's no important detail there anyway (Figure 4.46). The Up and Down arrow keys are particularly handy for quickly experimenting with small adjustments to this setting. Figure 4.46. A final Shadows adjustment restores the tiny bit of contrast that was lost to the Brightness slider. The Shadows slider doesn't allow for the same level of subtlety as the Levels black point control, so I don't want to push it too far here. If the image needs further black point adjustment, I'll do that later using Levels. This image has no noise, vignetting, or chromatic aberration troubles, and I want to perform my sharpening later in Photoshop, so I'm done. I can open the image in Photoshop and continue my edits there. Processing a low-contrast imageFigure 4.47 shows an image that is suffering from a contrast deficiency. As you can see from the histogram, there is very little image data in the highlight areas and no information in the shadow areas, so my main goal will be to improve the contrast of the picture without blowing out the highlights. Figure 4.47. This image has some contrast problems. Though it lacks shadows and highlights, there's plenty of midtone data to move around and play with.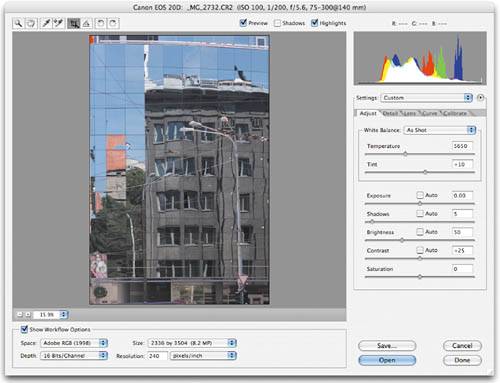 As before, I have configured for a 16-bit Adobe RGB image at full size and 240 pixels per inch. Before I begin my tonal corrections, though, I'm going to crop the image. The focus of the picture is the reflection of the building, but there's some extra room at the top of the image that detracts from that focus and doesn't really contribute anything. Camera Raw's Crop tool lets me easily get the composition I want (Figure 4.48). Figure 4.48. I begin by cropping the image to get the composition I want. By cropping first, I don't have to worry about skewing the histogram with image data that's not going to be in the final image.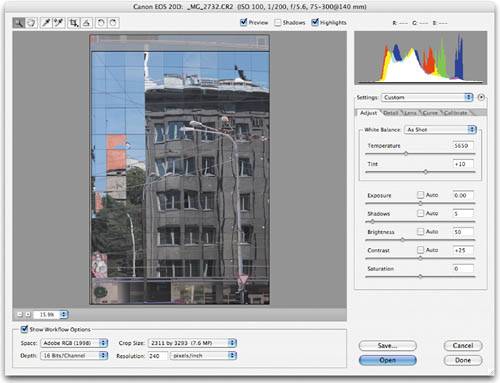 I'm now ready to start making tonal corrections. As in the previous example, the white balance in this image looks just fine. There are two ways that I could improve the contrast of this image: I could set the Exposure and Shadows sliders by hand, so that the data in my histogram goes all the way to the edges, or I could move the Contrast slider, which adjusts both bright areas and shadows simultaneously. I'm going to use the Contrast slider, simply because it's easy, and I'm going to keep a close eye on the highlights, since they're already very close to clipping (Figure 4.49). Figure 4.49. The Contrast slider lets me adjust the white and black points with a single edit. I increased the contrast by sliding the Contrast slider to the right.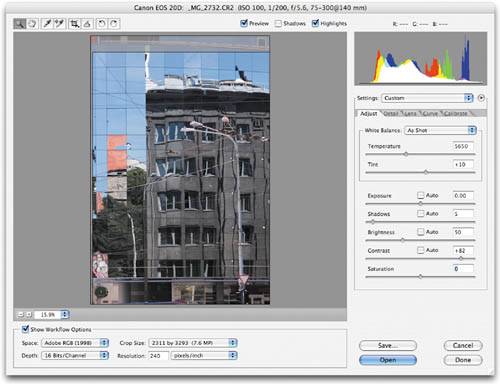 The image already looks much better. However, as you can see from the histogram, I still have some headroom below my black point. I'm going to take advantage of this by using the Shadows slider to move the black end down a little more, to get a deeper color out of the blue sky (Figure 4.50). Figure 4.50. A Shadows adjustment deepens the colors of the sky. Finally, because the reflected building is beginning to get a little overbearing, I'm going to use a slight Brightness adjustment to brighten the midtones. Like the previous image, this image doesn't need any noise or lens correction, and I will apply sharpening later (Figure 4.51). Figure 4.51. Finally, I use the Brightness slider to bring up the midtones a little bit, to brighten the reflected building.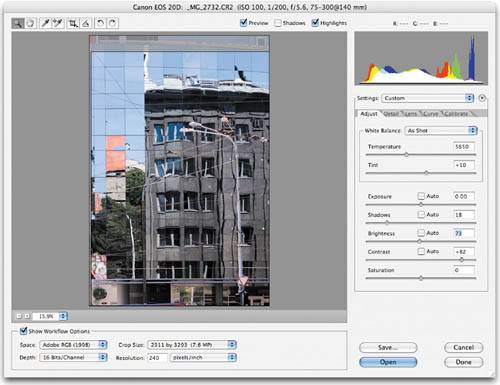 Processing an underexposed imageFigure 4.52 shows an image that is plainly underexposed. This picture was shot in an extremely dark room using a Canon EOS 20D at ISO 1600. The lens was already set to its widest aperture, and because the subjects were moving, I couldn't afford a slower shutter speed. Figure 4.52. This image has some substantial underexposure problems.
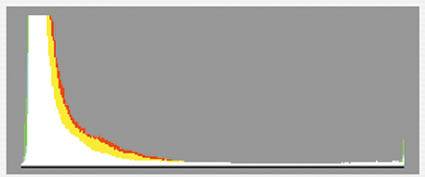
I knew that this picture would be dark and that my final processed image would be noisy, but there were simply no alternatives. Flash would have been intrusive, and the built-in flash on my camera would not have illuminated the entire room anyway. The image is too dark to be able to tell anything about white balance, so I'm not going to worry about that until I make some tonal adjustments. As before, my default Camera Raw settings have a Shadows value of 5. The histogram shows that my shadows are clipping, so my first step is to pull the Shadows value back to 0 to see if that improves anything (Figure 4.53). Figure 4.53. Dialing the Shadows value down to 0 reveals that the image isn't as under-exposed as it initially seemed. With Shadows at 0, things are much better. It turns out that my image isn't as underexposed as I thought it was. The shadows are no longer clipping, but take a look at the left edge of the histogram. The large cyan area indicates a curious lack of red and green. It could be that the camera simply didn't capture good color in these very dark regions. Another explanation, though, is that the Adobe RGB color space (which this image was shot in) is not capable of holding those particular dark colors that the camera was able to capture. If I switch the Space pop-up menu to ProPhoto RGB, the histogram looks a bit healthier because the image is now being mapped into a color space that's large enough to hold all of the colors that the camera actually captured (Figure 4.54). Figure 4.54. Switching to the ProPhoto color space places the image data into a color space that's large enough to hold all of the colors. Note how the histogram has changed.
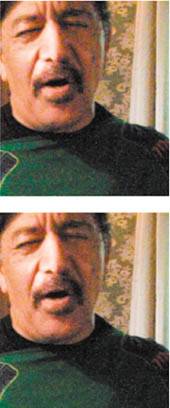
There's no visible change in the image when I do this, because the affected areas are too dark to see onscreen. But as a side benefit, the little bit of highlight clipping that was occurring before has been reduced, thanks to ProPhoto's larger space. As you've seen, there's no single "correct" order in which you should use Camera Raw's controls. In this case, I needed to deal with the underexposed shadows before I could make sense of the rest of the image. With the shadows a little more under control, I can move on to trying to brighten the rest of the picture. While adjusting the Brightness control might seem the most logical way to brighten an image, remember that Brightness is really a midtone, or gamma, control. I'm going to begin by using the Exposure slider to set the white point for the image. The histogram shows that there's already a little bit of white clipping. However, if you look at the picture, it's pretty easy to tell that it's the bright window and the bright light behind the singer's head that are causing the clipping. These areas are already blown out to white, so there's no detail there to worry about losing. Consequently, I can push the white point farther into clipping without losing any detail that matters. The brightest whites that contain any detail are the whites of the bata drummers that are sitting along the wall. Those are the areas that I want to be careful about as I adjust the Exposure slider. The Camera Raw clipping display (activated by pressing Alt in Windows or Option on the Mac while dragging the Exposure slider) makes it easy to see when I'm overexposing these areas (Figure 4.55). Figure 4.55. Using the Camera Raw clipping display, I can adjust my Exposure setting while keeping an eye on the bright highlights that I know I want to preserve.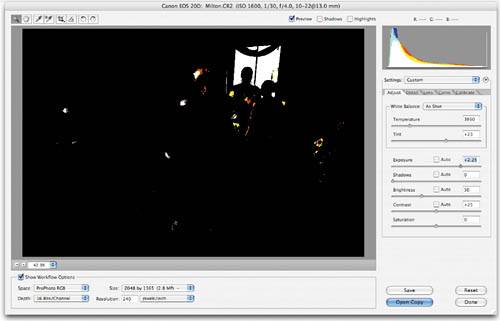 For the sake of this example, Figure 4.56 shows a slightly aggressive Exposure value. You can see the whites of the hats already blowing out. For my actual Exposure setting, I'm going to back off to around +1.50. Figure 4.56. The Brightness slider will be my main tool for brightening this image. Selecting the Highlights check box lets me ensure that I'm not clipping any highlights that matter to me.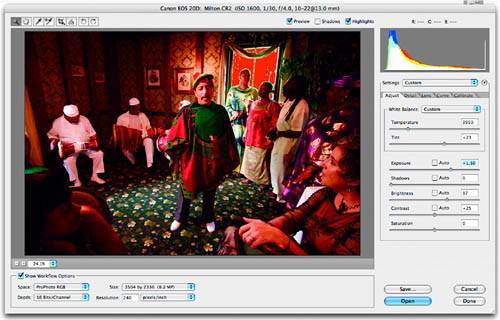 Now it's time to tackle the midtones, which is where the bulk of this image resides. The histogram shows that the majority of my image data is still living in the deep shadows, so I'm going to move those tones up into the middle of the histogram. In theory, the Brightness control is supposed to work like the gamma control in the Levels dialog box; it should let me adjust the midtones without affecting the white point. However, it doesn't quite work like that in Camera Raw. Brightness can push the white point, so I'll keep a close eye on the right end of the histogram while I move the Brightness slider to the right. The Brightness slider doesn't provide a clipping display like the Exposure slider does, but I can select the Highlights check box to get a superimposed clipping display (Figure 4.56). With a Brightness value of 97, I get a lot of lightening in the midtones and not a lot of clipping in the highlights. The clipping display shows a tiny bit of clipping here and there, but nothing so bad that I'm going to worry about it. The image is really coming along now. As you can see in the histogram, I have a little bit of room to darken the shadows, but because images tend to go darker when printing (and I know I want to print this image), I'm going to leave this extra bit of headroom below the shadows. When I print, the relevant shadows should darken to a good black. If they don't, it's easy enough to make a further black point change later using a Levels adjustment. Shooting in low light tends to yield images with a strong yellowish or red cast. This image suffers a bit from that, causing the picture to be overburdened by warm tones. A simple white balance shift lets me cool down the image (Figure 4.57). Figure 4.57. By moving the Temperature slider, I can easily take some of the overly warm tones out of the image.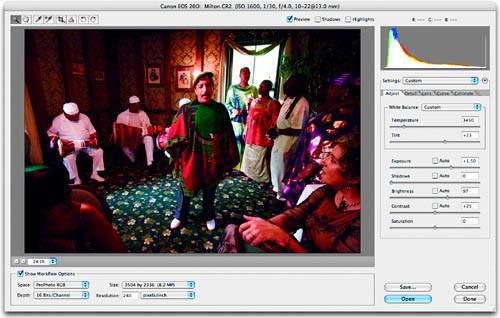 I could achieve something similar using a slight desaturation. However, unlike a Temperature adjustment, desaturation wouldn't restore the right color to the rug. It might also result in a tiny bit of data loss. Remember: Color temperature adjustments don't degrade your image. That's it for the tonal corrections. As mentioned earlier, this image was shot at 1600 ISO, which means it inevitably has some noise troubles. Because I was expecting this image to be noisy (and because I often like my images to have a bit of grain), I'm not too worried about the noise. However, it's still worthwhile to see what Camera Raw's noise reduction controls can do. My default Color Noise Reduction setting is 25. If I drop it to 0, I can see that a tiny bit of color noise has been eliminated, but there isn't much color noise in this image to begin with. Because there's no reason to apply more correction than is needed, I experimented a little, but in the end found that a value of 25 is a good choice. The singer's shirt was particularly susceptible to color noise, as was the shadowy side of his face. Those are the two areas that I paid particular attention to while adjusting the Color Noise Reduction slider. The bulk of this image's noise problems are luminance noise. My default Luminance Smoothing setting is 20; a little experimentation shows that this is a good setting (Figure 4.58). Figure 4.58. These crops show the slight improvement that's made with a Color Noise Reduction setting of 10.
|

EAN: 2147483647
Pages: 76