Processing an Image Using Camera Raw
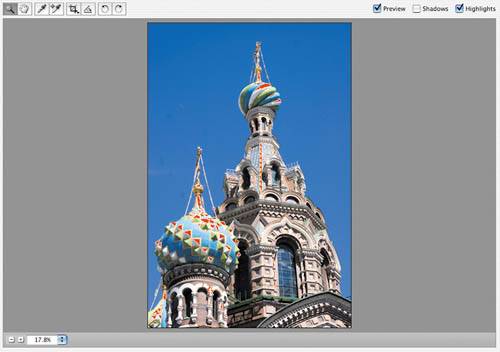
| Although Camera Raw's controls may initially be intimidating, processing an image is actually very simple. To get the most out of this section, open a raw image of your own and follow along with the descriptions of each control. Getting a feel for the controls is an important part of learning which parameters are good for which types of adjustment. Before getting to work adjusting the color and contrast of your image, though, it's good to make any necessary geometric adjustments to it. RotatingThese days, many cameras can automatically detect whether an image was shot in portrait or landscape mode (vertically or horizontally). Cameras with such a mechanism will automatically tag your image as either portrait or landscape, storing this information in the image metadata. Adobe Camera Raw can read this tag and automatically rotate your image accordingly. If your camera doesn't detect rotation, or if it has detected it incorrectly, then you may need to rotate your picture manually. Simply click the Rotate buttonslocated above the Preview pane when running in CS2, and below when running in Elementsto rotate your image in 90-degree increments (Figure 4.17). Figure 4.17. Camera Raw's Rotate buttons let you rotate your image in 90-degree increments.
CroppingWith Camera Raw 3.1 in Photoshop CS2, Adobe added a Crop tool to the Camera Raw interface. Just like the Crop tool in Photoshop, Camera Raw's Crop tool lets you crop your image simply by dragging out a rectangle to select the area you want to keep (Figure 4.18). Figure 4.18. To crop in Camera Raw, select the Crop tool and then drag out an area around the part of the image that you want to keep.
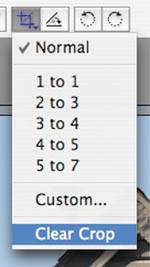
It's often a good idea to crop before you start your exposure and tonal corrections, so that your histogram won't be affected by pixels that you're planning to discard. This is especially true if the areas you're planning to crop contain clipped highlights or shadows. If you crop these areas before you start your correction, your histogram will provide a more accurate display when you're editing. The Crop tool also provides a drop-down menu that lets you constrain the crop to particular aspect ratios, making it easy to crop for paper with particular dimensions. The Crop menu also lets you clear your current crop setting (Figure 4.19). Figure 4.19. If you click and hold the Crop tool, Camera Raw opens a menu that allows you to constrain your crop to a particular aspect ratio or to clear your current crop setting.
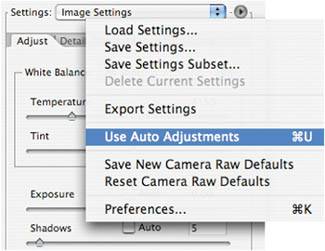
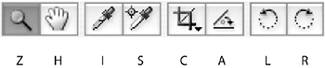
StraighteningCamera Raw's Straighten tool provides a facility that even Photoshop itself doesn't have. Camera Raw's Straighten feature provides a two-click solution that straightens and crops. To use the Straighten tool, select it from the tool palette at the top of the Camera Raw window or press the letter A. (Elements users don't have access to the Straighten tool.) The Straighten tool works just like a straight-line tool in a drawing program. Click it at one end of a line in your image that should be straight; then click at the other end (Figure 4.20). Camera Raw automatically rotates your image so that the indicated line is now horizontal. What's more, Camera Raw automatically calculates a crop that selects the largest usable area of the now-rotated image. Figure 4.20. Camera Raw's Straighten tool not only straightens images with just two clicks, but it also automatically crops the resulting image, saving you the trouble of a separate cropping step.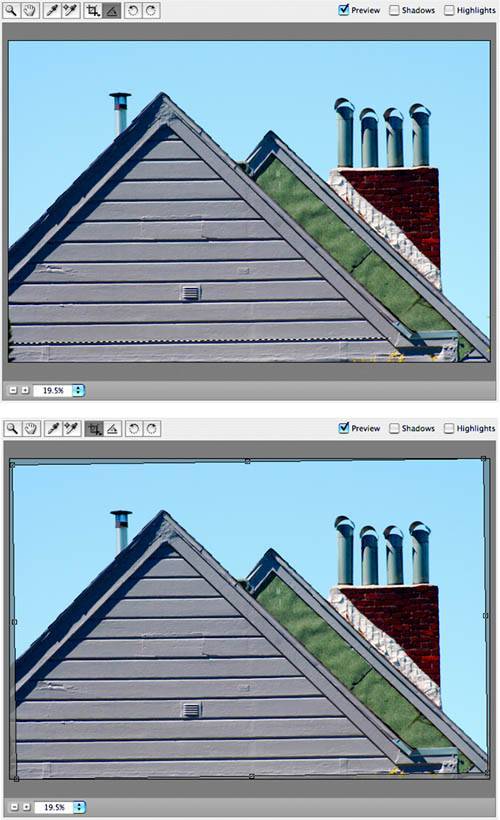 TIP Because Camera Raw has only one level of undo, you won't be able to undo your cropping or straightening once you've made any additional edits to your document. However, you can clear the crop by selecting the Crop tool and right-clicking (Windows) or Control-clicking (Mac) the preview image and then selecting Clear Crop from the pop-up menu. Or you can click and hold the Crop tool to drop down the Crop menu and then select Clear Crop from there. Because straightening results in a little bit of cropping, it's a good idea to perform this step before making your tonal corrections, for the reason described in the "Cropping" section. Workflow optionsIt really doesn't matter if you choose to set image size and resolution in Camera Raw or wait until you're back in Photoshop. These settings are simply provided to ease the batch processing of multiple images. However, it is worth considering bit depth and color space before you start editing. As discussed earlier, most digital cameras capture 12 bits of color information per pixel. If you're shooting in JPEG mode, then your camera converts these images to 8 bits per pixel before saving. This results in a significant loss of color information. If you plan to edit and print your images, then it's worth letting Camera Raw convert your image to a 16-bit file. This will afford you much more latitude when editing. Simply select 16-bit from the Depth pop-up menu. Note that this will result in larger files, and you'll have to convert to 8-bit later if you want to save in JEPG mode. (In Photoshop, you can convert to 8-bit by choosing Image > Mode > 8-bit.) In Chapter 3, you learned about color spaces. Although your camera likely lets you choose between sRGB and Adobe RGB color spaces, these may not be big enough to represent the full range of colors that your camera can capture. You can select from other spaces using the Space pop-up menu. You'll learn more about color space choice later. In general, Adobe RGB is a very good default color space to choose. Using the Adjust tabWith your image straightened, rotated, and cropped (if it needed any of those operations), you're ready to start to work on tonal and exposure adjustments. Using the histogram as a reference, your goal here is to perform all of the adjustments to your image's raw data that your camera would normally perform on its own. However, because of the sophistication of Camera Raw's routines, the granularity of its controls, and the fact that your eye is possibly more refined than a factory-set algorithm, you'll likely get better results than what your camera would produce if you were shooting JPEG. NOTE Elements users will find this same set of sliders in the Camera Raw dialog box rather than on a separate Adjust tab. You'll perform the bulk of your work using the Temperature, Tint, Exposure, Shadows, Brightness, and Contrast sliders, possibly in that order.
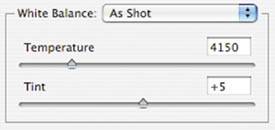
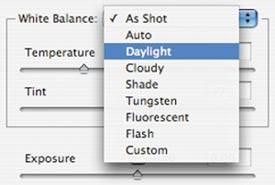
Adjusting white balanceAs discussed in Chapter 2, white balancing is the process of calibrating your camera so that it renders colors correctly for the type of light in which you are shooting. If you're using an auto white balance mechanism, then your camera takes a guess as to what the correct white balance setting should be; if you're using a preset or manual white balance, then you have effectively told the camera the color temperature. No matter what white balance setting you're using, the camera stores this information with the raw file. When your camera processes a file, it uses this white balance setting to adjust the color information in your image to compensate for the type of light in your scene. These days, most cameras do a very good job of white balancing, so unless you inadvertently chose an incorrect manual white balance, your image will probably look pretty good. However, if it has an incorrect white balance, Camera Raw will let you correct it with ease. When you first open a raw file, Camera Raw attempts to read the white balance tag that your camera embedded in the file, and then it sets the white balance slider accordingly. If your white balance was set incorrectly, or if the camera's auto white balance mechanism is particularly lousy, you may see an image that looks really terrible (for instance, like Figure 2.5 in Chapter 2). Camera Raw's White Balance pop-up menu defaults to As Shot, meaning that the white balance is set to whatever value the camera was set for at the time of shooting. You can see what value this is by looking at the Temperature slider directly below the White Balance pop-up menu (Figure 4.22). Figure 4.22. Camera Raw provides three options for changing the white balance of your raw image. The pop-up menu contains predefined white balance settings, and the Temperature and Tint sliders give you true manual white balance control.
The White Balance pop-up menu offers a list of standard white balance options: Auto, Daylight, Cloudy, Shade, Tungsten, Fluorescent, and Flash (Figure 4.23). If the color in your image looks wrong, try picking the white balance option that matches the type of light you were shooting in. Figure 4.23. You can use Camera Raw's White Balance menu to select a standard white balance setting for your image.
If you were shooting in a mixed-lighting situation and your color is off, then the preset white balance options may not help you. For these instances, you'll need to take manual control and adjust the Temperature slider to correct the white balance. You can try simply moving the slider by hand until you get color you like, and this is often the best way to proceed with correcting a bad white balance. But both the Elements and CS2 versions of Camera Raw provide an additional excellent white balance correction tool: the White Balance Eyedropper (Figure 4.24). Figure 4.24. The White Balance Eyedropper lets you set the white balance for your image by clicking an area of your image that should be a neutral tone.
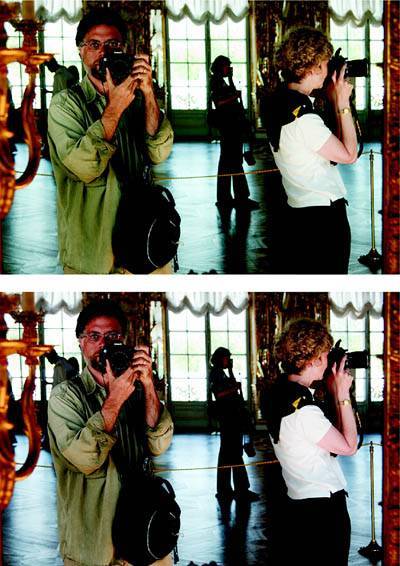
To use the eyedropper, select it and then click a part of your image that should be neutralnot white, and not colored, but a medium-tone gray. Sometimes it can be difficult to tell what, in your scene, was originally gray, but if you know for sure, then you can use the White Balance Eyedropper to perform a very accurate white balance correction with a single click (Figure 4.25). Figure 4.25. Just before taking this picture, I had been indoors shooting with my camera set to Tungsten white balance. Unfortunately, I didn't think to switch it back to Daylight when I stepped outside. Consequently, the white balance in the left image is dead wrong. Clicking the White Balance Eyedropper on an area in the image that is supposed to be a neutral gray restored the image to more accurate color.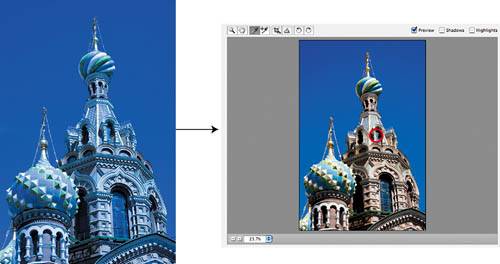 If you're not sure what might be gray in your image, try clicking tones that look close to gray or that are likely to be neutral; then choose the one that looks best. If you still can't find a tone that yields a good result, then click something white. This will get you pretty close to correct white balance, though your image may still look a little strange. You can then fine-tune the white balance using the Temperature and Tint sliders (we'll discuss Tint in the next section). If you've ever tried to correct a white balance problem using Photoshop's normal color correction tools, then you already know that it can be extremely difficult to restore correct color to an image that has bad white balance. The color shifts that occur with improper white balance extend all the way from the shadows to the highlights, making it impossible to find a single operation that can restore the entire scene. What's more, by the time you've performed this correction, you will have pushed your image data so far that you'll have very little latitude left for additional edits. The Levels control that we explored in Chapter 3 makes changes to your image by redistributing the pixel values that comprise your picture. As you saw, this redistribution results in potentially image-degrading data loss. Changing white balance in Camera Raw has no such consequences. It's a completely "free" edit in terms of preserving your image data. When you adjust the white balance of a raw file, you're not redistributing pixel values. Instead, you're making changes to the colorimetric definitions that your raw converter uses to interpret the colors in your original raw file. Rather than moving pixels, you're simply redefining the program's understanding of what each color is supposed to be. Thus, adjusting white balance in a raw file allows you to perform color corrections that would be impossible with any other color editing tool. Adjusting tintJust below the White Balance slider is the Tint slider. The White Balance and Tint sliders work in concert to produce an accurate white balance. When you select a white balance preset from the White Balance pop-up menu or click your image with the White Balance Eyedropper, Camera Raw automatically adjusts both sliders. In the simplest terms, the two sliders represent two different axes of color. The White Balance slider shifts from blue on the left to yellow on the right, while the Tint slider lets you move from green to magenta. When you move the White Balance slider manually, you may find that, though your color improves, it also picks up a green or magenta cast. You can correct this cast using the Tint slider (Figure 4.26). Figure 4.26. I corrected the white balance for this slightly complex mixed lighting situationheavy daylight through the windows combined with shady light and a tiny bit of tungsten in the buildingby first moving the White Balance slider. However, the image picked up a green cast. A small positive movement of the Tint slider shifted the image a little more toward magenta, eliminating the green.
It's not essential to set your white balance before performing other adjustments, but if the white balance in your image is blatantly wrong (as in Figure 4.26), then you'll have an easier time understanding what tonal corrections to make if you correct white balance first. If you make a very large adjustment with the Exposure slider, you may need to go back and tweak your white balance.
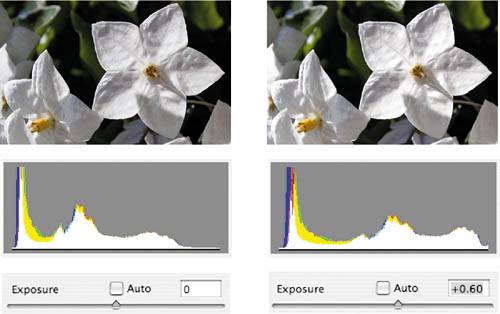
Adjusting exposureIn the simplest terms, the Exposure slider brightens your image. Just as you can adjust the brightness of a scene when shooting by selecting a different exposure, you can brighten your raw file by selecting a positive exposure adjustment using the Exposure slider. Intuitively enough, you can darken your scene by selecting a negative adjustment. The Exposure slider works very much like the Levels white point control that you learned about in Chapter 3. With that control, you can define how bright the brightest pixels in your image should be. Recall that with Levels, you can move the white point slider to a darker point on the histogram, and that point will become white. Your image will be brightened, with the pixels being redistributed in a way that maintains the shape of their overall distribution. Anything to the right of the new white point gets clippedchanged to pure white. When you look at your histogram after a white point adjustment, you will see your new tonal information spread all the way from black to white, probably with some gaps in it (Figure 4.27). Figure 4.27. With the Levels control, you move the white point to indicate which point on the histogram should be white.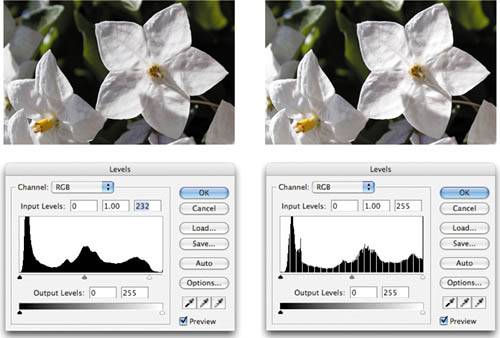 The Camera Raw Exposure slider works the same wayit also serves as a highlight clipping tool that allows you to redefine the white point in your image. The interface differs, though, in that the histogram updates on the fly while you move the Exposure slider. So unlike Levels, where you move the white point to a different spot on your image's existing histogram, the Camera Raw Exposure slider actually reshapes the histogram while you adjust. This allows you to immediately see what your final histogram will look like (Figure 4.28). Figure 4.28. When you adjust the Camera Raw Exposure slider, the data in the Camera Raw histogram updates in real time to show you the effect of your exposure adjustment.
As with the Levels control, you need to be very careful when adjusting the white point with the Exposure slider. If you clip too much highlight information, you'll lose details in the highlights of your image. However, the Exposure slider also presents some other concerns. Though it doesn't change the black point in your image, the Exposure slider does brighten the shadow areas. Shadow areas often contain noise, so as you brighten your image, you run the risk of making any shadow noise more visible (Figure 4.29). Figure 4.29. Be careful of using the Exposure slider to brighten an image. As shadows brighten, they may reveal noise.
Exposure is the most critical adjustment you'll make when processing your raw image, and you'll learn much more about it in Chapter 6. For now, use exposure control just as you would use the white point adjustment in the Levels control. Try to pick an exposure setting that doesn't clip your highlightsor doesn't clip them so much that loss of detail is noticeable. In general, it's best to adjust the Exposure slider so that the rightmost end of your histogram's datathe part representing the brightest pixelsjust touches the edge of the histogram itself, without clipping any highlights (Figure 4.30). Figure 4.30. On a well-exposed daylight image, you'll want to adjust the Exposure and Brightness settings so that your image data approaches the right edge of the histogram, but doesn't clip.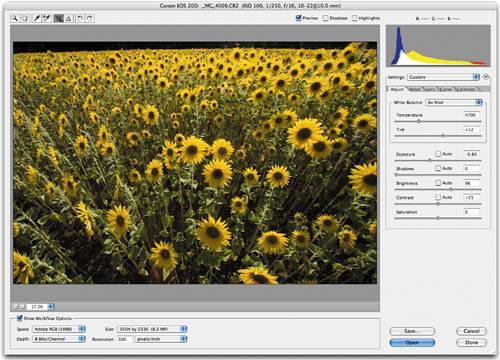 Adjusting shadowsThe Shadows slider lets you adjust the black point in your image in much the same way that the Levels black point slider does. As with the Exposure slider, you'll see your histogram update in real time when you use the Shadows slider. Just as the Exposure slider resets the white point in your image and clips everything above it, the Shadows slider resets the black point in your image and clips everything below it to solid black. Obviously, this can lead to a loss of detail, though clipped shadows are often less noticeable than clipped highlights. The Shadow slider is a little more sensitive than the Levels black point slider. Very small moves can have a very big effect, so you'll want to handle the Shadows control very carefully.
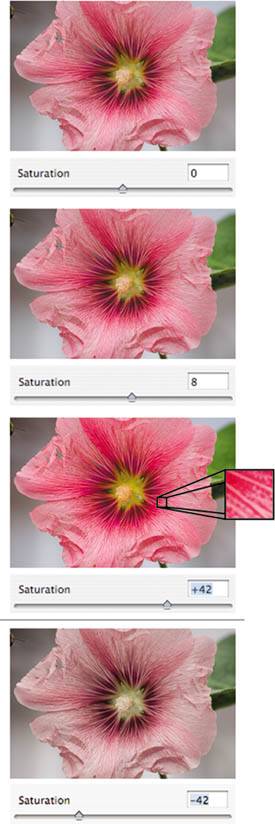
Adjusting brightnessThe Brightness slider lets you brighten or darken the midtones in your image, without altering the white or black point. Yes, this is exactly what the gamma slider in the Levels control does. For almost all edits, Brightness allows you to adjust your image without fear of clipping. However, if you're making extreme adjustments, it's worth keeping an eye on Camera Raw's clipping displays, just to ensure that Brightness hasn't overdriven your highlights. Adjusting contrastThe Contrast slider increases or decreases the contrast in your image. Positive movements create more contrast in your image (you'll see the data in your histogram expanding to cover more range), and negative values decrease contrast (causing the histogram to contract). Adjusting the contrast achieves the same effect as adjusting the white and black points at the same time; however, it doesn't actually change either point. You'll learn more about Contrast in the Chapter 6. NOTE The Brightness and Contrast sliders function very differently from the Brightness/Contrast command in Photoshop. Photoshop's Brightness/Contrast controls are very primitive and typically end up wrecking your image data. Camera Raw's Brightness and Contrast sliders are much more refined and useful. Adjusting saturationThe Saturation slider lets you alter the saturation of the colors in your image, either boosting the saturation to make colors richer or draining saturation to make colors appear more pastel. Using the Saturation slider is very simple: slide it to the right to increase saturation, and to the left to decrease saturation (Figure 4.33). Figure 4.33. You can increase the saturation of an image in Camera Raw by sliding the Saturation slider to the right. Don't go too far, though. Oversaturation can lead to posterizing, as you can see in the third flower. Sliding the Saturation slider to the left desaturates an image, ultimately yielding a grayscale picture.
Note that the Saturation tool can cause clipping in either the highlights or shadows, so you'll need to keep a close eye on your histogram when making saturation adjustments. Unlike white balance, saturation adjustments are not something you get "for free" in terms of your image data. It is possible to introduce posterization and tone breaks into your image using the Saturation control. However, if you're working in 16-bit modeone of the big advantages of raw over JPEGyou'll be able to push your saturation adjustments farther without incurring these problems. Adjusting white balance againOnce you've worked your way through Camera Raw's tonal correction controls, you may want to reconsider your white balance settings. Colors have tone, just as grayscale values do, and by the time you've finished with your tonal corrections, you may find that the colors in your image are slightly warmer or cooler than when you started. Consequently, you may need to make some slight adjustments to the Temperature and Tint sliders to get your color back where you want it. This doesn't mean that you've done something wrong with your other edits; it's just a simple fact of color adjustment.
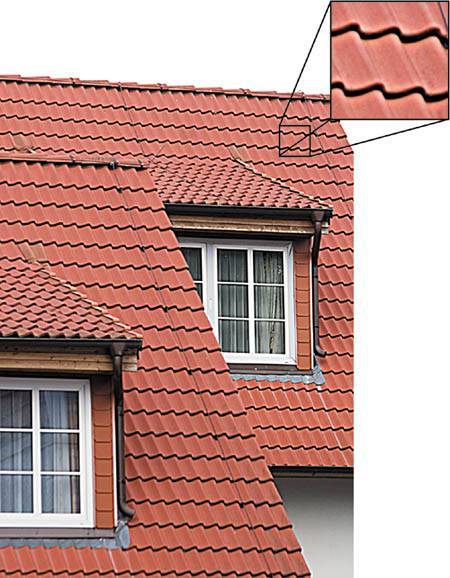
Using the Detail tabNOTE If you're using Elements 3, you won't have a separate tab for these controls. Instead, you'll find the Sharpness, Luminance Smoothing, and Color Noise Reduction sliders directly below the Saturation slider. With your image toned and corrected, you're ready to move on to the Detail tab, which will let you address any sharpness and noise troubles that your image might have. Adjusting sharpnessSharpening can be a touchy subject. While some people are very particular about sharpening and use special techniques to apply varying levels of sharpness to different parts of an image, other people simply want a quick sharpening process that makes their images look better. However, no matter what your particular sharpening taste, all of your raw images will need some sharpening. When you shoot JPEG, your camera automatically sharpens your image before it compresses and stores it. All digital camera images need some sharpening to make up for the slight blurring that's introduced to facilitate demosaicing (see Chapter 2 for details), if for no other reason. Your camera may provide options for several levels of sharpening when you're shooting JPEG, but if you're shooting raw, then your images will come out of the camera with no sharpening applied at all. No matter what your personal sharpening preferences, sharpening is something that should be applied at the very end of your editing workflow. If you're planning to make further adjustments to your image in Photoshop, then sharpening in Camera Raw may not be such a great idea. However, some people like to apply a little sharpening in Camera Raw and then perform more serious, localized sharpening later using Photoshop or a third-party sharpening tool. The Camera Raw Sharpness slider lets you apply sharpening by simply sliding the control to the right. Camera Raw's Sharpness slider uses the same sharpening method as Photoshop's Unsharp Mask filter, though with fewer parameters. Though it's generally best not to sharpen in Camera Raw since you'll probably make further changes later, it can still be handy to see what your image will look like sharpened while working in Camera Raw. Sharpening an image tends to increase its contrast, so being able to see a sharpened version of the image gives you a better idea of what the image's final contrast will look likesomething that can be essential for proper configuration of Camera Raw's tonal controls. Camera Raw provides a very simple solution to this dilemma. From the Camera Raw Preferences dialog box (open the Camera Raw pop-up menu or press Ctrl-K in Windows or Command-K on the Mac), choose Apply Sharpening to Preview Images Only (Figure 4.35). This will apply your chosen sharpening setting to the preview shown in the Camera Raw window, but will leave your final image untouched. Figure 4.35. Camera Raw's preferences provide an Apply Sharpening to Preview Images option that sharpens the image in Camera Raw's Preview window but leaves your final converted image unsharpened.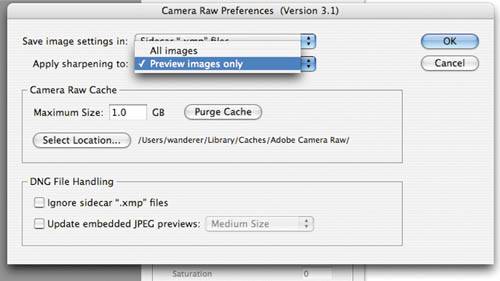 If you're unfamiliar with Photoshop's Unsharp Mask filter, it's important to know that you can apply too much sharpening to an image. An edge in a picture is usually characterized by a sudden change in contrast, so looking for contrast change is a good way of identifying edges, and therefore a good way of identifying areas that need to be sharpened. Unsharp Mask and Camera Raw's Sharpen slider work by identifying areas of sudden contrast change in your image. Once these areas have been identified, the pixels along the light side of the edge are lightened, and the pixels along the dark side of the edge are darkened. This increases the contrast of the edge even further, making it stand out more and, therefore, appear sharper. The risk with this sharpening technique is that if you apply too much of it, the edges in your picture will start to sport little halos of white and black. These halos can make an image appear "busy," with lots of distracting white and black textures (Figure 4.36). Figure 4.36. This image has had too much sharpening applied to it. The edges in the image are now bordered by halos of white and black pixels.
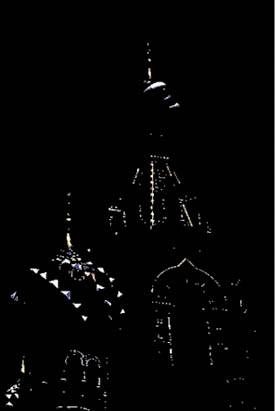
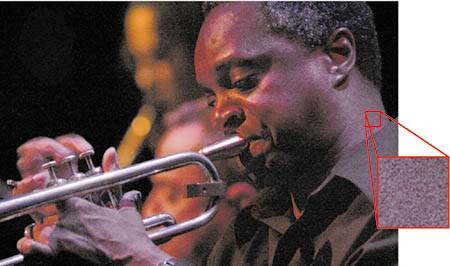
When applying sharpening, it's best to zoom in to view your image at 100%. This will give you a better view of the details of your image, and help you keep an eye on both the level of sharpening and the white and black halos that you're adding to your image. Using luminance smoothingWhen capturing an image, your camera performs a number of electrical processes such as converting each pixel's charge to a voltage and then converting that voltage to a digital count. These activities create two types of electrical noise in your image: luminance noise, which appears as speckled patterns that can appear vaguely similar to film grain, and chrominance noise, which appears as speckled, blotchy patterns of green, yellow, or magenta. Other factors increase the amount of noise in your image. The ambient temperature of your location and heat from your camera's internal electronics affect the temperature of your camera's image sensor. As the temperature of the sensor increases, so will the noise in your images. Noise also gets much worse as you increase the ISO setting of your camera. Noise levels vary from camera model to camera model, and your camera may not yield images that need much noise correction. The Luminance Smoothing slider lets you reduce the amount of luminance noise in your image. You won't find a lot of luminance noise when shooting at low ISO settings. If there's any to be found, it will be in the shadow areas of your image; midtone and highlight areas will probably be noise free. At higher ISO settings, the odds are good that you'll see noise throughout your entire image (Figure 4.37). Figure 4.37. Low-light photographs are extremely susceptible to luminance noise, the speckled patterns you see here.
Using the Luminance Smoothing slider is very simple: just slide it to the right to reduce the amount of luminance noise in your image. Luminance smoothing can result in a loss of sharpness and detail in your image, so you don't want to apply any more than you have to. Also, bear in mind that noise that's visible when looking at your image onscreen at 100% may not appear at all in print. This is especially true if you have a camera with a high pixel count. If you've brightened your image by moving the Exposure slider to the right, there's a chance that you will have revealed more of the shadow noise that's in your image. Thus, any time you make a big positive Exposure adjustment, be sure to look for increased shadow noise, and then try to reduce it using luminance smoothing. Reducing color noiseWhile luminance noise often provides a nice film-like texture, color noise is just downright ugly. Appearing as speckled patterns of colorusually magenta, yellow, or greencolor noise can find its way into the shadows and midtones of your image. Like luminance noise, color noise becomes worse at high ISO settings, but it can also be introduced if you brighten your image with Camera Raw's Exposure control. Removing chrominance noise can be very difficult using Photoshop's normal toolset. Camera Raw's Color Noise Reduction slider does an excellent job of removing color noise. NOTE If shooting in raw mode seems to be yielding noisier images than what you're used to in JPEG mode, you may be right. However, this doesn't mean that raw shooting somehow makes your camera noisier. Rather, the JPEG processing algorithms that most cameras employ tend to darken shadow areas, which serves to improve contrast, but also to hide noise. With Camera Raw, you have all the controls you need to manage shadow detail, contrast, and noise. As with luminance noise, you don't want to apply any more color noise reduction than you need to, as increasing it can affect the sharpness and detail in your image. You may find that Camera Raw's default Color Noise Reduction setting is a little aggressive, so it's worth experimenting with a lower value. Using the Lens tabWe now head into the features that are available in Camera Raw when running under Photoshop CS and CS2. Elements users won't find these tools, and while they're not essential, everyday tools, they can be very handy. If you're currently using Elements, it's worth taking a look at this section to see if any of these features warrant an upgrade.
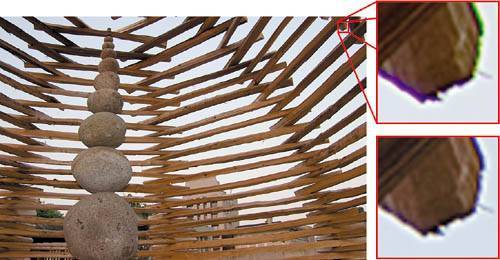
Reducing chromatic aberrationThe lens on your camera is not a single piece of glass, but a collection of lenses arranged in an array that's designed to focus light onto the image sensor inside your camera's body. Unfortunately, designing a "perfect" lens is impossible, and even an extremely good lens is very difficult to achieve, especially if it's a zoom lens. Consequently, there are a number of common problems that can afflict a lens. The most common are flares: those circles of colored light that appear on an image when you point the lens toward a bright light source. Less common are chromatic aberrations: color fringes (usually red or blue) that appear along high-contrast lines in your scene. Chromatic aberrations are the result of your camera's lens' inability to precisely focus all the wavelengths of light onto the same spot on the focal plane. The fringing occurs because some wavelengths are out of registration with the others (Figure 4.39). Figure 4.39. Chromatic aberrations, the weird colored fringes shown here, can be easily removed using Camera Raw's Chromatic Aberration sliders.
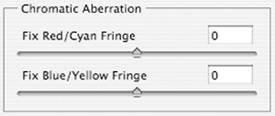
Chromatic aberrations usually occur only at very wide angles and extreme apertures, and only when shooting very contrasty situationsdark tree branches against a bright sky, for example. Camera Raw's Chromatic Aberration sliders let you reduceand in many cases, completely eliminatethese annoying colored fringes simply by moving two sliders. The Chromatic Aberration Fix Red/Cyan Fringe slider lets you reduce red or cyan fringes, and the Chromatic Aberration Fix Blue/Yellow Fringe slider lets you reduce blue or yellow fringes. The Fix Red/Cyan Fringe slider works by slightly shrinking the size of the red-channel image so that it falls back into registration with the green-channel image. The Fix Blue/Yellow Fringe slider does the same thing, but reduces the size of the blue-channel image (Figure 4.40). Figure 4.40. Camera Raw's Chromatic Aberration sliders let you attack two different types of colored fringing.
The Chromatic Aberration controls in Camera Raw are extremely effective and provide a simple solution to this sometimes vexing problem. Before you get too flipped out about chromatic aberration in your images, however, bear in mind that tiny fringes that you may be able to see when zoomed in to 100% on your computer screen may not be visible at all in print. Do some test prints at your desired print size before trying to solve a problem that isn't really a problem.
Correcting vignettingVignetting is the darkening of corners that can happen when shooting with wide-angle lenses. Camera Raw provides a simple vignette correction that brightens the corners of your image. Move the Amount slider to control the amount of brightening to apply, and move the Midpoint slider to control the center point for the vignetting correction. Using the Curve tabIf you've ever worked with the Curves control in Photoshop, then you'll be familiar with the interface provided on the Curve tab, which lets you perform very controlled, localized adjustments of the contrast and brightness of your image. We'll delve into the Curve tab in detail in Chapter 6. Using the Calibrate tabAs explained in Chapter 2, to process a raw file from a particular camera, any raw converter needs a profile for that camera. Among other details, this profile contains colorimetric information about the camera's basic RGB color response. Camera Raw is no different. Unfortunately, no matter how good a job Adobe does when building its camera profiles, they can't account for the fact that there can be variation between individual units of a particular type of camera. Thus, your particular camera may yield images that are, for example, a little more blue than images from another unit of the same make and model. The Calibrate tab lets you fine-tune Camera Raw's built-in profile for your particular camera. Calibration is a complex process that requires you to shoot images of special color calibration targets. These targets can be pricey, and you'll want to shoot them in a controlled lighting situation. We won't be covering calibration in this book, but you can learn more about it in Real World Camera Raw with Adobe Photoshop CS2 by Bruce Fraser, also published by Peachpit Press. Saving your imageWith all of your settings configured (in either Elements or CS2), you're ready to finish. Camera Raw provides several options at this point, each of which allows you to take a different approach to your camera raw workflow. No matter which program you're running or what workflow you use, one of the great things about raw is that no matter what save options you choose, your original raw file will never be altered. Camera Raw does not save any changes back into your raw filethe file truly functions as a digital negative. You can open the same raw file several times, apply different adjustments, and save out multiple versions, but your raw file will always remain pristine. Saving in Photoshop CS2Camera Raw's default saving option is the Open button, which processes your raw image according to the settings you've defined and then opens the resulting image in Photoshop. Obviously, if you want to make further edits, print, or convert your image to another format, this is the way to go (Figure 4.41). Figure 4.41. When running under Photoshop CS2, Camera Raw's save buttons provide several options for handling your processed image.
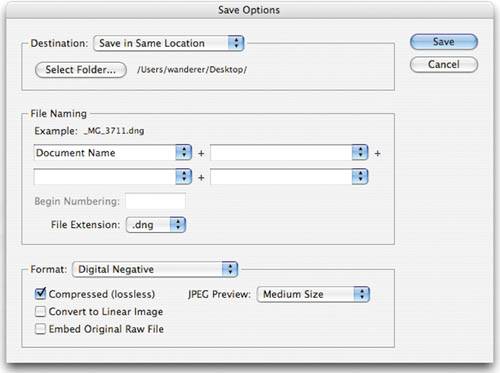
If you don't plan on making any more edits, or if you want to move on to processing other raw images before embarking on further Photoshop work, then click the Save button. This will bring up Camera Raw's Save Options dialog box, which lets you choose a file format, pick a destination, and add automatically numbered extensions to your file names (Figure 4.42). Figure 4.42. Camera Raw's Save Options dialog box lets you select a format, location, and special file naming options for your processed raw file.
The Cancel button dismisses the Camera Raw dialog box without saving any files or opening anything in Photoshop. The Done button neither opens the raw file nor saves a processed file. Instead, it simply saves your settings so that next time you open this raw file, it will already have the settings you've just defined. The idea is that you can work through a bunch of raw files and specify settings for each of them, but put off the processing of the files until later. Because processing can take a long time, this affords a simple batch processing mechanism. All of these approaches provide several options and facilitate a few different raw processing workflows. We'll delve further into the details of saving and batch processing from Camera Raw in Chapter 5. In the meantime, it's probably best just to use the Open button and then save the resulting file from Photoshop. Saving in Elements and Photoshop CSIf you're using Elements, your saving options are fairly simple: click OK, and Camera Raw will process your image and then open it inside Elements. Remember, at this point, that there's no actual saved file of your processed imagejust the original raw file and the opened document that you now have within Elements. To create a saved document, you need to save it from within Elements, using the standard Save dialog box. |


EAN: 2147483647
Pages: 76