Chapter 4. Getting Started with Camera Raw
| Milton Cardona with his Eya Arania Ensemble, performing at a wedding in upstate New York. Canon EOS 20D, 1/30s at f/4 with a Canon 10-22mm EF-S lens.
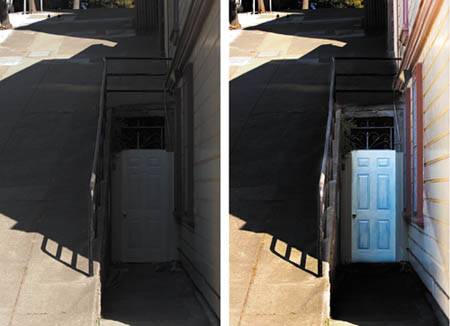
We all know the arguments for digital over film: instant feedback, smaller cameras, no film or processing costs, none of the hassle of carrying and changing rolls of film. But nowadays it's hard for the digital photographer or 35mm film photographer to remember that mass-produced roll film was actually a similar convenience when compared to the tools and techniques required in the early days of photography. Early masters of photography such as Ansel Adams not only had tremendous command of exposure and composition, but they also were experts in film chemistry. They spent countless hours making their own photographic paper and preparing custom emulsions for their film plates. They experimented at length with everything from the mixture of their chemicals, to the timing of development, to the amount of agitation used while processing their film. Because they had such a precise understanding of the chemical response of the film and paper that they had created, when shooting they frequently made exposure decisions based upon how they expected to process the film when they got back to the lab. While looking through the camera, they never lost sight of what they would need to do in the darkroom to achieve the image they were visualizing. Though these photographers were frequently referred to as "expert craftsmen" or "master artisans," if they were alive today we would use another word to describe them: geeks. These people were the original photography gearheads and nerds. Granted, they also had an incredible level of innate talent and artistry, but this talent was useful only thanks to their fundamental understanding of the basic imaging characteristics of their technology. Shooting raw requires a similar combination of technical understanding and visual artistry. When you shoot raw, you're capturing fundamental image data, just like the fundamental data captured by a piece of film. It's only after that data is processed through raw conversion software that a usable image appears. Because raw conversion is not an objective, quantifiable process, the quality and appearance of the image produced from a raw file may vary from one raw conversion program to another. However, in the future, as raw converters improve in quality, you will be able to go back to your original raw files, reprocess them, and possibly get better results. In this chapter, you're going to learn the basics of Adobe's Camera Raw converter. You'll learn how to open and process images and how to use the seemingly simple controls provided in Camera Raw. Understanding what each slider and control does is essential to processing your images and getting good results, but it's important to learn more than just the theory behind the tool. The camera is only one part of the photographic process. Since the inception of photography, good photos have depended as much (and sometimes more) on good darkroom work as on good shooting skills. Digital photography is no different. And just as geeky master photographers of old made shooting decisions based on their understanding of what they could achieve in their darkrooms with their chosen chemicals and films, you need to develop a similar understanding of your raw converter and editing software. The image in Figure 4.1 is very flat and not particularly dramatic. When I shot it, though, I knew that I would have enough latitude in my image to brighten up the doorway and wall to create a very different picture. Figure 4.1. Because I had a good idea of how much I could push and pull the tones and colors in my image, I was able to visualize a more dramatic image when I saw this scene.
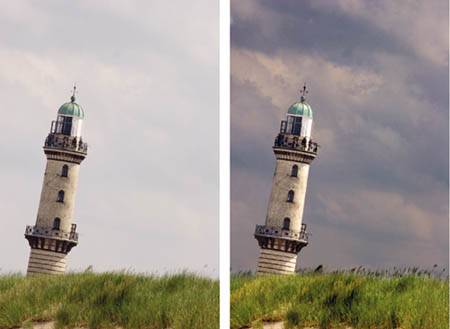
The image in Figure 4.2 was initially nothing more than a composition exercise. As I shot, though, I realized that I would be able to pull a lot more contrast out of the sky and deepen the texture and saturation of the lighthouse to make a more compelling picture. Figure 4.2. Paying attention to the potential contrast and color in a scene is essential to visualizing a good photo when you're in the field. But the only way to recognize those potentials is to become familiar with the capabilities of your editing software.
So while working through these explorations of Camera Raw, don't just try to memorize what each control does. Play with the controls and experiment with images from your particular camera, and pay attention to how much you can brighten or darken an image before it turns noisy or blows out. Note how far you can expand the contrast of an image before you start to see posterization artifacts. Different cameras yield different amounts of data, so try to get a feel for how much latitude the images from your camera have. This understanding will help you identify potential pictures when you're out shooting. We'll discuss this topic more in Chapter 6. |

EAN: 2147483647
Pages: 76