Customize the Dock
By default, the Dock is located on the bottom of your display and is quite large. In addition to changing the location and size, the Dock has a few additional tricks up its sleeve, all available in the Dock preference pane. Many of the Dock’s settings can also be changed via a contextual menu or through direct clicking on the Dock. The different ways to initiate all of the commands is discussed under each heading. That said, to gain access to all of the Dock’s available options in one place, open the Dock preference pane, shown in Figure 4-6. Choose Apple Dock Dock Preferences (or Apple System Preferences Dock). The Dock pane of System Preferences appears, as shown in Figure 4-6.

Figure 4-6: Change Dock size, magnification, hiding, position, and visual effect in the Dock pane of System Preferences.
Resizing the Dock
The Dock resizes automatically as items are added to or removed from it, but you can also manually resize the Dock (and the icons in it) yourself. To do this, move the Dock Size slider from Small to Large and release at the desired size. Alternately, move the pointer to the vertical line that separates application icons from folder and document icons. When the pointer changes to look like a two-headed arrow, drag down to make the Dock smaller or up to make the Dock larger. Figure 4-7 illustrates the difference between a large and a small Dock.
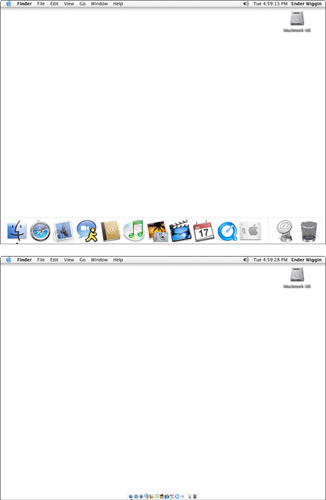
Figure 4-7: The Dock at maximum size, filling the width of the screen (top), the Dock at minimum size (bottom).
| Tip | To scale the Dock up or down incrementally, so the icon size is always a multiple of 16 pixels, press Option while you drag the separator line. |
Setting the Dock position and hiding
The Dock can be at the bottom of the screen or at either side. The bottom of the screen is longer than the sides and has room for more Dock icons. That said, the Dock will get in your way more at the bottom than on a side. At the bottom of the screen, the Dock interferes with making windows the full height of the screen to minimize vertical scrolling. This has become obvious as more and more users migrate to widescreen-style displays. The increased room left to right translates to less room top to bottom, and the dock takes up a healthy portion of that top to bottom space!
The Dock, when permanently displayed, is least obtrusive on the right side of the screen, because most applications display windows aligned with the left side of the screen. To reposition the Dock on the left or right side of the screen, select the appropriate radio button in the Dock preference pane. As an alternative method to reposition the Dock, hold the control key and click on the vertical separator in the Dock, and click to check the desired location from the Dock position onscreen pull-out menu.
Regardless of the Dock position, to conserve space, the most desirable option is to have the Dock stay out of your way altogether. This is accomplished by having it hide until you move the pointer to one of the edges of the screen. In the Dock preference pane, select the Automatically hide and show the Dock option. (Alternatively, you can Control-click on the vertical line that separates application icons from folder and document icons, and select Turn Hiding On.) This option will cause the Dock to retreat beyond the edge of the screen. When your mouse is moved to the area where the Dock should normally be, the Dock emerges from hiding, ready for use. This is the best way to get the most out of your available screen real estate.
Setting Dock magnification
When you resize the Dock to make the icons very small, it becomes difficult to distinguish between the various items. As a solution to this, the Dock can magnify icons as the pointer approaches so they are easier to recognize. To enable this feature, click the Magnification checkbox. The Magnification slider will no longer be dimmed out. This slider adjusts the amount of magnification that occurs when your pointer rolls over a particular item in the Dock. Alternatively, you can Control-click the Dock’s separator line to display its contextual menu, and choose Turn Magnification On. When magnification is turned on, the menu commands change to Turn Magnification Off. Figure 4-8 shows the results of magnification active and set to the middle rate.
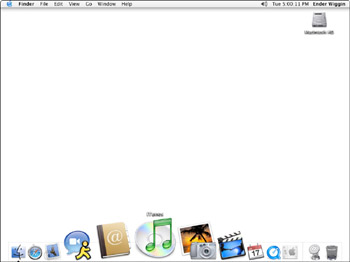
Figure 4-8: Magnification is a way to better see the items in the Dock as the pointer approaches.
Choosing a visual effect
When you minimize a window, the Dock normally shows a visual effect that resembles a genie being sucked into a bottle.
The genie-in-a-bottle visual effect that occurs when you minimize a window is impressive, but after a while, you may get tired of it and wish the window would just minimize more quickly. For this purpose, Apple has made the Scale Effect. It’s simpler and faster than the Genie Effect (in which the window gradually gets smaller as it minimizes). You can set the visual effect by choosing Scale Effect in the Minimize using pull-down menu in the Dock preferences pane, or you can Control-click the separator line in the Dock and then choose Scale Effect in the pop-up menu.
Adding items to the Dock
Add any item to the Dock by simply dragging it to the Dock. This creates a Dock-based alias of the item. Note that there is no small arrow in the lower left nor the word alias in its name to signify its alias status, but since the actual item remains in its original location, and this Dock item merely points to it, the icon in the Dock is a kind of alias. Applications must be placed on the same side of the separator line as the Finder; documents, folders, and other disks must be placed on the other side of the line. Placing an application’s icon in the Dock gives you one-click access to the application regardless of what application is currently active. When you place a document or folder icon in the Dock, it is quickly available with a single click.
Removing Dock icons
Removing an item from the Dock is also extremely simple. Drag the icon out of the Dock, let go, and it disappears in a puff of smoke. You can’t remove the Finder or the Trash from the Dock.
Moving icons in the Dock
You can rearrange icons in the Dock by dragging them to different positions. As you drag an icon across the Dock, the other icons move apart to make room for the icon you’re dragging. You can place the icon you’re dragging in any space that opens up by releasing the mouse button.
Using Dock folder navigation
The real convenience and power of the Dock is felt when you place a folder or disk icon in the Dock. As with all items in the Dock, clicking it opens it. An application when clicked will open; a document when clicked will open in its target application. Click a folder, its contents appear in a new Finder window. But if you click and hold (or Control-click) a folder icon in the Dock, you see a hierarchical menu that enables you to traverse the folder structure and navigate down deeper into the folder’s contents. Release the mouse button after this menu appears, navigate through it, and then click any item in the menu to open it. If you prefer, click and hold the mouse button the whole time you navigate, and release the mouse button on the desired item. A folder’s pop-up Dock menu also contains a Show in Finder command. Choose Show in Finder to see the folder in a Finder window. Figure 4-9 shows an example of a folder’s pop-up Dock menu.
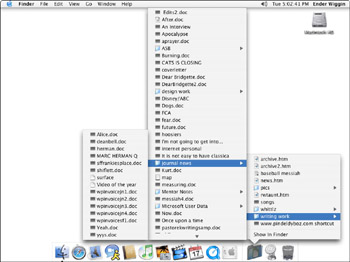
Figure 4-9: Get to any part of a folder when its icon is in the Dock.
Applications in the Dock
In addition to the shortcuts that are already in the Dock, every open application adds its own icon to the Dock temporarily. When these applications quit, the icon will fade, shrinking the Dock back to its original state. All open applications are identifiable by a small black triangle-shaped marker that appears below the application’s icon in the Dock. When you click and hold (or Control-click) the icon of an open application in the Dock, a pop-up menu appears, giving you application-specific choices. For example, the Finder’s pop-up Dock menu presents a list of available windows, and you can choose one to bring it to the front. Other applications list different commands and items in their pop-up Dock menus. Figure 4-10 shows an example of the iTunes pop-up Dock menu, displaying options to Quit, Hide (which banishes all open windows off screen, to help free up screen space), Show in Finder (which opens a new Finder window displaying the item in its location on the disk), and all the open windows that can be brought to the front by selecting them from the pop-up menu. If the application is not permanently added to the Dock, another option will appear: Keep in Dock. Selecting this option is another convenient way to prevent an application from leaving the Dock after quitting the application.
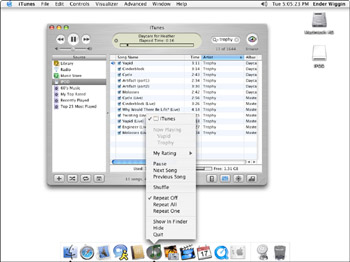
Figure 4-10: The pop-up Dock menu of an open application may include items that are specific to the application.
Minimizing windows in the Dock
When you minimize a window by clicking its Minimize button, the Genie or Scale effect occurs, leaving you a miniature version of the window in the Dock (on the right side of the vertical separator). Whatever was displayed in that window is also displayed, but reduced in size, in the minimized window. Furthermore, the window belongs to an application that is still running, and the application may continue updating the minimized window in the Dock. For example, Apple loves to demonstrate this capability by playing miniature QuickTime movies in the Dock. (Chapter 20 describes how to work with QuickTime movies.) Click a minimized window icon in the Dock to restore the window to full size and its original position.
EAN: 2147483647
Pages: 290