Interacting with Icons
Whether you are viewing your windows in list mode, column mode, or icon mode, the items you interact with day-to-day are all icons. All icons respond universally to a few standard interactive techniques. This section explores some of them, preparing you for a more in-depth look at your environment in the following Chapters. Modifying the appearance of items is covered in Chapter 4. Opening applications and creating/editing documents is covered in Chapter 5.
Selecting icons
Everyone who uses a Mac quickly learns to select an icon by clicking on it with the mouse, but even some seasoned veterans don’t know that you can select icons individually by typing instead of clicking. In addition, you can select more than one icon at a time using various techniques.
When you select an icon, the Mac OS highlights it by creating a border around it and by highlighting the item’s name. Figure 3-19 shows an example of an icon that is highlighted and one that isn’t.
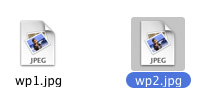
Figure 3-19: Mac OS X highlights the selected icon by surrounding it with a shadow and highlighting the title.
Selecting multiple icons by clicking
Ordinarily, clicking an icon selects it (highlights it) and deselects the icon that was previously highlighted. After selecting the first icon, you can select a group of icons in the same window by pressing the z key while clicking each icon in turn. At any time, you can deselect a selected icon by holding down the z key and clicking it again.
Selecting multiple items in a column view
In a window where icons are displayed in a list or column, you can select a whole range of icons with two clicks. First, you click one icon to select it; then you press and hold the Shift key while clicking another icon to select it and all the icons between the first icon and the one you just selected. In a Column View, when multiple items are selected, preview data in the right-most column is not shown, nor do selected folders expand in the next column.
Selecting from multiple folders in a list view
In a list view, you are afforded an additional technique for selecting with z-clicks. After expanding several folders in a list view, you can simultaneously select items in any of the expanded folders. To select an additional item, press z while clicking it. If you want to select consecutive items, drag a selection rectangle across the consecutive items or select the first item and Shift-click the last item. If you need to deselect a few items, z-click each item. Figure 3-20 shows a list view with items selected from two folders.
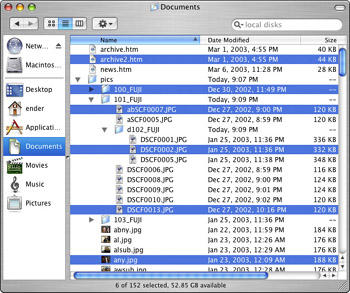
Figure 3-20: In a list view, you can select items from multiple folders.
Selected items remain selected if you expand or close other folders in the same window. Note that any selected items in a folder you collapse are no longer selected.
Selecting multiple icons by dragging
In addition to selecting multiple icons by clicking with the z or Shift keys, you can select adjacent icons by dragging the mouse pointer across them. As you drag, the Mac OS displays a shaded rectangle, called a selection rectangle, and every icon it touches or encloses is selected. Icons are highlighted one-by-one as you drag over them, not en masse after you stop dragging. All icons must be in a single window. Figure 3-21 is an example of selecting several icons with a selection rectangle.
Figure 3-21: Drag across adjacent icons to select all of them.
You can combine dragging with the use of the z key. Pressing z while dragging a selection rectangle across unselected icons adds the enclosed icons to the current selection. Conversely, pressing z while dragging a selection rectangle across selected icons deselects the enclosed group without deselecting other icons (if any).
Selecting by typing
When you know the name of an icon that you want to select but aren’t sure where it is in a window, you can quickly select it by typing. Typing may be faster than clicking if the icon you want to select requires lots of scrolling to bring it into view.
To select an icon in the active window by typing, simply type the first part of its name. You need to type only enough of the name to identify the icon you want uniquely. In a window in which every icon has a completely different name, for example, you need to type only the first letter of a name to select an icon. By contrast, in a folder where every item name begins with Mac, you have to type those three letters plus enough additional letters to single out the icon you want. This typing must be done reasonably quickly, as any lengthy delays will result in the computer assuming you are searching for a new file. This will frustrate slower typists. (And, perhaps, serve as inspiration for some intense typing practice?) When selecting by typing, capitalization doesn’t matter.
Also, pressing one of the arrow keys selects the icon nearest the one currently selected in the arrow’s direction. In a window where icons are not displayed in a list, pressing Tab selects the next icon alphabetically and Shift-Tab selects the previous icon alphabetically. Table 2-1 summarizes keyboard selection techniques.
| To Select This | Do This |
|---|---|
| An icon | Type the icon’s partial or full name. |
| Next icon up or down* | Press Up or Down Arrow ( ) or ( ) |
| Next icon left or right* | Press Left or Right Arrow ( ) or ( ) |
| Next icon alphabetically* | Press Tab. |
| Previous icon alphabetically* | Press Shift-Tab. |
[1] *Applies only to a window where icons are not displayed in a list.
Through a simple Control-click on an item, the contextual menu is revealed. Each item’s contextual menu is different, depending on the item’s type (thus the name, contextual). Folders, documents, aliases, disks, and applications all get their own suite of options. All the commands made available in a contextual menu are available elsewhere, via the File menu, the Apple menu, or some other way, but the contextual menu is a convenient and fast way to apply commonly used commands to an item. Bringing up the contextual menu for the desktop and selecting Change Desktop Background brings up the Desktop & Screen saver preference pane, which enables you to change the desktop background. The contextual menu for a standard document has an Open With option. This expands via a submenu to show compatible applications. It’s a convenient way to open a document with a different application. We refer to contextual menus often, and strongly recommend purchasing a two-button mouse and using the right-button. The two-button method is much easier and faster than the “Steve-Jobs-two-handed” control-click method.
Moving icons
After selecting a few items, you may wish to move them around. To move files from folder to folder, simply select the files, then drag any of the items to the new desired location. You can drag an item by its icon or its name. In a list view, you can also drag an item by any text on the same line as the item’s icon, such as its modification date or kind. The new location for your item can be the desktop, an open Finder window or a closed folder. When you position the item you are moving over a folder icon, the Finder highlights the destination icon by making it darker. When you drag an item over a Finder window, the Finder highlights the window by drawing a heavy border inside the window frame. The highlight visually confirms your target.
When you release the mouse button, the item will be moved from its original location to the newly selected one. There is one exception: if you are attempting to move a file to a different disk, the mouse pointer changes from a black arrow to a plus sign within a green dot. This symbol signifies that you are not moving the file to the new location, but rather making a copy of the file to the new location. The original item will be unaffected.
If a folder or disk is open, you can move it by dragging the small proxy icon in the title bar of its window. To drag a proxy icon, you must place the pointer over it and hold down the mouse button for a second before dragging the icon away. Proxy icons are handy when you want to move a folder that is already open. Even if you can’t see the folder’s regular icon, you can move the folder by dragging its proxy icon to a Finder window, the desktop, a different folder’s icon, or the Dock.
Replacing items
If you move an item into a folder that contains another item of the same name, you are confronted with an alert, asking if you want to replace the file at the destination. (If you copy a group of items and more than one of them has the same name as items at the destination, you are alerted one-by-one for each of the duplicates.) Clicking Replace will erase the items noted in the alert window from the destination folder and replace them with the moved items. Clicking Stop will cancel the move operation. Figure 3-22 shows an example of the alert the Finder displays to verify replacement.
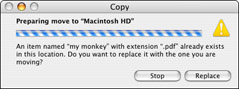
Figure 3-22: The Mac OS X Finder lets you decide whether to replace existing files of the same name.
Spring loaded folders
To move an item from one folder to another, you do not need to have both folders open in separate windows simultaneously. You can deposit an item directly on top of another folder. This will place the item within the folder. If you want to delve deeper, use Apple’s extra-nifty Spring Loaded Folders feature. Drag an item over a folder to highlight it and hold it there. After a brief delay, the folder blinks twice as if double-clicked and opens to display its contents. If there wasn’t a window already opened, a new one will open. You can then place the item within the folder that has been sprung, or repeat the process with more and more subfolders as they are revealed. If you open the wrong folder with this method, either move the item out of the window (which will close the window), or move the item over a location in the sidebar to navigate there. For example, if you delve too deeply into your Documents folder, go back to the root level of your Documents folder by dragging over its icon in the sidebar. After the brief Spring Loaded Folder delay, your window will now display the Documents folder, and you can reattempt the moving process. After you release the item into its new location, the item is placed there. It is worth noting that if the window was created by the Spring Loaded Folders function, releasing the item places it in its new location and also closes the window.
This technique works for disks as well; dragging an item directly on top a disk (and waiting for the term of the prescribed delay) will open a new Finder window displaying the contents of the root level of the selected drive. The length of delay time before springing is set in the Finder preferences, as covered in Chapter 4.
Replicating your files
There will be times when you may need to replicate a file, either to make changes to one while preserving the original version, or to copy the file from one disk to another. The commands Copy or Duplicate are typically used, and are interchangeable in this context for all intents and purposes. In either case, there are a few simple techniques available.
If you move a file to an incorrect location, assign the wrong file name, or incorrectly label a file with a color, pressing z-Z (or selecting Undo from the Edit menu) will undo the erroneous move/name/color. The function will undo only the last action performed, and the Undo operation will not undo an item replacement or deletion. It will simply restore items to their original location or name or color, but replaced or deleted items are gone for good! Of course, it’s still a powerful tool to use. In fact, after using the Finder’s Undo feature a few times, we all wish the other aspects of our lives had an “undo.”
Duplicating an item
To generate an identical copy of a selected item in the same location as the original, use the Duplicate command. To perform a duplicate operation, single-click on an item and select Duplicate from the File menu. If the item chosen is a folder, the duplicate contains duplicates of everything in the original folder. The newly created item will be placed in the same folder as the original, but with the word copy tagged onto the end of its name. This phrase is added to the end to help distinguish between the original and the copy, and because two files with the same name cannot exist simultaneously in the same folder. (The computer would have no way to know which one is which.) Additional copies of the same item also have a serial number added after the word copy. If the name does have a file extension, the word copy and the serial number appear before the extension. For example, the first duplicate of a folder named Untitled Folder is Untitled Folder copy, but the first duplicate of a file named Readme.txt is Readme copy.txt. The keyboard shortcut for Duplicate is z-D. You can also duplicate a file with the contextual menu, selecting the Duplicate option when control-clicking on an item.
Copying an item
The main difference between Duplicate and Copy is that Duplicate creates the new item in the same location as the original and tinkers with the new item’s name, whereas Copy does not. A copy can create items in the same folder, forcing the name change, but it can also create files in new locations, with no need to change the name, due to the alternative location (i.e., no name conflict).
To copy a file, select the item, and then choose Copy from the Edit menu (or contextual menu). Then, navigate to the new desired location and make it active. Select Paste from the Edit (or contextual) menu to initiate the copy. This method works best with a two-button mouse, as all copies can be done with one hand.
Another method is to hold down the Option key and then drag the file. The pointer will switch from its normal status as an arrow to becoming a plus symbol in a green dot. This signifies that you are about to copy the file to the selected location, rather than just move it there.
The Finder always copies an item when you drag it to a folder that’s on another disk. Again, the Finder displays a little plus sign on the pointer when you position an item over a folder of a different disk.
Replacing an item
Much as with moving files, when you copy an item to a folder that already contains an item by the same name, an alert asks whether you want to replace the item at the destination. If you copy a group of items and more than one of them has the same name as items at the destination, you are alerted one by one for each of the duplicates. Clicking Replace will erase the items in the destination folder and replace them with the new copies. Clicking Stop will halt the copy operation.
Renaming Files
After an item is selected, you can rename the item to better reflect your needs. For example, you may need to reflect changes in the document by tacking on a “revised” to the name, or you may just want to rename an item to reflect its creator or content “Story from Mom” or “Picture of Famke Jannsen.” Some items can be renamed with impunity, while other items are best left unmodified. Documents can be renamed with total freedom. Applications and system files should not be renamed on a whim. (If you aren’t sure, don’t rename them!) Disks can be renamed with freedom, although the new name may goof up some external things, like aliases and path shortcuts. (Aliases are covered in detail in Chapter 4, network paths are covered in Chapter 15.)
Archive creation is a new standard feature in Panther. This was once handled by third-party software, but now the OS does it internally. What is archiving? Archiving compiles and compresses any number of files selected into a single, smaller, more protected file. Select any folder, disk, item (or group of items), and select Create Archive of <filename> from the File menu (or from the contextual menu). When using the archive command, a progress bar will briefly appear as the system is creating the archive. Archiving is often necessary to email files to friends, as email really kicks your files around in transit (much like the post office does with your mail), and often corrupts them. This is especially true when trying to email more than one item at a time. By compressing the files into a single archive, you protect them from harm as they zoom around the Internet. This archiving is also a form of compression. Compression makes a file smaller without actually reducing any of the quality (when the file is uncompressed it goes back to its original size). Compression is obviously useful if you want to preserve space on your disk, or if you just want to make a particular cluster of files into a single, easily manageable item. After the archive is created, you can un-archive the files by simply double clicking on it. The archive will be opened and the files safely extracted by any of a number of available tools. After extraction, the archive will remain in its original form, still full of your files.
To rename a folder, file, or other item, you must explicitly select its name. After you have performed the selection correctly, the item’s name will be highlighted with a lighter shade of the selection color (remember, when items are selected, the icon is highlighted, and the name is surrounded by a color). The lighter shade highlighting the name indicates that the entire text is selected and ready for replacement. There are a few different methods to achieve this, depending on the way your items are displayed.
-
In any view mode: First select the item, and then strike the Return or Enter key.
-
In Icon view: Single-click on the text of the name, rather than the icon. After a brief delay, the name will be highlighted with the lighter shade.
-
In the List view or Column view: You must first select the item using any method you choose, then wait briefly and click the selected item’s name. If you issue the second click too quickly, the computer will think you are double-clicking though, and open the document rather than selecting the name for editing. In either case, after a brief delay, the name will be selected for your editing pleasure.
-
In the Get Info window: You can change the name in the Name and Extension panes. When the name is first selected, the entire name is highlighted. With the whole name selected this way, you replace it completely by typing a new name. If you want to change only part of the name, you can select that part and replace or delete it. You can also place an insertion point and type additional text. Figure 3-23 shows one icon name entirely selected, another name partially selected, and an insertion point in a third name.
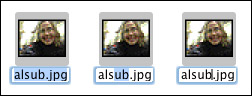
Figure 3-23: Select all of an icon name (left), part of an icon name (middle), or simply type new text from an insertion point (right).
To replace or delete part of an item name, do the following:
-
Select the name for editing. Use any of the methods just described.
-
Position the pointer where you want to begin selecting in the name. When the pointer is over the selected text, it should be shaped like the letter I.
-
Hold down the mouse button and drag the pointer to select part of the name. As you drag, Mac OS X highlights the text you are selecting.
-
To select one particular word in a name, you can double-click the word instead of dragging across it.
-
Release the mouse button to stop selecting.
-
Type a replacement for the selected part of the name or press Delete to remove the selected text.
-
Press Return to end your editing. Alternatively, you can click outside the name that you’re editing.
To insert text in an item name, follow these steps:
-
Select the name for editing. Use any of the proscribed methods.
-
Position the pointer where you want to make an insertion. When the pointer is over the selected text, it should be shaped like the letter I.
-
Click to place an insertion point. A thin flashing line (known as the cursor) marks the position of the insertion point.
-
Type your additional text.
-
Press Return to end your editing. Alternatively, you can click outside the name that you’re editing.
When the desired name is entered, press return or enter to complete the renaming. If you decide you don’t want to rename the item, but have already accidentally erased the original name, don’t panic! Press the Escape key before pressing return and the original name will be restored. If you have already pressed Return and applied the name, all is still not lost. Use the Finder’s Undo feature to revert the name. To use the Undo, press z-Z. The Undo feature is covered in greater detail later in this Chapter.
Naming with Cut, Copy, and Paste
While editing a name, instead of typing the name from scratch, you can use the Cut, Copy, and Paste commands in the Edit menu. To copy all or part of an icon name, select the part that you want to copy and choose Copy from the Edit menu. The Copy command places the selected text on the Clipboard, which is an internal holding area. Then you can paste what you copied by selecting all or part of another icon’s name and choosing Paste from the Edit menu. At this point, you can make changes to the name that you pasted. Whatever text you copied remains on the Clipboard until you use the Copy command again or the Cut command. The Cut command works just like the Copy command, but Cut also removes the initially selected text while placing it on the Clipboard. Cut, Copy, and Paste operations are covered in greater detail in Chapter 5.
With an icon name selected for editing, you can also move the insertion point or change the selection by using the arrow keys.
|
| Moves the insertion point to the beginning of the name |
|
| Moves the insertion point to the end of the name |
|
| Moves the insertion point to the right |
|
| Moves the insertion point to the left |
| Shift- | Selects more (or less) of the name to the right |
| Shift- | Selects more (or less) of the name to the left |
Whether Shift- and Shift- selects more or less depends on the direction that you dragged when you initially selected part of the name.
| Note | Some item names cannot be selected for editing. You can’t rename such an item because it is locked or you don’t have Write privileges for the item. You may be able to unlock the item, but you probably can’t give yourself Write privileges. We discuss locking and unlocking later in this Chapter. Privileges are covered in detail later in Chapter 14. |
Some notes on naming
Mac OS X is very forgiving with regards to naming rules. With support for 255 character-long names and all the funky symbols you can imagine, names in the Mac OS X world are only limited by your imagination. That said, your friends and their Windows machines are not so forgiving. If you ever intend to share your documents or submit them for publication or review, then you should obey certain rules.
-
Avoid special characters, like the infinity symbol (∞), the bullet symbol (•) or the euro symbol (†) in the file name, because the Windows OS may not render these characters correctly. Because of having incorrectly represented characters in a name, the files may come up as unreadable for others.
-
Names can’t include colons because the Mac OS uses colons internally to specify the path through your folder structure to a file. A pathname consists of a disk name, a succession of folder names, and a file name, with a colon separating each name. For example, the pathname Macintosh HD:Applications:Chess specifies the location of the Chess application on a startup disk named Macintosh HD. Putting a colon in a file name would interfere with the computer’s scheme for specifying paths, so the Finder won’t let you do it.
-
Although the Finder won’t let you use colons in a file name, it will let you use slashes. It is strongly advised that you never use slash characters (/ or \) in your file names. Windows machines read these characters as indicating the path on their disks, and the computer will be looking to folders that do not exist, resulting in a completely inaccessible document (unless your friend is smart enough to figure out how to rename the files).
Mac OS X doesn’t permit you to move, rename, or copy everything, and it won’t let you put stuff anywhere you want. For example, you can’t move or copy your items into another user’s home folder. Conversely, you can’t move or rename items that belong to other users, although you may be able to copy other users’ items into your folders.
The Finder won’t let you move an item from its current location or rename it unless you have Write privileges for the item. If you try to move an item for which you don’t have Write privileges but do have Read privileges, the Finder makes a copy of the item instead. If you don’t have Write or Read privileges for an item, the Finder doesn’t let you move, rename, or copy the item.
Regardless of your Write privileges for an item that you want to move or copy, you must also have Write privileges for the destination folder. If you try to move or copy an item to a folder for which you don’t have Write privileges, the Finder displays an alert, saying the destination folder cannot be modified.
We cover privileges in Chapter 14.
-
Periods are also not recommended as both Mac OS X and Windows use the information following the period to determine a file’s type. In the Mac OS, this information, called the file extension, is hidden by default. Of course, you can place a period in the name if you want to specify the file extension, or if you just want to take the chance.
-
A few things that are okay: All alphabetic letters (capital or not, i.e., A–Z, a–z), Hindu-Arabic numbers (0–9), The symbols in the number row (`~!@#$%^&*()=+), blank spaces, hyphens (-) and underscores (_) are universally acceptable, as are commas (,).
Get Info
Mac OS X keeps a great deal of detailed information about your files, folders, and disks beyond what’s available in regular Finder windows. A time may come when you want to see or change some of this information. Hidden in the Info window (also known as the Get Info pane; or just Get Info) is the area that displays the additional critical information and enables some interesting changes to be performed on most selected items. To bring this powerful window to light, select an item and select Show Info from the File menu, or press z-I. The Get Info window opens, complete with basic information and bearing multiple disclosure triangles hiding various information and control repositories, as shown in Figure 3-24. These are described in the following text.
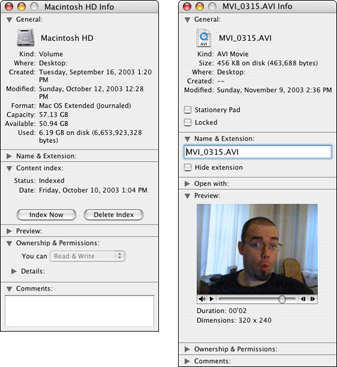
Figure 3-24: The Get Info windows a disk (left) and a movie file (right), each with different disclosure triangles exposed.
General
General is the main area of the Get Info window. The item’s icon, its name, type, location, creation date, modification data, and size are all shown in this area. Depending on the item’s type, additional or alternate information will be displayed. For example, if the selected item is a disk, as shown on the left side of Figure 3-24, information on the Format method applied to the disk will be shown, and the size information will be replaced and supplemented with total capacity, available space remaining on the disk, and the amount of space currently in use.
Name & Extension
The name of the selected item is shown in the Name & Extension section. Clicking in the box containing the item’s name allows you to edit the name of the item. It is worth noticing that the name of the item is shown with its extension here. The file name extension is a three or four letter code that delineates the document’s type. Changing this extension is not recommended, as it has the potential to confuse the Finder’s ability to choose the appropriate application to open for the document. See “Some notes on naming” earlier in this Chapter regarding some general tips on naming files.
Preview
If the item is a graphic file, this area will show a preview of the image here. If the file is a movie file, the preview will be a miniature version of the movie, complete with controls to play it, as shown on the right side of Figure 3-24. Some items cannot be previewed in this area, either because they cannot be rendered by the preview engine or because there is nothing to preview. Items that cannot be previewed include but are not limited to text documents, folders, and disks. In this case, the Preview field will just be populated with a full size rendering of the item’s icon.
Open With
Each document has a parent application, that is, the application that by default will attempt to open it. In this area, that default application can be changed. For example, many types of images can be opened by Apple’s built-in Preview application or by Photoshop. Choose which application you’d like to open the document with by default by using the convenient pop-up menu.
Ownership & Permissions
Ownership of a file and the permissions associated with the file are complex and potentially confusing. The basic concept is as follows: The creator of a file is the default owner of that file. The owner can do as he pleases with his files, editing, copying, or deleting them to his or her heart’s delight. Permissions are the rules that an owner applies to their files, enabling other people to work with them. The permissions can be very specific, only allowing visitors to read files, and not to edit or delete them. The permissions can be cut and dried as well, allowing total control or complete lock-out. Ownership & Permissions are covered in greater detail in Chapter 14.
Comments
This field can be populated with any information you care to insert. This field can be helpful when managing a large host of files with similar names, as users can enter information there to help distinguish files. Also, information can be entered in the Comments field for the benefit of others that may be using the files. The Comments field also gets automatically populated with information at certain times. For example, if you download a file off the Internet, the Web address that the file came from is often entered here, depending on the Web browser used.
Stationery Pad
Many items have the stationery pad checkbox. Checking this box turns the item into a template. More on stationery pads and templates can be found in Chapter 5.
Locking or unlocking an item
You can use the Info window to lock files individually so that they can’t be changed. After locking a file, you can open the file and copy it, but you can’t change its name or its contents. In addition, the Finder does not let you move locked files into the Trash. You can tell a file is locked by the small, lock-shaped badge on its icon. Lock a file by following these steps:
-
Select the file that you want to lock. Information for the selected item appears in the Info window.
-
Select the Locked option in the Info window. The Locked option appears at the bottom of the Info window. You can’t change an item’s Locked option if you’re not the item’s owner.
EAN: 2147483647
Pages: 290