Working with Folders
Having discussed some generic, universal commands to interact with icons and windows, including resizing, renaming, getting info, and selecting, the following sections cover some specific techniques for a few different item types.
Creating folders
Folders are very small files that create branches on the data storage tree within a volume. All they do is partition the files into smaller clutches of information that you organize yourself. Apple provides you with a host of useful folders within the user’s home folder, but you will certainly need to create more finely tuned subdivisions. To create new folders, the Finder must be the active application. Simply click Create New Folder in the File menu, or press z-Shift-N. This creates a new folder named Untitled Folder in the currently active window. If no window is active, the folder will be created on the desktop. When the new folder is created, its name will be automatically selected and ready for editing. (Unless you are in column view, in which case the folder’s name is not automatically selected. Just click on the name itself to edit it.) Type a desired name, and press Enter or Return or click the mouse somewhere else onscreen. At this point, the folder is ready for action and itchy to receive any and all files you throw at it. There is no limit to how much data a given folder can hold, although it makes sense to organize your data in a way that makes finding files easy. There is certainly no need to create a folder for every individual item, but it makes sense to create new folders for documents of particular types or files containing data on similar topics. Some applications have the capability to create new folders, particularly during the Save process.
| Tip | A quick way to create a new folder on the desktop or in a background window is to Control-click the place where you want the new folder and choose New Folder from the contextual menu that pops up. You can do this one-handed if you have a two-button mouse; just right-click to get to the contextual menu. |
Opening folders and disks
One way to navigate the folder structure of your disks is by opening disks and folders. You can open any disk or folder that you can see in a Finder window or on the desktop (with the exception of restricted folders and disks, discussed in Chapter 14). When you open a disk or a folder, you see its contents in a Finder window. If these contents include folders, you can open one of them to see its contents in a Finder window. By opening folders within folders, you make your way through the folder structure. If you open the right sequence of folders, eventually you open the folder that contains the document or application that you’re looking for.
You cannot create a new folder inside some folders because you do not have Write privileges for all folders. For example, you cannot create a new folder in the System folder, the Users folder, or another user’s home folder. These folders are off limits to protect their contents. We discuss privileges in more detail later in Chapter 14. If you do not have Write privileges for the folder that’s displayed in the active Finder window, the New Folder command is disabled (dim) in the File menu and is not included at all in the window’s contextual menu. The easiest way to keep an eye on your Write privileges is to have the Finder window status bar showing (choose View Show Status Bar). If you see an icon that looks like a pencil with a line through it at the left end of the status bar, you don’t have Write privileges for the folder displayed in the window.
To open a disk or folder that you have located in a Finder window or on the desktop, you can use any of these methods:
-
Double-click the icon or the name of the item.
-
Click the item’s icon to select it, and then choose File Open.
-
Click the item’s icon to select it, and then press z-O.
-
Control-click the item’s icon to display its contextual menu, and then choose Open from the contextual menu.
All these methods for opening items work in any Finder window viewed as icons, lists, or columns. The methods also work for opening items on the desktop (which is always viewed as icons).
| Note | In a list view of Mac OS X 10.1.1 and earlier, you must first click an item to select it before you can display its contextual menu by Control-clicking the item. Of course, we recommend Apple’s Panther (Mac OS 10.3) for many reasons, this being one of them. |
When you open a folder shown in an already open window, its contents appear in the same Finder window. Folders open in new Finder window if the window’s toolbar is suppressed. You can reverse this behavior by pressing the z key while opening a folder. For example, if you z-double-click a folder in a Finder window whose toolbar is showing, the folder’s contents appear in a new Finder window. You can also change a Finder preference setting to make the Finder normally display a new window when you open a folder; we cover setting Finder preferences in Chapter 4.
Opening the alias of a folder or disk has exactly the same effect as opening the folder or disk that the alias represents. If you open an alias of a folder or disk, Mac OS X resolves the alias and the Finder displays the contents of the original folder or disk.
Folder Actions
With Panther, Apple has added quite a few new tools to make your computing more efficient. A collection of AppleScripts, known as Folder Actions have been added, so that your folders themselves can perform actions for you — making your day-to-day work easier. Folder Actions are actually AppleScripts that run when the Folder is accessed in some fashion. Some Folder Actions perform operations on documents that are dropped within them. Some Folder Actions simply edit the way a folder behaves, closing all folders within, or by displaying more or less information, basically Folder Actions do whatever the chosen AppleScript demands.
Enable Folder Actions
To enable Folder Actions, bring up the contextual menu on any folder or disk, and select Enable Folder Actions from the list. Selecting this option will make the Folder Action system active, enabling you to attach and remove actions to particular folders or volumes. After you select it, this menu option becomes Disable Folder Actions, which when selected, will turn off all Folder Actions system-wide.
Attach action
To attach an action to a folder, bring up the contextual menu for the item, and select the desired action from the dialog that follows. Apple provides a collection of scripts that perform various functions, most relating to file conversion. The dialog is shown in Figure 3-25.
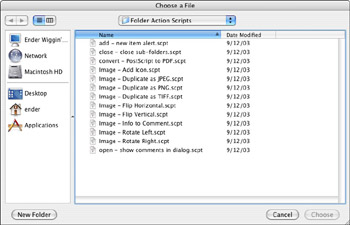
Figure 3-25: Folder Actions are a convenient way to make folders into tools that perform certain selected operations when items are placed within.
Select the action you want to apply to the folder, and click Choose. This will close the dialog and make the selected Folder Action active on the folder. The Folder Action is now ready for use!
Using actions
The standard method to use a Folder Action is simply to drag an item (or items) onto the icon of the folder. This will activate the Folder Action script, and perform the programmed action on the items selected. Most of the standard Apple-made Folder Actions simply convert images. These types of scripts also create two subfolders within their parent folder: one called Original Images and another called <type> Images (where <type> is the chosen destination format for the images). To use these actions, place images of certain types onto the folder, the script runs, converts images from one format to another. The script then places the original unedited item into the Original Images folder, and creates the converted file in the <type> Images folder. This is a vastly easier way to save a large cluster of files in an alternate format.
Folder Actions are of course not limited to simply reformatting images, and don’t always require that items be dropped in to activate. You can create your own Folder Actions that perform other operations, like emailing dropped-in files to certain people, or renaming files according to a certain standard, or automatically uploading the files to a server and then securely deleting them from your computer. You are limited only by your imagination and your knowledge (and the capabilities) of AppleScript. To learn how to use AppleScript, tune in to Chapter 23.
Configure Actions
To add, remove, temporarily deactivate, or edit Folder Actions all in one convenient window, use the Configure Actions command. Select Configure Actions from the contextual menu from any folder or disk. The Folder Actions Setup application opens, as shown in Figure 3-26.
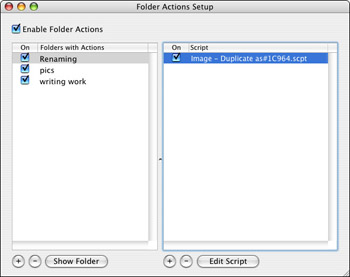
Figure 3-26: Configure Actions is a convenient way to turn off actions without removing them from folders; it’s also a helpful tool to see how many actions are currently in place.
After applying a number of Folder Actions, it is possible to lose track of which actions have been applied where. The Folder Actions Setup application also is helpful in this eventuality. The list on the left side shows all folders that have Folder Actions applied. Selecting any folder on the left side will populate the right side of the window with a list of the actions applied to that folder. Each item has a checkbox next to it. Uncheck any folder to temporarily turn off all applied actions for that folder. Uncheck individual actions from the right side of the window if you wish to temporarily deactivate only some of the actions applied to a folder.
At the top of the Folder Actions Setup window is a checkbox labeled Enable Actions. Unchecking this box will deactivate all Folder Actions. (You can get this result more easily by simply selecting Disable Actions from the contextual menu from any folder or disk.)
At the bottom of the left side (the folder side) of the Folder Actions Setup application are plus (+), minus (-), and Show Folder button. Click the plus sign to select a new folder to which you want to attach actions. This action generates a dialog from which you select a new folder to which you wish to attach Folder Actions. Navigate through your drive hierarchy in this dialog, select the folder you wish, and click Open. This dialog is shown in Figure 3-27.
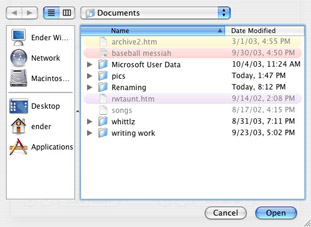
Figure 3-27: To select a new folder for Folder Actions, select it from this dialog.
The newly selected folder will appear in the left side of the main window. Select any item in the left side of the window, and the minus sign and the Show Folder button become active. To remove all Folder Actions on a folder, click the minus sign. An alert will come up after clicking the button, confirming your intention to remove all Folder Actions. To see a folder that has actions applied to it, click the Show Folder button and a new Finder window will open displaying content of the selected folder’s parent (that is, the folder that the selected item lives inside of).
At the bottom of the right side (the action side) of the Folder Actions Setup window are plus (+), minus (-), and Edit Script buttons. These items will be active only when an item is selected on the left side (as the right side will not be populated with any actions to edit without first choosing a folder). To add an action to a folder, click the plus sign. A dialog box appears containing the list of valid Folder Actions. Select the desired action and click Attach. This dialog is shown in Figure 3-28.
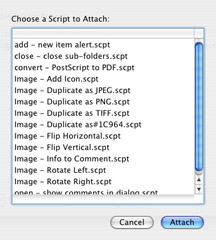
Figure 3-28: To add actions to a folder, select one from this dialog.
To remove an action from a folder, select the action and then click the minus sign. A dialog will appear, confirming your intention to remove the selected script.
To edit a Folder Action, select the action and then click on the Edit Script button. The ScriptEditor application will open, allowing you to tinker with or simply review the content of the action. AppleScript is covered in Chapter 23.
Remove Action
You don’t need to go to Folder Actions Setup to remove an action from a folder. To do this more quickly, use your contextual menus! From the contextual menu of a folder with Folder Actions attached, select Remove Action to reveal a pull-out menu. The pull-out menu is populated with all actions attached to this folder, selecting any of them will remove that action from the folder.
Edit Action
You can also Edit the actions applied to a folder via your contextual menus. From the contextual menu of an item with Folder Actions applied, select Edit Action to reveal the pull-out menu that contains the list of attached scripts. Select the script you wish to edit, and the ScriptEditor Application will open, with your script ready for edit or review. AppleScript is covered in detail in Chapter 23.
EAN: 2147483647
Pages: 290
- ERP Systems Impact on Organizations
- Enterprise Application Integration: New Solutions for a Solved Problem or a Challenging Research Field?
- Distributed Data Warehouse for Geo-spatial Services
- Intrinsic and Contextual Data Quality: The Effect of Media and Personal Involvement
- Relevance and Micro-Relevance for the Professional as Determinants of IT-Diffusion and IT-Use in Healthcare