Model File Content
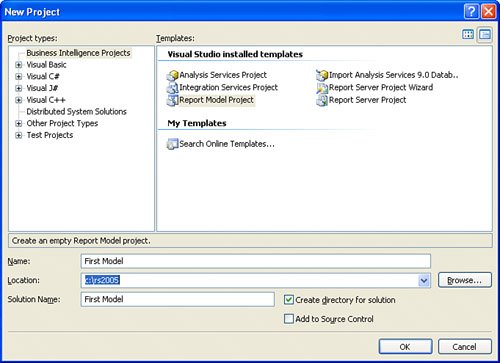
| 1. | Create a new project. Open Visual Studio or Business Intelligence Development Studio. Click File and then New Project. |
| 2. | In the dialog box that opens, if not selected by default, select Business Intelligence Projects under Project Types. |
| 3. | Under Templates in the right pane in the active dialog box, select Report Model Project. |
| 4. | Call the project "First Model" and change the location to C:\rs2005. Make sure Create Directory for Solution is checked. See Figure 16.1. |
Figure 16.1. Creating new business intelligence projects.
Creating a Data Source
Now that you have an empty project, the next thing to do is connect it to a data source. Remember the data source has to be SQL Server (or abstracted through linked servers or UDM).
Unlike Report Designer, no other data sources are accepted directly:
| 1. | Open Solution Explorer and right-click on the Data Sources folder. Click Add New Data Source. This launches the New Data Source Wizard. |
| 2. | Skip the welcome page by clicking Next. |
| 3. | On the next page, select Create a Data Source Based on an Existing or New Connection, and then click New. |
| 4. | Enter "localhost" as the name of the server to connect to. |
| 5. | Select Windows Authentication. |
| 6. | In the Select or Enter a Database Name list, select "Adventure Works." |
| 7. | Click Test Connection; if you get an OK dialog box, click OK. If not, try to resolve the error using the debug information given, and then try again. |
| 8. | Click OK. At this point, you should have a screen that looks similar to Figure 16.2. Figure 16.2. Defining the connection. |
| 9. | Click Next. |
| 10. | At this point, you could change the name of the data source. If it is not already, call the new data source Adventure Works. |
| 11. | Click Finish. |
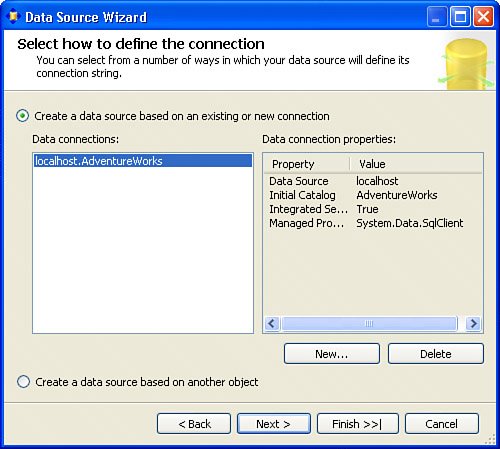
A new data source called Adventure Works should appear in the Data Sources folder in Solution Explorer.
Creating a Data Source View
The next step in the creation of a model is the creation of the Data Source view. Recall, from earlier, that the Data Source view contains information about the physical layout of the database. To create a Data Source view, complete the following steps:
| 1. | Open Solution Explorer and right-click on the Data Source Views folder. Click Add New Data Source View. This launches the New Data Source View Wizard. |
| 2. | Select the Adventure Works data source and click Next. |
| 3. | The next screen asks you to select the tables and views that are going to be included in the semantic model. Click the >> button to move all the objects from the Available Objects list box to the Included Objects list box. See Figure 16.3. Figure 16.3. Selecting the tables and views. |
| 4. | Click Next. |
| 5. | Name the Data Source view "Adventure Works DSV." |
| 6. | Click Finish. |
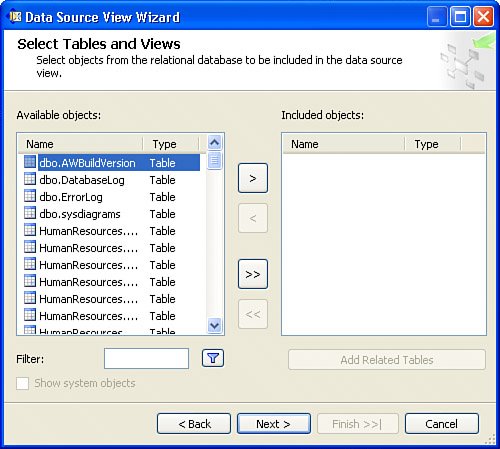
A new Data Source view called "Adventure Works DSV" should appear in the Data Source Views folder in Solution Explorer.
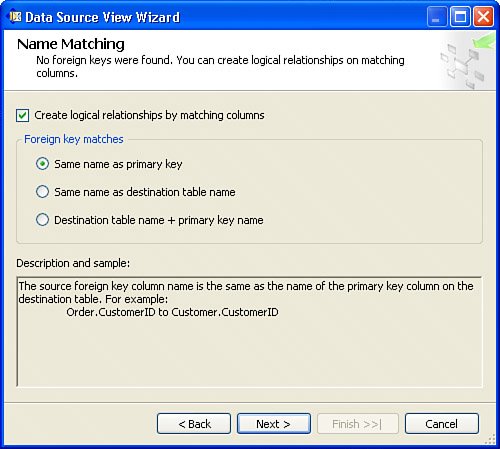
The wizard is smart enough to detect if the underlying data source has no foreign key constraints. In this case, the wizard gives you an extra screen before selecting which tables to include in the Data Source view. The screen gives you three types of matching logic so it can infer relationships in the data store. If your DBMS does not follow any of these conventions, you will have to add the data source relationships yourself. Figure 16.4 shows you a copy of the screen.
Figure 16.4. Name Matching screen of the Data Source View Wizard.
After the wizard is complete, double-click on the Adventure Works DSV file in Solution Explorer. This opens a document showing you the relationships that the wizard has just inferred. See Figure 16.5.
Figure 16.5. Data Source view.
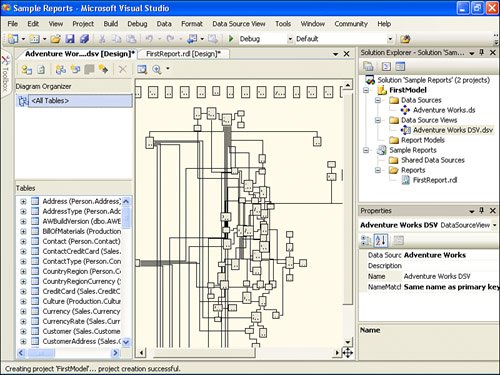
To get the document to fit on one page, you might have to click the View menu, point to Zoom, and then click To Fit.
Creating a Report Model
Finally, you can create the actual model. To create the model, complete the following steps:
| 1. | Open Solution Explorer and right-click on the Report Models folder. Click Add New Report Model. This launches the New Report Model Wizard. |
| 2. | Click Next on the welcome screen. |
| 3. | The next screen is the screen to select Data Source views. At this point, only the "Adventure Works DSV" should show up. Select this and then select Next. |
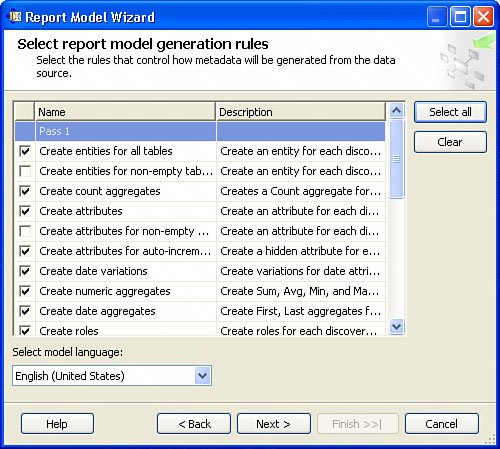
| 4. | The next screen is the Model Generation Rules screen, which is shown in Figure 16.6. This allows you to select from a predefined set of rules to ease the model generation process. For our purposes, the defaults are fine. Click Next. Figure 16.6. Selecting report model generation rules. |
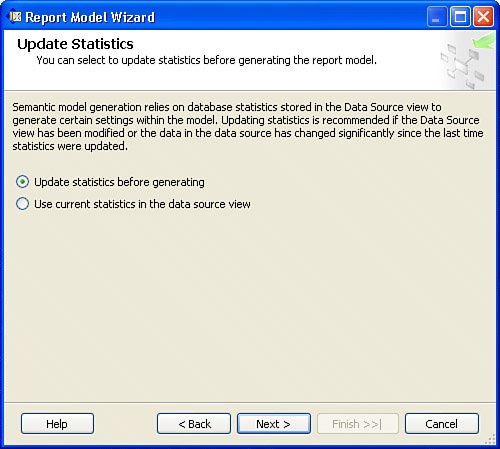
| 5. | The next screen asks you to create statistics. Because Report Builder uses database statistics to aid it in the model generation process, it is important to make sure your statistics are up to date. Otherwise, it might miscalculate some factors, such as drill down and aggregates. It is recommended to update statistics whenever the data source or Data Source views have changed. Click Update Statistics Before Generating, if necessary. Click Next. See Figure 16.7. Figure 16.7. Update Statistics screen of the Report Model Wizard. |
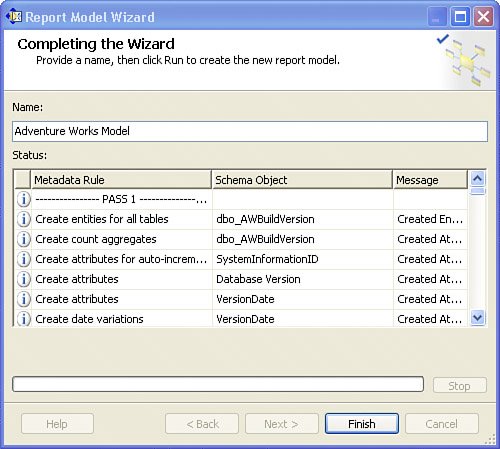
| 6. | Name the model "Adventure Works model," and then click Run. Figure 16.8 shows the resulting screen. Figure 16.8. Completing the Wizard screen of the Report Model Wizard. |
| 7. | Click Finish. Figure 16.9 shows the completed model. Figure 16.9. Completed database model.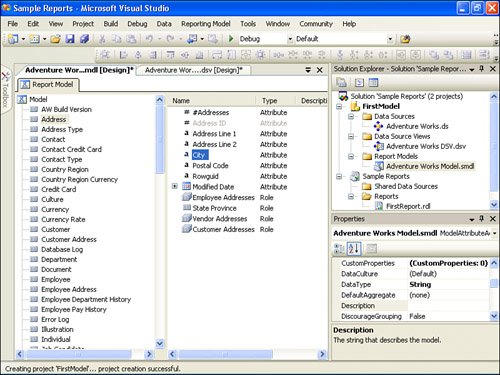 |
Modifying Items in the Model
The way entities show up in the Model Designer reflects how they will show up in Report Builder. To make things more meaningful for the end user , many of the properties or entities can be customized. Working with the model involves some of the same basic concepts as working with Report Designer. The properties of any object can be modified from the properties window.
Some of the things you can customize include sorting, instance selection, and inheritance. What this means is that attributes can be set to come from other entities or that users can see a filtered list of instances of an entity. Entities can also predefine formatting of their attributes. For example, attributes that reflect currency can be formatted as currency depending on the user's localized settings. The order in which things appear in the entity browser can also be customized. By default, entities appear sorted in alphabetical order, but you can move certain entities to the top if users are going to report off them frequently.
To modify items in the model, it is simply a matter of right-clicking in the treeview or listview. The Report Model menu in the Model Designer also gives the same menu options. To delete any item, simply navigate to the item, right-click it, and choose Delete from the shortcut menu.
To add an entity, folder, or perspective, do the following:
| 1. | Navigate to the top of the treeview. |
| 2. | From the Report Model menu, select New Entity, New Perspective, or New Folder. |
From this point, each of these items has their own caveats.
If you choose to add a new entity, the name given to the entity is simply NewEntity . You must navigate to NewEntity , right-click it, select Rename from the shortcut menu, and rename it to what you want. To be effective, the binding information has to be set as well. When adding folders, a similar process has to be followed. You must navigate to the entity or to the top entity in the tree, right-click it, and select New Folder. A new folder called New Folder is created. The location of the new folder is dependent on where you were when you right-clicked to add the new folder. You must right-click on it, and select Rename from the shortcut menu to rename it.
To add a new role, attribute, or source field, click on any detail item, and then select the option you need from the Report Model menu. When you add a new role, a pop-up appears with a list of entities. Select an entity, and then assign the bindings in the properties window. Role bindings are nothing more than a list of relations defined in the Data Source view. When adding or modifying an expression, the Expression Editor is shown. From here, you can design the expression and name it. When adding a source field, select New Source Field from the Report Model menu. After adding the source field, you must rename it and set the bindings from the properties window. Source field bindings refer to a list of columns from the Data Source view.
When adding or modifying perspectives, a specialized dialog box opens that allows you to add/remove items from the perspective.
When adding and removing perspectives, you might notice that adding one object seems to add others, and removing it removes other objects as well. This is because of the hierarchical nature of the items. When a parent item, such as a folder or attribute, with variations get added or removed, all of its children get added and removed as well. The same thing applies for roles and identifying attributes. When a role is selected, the corresponding role is selected along with the entity it leads to. The reverse is also true. When an identifying attribute is deselected, any other entities that use that identifying attribute get deselected as well. To reselect those entities, the identifying attribute must get reselected.
Publishing the Model
When you are done creating or updating the model, you can publish the model just as you would a report. In a published model, the data source and the SMDL file (semantic model file) are placed in the Report Server. Because the information in the Data Source view is incorporated into the semantic model, the Data Source view does not get published. If the information in the Data Source view, or for that matter, anything in the semantic model, needs to be updated, simply publish an updated model.
After the model is published, it can be secured using Reporting Services' role-based security. To use the model in Report Builder, a user must have access to it.
After you are ready to deploy the semantic model, the deployment steps closely resemble the deployment steps in Report Designer.
| 1. | Right-click on the project file in Solution Explorer, and select Properties. |
| 2. | Review the target folder's properties. There is one target folder for the data sources, and there is another target folder for the semantic models. |
| 3. | Verify the Overwrite Data Sources option is on the intended setting. This option is similar in name and function to the one in Report Designer. |
| 4. | Click OK. |
To deploy the model and data source, right-click on the project file in Solution Explorer, and select Deploy from the shortcut menu. To deploy just the model file, right-click on the semantic model and click Deploy.
Creating Models from Report Designer
A second way to create a model is from Report Manager. Report Manager has the ability to take any SQL Server or Analysis Services data source and generate a model from it. You can complete the following steps to generate a model from Report Manager:
| 1. | Go to the Report Manager web page. By default, it is located at http://localhost/Reports. |
| 2. | Click the New Data Source button. |
| 3. | Enter a name for this data source. Call this "AdventureWorks DS". You can also enter a brief description. |
| 4. | Enter a connection type of "Microsoft SQL Server". |
| 5. | Make sure that the Enable This Data Source check box is checked. |
| 6. | Enter "Data Source=localhost;Initial Catalog=AdventureWorks" in the Connection string text box. |
| 7. | Select Windows Integrated Security. |
| 8. | Click OK. You should return to the Folder view screen. Click on the data source you just created ("AdventureWorks DS"). |
| 9. | Click the Generate Model button. |
| 10. | Enter a name for this model. Call it "Adventure Works DS Model." If you want to, you can change where the model is located and give it a description. For now, just leave these fields blank. |
| 11. | Click OK. |
EAN: 2147483647
Pages: 254