Using Archives and Disk Images
| Everyone should know that backups are a critical component of every desktop environment, and there are several backup packages you can use, including the .Mac Backup utility. However, Mac OS X has built-in tools that you can use to manage your desktop working environment. The Archive feature in the Finder helps you organize data and manage your files so that they take up less space, and Disk Utility can create compressed disk images with entire file systems that you can easily burn to CD or DVD. This provides day-to-day benefits for you and your end users.
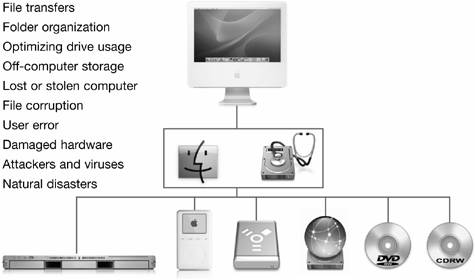
Archives and disk images do not replace a backup strategy, but they can be an effective component, making backups more effective by reducing file counts and organizing files that can be removed from your drive. The Mac OS X tools for archiving and transferring files, which we will explore next, are an essential part of computer maintenance. Time spent organizing and archiving with these tools will pay dividends, so that you can smoothly recover from any kind of data loss or hardware problem. If you wish to incorporate automated backups or use advanced backup components such as tape libraries, there are several third-party options available, but they are beyond the scope of this book. Creating Archives from the FinderThe Finder can archive files and folders without additional software. Archived files take up less disk space, so archiving is useful for making backup copies of your data and transferring large folders across a network. To archive files or folders, select an item or items in the Finder and choose File > Create Archive. Whether you archive a single file or a folder full of files, the archive is created with the name of the file or folder and a .zip extension. If you archive several selected items, the archive file is called Archive.zip. When you double-click an archive in Mac OS X, it expands automatically. If the archive was made from a folder, that folder will appear and the files inside it will be decompressed. 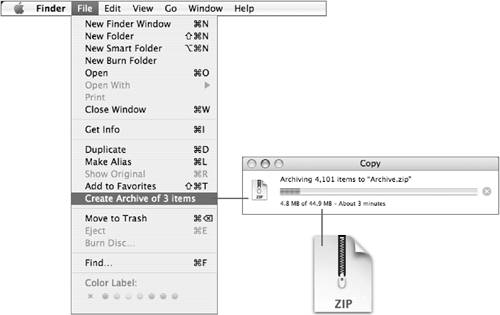 NOTE The original files are not changed or deleted when you create an archive. If you want to create free disk space, be sure to drag the originals to the Trash after you've confirmed that the archive was properly created. Zip files have traditionally been archives of flat files. However, starting in Mac OS X 10.3, the Finder's archives support file forks using the AppleDouble format. When a current Mac OS X computer archives a forked file, the forks are split, and then seamlessly rejoined when the file is decompressed. It is important to note that a Windows client might see two files when it decompresses a Mac OS X archive that includes forked files: one file with the original name containing the data fork, and a second file beginning with ._, representing the resource fork. NOTE If you give an archive to Windows users and they are unable to open it, they may be using an older version of the PKZIP application or they have several copies of PKZIP installed, and an older one is trying to open the archive. You can suggest that they upgrade to the latest version of PKZIP (www.pkware.com), specifically use the Open command in the latest version of PKZIP they have installed, or use a third-party utility that can decompress more up-to-date archive formats. Creating Disk Images with Disk UtilityA disk image is a file that you can mount on your desktop as if it were a separate volume with its own file system. Disk images are useful for many reasons: you might need to transfer files over the Internet or on media such as CD or DVD, or you might need to ensure that you distribute an exact representation of a file and folder structure. Disk images are very useful for that because they are bit-for-bit copies of the files in the original folder structure copied into a single file. There are two common types of disk images:
Creating a disk image is a good way to archive or transfer a set of files and hierarchical folders, because it stores them in a single flat file that can be compressed to save space. Compression is useful for speeding up file transfers or saving disk space. You can also create disk images of bootable CDs and hard disks, and encrypt your images for additional security. The panes in Disk Utility allow you to select the destination folder, format, and encryption type for your disk image. You can create an image from a drive or folder, or create an empty image of a specific size that you can copy files into when it is mounted. Image formats include read/write, read only, compressed, and DVD/CD master. Encryption types include none or AES-128. NOTE You can resize or split disk images at any time using the command-line utility hdiutil. You will read more about command-line utilities in Lesson 7, "Command-Line Interface." Disk Utility can use Apple Software Restore (ASR) to restore an entire hard drive. This allows you to very quickly restore everything from a backup image or configure new computers as a part of large deployments. To use the restore feature, click the Restore tab in the Disk Utility window and follow the onscreen instructions. Always observe licensing restrictions when you use this feature, and be careful when restoring to ensure that you do not accidentally overwrite data. Creating a Disk Image File with Disk UtilityIn addition to managing and repairing disk drives, you can use Disk Utility to create disk images. The following steps will guide you through using Disk Utility to create a compressed disk image.
Mounting and Using a Disk Image FileThe disk image file format is useful for software distribution. Images can be mounted and used like a drive volume.
Burning CDs or DVDsIf your Macintosh comes with a built-in CD or DVD burner, Mac OS X can burn optical discs using the Finder or Disk Utility. Disk Utility is designed to burn a disk image file to disc, while the Finder is designed to allow easy ad hoc disc burning. If you use Disk Utility to burn disk images onto optical media, each disk image can be burned as a separate session. 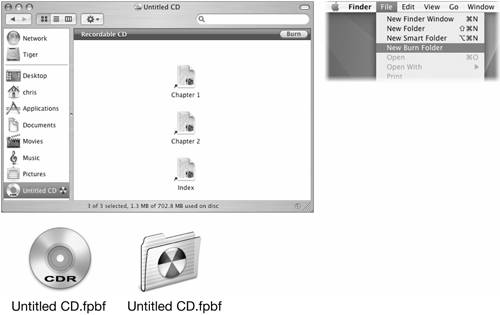 You can use the Finder to burn files directly to a blank disc in a single session. New in Mac OS X 10.4 is the ability to create a burn folder. Previous versions of Mac OS X used a multistep burning process, in which Mac OS X created a disk image file during the initial copy stage, and then used it to burn the disc. This method required that your startup drive had enough free space available to create this disk image behind the scenes. A burn folder can be created from the Finder's File menu and can be saved and reused over time. When copying items to the burn folder, only an alias to the original item is copied. This allows you to change items in the Mac OS X file system; the resulting burn folder will reflect these changes automatically. For example, you can create a burn folder of your ~/Documents folder and burn it to a CD every week. The contents of the burn folder will always accurately reflect your ~/Documents folder, including any changes you made during the week. This feature is very useful to archive a static folder organization where the folder contents change frequently, such as with financial records. NOTE Though the terms are sometimes interchanged, "disc" refers to optical storage media, such as CD-ROM, CD-R/W, or DVD-R, while "disk" refers to most other storage media or devices, such as floppy disks or hard disk drives. NOTE For maximum compatibility burning optical media, use the optical drives Apple ships in its computers, such as a Combo drive for burning CDs or a SuperDrive for burning CDs or DVDs. When considering third-party optical drives for burning discs, check with the manufacturer to ensure that it is fully compatible with Mac OS X 10.4. For example, some third-party DVD burners can burn discs on a Macintosh when using Disk Utility or DVD Studio Pro, but not when using iDVD. Ignoring Volume OwnershipThe permission to access removable media such as optical discs is determined by the ownership, just like any other Mac OS X volume. You can use the "Ignore ownership on this volume" checkbox in the Info window to gain access to a removable volume that is otherwise inaccessible due to ownership. NOTE This feature was designed for convenience when using removable media. However, you can also use it to ignore ownership on disk partitions other than the boot volume, which means that file ownership alone is not sufficient to protect files on a nonroot partition. Users with more stringent security needs should use other techniques, such as encryption, to protect files.
|
EAN: 2147483647
Pages: 233