Extra Credit
|
| < Day Day Up > |
|
For this extra credit session, let's take a look at how we can use descendant selectors to uniquely style different levels of a set of nested lists. The example we'll work with is a portion of a small site map. We'll discover that we can keep the markup very basic, without needing to add extra class attributes in order to style the levels separately.
First, let's introduce ourselves to the markup.
The Raw Markup
At a very basic level, nested, unstyled lists deliver the perfect hierarchy for something like an outline or, for our example, a simple site map. By nesting the lists, we can guarantee the proper structure that all browsers and devices will read, while easily styling it with CSS later on.
The markup for a small site map might look something like this, with three top-level items and a few nested ones:
<ul> <li>Weblog</li> <li>Articles <ul> <li>How to Beat the Red Sox</li> <li>Pitching Past the 7th Inning <ul> <li>Part I</li> <li>Part II</li> </ul> </li> <li>Eighty-Five Years Isn't All That Long, Really</li> </ul> </li> <li>About</li> </ul>
Figure 9-1 shows us how the preceding markup will render in most browsers. You can see that, by default, the structure that we're striving for is roughly in place. The hierarchy is evident, even in the absence of style. It's a little boring, though, so next let's start adding some CSS.

Figure 9-1: Unstyled rendering of the nested list markup
Adding Style
Let's say that we'd like to add some definition for certain levels of the site map. All we really need to add to the markup is a single id so that we may style this particular list differently from any other lists that may be on the same page, without any additional markup:
<ul > <li>Weblog</li> <li>Articles <ul> <li>How to Beat the Red Sox</li> <li>Pitching Past the 7th Inning <ul> <li>Part I</li> <li>Part II</li> </ul> </li> <li>Eighty-Five Years Isn't All That Long, Really</li> </ul> </li> <li>About</li> </ul>
Again using descendant selectors, we can give a unique style to each separate level of the list. For instance, if we'd like the higher levels to be large, bold, and orange, with the inner levels progressively smaller, we'd first set the size, weight, and color for the entire list:
#sitemap { font-size: 140%; font-weight: bold; color: #f63; } That will make the entire list big, bold, and orange. Next, we'll reduce the size and change the color for <li> elements that are nested at any level below:
#sitemap { font-size: 140%; font-weight: bold; color: #f63; } #sitemap li ul { font-size: 90%; color: #000; } The preceding CSS will ensure that all top-level items will be big, bold, and orange, while all lists that are nested within will be black in color with a font size of 90 percent (which in this case is 90 percent of 140 percent). See Figure 9-2 for the results.
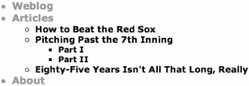
Figure 9-2: Adding style to the top-level list items
We need not assign a smaller size for the third level, as it will automatically apply 90 percent of 90 percent (a little confusing, but it works!).
Now we have a descending font-size for each level of the list. Next, we'll add some bullets.
Custom Bullets
Let's turn off default styling, and add a decorative bullet for only third-level items by using the background property. We'll first turn off list styling, in general, for all <li> elements, and then we'll specifically assign a background image for third-level items. For further separation, we'll also make third-level items font-weight: normal;—overriding the list's default of bold.
#sitemap { font-size: 140%; font-weight: bold; color: #f63; } #sitemap li { list-style: none; /* turns off bullets */ } #sitemap li ul { font-size: 90%; color: #000; } /* for third-level */ #sitemap li ul li ul li { font-weight: normal; padding-left: 16px; background: url(bullet.gif) no-repeat 0 50%; } Figure 9-3 shows the resulting site map with a custom bullet and normal font weight applied only to third-level <li> elements. We've added 16 pixels of padding on the left to account for the width of the decorative bullet image (plus a bit of whitespace). We're also telling the browser to align the image 0 pixels from the left and 50 percent from the top, which essentially aligns the bullet to the left and center of the text. While we could've used a pixel value here, using a percentage allows for similar bullet placement if text is resized.
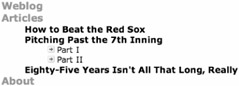
Figure 9-3: Custom bullets added to third-level items
Adding a Border
To complete our site map, let's add a dotted border to the left side of the second-level list. This will further cue the user that the top-level item has suboptions that belong to it.
To achieve the border only on the second-level list, we'll add the following rules:
#sitemap { font-size: 140%; font-weight: bold; color: #f63; } #sitemap li { list-style: none; /* turns off bullets */ } #sitemap li ul { margin: 6px 15px; padding: 0 15px; font-size: 90%; color: #000; border-left: 1px dotted #999; } /* for third-level */ #sitemap li ul li ul { border: none; } #sitemap li ul li ul li { font-weight: normal; padding-left: 16px; background: url(bullet.gif) no-repeat 0 50%; } We've adjusted margins and padding a bit for the second level, as well as the addition of the dotted border. Following that rule, we'll turn off the border for third-level lists with the border: none; rule.
Figure 9-4 shows the resulting list with varying fonts, borders, and list images in place.

Figure 9-4: Final styled site map, with dotted border applied to second-level lists
For building outline-like lists, nesting uls makes for a structurally sound and easily styled solution. By assigning a single id to the top-level ul, we can let CSS do all the hard work of styling each level separately—without the need for extraneous presentational markup. And possibilities for creative styling go way beyond this simple example.
Figure 9-5 shows the same CSS applied to a slightly larger site map. Because the CSS assigns style depending on the level, the markup would be set up exactly the same. Depending on nesting level, the items would take on the appropriate style.
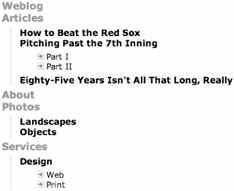
Figure 9-5: Expanded site map with nested lists and CSS
|
| < Day Day Up > |
|
EAN: 2147483647
Pages: 119
- Integration Strategies and Tactics for Information Technology Governance
- Measuring and Managing E-Business Initiatives Through the Balanced Scorecard
- A View on Knowledge Management: Utilizing a Balanced Scorecard Methodology for Analyzing Knowledge Metrics
- Technical Issues Related to IT Governance Tactics: Product Metrics, Measurements and Process Control
- The Evolution of IT Governance at NB Power