11.2. Multiuser Updates
| You may have noticed that I did not ask you to turn on support for optimistic concurrency. You are now going to go back and check this box, but before you do, let's take a moment to put optimistic concurrency in context. As things stand, you read data from the database and into your data grid through the SqlDataSource. You have now added the ability to update (or delete) that information. Of course, more than one person may be interacting with the database at the same time (few web applications support only single-user access). You can easily imagine that this could cause tremendous problems of data corruption. Imagine, for example, that two people download a record: Company: Liberty Associates, Inc. / City: Boston / Contact Name: Jesse Liberty The first editor changes the City from Boston to New York. The second person changes the Contact Name from Jesse Liberty to Milo Liberty. Now things get interesting. The first editor writes back the data record, and the database has: Company: Liberty Associates, Inc. / City: New York / Contact Name: Jesse Liberty A moment later, the second person updates the database and the database now has: Company: Liberty Associates, Inc. / City: Boston / Contact Name: Milo Liberty These earlier updated values are overwritten and lost. The technical term for this is bad. To prevent this kind of problem, you may use any of the following strategies:
The following sections explore each of these possible strategies. 11.2.1. Lock the RecordsMany databases provide pessimistic record-locking . When a user opens a record, it is locked, and no other user may write to that record. For database efficiency, most databases also implement pessimistic page-locking; that is, not only is the particular record locked, but a number of surrounding records are locked as well. While record and page locking are not uncommon in some database environments, they are generally undesirable, especially in large web applications. It's possible for a user to lock a record, and then never return to the database to unlock it. You would need to write monitoring processes that keep track of how long records have been locked, and unlock records after a time-out period. Yuck. More important, a single query may touch many records in many tables. If you were to lock all those records for each user, it wouldn't take long before the entire database was locked. In addition, it often isn't necessary. While each user may look at dozens of records, typically each user will update only a very few. Locking is a very big, blunt weapon; what is needed in a web application is a small, delicate surgical tool. 11.2.2. Update Only the Records You ChangeThis is great in theory but it exposes you to the risk of having a database that is internally consistent but that no longer reflects reality. Here's an example. Suppose two salespeople each check the inventory for a given part. The NumberOnHand value returned to both is 1. The first person makes the sale and sets it to 0. The second person makes the sale and also sets it to zero. The database is perfectly happy, but one or the other customer is not going to get the part, because you can only sell a given part once. To prevent this, you are back to locking records , and we already saw that we don't like that solution. 11.2.3. Compare Original Against NewTo understand how to compare the changed records against the database, you must keep in mind three possible values for each of your fields:
You could decide that before you make an update, you'll check the record and make sure that it has not changed, and only if it has not changed will you make the update. Unfortunately, this still does not solve the problem. If you look at the database before updating it, there is still the (admittedly small) chance that someone will update the database between the time you peek at it and the time you write your changes. Given enough transactions over enough time, there is certain to be corrupted data. 11.2.4. Handle the ErrorsOdd as it may seem at first, it turns out that the best approach to managing concurrency is to try the update with a Where clause that will only succeed if the rows you are updating have not changed since you read them. You then respond to errors as they arise. For this approach to be effective, you must craft your Update statement so that it will fail if someone else has updated the record in any way. This approach has tremendous efficiency advantages. In the vast majority of cases, your update will succeed, and you will not have bothered with extra reads of the database. There is no lag between checking the data and the update, so there is no chance of someone sneaking in another write. Finally, if your update fails, you know why, and you can take corrective action. For this approach to work, your updates must fail if the data has changed in the database since the time you retrieved the data. Since the DataSource can tell you the original values that it received from the database, you only need to pass those values back into the stored procedure as parameters, and then add them to the Where clause in your Update statement. That is, you must extend your Where statement to say "where each field still has its original value." When you update the record, the original values are checked against the values in the database. If they are different, you will not update any records until you fix the problem. Reopen the wizard, but this time makes sure to check both checkboxes, as shown in Figure 11-12. Figure 11-12. Turn on Optimistic Concurrency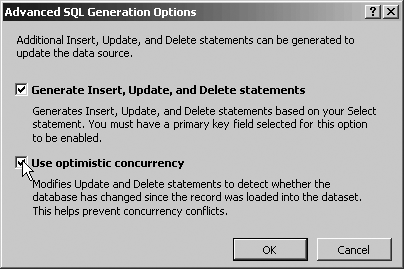 Click OK, Next, and Finish. Once more, examine the source code shown in Example 11-4. Example 11-4. DataSource control with Optimistic Concurrency<asp:SqlDataSource runat="server" SelectCommand="SELECT * FROM [Customers]" ConnectionString="<%$ ConnectionStrings:NorthwindConnectionString %>" DeleteCommand="DELETE FROM [Customers] WHERE [CustomerID] = @original_CustomerID AND [CompanyName] = @original_CompanyName AND [ContactName] = @original_ContactName AND [ContactTitle] = @original_ContactTitle AND [Address] = @original_Address AND [City] = @original_City AND [Region] = @original_Region AND [PostalCode] = @original_PostalCode AND [Country] = @original_Country AND [Phone] = @original_Phone AND [Fax] = @original_Fax" InsertCommand="INSERT INTO [Customers] ([CustomerID], [CompanyName], [ContactName], ContactTitle], [Address], [City], [Region], [PostalCode], [Country], [Phone], [Fax]) VALUES (@CustomerID, @CompanyName, @ContactName, @ContactTitle, @Address, @City, @Region, @PostalCode, @Country, @Phone, @Fax)" UpdateCommand="UPDATE [Customers] SET [CompanyName] = @CompanyName, [ContactName] = @ContactName, [ContactTitle] = @ContactTitle, [Address] = @Address, [City] = @City, [Region] = @Region, [PostalCode] = @PostalCode, [Country] = @Country, [Phone] = @Phone, [Fax] = @Fax WHERE [CustomerID] = @original_CustomerID AND [CompanyName] = @original_CompanyName AND [ContactName] = @original_ContactName AND [ContactTitle] = @original_ContactTitle AND [Address] = @original_Address AND [City] = @original_City AND [Region] = @original_Region AND [PostalCode] = @original_PostalCode AND [Country] = @original_Country AND [Phone] = @original_Phone AND [Fax] = @original_Fax" ConflictDetection="CompareAllValues"> <DeleteParameters> <asp:Parameter Type="String" Name="original_CustomerID" /> <asp:Parameter Type="String" Name="original_CompanyName" /> <asp:Parameter Type="String" Name="original_ContactName" /> <asp:Parameter Type="String" Name="original_ContactTitle" /> <asp:Parameter Type="String" Name="original_Address" /> <asp:Parameter Type="String" Name="original_City" /> <asp:Parameter Type="String" Name="original_Region" /> <asp:Parameter Type="String" Name="original_PostalCode" /> <asp:Parameter Type="String" Name="original_Country" /> <asp:Parameter Type="String" Name="original_Phone" /> <asp:Parameter Type="String" Name="original_Fax" /> </DeleteParameters> <UpdateParameters> <asp:Parameter Type="String" Name="CompanyName" /> <asp:Parameter Type="String" Name="ContactName" /> <asp:Parameter Type="String" Name="ContactTitle" /> <asp:Parameter Type="String" Name="Address" /> <asp:Parameter Type="String" Name="City" /> <asp:Parameter Type="String" Name="Region" /> <asp:Parameter Type="String" Name="PostalCode" /> <asp:Parameter Type="String" Name="Country" /> <asp:Parameter Type="String" Name="Phone" /> <asp:Parameter Type="String" Name="Fax" /> <asp:Parameter Type="String" Name="original_CustomerID" /> <asp:Parameter Type="String" Name="original_CompanyName" /> <asp:Parameter Type="String" Name="original_ContactName" /> <asp:Parameter Type="String" Name="original_ContactTitle" /> <asp:Parameter Type="String" Name="original_Address" /> <asp:Parameter Type="String" Name="original_City" /> <asp:Parameter Type="String" Name="original_Region" /> <asp:Parameter Type="String" Name="original_PostalCode" /> <asp:Parameter Type="String" Name="original_Country" /> <asp:Parameter Type="String" Name="original_Phone" /> <asp:Parameter Type="String" Name="original_Fax" /> </UpdateParameters> <InsertParameters> <asp:Parameter Type="String" Name="CustomerID" /> <asp:Parameter Type="String" Name="CompanyName" /> <asp:Parameter Type="String" Name="ContactName" /> <asp:Parameter Type="String" Name="ContactTitle" /> <asp:Parameter Type="String" Name="Address" /> <asp:Parameter Type="String" Name="City" /> <asp:Parameter Type="String" Name="Region" /> <asp:Parameter Type="String" Name="PostalCode" /> <asp:Parameter Type="String" Name="Country" /> <asp:Parameter Type="String" Name="Phone" /> <asp:Parameter Type="String" Name="Fax" /> </InsertParameters> </asp:SqlDataSource> Don't panic! The only difference between Examples 11-3 and 11-4 is that in the latter, the Where clause is extended to make sure the record has not been altered. The DeleteCommand illustrates this, and the UpdateCommand works the same way. DeleteCommand="DELETE FROM [Customers] WHERE [CustomerID] = @original_CustomerID AND [CompanyName] = @original_CompanyName AND [ContactName] = @original_ContactName AND [ContactTitle] = @original_ContactTitle AND [Address] = @original_Address AND [City] = @original_City AND [Region] = @original_Region AND [PostalCode] = @original_PostalCode AND [Country] = @original_Country AND [Phone] = @original_Phone AND [Fax] = @original_Fax" You must, therefore, send in not only the parameter for the customerID but the original values of these fields: <DeleteParameters> <asp:Parameter Type="String" Name="original_CustomerID" /> <asp:Parameter Type="String" Name="original_CompanyName" /> <asp:Parameter Type="String" Name="original_ContactName" /> <asp:Parameter Type="String" Name="original_ContactTitle" /> <asp:Parameter Type="String" Name="original_Address" /> <asp:Parameter Type="String" Name="original_City" /> <asp:Parameter Type="String" Name="original_Region" /> <asp:Parameter Type="String" Name="original_PostalCode" /> <asp:Parameter Type="String" Name="original_Country" /> <asp:Parameter Type="String" Name="original_Phone" /> <asp:Parameter Type="String" Name="original_Fax" /> </DeleteParameters> All of that work is done for you by the wizard! 11.2.5. Displaying and Updating the GridNow that your DataSource object is ready to go, you have only to set up your GridView:
Figure 11-13. Enable Deleting and Editing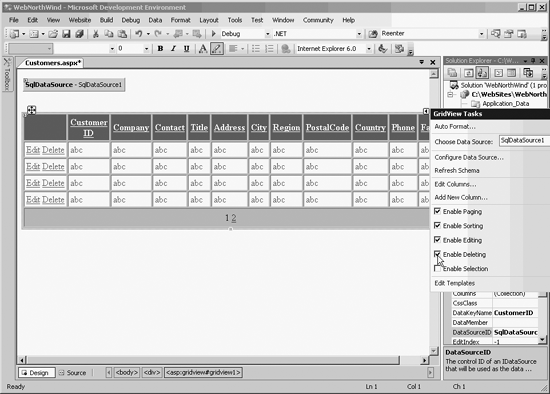 If you would prefer to have buttons for Edit and Delete, rather than links, click on the smart tag and click on Edit Columns....When the fields dialog box opens, click in Selected Fields on the Command Field entry. This brings up the field properties in the righthand window, where you can change the ButtonType from Link to Button, as shown in Figure 11-14. Figure 11-14. Change ButtonType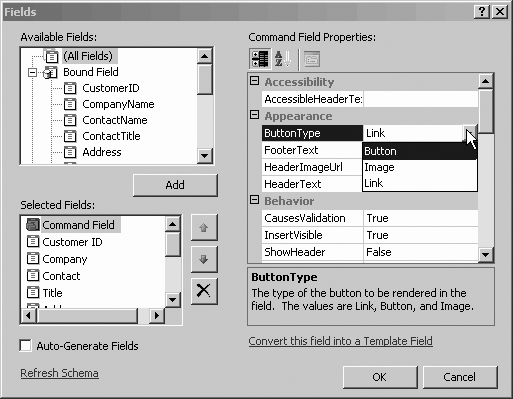 The result is that the commands (Edit and Delete) are now shown as buttons, as shown in Figure 11-15. Figure 11-15. Button commands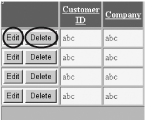 11.2.6. Take It for a SpinStart the application. The customer database information is loaded into your GridView. When you click the Edit button, the data grid automatically enters Edit mode. You'll notice that the editable text fields change to text boxes, and the command buttons change from Edit and Delete to Save and Cancel. Make a small change to one field, as shown in Figure 11-16. Figure 11-16. Editing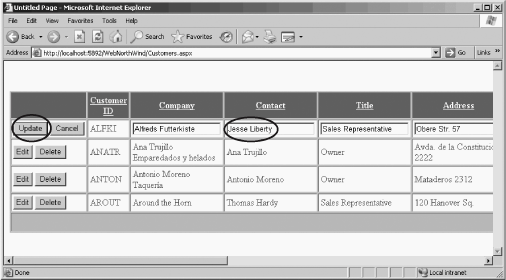 When you click Update, the grid and the database are both updated, as you can confirm by opening the table in the database, shown in Figure 11-17. Figure 11-17. Updated database table 11.2.7. Tracking the Update with EventsSome programmers get very nervous when a control does so much work invisibly. After all, when all goes well, it is great not to have to sweat the details, but if something goes wrong, how can you tell whether your connection failed, no records were updated, an exception was thrown, or exactly what happened? Related to that, what if you want to modify the behavior of the control in some way? The ASP.NET controls, in general, and the data controls, in particular, overcome these concerns by providing numerous events that you can handle. For example, the DataGrid has almost two dozen events. There is an event that fires when you press the Save button after editing a row (RowUpdating) and there is a second event that fires after the row has been updated (RowUpdated ). There are events for when the data is about to be bound, and when it has been bound, when the row is created, when it is about to be deleted, and when it has been deleted, etc. For example, after the Grid updates the row for you, the RowUpdated event is fired. To see this at work, create a handler:
Visual Studio 2005 will create an event handler named GridView1_RowUpdated and will place you in the code-behind page, within the skeleton of that method. Notice that the second argument to this method is of type GridViewUpdatedEventArgs. This object has useful information about the update, including a Boolean property: ExceptionHandled, that will be true if an exception was thrown when updating the data. In that case, the GridViewUpdatedEventArgs object also contains the exception object itself. Another property tells you how many rows were affected by your update (RowsAffected). Three ordered collections tell you what changes have taken place: Keys, OldValues, and NewValues. You can examine these in the debugger to see the values for each column in the row in turn, using the code shown in Example 11-5. Example 11-5. Handling the RowUpdated eventProtected Sub GridView1_RowUpdated( _ ByVal sender As Object, _ ByVal e As System.Web.UI.WebControls.GridViewUpdatedEventArgs) _ Handles GridView1.RowUpdated If e.ExceptionHandled = True Then Dim ex As String = e.Exception.Message Else Dim numRowsChanged As Int32 = e.AffectedRows Dim returnValue As IOrderedDictionary returnValue = e.NewValues Dim myDE As DictionaryEntry For Each myDE In returnValue If myDE.Value IsNot Nothing Then Dim key As String = myDE.Key.ToString Dim val As String = myDE.Value.ToString End If Next myDE End If End Sub The If block tests to see if an exception was handled, and if so, sets a string (ex) to the value of the Message in that exception. You would, presumably, either display this message or log it, and then present the user with options on how to handle the exception. If no exception has been thrown, you next get the number of rows that were affected, storing it in the local variable numRowsChanged. Again, you would presumably log this number and/or take action if it is zero (it might be zero because of a multiuser update conflict, as explained earlier). Finally, in the example, you iterate through the NewValues collection to see that the values you updated on the grid are, in fact, the values that were in the collection passed back to the database. (Put these in the watch window to see their values as you step through the For Each loop.) 11.2.8. Modifying the Grid Based on EventsSuppose your client would like you to modify the grid so that the contents of the Title column are red when the person listed is the owner of the company. You can do so by handling the RowDataBound event (which fires after each row's data is bound), as shown in Example 11-6. Example 11-6. Handling the RowDataBound eventProtected Sub GridView1_RowDataBound(ByVal sender As Object, _ ByVal e As System.Web.UI.WebControls.GridViewRowEventArgs) _ Handles GridView1.RowDataBound ' If the row passed in is a DataRow, and if its text is "OWNER" 'then display the text in red If e.Row.RowType = DataControlRowType.DataRow Then Dim cell As TableCell = e.Row.Cells(4) If cell.Text.ToUpper( ) = "OWNER" Then cell.ForeColor = Drawing.Color.Red End If 'end if text = owner End If 'end if is DataRow End Sub The first If statement tests whether the type of the Row passed in as a parameter is a DataRow (rather than a header, footer, separator, etc.): If e.Row.RowType = DataControlRowType.DataRow Then As you set up this test, IntelliSense will show you the various DataControlRowTypes that are available, as you see in Figure 11-18. Figure 11-18. Picking the DataControlRowType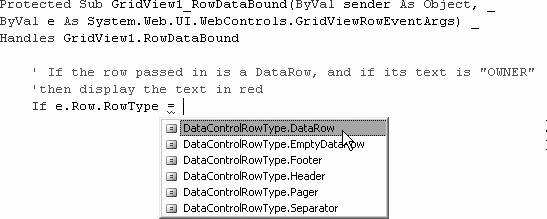 Once you know you are dealing with a DataRow, you can extract the cell you want to examine from that row (in this case, Title is the fifth cell, at offset 4). You are ready to compare the cell's text field to the text string OWNER. If they match, set the forecolor for the cell itself to Red, rendering the word Owner in red. If cell.Text.ToUpper( ) = "OWNER" Then cell.ForeColor = Drawing.Color.Red
11.2.9. Using IntelliSense to Help You Identify the Type to DeclareOne question that might arise is, How do you know that the type of the cell is TableCell? This is another place where the development environment helps you. When you open the parentheses on the Cells collection to place the index, a tooltip opens that not only tells you that the index must be of type integer, and that explains what that index does, but also tells you the return type of the object obtained from the collection, as shown in Figure 11-19. Figure 11-19. Indexing into the Cells Collection Tooltip 11.2.10. Passing Parameters to the Select QuerySometimes you do not want to display all the records in a table. For example, you might create a second grid on your current page that would display the Orders for the selected Company. To do so, you'll need a way to select a company, and a way to pass the ID of the selected company to a second grid to display that company's orders.
Step one is to add a Select button on the existing Grid. You can do so by clicking on the smart tag on the grid and checking the Enable Selection checkbox. The grid immediately adds a Select button to the first cell, alongside Edit and Delete, as shown in Figure 11-20. Figure 11-20. Adding the Select button Step two is to create a second GridView object, that will be used to display the Orders. Drag the second grid onto the page, then open its smart tag. Create a new data source, but use the existing connection string. Choose all columns from the Orders table, then click the Where button, as shown in Figure 11-21. The Add Where Clause dialog opens, as shown in Figure 11-22. Figure 11-21. Configuring the Orders table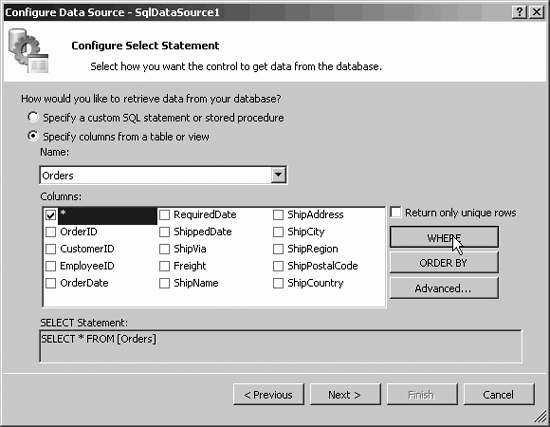 Figure 11-22. Add Where Clause dialog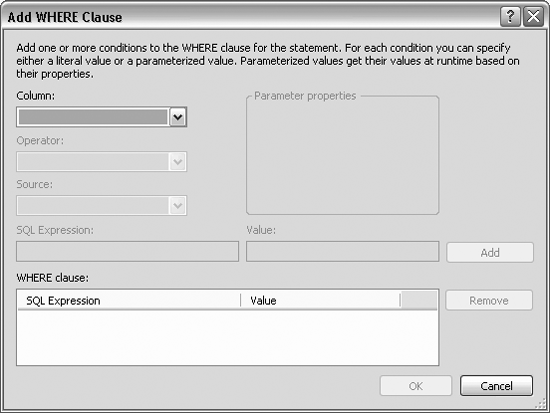 Pick the column you want to match on; in this case, CustomerID, then pick the operator, which can be equals, less than/greater than, like, contains, etc. In this case, you'll use the default (=). The third drop-down list lets you pick the source for the CustomerID. You can pick none if you will be providing a source, or you can obtain the source from the form, from a user's profile, from a QueryString or from Session state. In this case, however, you'll obtain the source of the CustomerID from the first GridView, so choose Control. When you choose Control, the Parameter Properties window wakes up. You are asked to provide the ID of the Control providing the parameter; in this case, GridView1 and (optionally) a default value. Once you've made all your choices, the dialog will look like Figure 11-23. Figure 11-23. Adding a Where Clause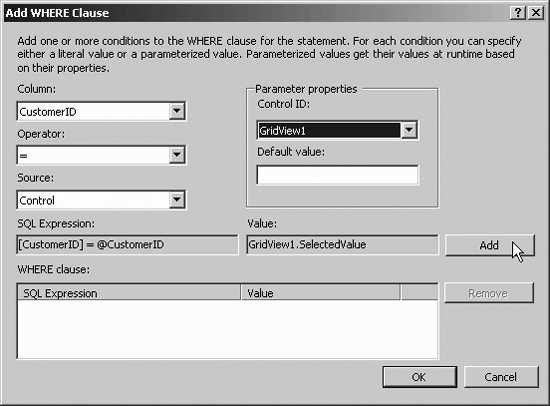 Now click add. When you do, the upper portion of the dialog returns to its initial (blank) state and the Where clause is added to the Where clause window, as shown in Figure 11-24. Figure 11-24. Where Clause added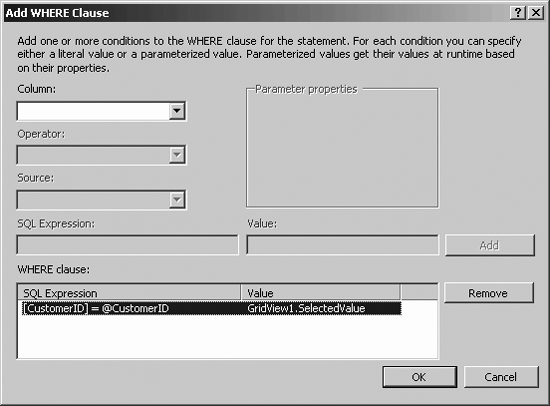 Click OK until you are back at the Con Select Statement dialog. While you are there, sort the results by the OrderDate column. You do this by clicking on the Order By button, which brings up the Add Order By Clause dialog, as shown in Figure 11-25. After you finish creating this DataSource control, switch to Source view and look at the declaration created by Visual Studio 2005, as shown in Example 11-7. Figure 11-25. Add Order By clause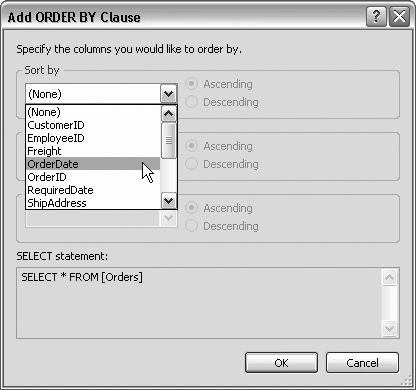 Example 11-7. DataSource control source<asp:SqlDataSource runat="server" ConnectionString="<%$ ConnectionStrings:NorthwindConnectionString %>" SelectCommand="SELECT * FROM [Orders] WHERE ([CustomerID] = @CustomerID) ORDER BY [OrderDate]"> <SelectParameters> <asp:ControlParameter Name="CustomerID" Control PropertyName="SelectedValue" Type="String" /> </SelectParameters> </asp:SqlDataSource> The Select statement now has a Where clause that includes a parameterized value (@CustomerID). In addition, within the definition of the DataSource is a definition of the SelectParameters, which includes one parameter of type asp:ControlParameter that is, a parameter that knows how to get its value from a control. The asp:ControlParameter has a property, ControlID, that tells it which control to check for its value, and a second property, PropertyName, that tells it which property in the Grid to check. There is also a third property Type that tells it that the type of the value it is getting is of type String, so that it can properly pass that parameter to the Select statement. You may now reformat your grid. Rebuild and run the application. Try out your new page; it should look something like Figure 11-26. As you click on each Select button in the upper grid, the orders for that customer are displayed in the lower grid. Figure 11-26. Order grid displayed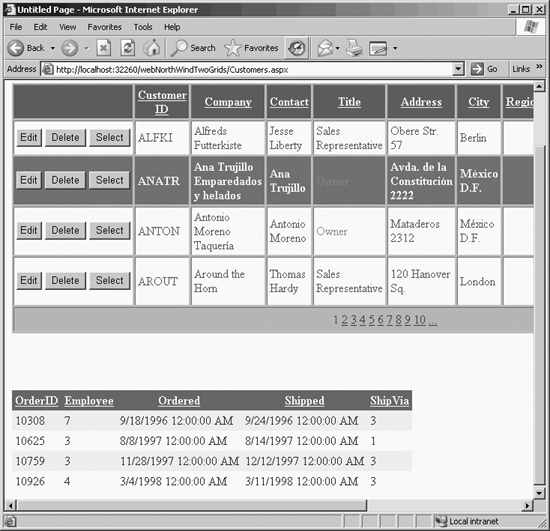 |
EAN: 2147483647
Pages: 162

 Copy Web Site to copy over the web site from the prior example, as previously described in Chapter 8.