11.1. Getting Data from a Database
| To see how to interact with a database, begin by creating a new web application that can be used to display information about the Northwind database. Call it WebNorthWind, as shown in Figure 11-1. Figure 11-1. Creating the WebNorthWind web site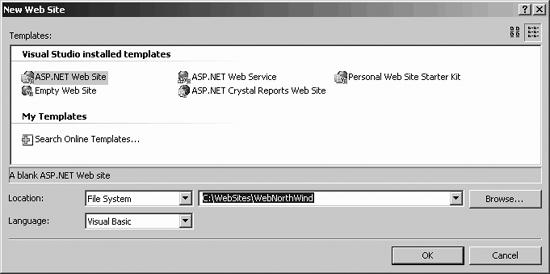 You'll be working with the Customers table in the Northwind database, so rename your .aspx file from Default.aspx to Customers.aspx (don't forget to change the class name both in the code file and in the page directive!). 11.1.1. Create a Data ConnectionYou need a connection to the database. You can explicitly create one, or you can use a control that depends on having a connection and one will be created for you. Let's start by explicitly creating one. Drag a SqlDataSource control onto the form, as shown in Figure 11-2. Figure 11-2. Data source control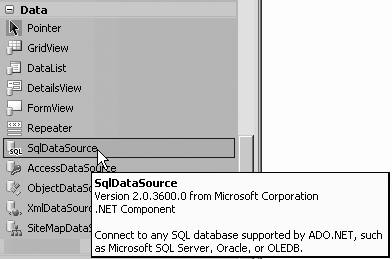 The SqlDataSource control will appear on your form, as shown in Figure 11-3. Figure 11-3. SqlDataSource control SqlDataSource control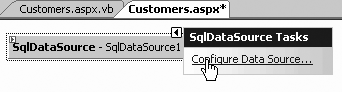
As you can see in Figure 11-3, the SqlDataSource control has a smart tag. Clicking on Con Data Source...opens the Data Source Configuration wizard . Your first option is to choose an existing connection or to press the button to create a new connection. When you create a new connection, you are first asked to choose the data source and data provider you'd like to use. For this book, you'll choose Microsoft SQL Server as the data source, and the .NET Framework Data Provider for SQL Server as the Data Provider, as shown in Figure 11-4. Once you've chosen your data provider, you have the option to save the connection string in the application file (the alternative is to save the connection string in the page as a property of the control). Generally, you'll want to save the connection string in the application file where it is more secure and encrypted. Figure 11-4. Choosing the SQL Data Provider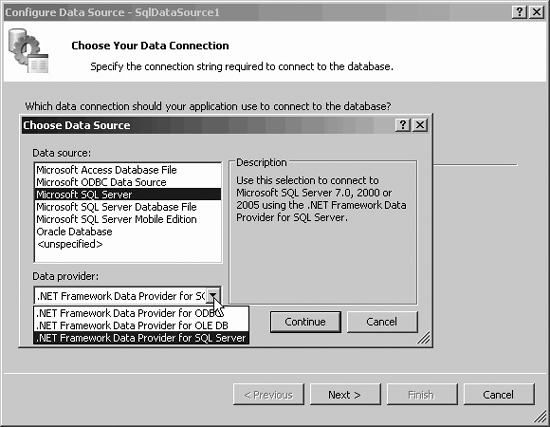 Step three is to specify your query or to pick the columns you want from a specific table. For this example, you'll choose all the columns from the Customers table, as shown in Figure 11-5. Figure 11-5. Choosing the Customers table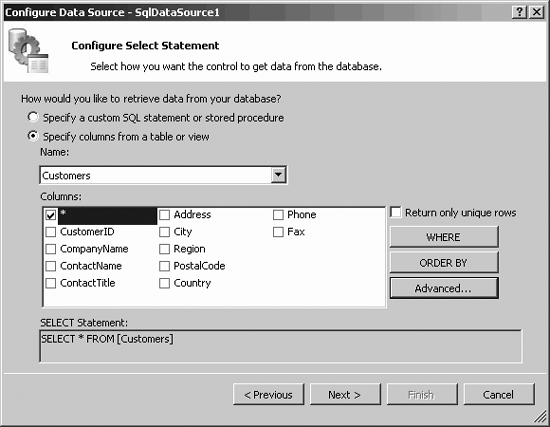
The next step in the wizard allows you to test your query. Clicking Finish creates the connection. 11.1.2. Data Source ControlsIn ASP.NET 2.0 database interaction is almost always through the DataSource controls .
The DataSource control provides a single object that you can define either declaratively (in your web page) or programmatically (in your code-behind). It will own the connection information, the query information, the parameters, and the behavior (such as paging and caching). You can bind it to various UI objects for display on your web page. There are a number of DataSource controls, including controls for accessing SQL from SQL Server, from ODBC or OLE DB servers, from XML files, and from business objects. All of these DataSource controls expose the same properties and methods, and all bind to UI objects (such as DataList and GridView) in the same way. You'll bind them to GridViews, DataLists, and some other controls later in this chapter. Thus, you have a variety of UI controls all binding in the same way to a variety of underlying data sources , and the details are handled by the DataSource controls, greatly simplifying even complex data manipulation tasks in web applications. 11.1.3. Binding Data Controls with Drag and DropNow that you have a working DataSource control, let's hook it up to a data display control to examine the data you've retrieved. Drag a GridView onto the page. The GridView recognizes that there is already a SqlDataSource on the page, so it does not create its own. Instead, its smart tag opens and asks you to choose your data source, as shown in Figure 11-6. Figure 11-6. Choosing an existing data source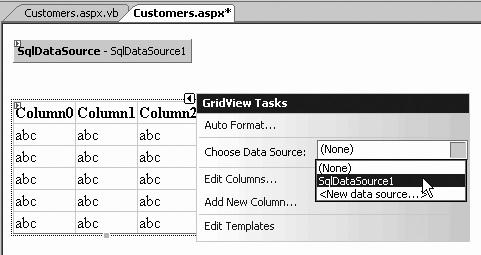 As soon as you set the data source, the data grid is redrawn, with a column for each field returned by the DataSource. Notice that the column headers have also been filled in for you. Switch to Source view, and examine the declaration of the data grid, as shown in Example 11-1. Example 11-1. ASP GridView bound to DataSource <asp:GridView PageSize="4" runat="server" DataSource AutoGenerateColumns="False" DataKeyNames="CustomerID"> <Columns> <asp:BoundField ReadOnly="True" HeaderText="CustomerID" DataField="CustomerID" SortExpression="CustomerID"> </asp:BoundField> <asp:BoundField HeaderText="CompanyName" DataField="CompanyName" SortExpression="CompanyName"> </asp:BoundField> <asp:BoundField HeaderText="ContactName" DataField="ContactName" SortExpression="ContactName"> </asp:BoundField> <asp:BoundField HeaderText="ContactTitle" DataField="ContactTitle" SortExpression="ContactTitle"> </asp:BoundField> <asp:BoundField HeaderText="Address" DataField="Address" SortExpression="Address"></asp:BoundField> <asp:BoundField HeaderText="City" DataField="City" SortExpression="City"></asp:BoundField> <asp:BoundField HeaderText="Region" DataField="Region" SortExpression="Region"></asp:BoundField> <asp:BoundField HeaderText="PostalCode" DataField="PostalCode" SortExpression="PostalCode"> </asp:BoundField> <asp:BoundField HeaderText="Country" DataField="Country" SortExpression="Country"></asp:BoundField> <asp:BoundField HeaderText="Phone" DataField="Phone" SortExpression="Phone"></asp:BoundField> <asp:BoundField HeaderText="Fax" DataField="Fax" SortExpression="Fax"></asp:BoundField> </Columns> </asp:GridView> Visual Studio 2005 has done a lot of work for you. It has examined the data source, and created a BoundField for each column in the data. Further, it has set the HeaderText to the name of the DataField. Finally, you'll notice on the third line of the declaration of the data grid that it has set AutoGenerateColumns to False. If you were creating the GridView by hand, and if you were going to let the data grid create all the columns right from the retrieved data, you could greatly simplify the code by just setting AutoGenerateColumns to TRue. To see this at work, create, by hand, a second GridView below the one created for you, as shown in Example 11-2. Example 11-2. Creating a GridView by hand <asp:GridView PageSize="4" runat="server" DataSource AutoGenerateColumns="True" DataKeyNames="CustomerID"/> Run the application. You should see two data grids , one above the other, as shown in Figure 11-7. Figure 11-7. Comparing the two grids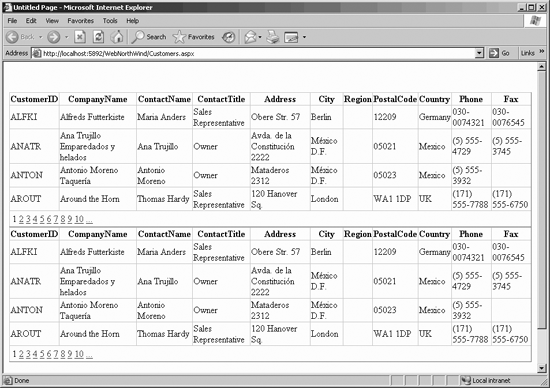 They are indistinguishable. So why did Visual Studio 2005 bother with turning off AutoGenerateColumns? The answer is that doing so gives you much greater control. You can, for example, set the headings on the columns (e.g., changing ContactTitle to Title). You can remove columns you don't need, and you can add new columns for manipulating the rows. You can make these changes by hand-coding the HTML in the Source view, or by clicking on the smart tag for the GridView and choosing Edit Columns. Doing so brings up the Fields dialog box , as shown in Figure 11-8. The dialog box is divided into three main areas: the list of available fields, the list of selected fields (with buttons to remove or reorder the fields), and the Bound Field Properties window on the right. Click on a selected field (e.g., ContactTitle) and you Figure 11-8. Fields dialog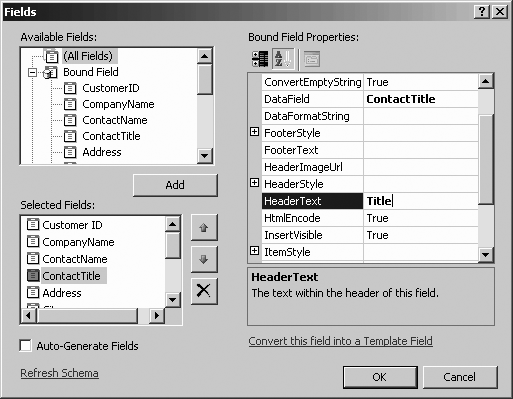 can set the way that field will be displayed in the data grid (e.g., changing the header to Title). 11.1.4. Adding Features to the GridWhile you're examining what you can do with the GridView, let's make it look a bit nicer. First, delete the second grid. Second, open the smart tag on the original grid. Click on AutoFormat and choose one of the formatting options (you can, of course, format it by hand, but why work so hard?) I'll choose Brown Sugar because it shows up well in the printed book. While you're at it, click on Enable Paging. This keeps your application from trying to load every single record into the grid. Finally, click on Enable Sorting (Hey! Presto! The columns can be sorted). Run the application. The output should look like Figure 11-9. 11.1.5. Adding Insert, Update, and Delete StatementsThe DataSource control that you've created currently has only a Select statement to extract data from the database, <asp:SqlDataSource runat="server" SelectCommand="SELECT * FROM [Customers]" ConnectionString="<%$ ConnectionStrings:NorthwindConnectionString %>"> </asp:SqlDataSource> You can, however, ask your DataSource control to create the remaining three CRUD (Create, Retrieve, Update, and Delete) statements , using a wizard to make your work much easier. To do so, switch to design view, click on the SqlDataSource's smart tag, and choose Con Data Source.... The Con Data Source wizard opens, displaying your current connection string. Click Next and the Con Select Statement dialog is displayed. Click the Advanced button, as shown in Figure 11-10. Figure 11-9. Running the formatted grid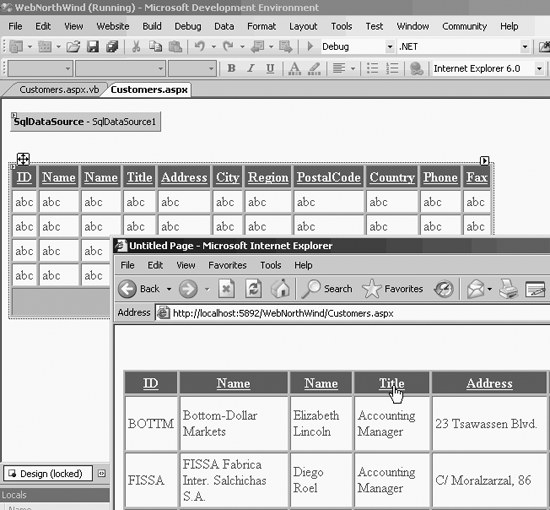 Figure 11-10. Click the Advanced button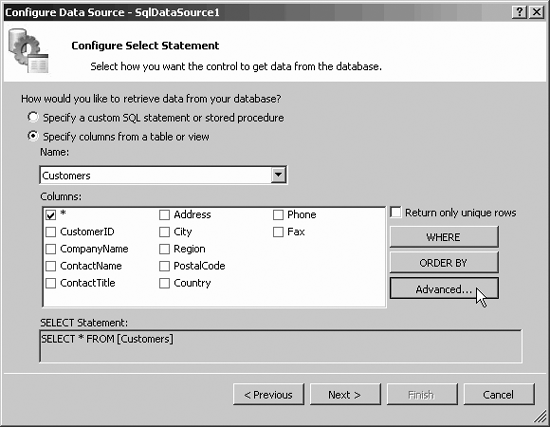 This opens the Advanced SQL Generation Options dialog. Click the Generate Insert, Update and Delete statements checkbox, as shown in Figure 11-11. Clicking this checkbox instructs the wizard to create the remaining three CRUD methods, and it also enables the second checkbox: Use Optimistic Concurrency. Do not check this yet. Click OK, Next, and Finish. You will be asked to update your grid, which, unfortunately, will wipe out all your careful work setting titles, etc., but the good news is that you are now bound to a DataSource control that provides all four CRUD methods. Take a look at the HTML generated for the DataSource control, shown in Example 11-3. Figure 11-11. Add CRUD methods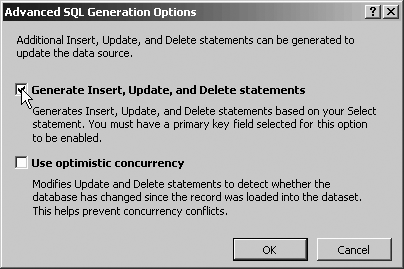 Example 11-3. Source code for SQL DataSource with CRUD <asp:SqlDataSource runat="server" SelectCommand="SELECT * FROM [Customers]" ConnectionString="<%$ ConnectionStrings:NorthwindConnectionString %>" DeleteCommand="DELETE FROM [Customers] WHERE [CustomerID] = @original_CustomerID" InsertCommand="INSERT INTO [Customers] ([CustomerID], [CompanyName], [Contact Name], [ContactTitle], [Address], [City], [Region], [PostalCode], [Country], [Phone], [Fax]) VALUES (@CustomerID, @CompanyName, @ContactName, @ContactTitle, @Address, @City, @Region, @PostalCode, @Country, @Phone, @Fax)" UpdateCommand="UPDATE [Customers] SET [CompanyName] = @CompanyName, [ContactName] = @ContactName, [ContactTitle] = @ContactTitle, [Address] = @Address, [City] = @City, [Region] = @Region, [PostalCode] = @PostalCode, [Country] = @Country, [Phone] = @Phone, [Fax] = @Fax WHERE [CustomerID] = @original_CustomerID"> <DeleteParameters> <asp:Parameter Type="String" Name="original_CustomerID" /> </DeleteParameters> <UpdateParameters> <asp:Parameter Type="String" Name="CompanyName" /> <asp:Parameter Type="String" Name="ContactName" /> <asp:Parameter Type="String" Name="ContactTitle" /> <asp:Parameter Type="String" Name="Address" /> <asp:Parameter Type="String" Name="City" /> <asp:Parameter Type="String" Name="Region" /> <asp:Parameter Type="String" Name="PostalCode" /> <asp:Parameter Type="String" Name="Country" /> <asp:Parameter Type="String" Name="Phone" /> <asp:Parameter Type="String" Name="Fax" /> <asp:Parameter Type="String" Name="original_CustomerID" /> </UpdateParameters> <InsertParameters> <asp:Parameter Type="String" Name="CustomerID" /> <asp:Parameter Type="String" Name="CompanyName" /> <asp:Parameter Type="String" Name="ContactName" /> <asp:Parameter Type="String" Name="ContactTitle" /> <asp:Parameter Type="String" Name="Address" /> <asp:Parameter Type="String" Name="City" /> <asp:Parameter Type="String" Name="Region" /> <asp:Parameter Type="String" Name="PostalCode" /> <asp:Parameter Type="String" Name="Country" /> <asp:Parameter Type="String" Name="Phone" /> <asp:Parameter Type="String" Name="Fax" /> </InsertParameters> </asp:SqlDataSource> Taking this apart, you see first the declaration for the SqlDataSource (and the closing tag at the very bottom). After the ID and the obligatory runat="server" you see four attributes: the SelectCommand (that was there previously) and the new DeleteCommand , InsertCommand , and UpdateCommand . SelectCommand="SELECT * FROM [Customers]" DeleteCommand="DELETE FROM [Customers] WHERE [CustomerID] = @original_CustomerID" InsertCommand="INSERT INTO [Customers] ([CustomerID], [CompanyName], [ContactName], [ContactTitle], [Address], [City], [Region], [PostalCode], [Country], [Phone], [Fax]) VALUES (@CustomerID, @CompanyName, @ContactName, @ContactTitle, @Address, @City, @Region, @PostalCode, @Country, @Phone, @Fax)" UpdateCommand="UPDATE [Customers] SET [CompanyName] = @CompanyName, [ContactName] = @ContactName, [ContactTitle] = @ContactTitle, [Address] = @Address, [City] = @City, [Region] = @Region, [PostalCode] = @PostalCode, [Country] = @Country, [Phone] = @Phone, [Fax] = @Fax WHERE [CustomerID] = @original_CustomerID"> The DeleteCommand takes a single parameter (@original_CustomerID), specified in the DeleteParameters element: <DeleteParameters> <asp:Parameter Type="String" Name="original_CustomerID" /> </DeleteParameters> The UpdateCommand requires more parameters, one for each column you'll be updating, as well as a parameter for the original customer ID (to make sure the correct record is updated). Similarly, the InsertCommand takes parameters for each column for the new record. All of these parameters are within the definition of the SQLDataSource. |

 Non-Visual Controls.
EAN: 2147483647
Pages: 162