3.1. Adding a Menu and Toolbar
| To navigate to the new pages that you'll be adding to the application in this chapter, you'll need to add a menu to the Welcome page. Lengthen the form and drag all the controls down (including the images) to make room for the menu. To do so, click in the form, click Control-A to mark all the images, then grab a move-handle and drag them in unison. Drag a menu strip control from the Toolbox to the top of the Welcome page. Notice that "MenuStrip1" is added. Rename this to mnuWelcome. Click on the Menu, and add four top-level menus : Employees, Customers, Orders, and Suppliers. For each, create two sub-menu choices: Show All and Find.
You can now move all the other controls back up into position below the menu. 3.1.1. Rename All the Menu ChoicesBefore proceeding, rename the various menu choices by clicking on each and setting its Name property in the Properties window. For example, click on Employees Figure 3-1. Set the menu choice name in the Properties window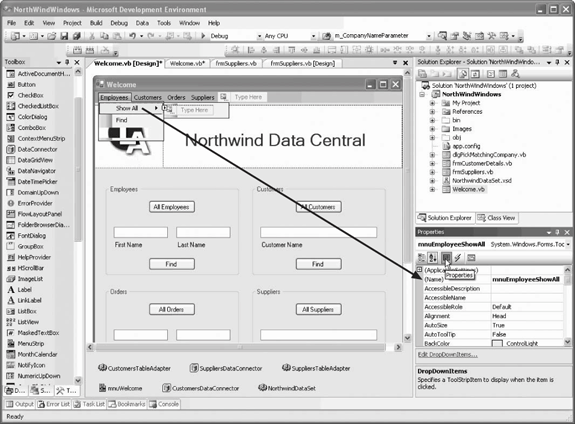 Setting the event handlers for the menu choices is also pretty easy, as you want them to do the same thing their related buttons specify. Thus, click on the All Employees button, and in the Properties window, click the Events button (the lightning bolt) to see the names of the predefined event handlers for this control. Copy the button's Click event handler (btnAllClick). Now click on the Employees menu to open it, and select Show All. In the Properties window, click on the Event button (the one with the lightning bolt) to reveal the events for this menu choice, and in the Click event, paste the btnAllClick event handler name, as shown in Figure 3-2.
Figure 3-2. Setting the Click event handler Do the same for the Show All for each of the other menu choices. Next, click on the Find button for Customers, and pick up btnFind_Click, which you can add to the Find menu choices for Customers and Suppliers. Before you choose the Show All menu choice, you'll need to make some changes to the btnAllClick menu choice, because that event handler, as written, assumes it was clicked by a Button control. The modified event handler for the All buttons on the Welcome page is shown in Example 3-1. Example 3-1. All buttons Click event handler Private Sub btnAllClick( _ ByVal sender As System.Object, _ ByVal e As System.EventArgs) _ Handles btnAllCustomers.Click, _ btnAllSuppliers.Click, _ btnAllEmployees.Click, _ btnAllOrders.Click, _ mnuEmployeeShowAll.Click, _ ShowAllToolStripMenuItem1.Click, _ ShowAllToolStripMenuItem2.Click, _ ShowAllToolStripMenuItem3.Click MessageBox.Show(CType(sender, Button).Text + _ " not yet implemented", "Not Yet Implemented", _ MessageBoxButtons.OK, MessageBoxIcon.Exclamation) End Sub Because a ToolStripMenuItem does not inherit from Control, you'll need to test the type of the sender and then cast accordingly. Thus, replace the body of Example 3-1 with the code shown in Example 3-2. Example 3-2. Testing for sender type Dim txt As String = String.Empty If TypeOf sender Is Button Then txt = CType(sender, Button).Text ElseIf TypeOf sender Is ToolStripMenuItem Then txt = CType(sender, ToolStripMenuItem).Text End If MessageBox.Show(txt + _ " not yet implemented", "Not Yet Implemented", _ MessageBoxButtons.OK, MessageBoxIcon.Exclamation)
3.1.2. Other Cool ControlsBefore we continue with this application, let's explore some other cool controls that don't quite fit with our immediate business requirements but are still very handy. To get started, you'll add a Web Browser menu command and, in fact, you'll make it the first menu item. No problem, click on the end of the menu bar and choose the smart tab's Edit Items... link. This opens the Items Collection Editor. You have the opportunity to edit the names of the items and to insert a new item by clicking the Add button, as shown in Figure 3-3. Figure 3-3. Adding menu items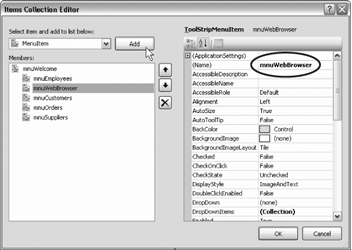 Add a new menu item and rename it mnuWebBrowser. Set its Text to Web Browser. Click the Up button to raise it to the first position in the menu and click OK. Set the event handler for the Click event of this menu item, as shown in Example 3-3. Example 3-3. Web Browser menu item Click event handler Private Sub mnuWebBrowser_Click( _ ByVal sender As System.Object, _ ByVal e As System.EventArgs) Handles mnuWebBrowser.Click frmWeb.Show( ) End Sub |

 Show All and set its name to mnuEmployeesShowAll, and set its Find sub-menu to mnuEmployeeFind, as shown in Figure 3-1.
EAN: 2147483647
Pages: 162