Section 9.2. Examining Values: The Autos and Locals Windows
9.2. Examining Values: The Autos and Locals WindowsLook at the tabs below the code window; you'll find a Locals window and an Autos window . Both of these display your local variables. The difference is that the Autos window shows variables used in the current statement and the previous statement. (The current statement is the statement at the current execution location, which is highlighted automatically in the debuggerthus, the window's name .) The Locals window displays all the variables in the current method, including parameters, as shown in Figure 9-8, along with each variable's current value and type. Figure 9-7. Breakpoint Condition dialog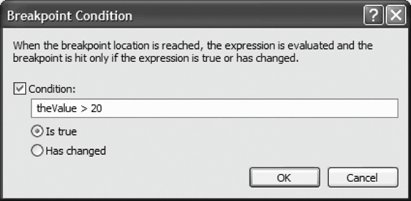 Figure 9-8. Locals window
To see how this works, put a break point on the first line of the Run( ) method and run the program. When the program stops, click F10 to step over the creation of the new DateTime object. The Autos window shows you that the current time has been set to the current date, as shown in Figure 9-9. Because the value of currentTime has just been set, it is shown in red. Notice the plus sign (+) next to the currentTime variable. This variable is of type System.DateTime , which is a type with many members . Expanding the plus sign reveals the state of this object, as shown in Figure 9-10. Figure 9-9. Autos variables window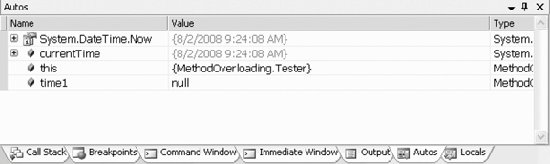 Figure 9-10. Expanding the variable Press F11 again to step into the Time class constructor. When you step into the Time constructor, the Autos window changes to show you the new values, appropriate to the current line of code. As mentioned earlier, the Locals window lets you look at all the variables in the current method simultaneously . In this series of examples, clicking on the Locals window reveals the local variables dt (the parameter) and this (the current object). Expand the this variable, and you'll see the Time object, with its members uninitialized . Press F11 to progress through the assignment of values to the member variables of the Time class. As you hit the F11 key, the update is reflected in the Locals window, as shown in Figure 9-11. Explore the Locals and Autos windows as you step through the program. When you want to stop, choose the Stop debugging item from the Debug menu to stop processing and return to the editor. |

EAN: 2147483647
Pages: 250