Section 19.7. Adding Controls and Events
19.7. Adding Controls and EventsBy adding just a few more controls, you can create a complete form with which users can interact. You will do this by adding a more appropriate greeting ("Welcome to Northwind"), a text box to accept the name of the user , two new buttons (Order and Cancel), and text that provides feedback to the user. Figure 19-14 shows the form. This form won't win any awards for design, but its use will illustrate a number of key points about Web Forms. Example 19-1 is the complete HTML for the .aspx file. Figure 19-12. Choosing the data fields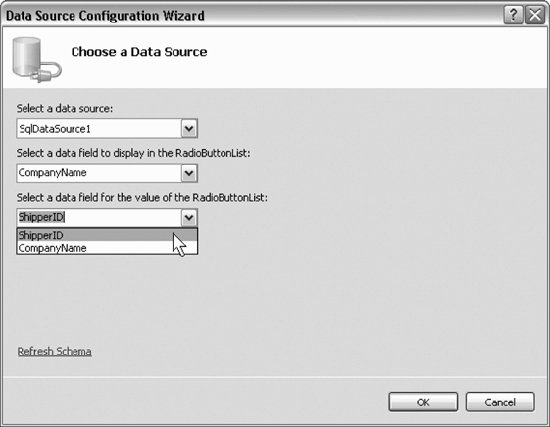 Figure 19-13. Viewing the HTML source code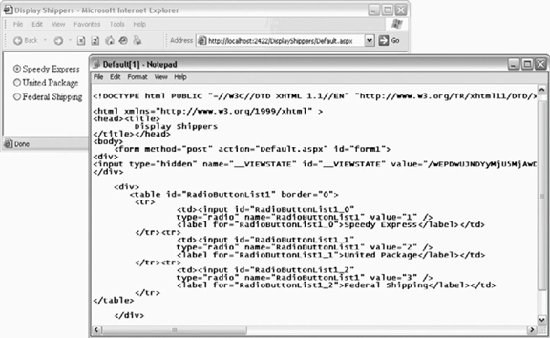 Figure 19-14. The shipper form Example 19-1. Completed shipper form Default.aspx
When the user clicks the Order button, you'll check that the user has filled in his name, and you'll also provide feedback on which shipper was chosen . Remember, at design time, you can't know the name of the shipper (this is obtained from the database), so you'll have to ask the ListBox for the chosen name (and ID). To accomplish all of this, switch to Design mode and double-click the Order button. Visual Studio will put you in the code-behind page, and will create an event handler for the button's Click event. You add the event-handling code, setting the text of the label to pick up the text from the text box and the text and value from the RadioButtonList : protected void btnOrder_Click( object sender, EventArgs e ) { lblMsg.Text = "Thank you " + txtName.Text.Trim( ) + ". You chose " + rblShippers.SelectedItem.Text.ToString( ) + " whose ID is " + rblShippers.SelectedValue.ToString( ); } When you run this program, you'll notice that none of the radio buttons are selected. Binding the list did not specify which one is the default. There are a number of ways around this, but the simplest is to override the OnLoad event and set the first radio button to be selected. Return to the Shipper.aspx.cs and type protected override . You will see a scrolling list of all the overrideable methods , properties, etc. Start typing the first letters of OnLoad, as shown in Figure 19-15. Figure 19-15. Using IntelliSense to override OnLoad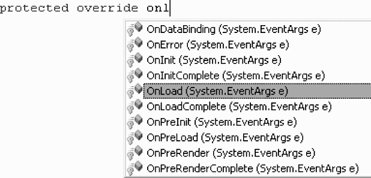 When OnLoad is highlighted, press Tab to accept the method. The stub for the overridden method is created, but its default body throws the NotImplementedException . Delete the exception and replace it with this code: rblShippers.SelectedIndex = 0; This selects the first radio button in the RadioButtonList . The problem with this solution is subtle. If you run the application, you'll see that the first button is selected, but if you choose the second (or third) button and click OK, you'll find that the first button is reset. You can't seem to choose any but the first selection. This is because each time the page is loaded, the OnLoad event is run, and in that event handler, you are (re-)setting the selected index. The fact is that you only want to set this button the first time the page is selected, not when it is posted back to the browser as a result of the OK button being clicked. To solve this, wrap the setting in an if statement that tests if the page has been posted back: protected override void OnLoad( EventArgs e ) { if ( !IsPostBack ) { rblShippers.SelectedIndex = 0; } } When you run the page, the IsPostBack property is checked. The first time the page is posted, this value is false and the radio button is set. If you click a radio button and then click OK, the page is sent to the server for processing (where the btnOrder_Click handler is run), and then the page is posted back to the user. This time, the IsPostBack property is true, and thus the code within the if statement isn't run, and the user's choice is preserved, as shown in Figure 19-16. Figure 19-16. The completed shipper form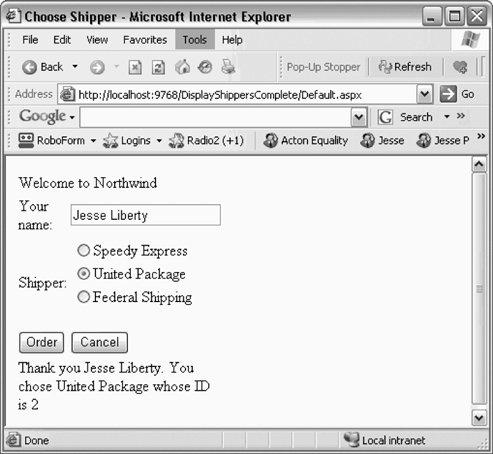 The complete code-behind form is shown in Example 19-2. Example 19-2. Code-behind form for Shipper.aspx.cs
|
EAN: 2147483647
Pages: 250
- Enterprise Application Integration: New Solutions for a Solved Problem or a Challenging Research Field?
- The Effects of an Enterprise Resource Planning System (ERP) Implementation on Job Characteristics – A Study using the Hackman and Oldham Job Characteristics Model
- Context Management of ERP Processes in Virtual Communities
- Intrinsic and Contextual Data Quality: The Effect of Media and Personal Involvement
- A Hybrid Clustering Technique to Improve Patient Data Quality
- Chapter III Two Models of Online Patronage: Why Do Consumers Shop on the Internet?
- Chapter VI Web Site Quality and Usability in E-Commerce
- Chapter XI User Satisfaction with Web Portals: An Empirical Study
- Chapter XIV Product Catalog and Shopping Cart Effective Design
- Chapter XVII Internet Markets and E-Loyalty