Section 18.1. Creating a Simple Windows Form
18.1. Creating a Simple Windows FormThe .NET Framework offers extensive support for Windows application development, the centerpiece of which is Windows Forms. The metaphor of a "form" was borrowed from Visual Basic, and is a hallmark of Rapid Application Development (RAD ). Arguably, C# is the first development environment to marry the RAD tools of VB with the object-oriented and high-performance characteristics of a C++/Java-like language (though, of course, C# and Visual Basic 2005 are now virtually the same language with different syntactic coatings). 18.1.1. Using the Visual Studio DesignerWhile it is possible to build a Windows application using any text editor, and it is possible to compile from the command line, it is senseless to do so. Visual Studio 2005 increases your productivity, and integrates an editor, compiler, test environment, and debugger into a single work environment. Few serious .NET developers build commercial applications outside of Visual Studio. To begin work on a new Windows application, first open Visual Studio and choose File Figure 18-1. Creating a Windows Application project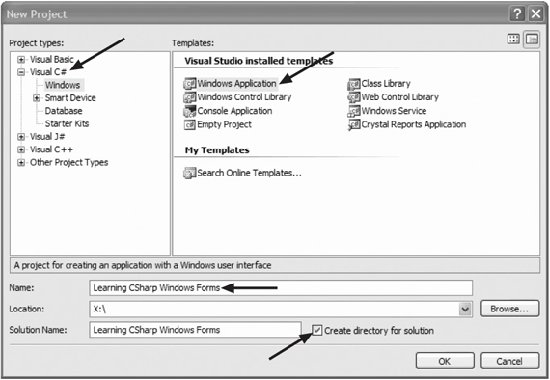 Be sure to choose C# and Windows Application (see arrows). It is convenient to place each project in its own directory (see checkbox), and you may name the project anything you like (and the name may include spaces, as shown). Visual Studio responds by creating a Windows Form application and, best of all, putting you into a design environment, as shown in Figure 18-2. The Design window displays a blank Windows Form ( Form1 ). A Toolbox window is also available, with a selection of Windows controls. If the Toolbox is not displayed, try selecting View
Before proceeding, take a look around. The Toolbox is filled with controls that you can add to your Windows Form application. In the upper-right corner, you should see the Solution Explorer, a window that displays all the files in your projects (if not, click View Figure 18-2. The design environment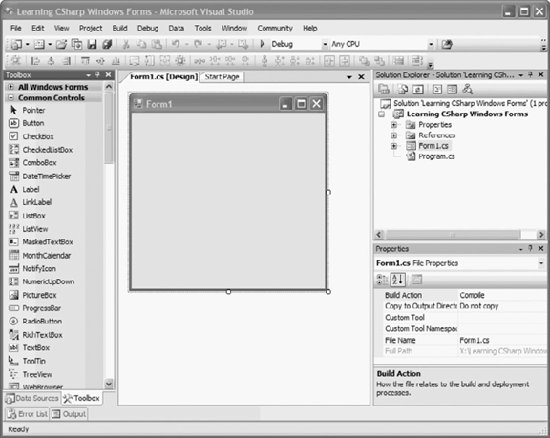 Drag a label and a button from the Toolbox onto the form. Click on the label and take a look at its properties in the Properties window, as shown in Figure 18-3. To add text to label1 , you can type the words "Hello World" into the box to the right of its Text property. If you want to change the font for the lettering in the HelloWorld label, click the + sign next to the Font property to expand it. Then click on the ellipsis next to the Name sub-property to open the Font editor, as shown in Figure 18-4. Click on the button and change its text to Cancel. Run the application by clicking the Start Debugging button, or clicking F5, just as you would with a console application. You'll see your new form running in its own window. Click on the Cancel button. Oops, nothing happens. For the application to respond to the button click, you must provide an event handler. Click on the X to close your application and return to the Design view. Figure 18-3. The properties for a control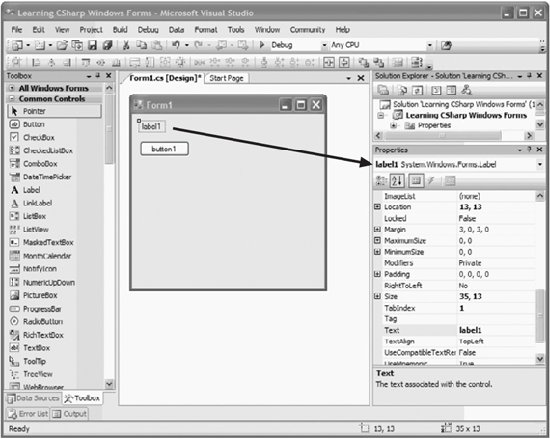 Click on the button so that its properties are shown in the Properties window. Notice that at the top of the window are a series of buttons . As you hover the cursor over each, a tool tip tells you what it is for, as shown in Figure 18-5. Click on the lightning bolt to change the Properties window to show all the events for the button. You'll want to create a handler for the Click event. You can type a name into the space next to Click or you can just double-click in the space and Visual Studio 2005 will create an event handler name for you. In either case, Visual Studio 2005 then places you in the editor for the event handler so you can add the logic. Add a line to the event so it looks like this: private void button1_Click( object sender, EventArgs e ) { Application.Exit( ); } Visual Studio 2005 created the name by concatenating the control name ( button1 ) with the event ( Click ), separated by an underscore . Your logic just says to exit the application when the button is clicked. Figure 18-4. Editing the font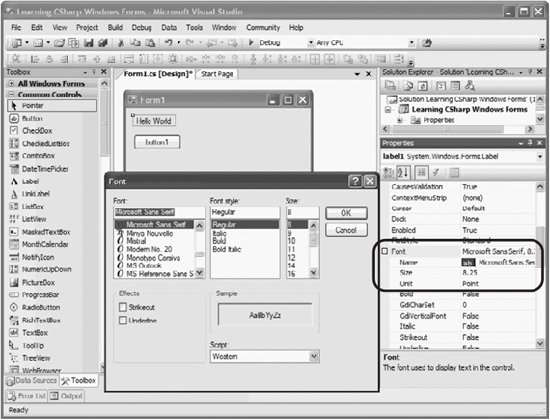 Figure 18-5. The Events button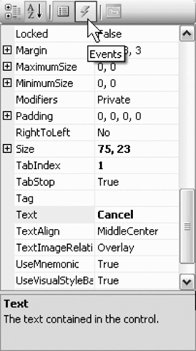
Notice that as you try to enter the method call Application.Exit( ) , Visual Studio 2005's IntelliSense tries to help you. When you type A, the first possible object that begins with A is shown. Continue typing through Appl and then hit the period: the class Application is filled in for you, and the methods and properties of the Application object are available.
Type Exi and IntelliSense scrolls to the first method that begins with those letters , as shown in Figure 18-6. Figure 18-6. IntelliSense at work Once you've found the method, just type the parentheses and semicolon.
18.1.2. The partial KeywordYour code file ( Form1.cs ) has only the using directives and the constructor and event handler. If you have experience with previous versions of C#, you may be wondering where the code to initialize the controls is hiding. The class definition contains the keyword partial . This indicates that the rest of the class definition is contained in another file. If you click the Show All Files button at the top of the Solution Explorer (as shown in Figure 18-7), you will see that the designer has revealed another file, Form1.Designer.cs , that contains the boiler-plate code and the initialization for all the controls. Figure 18-7. Show All Files button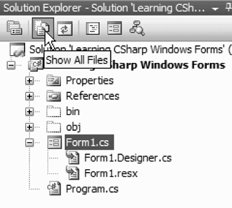 |
 New
New 
EAN: 2147483647
Pages: 250