Remoting
| | ||
| | | |
| | ||
The .NET Framework includes the remoting subsystem, which is the technology that allows .NET applications to interact with each other. (This includes both cross-process communication and communication across the network from machine to machine.) Remoting is also intended for use when creating client-server applications, because it enables efficient communication between the various tiers of an n- tier application. Furthermore, remoting enables distributed-object architectures, because it's capable of passing unanchored objects across the network.
As we discussed in Chapters 1 and 2, we'll rely on the concepts of anchored and unanchored objects, and the ability of remoting to support them, as we create our framework.
Basic Concepts
To understand remoting, we need to cover some basic concepts and terms. Remoting is all about allowing code running in one process to communicate with code running in a different processeven if that different process is on another machine across the network.
| Note | Technically, remoting enables communication between code running in two different scopes, which can mean different contexts, different application domains, different Windows processes, or different machines. |
Remoting allows a client application to communicate with a server object running in a different process. To do this, the client has an object proxy that represents the server object. To the client, the proxy is the server object, but in reality the object proxy takes each client method call and uses remoting to route it through to the server, where the server object can process the request. This is illustrated in Figure 3-1.

Figure 3-1: Proxy-stub architecture of .NET Remoting
On the client, remoting invokes a formatter object to convert the method call and its parameters into a single blob of data that can be efficiently transferred to the server. Remoting then invokes functionality in a channel object that's responsible for physically transferring the blob of data to the server. The client-side channel contacts the server's remoting listener object , which accepts the blob of data and invokes the remoting subsystem on the server. The server-side remoting subsystem then invokes a formatter to unpack the blob back into meaningful data, including the method to be called and all its parameters. It then calls the actual server object's method, passing the parameter data.
Once the server object's method completes, remoting takes any return values from the method, packs them up using the formatter, and returns them to the client via the channel. On the client, the remoting subsystem uses the formatter to unpack the results and returns them to the proxy object. The proxy then returns the results to the client application. The end result is that the client application has the illusion that the object proxy is the server object.
Channels
To communicate between the two processes (or machines), the remoting subsystem in .NET uses a channel. In fact, .NET provides two channels: an HTTP channel, and a TCP channel. If required, it's also possible to create custom channels, though doing so is far from a trivial task.
Both built-in channels provide the same basic functionality in that they allow remoting to send messages from the client to the server and retrieve any results from the server as follows :
-
The HTTP channel uses the standard HTTP protocol, so it works well with firewalls and proxy servers. However, it incurs more overhead than the TCP channel, because the message header data is in plain text.
-
The TCP channel uses a proprietary binary message protocol that's smaller than the standard HTTP header. It's therefore faster, but it may have issues with firewalls and/or proxy servers.
Although the TCP channel is slightly faster than the HTTP channel, the HTTP channel will work in more networking environments. As we'll see later in this section, the only way to use the TCP channel is to create our own remoting host application on the server. If we use IIS as the host, then HTTP is our only option. Using IIS as a host is often preferable, so the HTTP channel is the more commonly used of the two.
Note that the body of the message might be XML or binary, regardless of which channel we choose. How the body of the message is formatted is controlled by which formatter object we choose.
Formatters
The messages sent over a channel are formatted so that remoting can understand them at both ends of the connection. The .NET Framework provides two formatters: a SOAP/XML formatter, and a binary formatter. Again, it's possible to create our own formatters, though that, too, is nontrivial:
-
The SOAP (Simple Object Access Protocol) formatter encodes the data into SOAP's XML format, so it's human-readable , but has a lot of overhead.
-
The binary formatter encodes the data into a proprietary binary format that results in messages that are about 30 percent as big as those sent using the SOAP formatter. Also, encoding with the binary formatter is more efficient than converting the data into XML, so there's less overhead on both client and server.
The SOAP formatter is very nice for debugging during development, because we can navigate to our remoting service using a browser to see if it returns XML. For production deployment, however, the binary formatter is typically preferable, because it transfers so much less data across the network on each remoting call. Because of this, we typically develop using the SOAP formatter, and then switch to the binary formatter once we've got everything working properly.
Listener
Figure 3-1 shows a listener as part of the remoting process. The listener comes from the channel we choose, though, so while it's always involved, we don't have the option of choosing it.
Object Proxies and Location Transparency
The last item from the diagram that we need to cover is the object proxy , the function of which is to allow the client to interact with an object that's anchored on the server. We'll be using this capability as we create our data-portal mechanism.
One of our design goals for the data portal is that we should be able to switch between running the server-side data portal object in the local process on the client, or on a remote server. As mentioned in Chapter 2, this switch should be possible by simply changing a configuration file setting.
The reason why this is possible is that remoting supports the concept of location transparency , which means that when we write code on the client to invoke an object, the location of that object has no effect on the client code. Just by looking at the following code sample (which you may remember from our "object-in-charge" discussion), it's impossible to tell whether MyObject is running in the local process, or on a remote server:
Customer cust = new Customer(); cust.DoSomething();
Thanks to location transparency, this code will work just fine if MyObject is local or remote. This is very powerful, because it reduces the learning curve when we're working with remote objectswe use them just like we'd use a local object.
In order to achieve location transparency, the client needs information about the object it's going to interact with, and this is where the object proxy comes into play. The proxy looks just like the anchored server-side object, thereby giving the code on the client the illusion that it's interacting with the remote object. As shown in Figure 3-2, the proxy takes care of interacting with the remoting subsystem to get each method call formatted and sent through the channel to the actual remote object.

Figure 3-2: The proxy-stub architecture is transparent to clients and objects.
But how does the .NET runtime itself know how to find this remote object? Even if our code is unaware of the location of the object, .NET must know!
Remoting Configuration
The discovery of remote objects is handled through remoting configuration. The remoting subsystem can be configured in two different ways: via an XML configuration file, or programmatically. On the server side, we configure remoting so that it knows which classes are to be made available to remote clients. On the client side, we configure remoting by identifying which classes are to be accessed remotely, along with the URL of the remoting server.
One very important side effect of this client-side approach is that if we don't configure a class to be remote, it will be invoked locally. This means that changing an application to use a local object rather than a remote object can be as simple as changing a configuration file on the client! We'll use this feature so that we can reconfigure our server-side data portal to run locally or remotely, without requiring any changes to UI or business-logic code.
Remoting Servers
Ultimately, a remoting server or host is just a program that exposes one or more classes so that they can be instantiated and used by other applications via remoting. In most cases, the class will be in a DLL that was created by a class library project, though technically that's not essential. For the purposes of our discussion here, we'll assume that any such class will be in a DLL.
In Chapter 1, we discussed local, anchored, and unanchored objects. Table 3-1 summarizes these types.
| Object Type | Availability | Creation |
|---|---|---|
| Local | Available only within the process where they're created | The default behavior |
| Anchored | Available via remoting, but the object always stays in the process where it was created | To create, inherit from MarshalByRefObject |
| Unanchored | Available via remoting, and the object will be copied across the network when passed as a parameter or returned as the result of a function | To create, use the [Serializable()] attribute and optionally also implement ISerializable |
| Note | In the .NET documentation, an anchored object is referred to as a marshal-by-reference object (MBRO), and an unanchored object is referred to as a marshal- by-value object (MBVO). I find that such acronyms aren't nearly as intuitive as the terms "anchored" and "unanchored," which is why we're avoiding the use of the acronyms in this book. |
The objects that run in a remoting server are anchored objects. This means that they inherit MarshalByRefObject , which makes them available to other applications via remoting and ensures that they're anchored to the scope in which they're created in this case, our remoting server process.
When we choose to run our server-side data portal on a remote server, we'll need to have some host application running on the server within which the data portal DLL is loaded. This is because all DLLs must be hosted in a process that's created by running some executable. There are two ways to create a remoting server process. We can host the DLL in a regular .NET program (EXE), or we can host it in Internet Information Server (IIS). Hosting a DLL in IIS
-
Makes it easier to develop and configure, which is ideal for client-server scenarios
-
Allows us to use Windows' integrated security
-
Supports only the HTTP channel
-
Means that the server class must be in a DLL
Creating a custom host executable (which can be any .NET executable)
-
Makes it harder to develop and configure, but offers the potential of superior performance and support for peer-to-peer scenarios
-
Has no support for Windows' integrated security
-
Supports the HTTP and TCP channels (or custom channels you may write)
-
Means that the server class can be in a DLL, or in the host EXE itself
When creating client-server applications such as our data portal, the easiest and most powerful approach is to use IIS as the host, because it provides us with authentication, security, and management features with no extra coding effort. It enables the use of Windows authentication to ensure that only valid users can call our server-side code, and it allows us to use SSL to encrypt the remoting messages that are sent between client and server.
If we create our own custom host, we'll have to do quite a lot more work. We'd probably construct it as a Windows service, which would mean writing the service application, managing our own security, and creating our own monitoring and management tools.
| Note | The primary benefit to using a custom host for our server-side data portal is that we could run it on a Windows NT 4.0 server, while the use of an IIS host requires Windows 2000 or higher. Another possible benefit of creating a custom host is performance. If we create our own host, we can use a TCP channel for our remoting calls, thereby avoiding some of the overhead of HTTP. In most cases, however, IIS will provide sufficient performance. Given the savings in development time and easier management, it's better to try IIS first, and only resort to a custom host if you must. |
In this book, we'll use IIS to host the remoting server (that is, the server-side data portal) in order to benefit from its ease of development and management, and its support for Windows' integrated security. To see how it's going to work, let's run through a simple example of creating a remoting server using IIS.
Creating the DLL
Having chosen to use IIS as the host, we can expose any class via remoting if it's in a DLL. In VS .NET, we build a DLL by creating a Class Library project, so open up the IDE and create a new one named TestServer as shown in Figure 3-3.

Figure 3-3: Creating the TestServer Class Library project
As you'd expect, this project will start with a class named Class1 , which contains the following simple code:
public class Class1 { public Class1() { // // TODO: Add constructor logic here // } } From our discussions so far, you know that at the moment this is just a local class that won't be available via remoting. To change it to an anchored class whose services we'll be able to use remotely, it must inherit from MarshalByRefObject . While we do this, let's also change its name to TestService as shown here:
public class TestService : MarshalByRefObject { public TestService() {} } If this class is instantiated in the same process as the program using it, it will act normallyinheriting from MarshalByRefObject has no tangible impact in that case. If the TestService class is made available to clients via remoting, however, it will be an anchored objectit will run on the server, and the client will get an object proxy. All method calls from a client to the object will be transferred across the network to the server on which they can be run.
Let's add a couple of methods for our clients to call. For testing purposes, we'll make the methods return information about the machine and process in which the object is running as follows:
public class TestService : MarshalByRefObject { public TestService() {} public string GetServerName() { return System.Environment.MachineName; } public int GetProcessID() { return System.Diagnostics.Process.GetCurrentProcess().Id; } } We should be able to compare the values returned by these functions to our client's machine and process information, and thereby prove that the server code really is running on the server.
Creating the IIS Host
Having created the DLL, we now need to create a remoting host using IIS. (Remember, the server DLL must have a process to run in.) Although creating a custom host for remoting isn't difficult, using IIS makes the job almost trivial. With the TestServer solution still open in VS .NET, choose File ![]() Add Project
Add Project ![]() New Project, and add an Empty Web project named TestService as shown in Figure 3-4.
New Project, and add an Empty Web project named TestService as shown in Figure 3-4.

Figure 3-4: Creating the TestService web project
When you click OK, VS .NET will create a new web application named TestService . Because it's an empty project, however, there won't be any web forms or web-service files includednot even a Web.config file!
To turn this empty project into a remoting host, all we need to do is add a reference to the DLL that contains our server-side class, and set up a Web.config file to configure remoting. Right-click the References entry for TestService in the Solution Explorer, and select Add Reference. Using the Projects tab, select TestServer , and click OK. The resulting dialog box is shown in Figure 3-5.

Figure 3-5: Adding a reference to the TestServer project
This will add a reference to our DLL. More importantly, when we build the solution, VS .NET will automatically build and copy the DLL into the bin directory under the virtual root (http://localhost/TestService/bin) so that the DLL will be available to the remoting subsystem.
All that remains now is to set up a Web.config file with appropriate entries to configure remoting. Add one to the project by right-clicking the TestService entry in the Solution Explorer and choosing Add ![]() Add New Item, and then selecting a Web Configuration File as shown in Figure 3-6.
Add New Item, and then selecting a Web Configuration File as shown in Figure 3-6.

Figure 3-6: Adding a web configuration file to the TestService project
When you click Open, a Web.config file will be added to the project; it will contain the default settings that we'd find in any new web project. All we need to do is add a section to the file to configure remoting as follows:
<?xml version="1.0" encoding="utf-8" ?> <configuration> <system.runtime.remoting> <application> <service> <wellknown mode="SingleCall" objectUri="TestServer.rem" type="TestServer.TestService, TestServer" /> </service> </application> </system.runtime.remoting> <system.web> ...
The <system.runtime.remoting> element includes all the configuration information for the remoting subsystem. In this case, we're identifying a single class that's to be exposed to client applications via remoting.
| Note | There are many different options for configuring remoting. We won't be covering them all here, but instead we'll focus only on those that we'll use through the rest of the book. For more information on remoting, I recommend you look at Ingo Rammer's Advanced .NET Remoting book. |
In this new XML code, the <wellknown> element identifies a server-side (anchored) class that can be used by clients. When we use it, our first dilemma is to decide between the two different operation modes:
-
If the mode attribute is set to SingleCall , each method call from any client will cause the server to create a new object that will handle just that one method call. The object isn't reused in any way after that, and is destroyed automatically via the .NET garbage-collection mechanism.
-
If the mode attribute is set to Singleton , all method calls from all clients will be handled by a single object running on the server. Many method calls may be handled on different threads at the same time, meaning that our code would have to be entirely safe for multithreading.
Implementing an object for the Singleton mode can be very complex, because we have to deal with multithreading issues. Typically, this means using thread-synchronization objects, which will almost always reduce our performance and increase our complexity.
For most server-side behavior, SingleCall is ideal because each method call is handled by a newly created object that has its own thread. We don't need to worry about threading issues, or about one client interfering with another in some way.
Once we've selected our mode, we need to define the URI that will be used to access the server-side object. This URI is combined with the server name and virtual root to construct a URL that our clients can use. In this case, the virtual root is TestService , so we end up with http://localhost/testservice/testserver.rem.
| Note | The .rem extension is important. When ASP.NET is installed on a server, it configures IIS to route .rem and .soap extensions to the remoting subsystem. Either extension will work, as they're both configured to do the same thing. |
Finally, we need to tell the remoting subsystem which specific class and DLL this URL refers to. The type attribute is somewhat cryptic, because it accepts a string that contains the full name (including namespaces) of the class, a comma, and then the name of the assembly (DLL) that contains the class. Note that the assembly name doesn't include the .dll extension.
| Note | Note that the URI name (with the .rem extension) doesn't have to be the same as the name of our assembly or class. The two names are totally independent. Typically, however, we'll use a URI name that's somewhat similar to the class name in order to make it clear which class will be invoked via the URI. |
Now build the solution by choosing Build ![]() Build Solution. This compiles the TestService project into a DLL and copies it into the bin directory of the virtual root.
Build Solution. This compiles the TestService project into a DLL and copies it into the bin directory of the virtual root.
Testing with the Browser
At this point, our remoting server is ready for use. If we want to, we can even test it directly from a browser by asking for its Web Service Description Language (WSDL) specification. Open Internet Explorer and browse to http://localhost/testservice/ testserver.rem?wsdl to see the result as shown in Figure 3-7.

Figure 3-7: The WSDL returned from the TestService remoting host
As long as you get the result that you can see in Figure 3-7, this remoting server is ready to be called by clients.
Remoting Clients
The way remoting works in general is that the client application is simply created to interact with the object. To make the object run remotely, we configure remoting on the client. To make the object run locally, we don't configure remoting on the client. It's that easy. To test this, create a new Windows Application project in a new solution in VS .NET. Predictably, we'll give it the name TestClient as shown in Figure 3-8.

Figure 3-8: Creating the TestClient project
Before we can use the class in our new Windows form via remoting, we need its type information : a complete description of the class, including its assembly, its name, a list of its properties, methods, and events, and so forth. We need this information so that VS .NET can create the object proxy that enables our client application to interact with the remote class.
We can get type information in a couple of ways. The easiest is to simply reference the DLL containing the class TestServer.dll in our case. The other approach is to use the soapsuds.exe command-line utility to generate a DLL that contains the type information, but not the actual code. Either way, we face potential deployment issues, because we're deploying information that describes the remote object. If the remote object changes, we'll have to redeploy the type information (by redeploying the updated DLL or the proxy DLL to all clients). Because of this, we must always use good DLL design practices when creating a DLL that will be exposed via remoting. We must take special care to design the classes in that DLL so that we won't have to change their interfaces in the future.
There is one big drawback to using soapsuds.exe , which is that we can't simply toggle between running the code locally or remotelyand that's one of our core requirements for the data-portal mechanism! If the client doesn't have a local copy of the actual DLL, then there's no way to run the code locally. Because of this, we'll directly reference the DLL in our client, thereby making the switch possible.
Right-click References in the Solution Explorer window, and select Add Reference. Then click the Browse button, and navigate to the TestServer\bin\debug directory where TestServer.dll resides. Select this DLL, and click OK. Figure 3-9 shows the references that should exist.

Figure 3-9: Assemblies referenced by the TestClient project
We can now write code to interact with the DLL. Add a button to the form, and write the following code behind the button:
private void button1_Click(object sender, System.EventArgs e) { System.Text.StringBuilder output = new System.Text.StringBuilder(); TestServer.TestService test = new TestServer.TestService(); output.AppendFormat("TestServer values\n"); output.AppendFormat("Machine: {0}\n", test.GetServerName()); output.AppendFormat("Process: {0}\n", test.GetProcessID()); output.AppendFormat("\nClient values\n"); output.AppendFormat("Machine: {0}\n", System.Environment.MachineName); output.AppendFormat("Process: {0}\n", System.Diagnostics.Process.GetCurrentProcess().Id); MessageBox.Show(output.ToString(), "TestClient"); } This code creates an instance of the TestService class, and then displays the machine and process ID from that object. It also displays the machine and process ID for the client itself. At this point, we can run the program, using the TestService class to create a local object that's no different from any other local object we might use. The result should be similar to that shown in Figure 3-10.
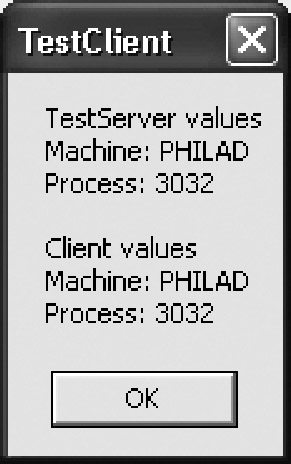
Figure 3-10: Example result from running the TestClient application
The machine name and process ID are the same for both client and server, which is not surprising given that the object is running in the same process as the client! Now let's see what happens when we change the code to use remoting.
Configuring Remoting
When it comes to changing our client to use the object via remoting, we have two options. First, we can configure the remoting subsystem so that it knows that the TestServer.TestService class is to be invoked via remoting, rather than locally. If we take this approach, then any time we create a TestService object, the .NET runtime will automatically use remoting on our behalf .
In order to configure remoting this way, we need to add a reference to System.Runtime.Remoting.dll and call a couple of methods in the remoting subsystem as our application is loaded. This approach is particularly nice if we'll be creating TestService objects throughout our code, because it means that we can simply use the regular new keyword to create the objects.
The other approach is to do what we illustrated in Chapter 2, which is to use the Activator class from the .NET Framework. This has a GetObject() method that allows us to create an instance of an object by supplying a URL to the server. The advantage of this approach is that we don't need to reference the remoting DLL or worry about configuring remoting. The drawback is that we can't use the new keyword to create our objectsinstead, we use Activator.GetObject() .
The Activator.GetObject() approach is nice if we're only creating our server-side object in one location in our code. It's often simpler just to use Activator.GetObject() than it is to reference an extra DLL and call the configuration methods to configure remoting. In general, however, the recommended approach is to configure remoting and simply use the new keyword, so that's what we'll do here and in the client-side DataPortal code.
The first thing we need to do is add a reference to System.Runtime.Remoting.dll in our client project as shown in Figure 3-11.

Figure 3-11: Referencing System.Runtime.Remoting.dll
At the top of our form, we can use the remoting namespace as follows:
using System.Runtime.Remoting;
The following code shows how to configure remoting to create the object remotely:
public Form1() { // // Required for Windows Form Designer support // InitializeComponent(); RemotingConfiguration.RegisterWellKnownClientType( typeof(TestServer.TestService), "http://localhost/testservice/testserver.rem"); } Note that this is done in the main form's constructor, so it only happens once when the application starts up. We're telling remoting that any requests for TestServer.TestService should be routed to a server identified by the provided URL. The .NET runtime takes care of the details on our behalf.
| Note | This example does assume that anonymous access is enabled for the virtual root we've created in our TestServer web project. |
No other changes are required. Remoting's intrinsic support for location transparency means that none of the code that actually uses the object has to change at all. When you run the program, you'll get a result similar to that shown in Figure 3-12.
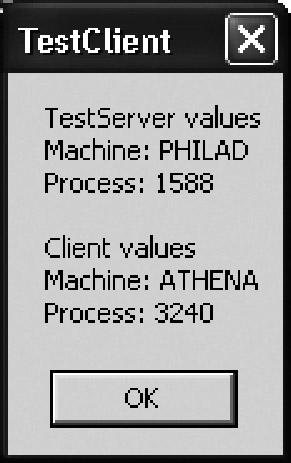
Figure 3-12: Example result from running the client application
The fact that the machine names and process ID values are different proves that the object is running in a different process from the server. If you run client and server on the same machine, only the process ID values will be different.
What's really compelling about this is that we can choose to run the TestService object locally or remotely by whether or not we configure remoting in our form's constructor. If we configure remoting, we'll invoke the object remotely; otherwise we'll invoke it locally in the client process. We'll use this capability when we create our client-side data portal in Chapter 5.
Using the Binary Formatter
Though our client is running quite happily, there's something we need to address. Earlier, we discussed channels and formatters, and because we're using IIS as our remoting host, we must use the HTTP channel. By default, the HTTP channel uses the SOAP formatter, which converts the messages going across the network into SOAP's XML format, but in terms of bandwidth and processing requirements it's far more efficient to use the binary formatter.
IIS supports both the SOAP formatter and the binary formatterit's up to the client to choose which one remoting should use. To make this choice, all we need to do is run a bit of extra code as we configure remoting in the form's constructor. To get the ball rolling, add a couple more using statements to the top of the form that will give us easier access to the namespaces we'll be using, as follows:
using System.Runtime.Remoting; using System.Runtime.Remoting.Channels; using System.Runtime.Remoting.Channels.Http;
Next we can write code in the form's constructor to configure remoting to use the binary formatter over the HTTP channel as shown here:
public Form1() { // // Required for Windows Form Designer support // InitializeComponent(); Hashtable properties = new Hashtable(); properties.Add("name", "HttpBinary"); BinaryClientFormatterSinkProvider formatter = new BinaryClientFormatterSinkProvider(); HttpChannel channel = new HttpChannel(properties, formatter, null); ChannelServices.RegisterChannel(channel); RemotingConfiguration.RegisterWellKnownClientType( typeof(TestServer.TestService), "http://localhost/testservice/testserver.rem"); } The goal of this code is to call the RegisterChannel() method, thereby providing it with an HTTP channel configured the way we'd like. To configure this channel, we must first create a Hashtable object with the properties of the channel. At a minimum, we must give the channel a name, as shown earlier.
With the Hashtable in place, we create our binary-formatter object, which is of type BinaryClientFormatterSinkProvider . This enables remoting to perform binary formatting on the client side. Given the formatter, we can create an instance of an HTTP channel object that's configured the way we want it, as shown here:
HttpChannel channel = new HttpChannel(properties, formatter, null);
Finally, we call RegisterChannel() to register this properly configured channel with the remoting subsystem as follows:
ChannelServices.RegisterChannel(channel);
Next any remoting calls that use the http:// prefix will be handled by the channel object we just created, which means that they'll be using the binary formatter. This includes using any objects we've registered with the RegisterWellKnownClientType() method, or any objects that we create using the alternative Activator.GetObject() approach.
Because the IIS host already understands the binary formatter, all of our communication with the server will now be handled using the more efficient binary format. If you run the program now, you'll see exactly the same behavior as beforethere's no visible or behavioral difference between the SOAP and binary formatters. All the changes are behind the scenes.
We'll be making heavy use of the remoting server and client concepts that we've discussed here in Chapters 4 and 5. For now, let's move on and discuss how .NET supports the serialization of objects.
| | ||
| | | |
| | ||
EAN: 2147483647
Pages: 111
If you may any questions please contact us: flylib@qtcs.net