| Maya's Particle Systems feature allows you to create complex collections of objects that look and behave similarly. Particles are ideal for animating difficult effects, such as explosions, swarms of bees, and galaxies of stars. You certainly wouldn't want to have to model and manually animate each particle of one of those effects! With Particle Systems, it's easy to create these effects with as many particles as you want. The particles can also collide with objects and be influenced by the same fields discussed earlier in the section, "Rigid-Body Dynamics." Creating Particles To create particles in your scene, you can use drawn particles or particle emitters. Generally, you use drawn particles when you want them to start out in a prearranged pattern and exist throughout the animation for example, to create a galaxy or star field. To paint particles in your scene, choose Particles | Particle Tool | option box. One option in this tool enables you to paint particles where you want them by using a Sketch Particles feature. Another method called Particle Grid is available, which you use to define the corners of a 2D rectangle that's filled with particles. Particle grids can be helpful for visualizing the effect of fields as you create them. The more traditional approach to particle systems is using an emitter object as the source that particles emanate from. In Maya, the source can be many things: Point - omni An emitter that sprays particles from a point in all directions. Point - directional An emitter that sprays particles in a linear or conical direction from a point. Volume Particles are created from multiple points within a defined volume, which can be a cube, sphere, cylinder, cone, or torus. Surface You can define one of your scene's NURBS or polygon objects to create particles from its surface. Curve Any NURBS curve can emit particles.
Particle Types In Maya, there are two types of particles: hardware rendered and software rendered. Hardware particle types must be rendered with the hardware-rendering system (Window | Rendering Editors | Hardware Render Buffer), because the particles don't appear in the normal software render. The purpose for these particles is that they render much faster using your graphics card's on-board hardware rather than using Maya's software-rendering engine. You might think this makes using hardware-rendered particles more difficult because when they disappear behind geometry, applying complex alpha matting materials to those objects might be required. However, the Hardware Render Buffer has an option for masking any particles that fall behind scene objects. Another issue is that, by default, hardware rendering looks jagged (aliased). Maya handles antialiasing similarly by multisampling in the Hardware Render Buffer, which is enabled by choosing Render | Attributes on the Hardware Render Buffer menu (see Figure 15.6). So, all you need to do is composite the rendered particles' image sequence on the scene's software-rendered image sequence to complete the effect. If you have many particles or a long animation, this should save hours of rendering time. Figure 15.6. The hardware renderer with particle spheres. 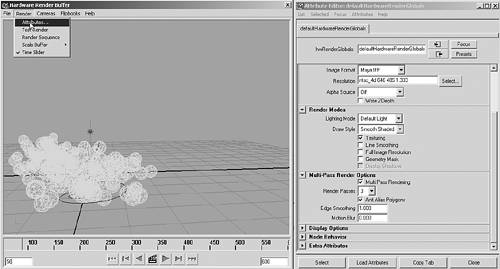
Hardware-Rendered Particles The following list describes the hardware-rendered particle types. Note that hardware-rendered particles cannot cast shadows or appear in reflections or refractions: Point The default particle type, designed to render as a spot (it always faces the camera, so it has no apparent thickness). It looks like a square of pixels unless you enable a rendering option called multipass rendering, which blurs smaller particles (size lower than 5) into circular dots. You use the render settings in the Hardware Render Buffer, under Render | Attributes. Multipoint Like the Point particle type, but creates clusters of points to get a denser, clumpier appearance. Streak Similar to the Point, but creates a streaking line instead of a dot. This type does not render until the particles are moving and you attempt to hardware-render a frame with particle motion. The size (line width) of these particles is an absolute width, so even if the particles recede into the distance, their apparent line width remains the same. Multistreak Like the Streak particle type, but creates clusters of streaks to get a denser look. Sprites Similar to Point in that Sprites always face the camera, but Sprites can have a texture and optionally an alpha (transparency) channel. In addition, these textures can be image sequences rather than still images. To create the effect of hundreds of flaming chunks of debris falling, you could use a single animated flame texture combined with a sprite particle system. Spheres These are three-dimensional spheres, and you can set the radius globally for all spheres. You can apply simple flat color materials to the spheres, which are Gouraud shaded in the Hardware Render Buffer. Numeric A test mode, this particle type displays a number for each particle. It's particularly useful for troubleshooting stray particles that are going somewhere you don't want them to.
Software-Rendered Particles The following particle types render as part of your scene when you render a frame. They are able to reflect, refract, and cast shadows; these options are available in the Attribute Editor for particles. There are four software-rendered particle types: Blobby Surface A particle form of metaballs, the blobby surfaces look like spheres until they approach another, at which point they reach for each other like drops of mercury (see Figure 15.7). You can set the surface tension and the radius for each particle sphere. You can also texture this particle type, but you'll usually need to do test renderings to adjust the U and V mapping in the Attribute Editor for materials so that you can scale your textures to the right size. Figure 15.7. Blobby objects in the viewport and rendered; notice the inherent mapping coordinates for the texturing on the blobby surface. 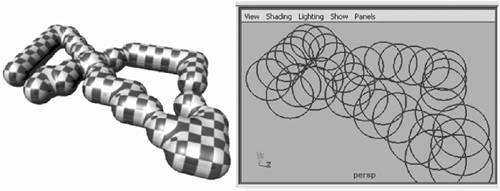
Cloud Similar to the blobby surface type, but designed to blur and soften the edges of the blobby surface to get a cloud-like appearance. This particle type works specifically with the Particle Cloud material type and doesn't render with typical object "surface" materials. Tube As the name implies, the source object type is a kind of uncapped cylinder. You can define the radius at the two ends. This type of particle is automatically assigned the particle cloud material type, and renders only with volumetric material types. Instanced Geometry If you want to have an object stand-in for the particles, you should use Maya's Instancer, which enables you to use any kind of geometry or textures you like. For example, if you wanted to make a swarm of butterflies, you would create a single flapping butterfly type after making a particle system that animates the flight paths. Then, you would open the Instancer with Particles | Instancer | option box, and configure it to substitute the animated butterfly for the particles.
Particle Materials and Age Particle system materials can be made to vary by using Gradient Ramps for texturing. Each particle has an inherent age (the time since it has been emitted) that Maya can use to calculate what part of the Gradient Ramp to use. Using this technique, you can make particles change color over the course of their lifespan. A typical use of this technique is to change the particle color based on its age to get the effect of sparks, for example. The spark particles might be white at first, then cycle through yellow, orange, and red, and then fade to black, which can add to the realism of your particle effect. You can apply gradient maps to any particle material variable to make it vary with the particle's age particle birth is at the bottom of the gradient and particle death is at the top (see Figure 15.8). Figure 15.8. A gradient applied to particle materials can control a particle over its lifespan; with this gradient, the particle would begin as black, and then brighten and dim twice. 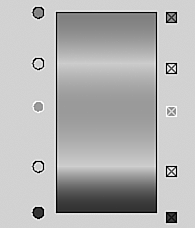
Particle Influences Your particle systems can interact with your scene elements in several dynamic ways. Like the rigid-body dynamics discussed earlier, you can apply any of the same fields to particle systems to influence how they move. You can also define surfaces that act as particle collision objects. A third option allows you to specify goals that particles can be attracted to or repelled away from. Fields Fields are described in the section on rigid-body dynamics earlier in this chapter, and many of the field types are clearly designed to apply to particle systems. Don't forget that nearly all fields can be set to occur within a volume shape or to fall off with distance so that they have only a localized effect. Collisions Any particle system can collide with any scene geometry, but you have to set each collision up separately. To do so, you select the particles, Shift-select the geometry they will collide with, and choose Particles | Make Collide. The particles then collide if they hit the object. This works regardless of whether the particles or object or both are moving. For example, the particles could be stationary and then set into motion by an object. You can also set particles to die (meaning the particle disappears), split (separates into several particles, with each having the same particle age), or spawn (the particle dies, but new ones are created in its place) when collision occurs. These effects are typically used for splatter or breakup effects, in which particles break into shrapnel when they collide with an object. Goals Particles can also be set to have goals, meaning that the particles try to move to a specific configuration, shape, or location. You can use this effect to make particles chase their goal object while staying in a specific relative position to the other particles. When a target object is assigned to the particles as a goal, the CVs (for a NURBS target) or vertices (for a polygonal target) collect particles that are evenly distributed on the goal object. Tutorial: Chimney Smoke Now that you've learned some of the possibilities of particle systems, you'll try applying them to a scene of a creepy little house. Load the house scene file noted next to the DVD icon. You'll add another hazy element as though this scene weren't foggy and smoky enough! You'll set the top of the chimney to emit particles that you'll animate and texture to behave like real smoke. On the DVD  Chapter_15\movies\ch15tut02.wmv |
On the DVD  Chapter_15\ch15tut02start.mb |
After loading the scene file, switch to Four View mode, select the camera view, and change it to the Perspective view with Panels | Perspective | Persp. Set this view to Shaded mode (hotkey: 5). Next, make sure you have the Layers dialog box open and hide all the objects but the chimney by right-clicking on the V next to the ChimneyL layer and choosing Select Objects (so the chimney layer objects are selected); now you can hide all deselected objects with Display | Hide | Hide Unselected Objects. This leaves only the objects in the ChimneyL layer selected. Make sure you center and frame the chimney in all the views (hotkey: f). The chimney is animated to move around, so you need to use part of the chimney, the chimney_pipe, to emit particles. Click in any panel to deselect the currently selected objects, and then click on the chimney_pipe to select it. Make sure the chimney pipe is still selected, and choose Particles | Emit from Object | option box. In the Emitter Options (Emit from Object) dialog box (see Figure 15.9), set the Emitter Name to ChimneySmoker, and select Directional in the Emitter Type list box. Also, be sure to select None in the Cycle Emission list box because you don't want the smoke animation to loop. Expand the Distance/Direction Attributes section, and set the Spread to 0.2. Also, set DirectionX to 0 and DirectionY to 1, which means the smoke will travel upward. Click the Create button to create the smoke emitter and close the dialog box. Now play the animation, and zoom in the Perspective view to the top of the chimney. You should see the particles leaving the chimney_pipe. Figure 15.9. Setting options for the smoke emitter. 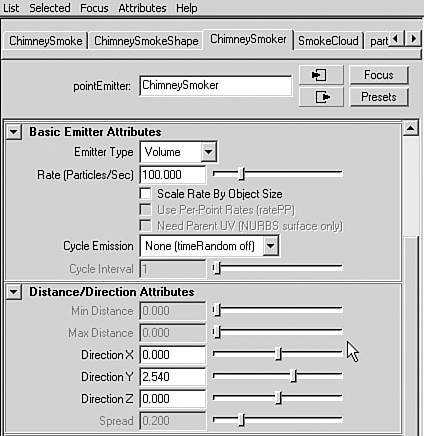
Stop playback at frame 50, and click on the emitted particles. A green box will appear around the particles in the Shaded view, and the Channel Box will show the name for the particles: particle1. Change it to ChimneySmoke, and open the Attribute Editor. First, switch to the ChimneySmoker tab in the Attribute Editor. In the Basic Emitter Attributes section, select Volume in the Emitter Type list box. Farther down the Attribute Editor, you'll find the Volume Emitter Attributes section (see Figure 15.10). Select Sphere in the Volume Shape list box to make the particles emit from a ball inside the chimney pipe, and enter 1.2 in the Volume Offset Y text box (the middle one) to push the ball a little deeper down the pipe. In the Volume Speed Attributes section, enter 60 for Along Axis, 10 for Random Direction, and 60 for Directional Speed. Now, take a look at the changed particle emission; it looks less like hair strands. If you can't see it, rewind the playback, and play from frame 0. You can stop it after roughly 100 frames to get the idea. Figure 15.10. Particle settings for changing how the smoke moves. 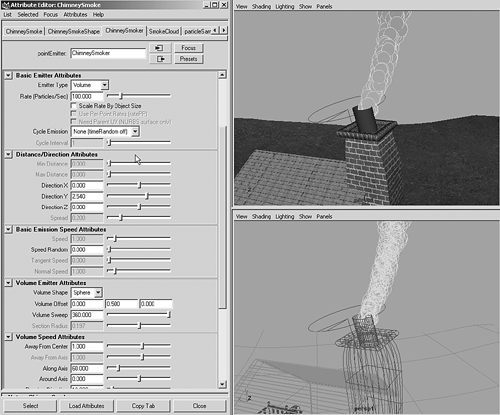
In the Attribute Editor, select the ChimneySmokeShape tab. In the Lifespan Attributes section, change the Lifespan mode from Live Forever to Constant, which means each particle is present in the scene for a certain number of frames and then disappears. The smoke effect should dissipate at a certain distance from the chimney, so set the Lifespan to 6 to make the particles disappear after 6 seconds. Expand the Render Attributes section, and in the Particle Render Type list box, select Cloud(s/w) for a software-rendered puffy cloud material type. Click the Add Attributes for Current Render Type button to see the cloud parameters. Enter 15 for Radius, .7 for Surface Shading, and .9 for Threshold. Surface Shading indicates how sharply the clouds are rendered, with higher values making more distinct clouds. The Threshold attribute controls blending between cloud "puffs," with higher values blending the particles more. Click the Play button, and you'll notice a completely different look to the particles, as shown in Figure 15.11. Figure 15.11. The smoke particle size and type are now set up, and the particles travel upward and spread out. 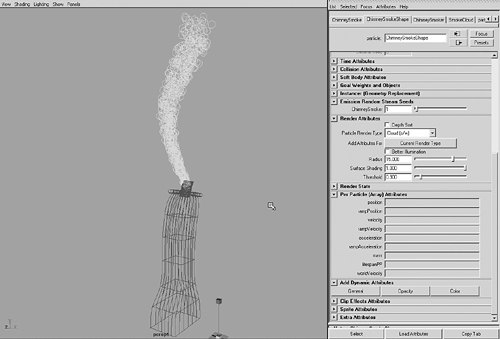
Now, you'll make a material for the smoke. Open Hypershade (hotkey: Alt+h). Create a new volumetric Particle Cloud material by MMB-dragging the material from the Create Bar (in the Volumetric section) to the Work Area. Select the particles in the scene, and then right-click on the new material in Hypershade and choose Assign Material to Selection. The scene is currently very dark, so add a Point light to make sure you're correctly evaluating the smoke as you create it. In the Channel Box, set the light's Translate X, Y, and Z to 175, 400, and 100. In the Render Global Settings window, set the resolution to 320x240 so that you'll get a fast render. Rewind the animation and play it through to frame 100 or higher to have some particles to render. Position the Perspective view to see the lit side of the smoke and render a frame (note that IPR won't work with particles). It should look like Figure 15.12. Figure 15.12. The initial render of the smoke particles, lit by the added Point light. 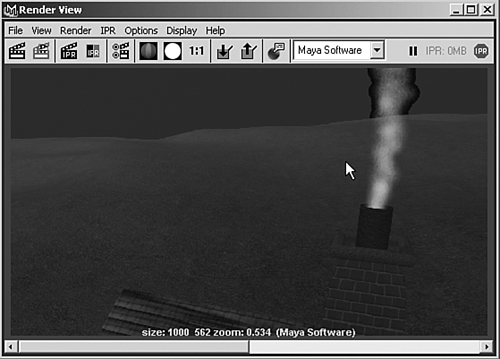
Leave the rendering open, and drag a box around the smoke area. With the smoke material selected in Hypershade, open the Attribute Editor. Name the material SmokeCloud. Set the color to dark brown and turn the transparency up to about 75%. Click the Render Region button in the Render View window to re-render the portion inside the box you drew. You might want to resize the region (in the red rectangle) smaller to speed up rendering. It should render the area in the rectangle very quickly, enabling you to get quick feedback as you adjust settings and click the Render Region button. Set Density to 0.05 and the Blob Map color to dark gray (HSV: 0, 0, 0.3). Render the view, and you should see a more smokelike appearance. To add more complexity to the smoke, expand the Built-in Noise section. Change Noise to 1, Noise Freq to 0.5, and Noise Aspect to -0.5. If you render after each change, you can see the effect of adding a subtle perturbation in the noise settings. Next, in the Surface Shading Properties section, set Diffuse Coefficient to 2 to make the smoke look more three-dimensional. Your renderings should look similar to Figure 15.13. Figure 15.13. The final rendered smoke after adjusting the material settings. 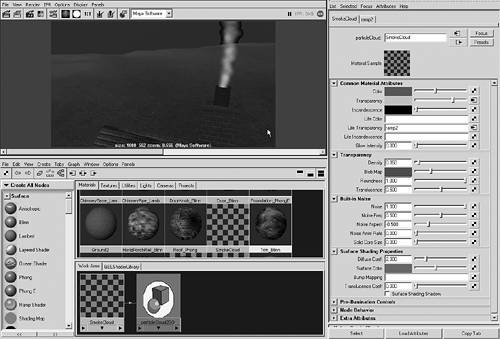
Last, you'll use a Ramp map in the particle's Life Transparency attribute to make particles fade away as they age. That way, when the particles get to the end of their lifespan (6 seconds), they'll completely fade out instead of just popping off the screen in one frame. Play the animation to at least frame 200 and zoom the Perspective view back far enough to see the top of the smoke plume, where the particles should be fading out. In the Attribute Editor, with the SmokeCloud material showing, click the checkered button next to Life Transparency and click the Ramp type in the Create Render Node dialog box. Click the color circles at the left of the gradient sample to change the color: Make the top circle white and the middle and bottom circles light gray (HSV: 0, 0, .75). This makes the particles' transparency increase until they're completely transparent at the end of their lifespan. To extend the middle color a little higher up the gradient, select Exponential Up in the Interpolation list box (see Figure 15.14). Imagine the Ramp as the transparency value from birth at the bottom to death at the top. Figure 15.14. The Ramp overrides the transparency value and fades each particle based on its age, mapping the Ramp over the particles' lifespan from bottom to top. 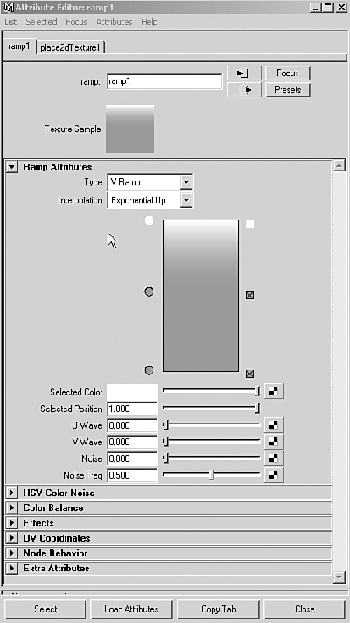
Now, you can delete the temporary Point light and unhide all the scene geometry to render a test of the smoke. Because you already tested the motion of the particles when you played the animation in step 5, you have a good idea of how the smoke will move. Rendering a single frame now will confirm what the smoke materials look like with the rest of the scene. Switch the shaded Perspective view to the camera view with Panel | Perspective | Camera and set the Shading mode to Bounding Box. Click the Play button and let the animation play forward to frame 100. This ensures that the particles are emitted from the start, so that they're in the right place when you render the frame. See the results shown in Figure 15.15. Figure 15.15. A rendering of the scene with the completed particle smoke effect. 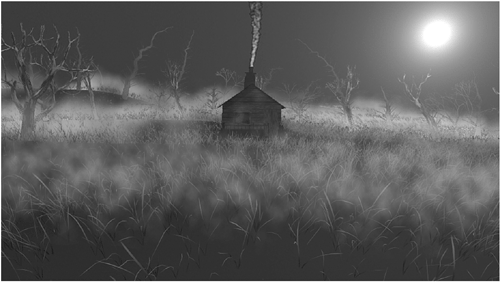
You should see a realistic smoke effect appearing from the chimney. You can compare your scene to the file included on the DVD-ROM. If you like the still frames, you can render the entire animation. The smoke effect doesn't increase rendering time very much. On the DVD Chapter_15\ch15tut02end.mb |
|