| Soft-body dynamics are handled in Maya by creating a set of particles that surround the object and influence it. When these particles collide with something or are moved by fields, the connected geometry moves with them. This is ideal for creating effects that mimic cloth and organic flexible materials. Soft-body dynamics are also used to create rigid yet flexible effects, such as objects that bounce and bend as though they were made of rubber or gelatin. Using the default settings, soft bodies can infinitely inflate or deflate from almost any influence. To get a realistic response, you must add goals or springs. Goals give the object a target shape to move toward, like a rubber squeeze toy that un-squeezes back to its original shape. Alternatively, springs add a lattice of tensioned springs throughout the geometry, like adding a boxspring of rigidity to the object. In this section, you'll explore the springs approach to soft bodies. Creating a Soft-Body System Any polygonal or NURBS object can be made into a soft body. The controlling particle system is created by placing a particle at each CV (for NURBS objects) or vertex (for polygonal objects), and then controlling the position of the CVs or vertices based on what happens with the particle motion. You usually make an object soft with Bodies | Create Soft Body | option box, and then determine whether the object simply becomes soft or is duplicated to keep the original object as a goal. Normally, you choose the latter method so that the soft body tries to configure itself back to the shape of the original object. In either case, the object is then soft, but doesn't collide with other objects in the same manner as with rigid-body dynamics. Because soft bodies are particle based, you must set these particles to collide specifically with a certain object to see the results of the soft-body dynamics. For each object that will collide with the soft body, you must select the particles, Shift-select the geometry it will collide with, and then choose Particles | Make Collide. Adding Springs When the object must be more resilient than a soft cloth, you can add the Springs attribute to give the object a kind of support structure. This attribute creates a virtual spring object between each particle. Depending on how resilient you want your object to seem, you can create more springs by increasing the Wire Walk Length setting. This parameter connects springs not only between a particle and its neighbor, but also the neighbor's neighbor, and so forth. The default setting is 2. This makes for a fairly resilient jiggle. You can also set the spring's Stiffness attribute to make the spring oscillate faster, and the Damping attribute, which absorbs energy to halt the jiggling sooner. Damping is like the shock absorbers on your car; Stiffness relates to the thickness of the spring. Tutorial: Rubber Dumbbell Now, you'll apply soft body attributes to a dumbbell to make it bounce around its environment as though it were made of stiff rubber. Load the scene file noted next to the DVD icon. On the DVD  Chapter_15\movies\ch15tut03.wmv |
First, select the dumbbell, and then choose Soft/Rigid Bodies | Create Soft Body | option box. Reset the settings in the Soft Body Options dialog box, and click the Create button. On the DVD  Chapter_15\ch15tut03start.mb |
While the dumbbell is still selected, choose Fields | Gravity. Set the gravity's Magnitude to 50 in the Channel Box, and then click the Play button. Notice that the dumbbell falls but doesn't bounce from the cube walls. Select the box object. Choose Particles | Make Collide | option box, set Resilience to 0.8 and Friction to 0.1, and click the Create button. Next, select the planar object named bouncer, and choose Particles | Make Collide. Click the Play button, and you'll see that the dumbbell continues to pass through the boxes when it fall. These objects are meant to be collision surfaces for particles, but the particles weren't selected when you assigned them, so you must link the soft-body particles to the two objects in Maya's Dynamic Relationships Editor. Choose Window | Relationship Editor | Dynamic Relationships. In the Dynamic Relationships Editor, open the dumbbell object so that you can see the particle system and select it. Then, select the Collisions radio button, and select both the bouncerShape and the boxShape. They should turn light orange to indicate they've been assigned, as shown in Figure 15.16. Also, select the bouncer object, and enable the Gravity field for it. Figure 15.16. The Dynamic Relationships Editor, with collisions enabled for the soft-body particle system on the box and bouncer objects. 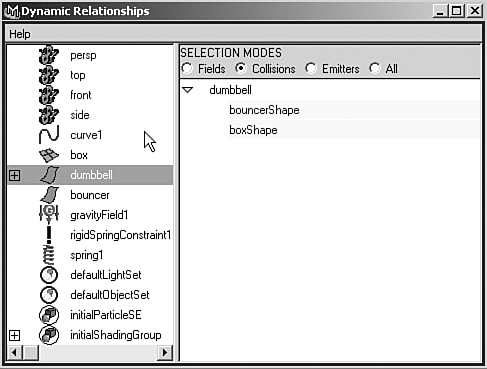
Select the bouncer object and choose Soft/Rigid Bodies | Create Constraint | option box. Set the constraint type to Spring and click Create. In the Channel Box, set Spring Stiffness to 2. Switch to Move mode, and raise the spring up to about 32 units in the Y axis (so that the plane is hanging by the line that indicates the spring). Click the Play button, and you'll get a cartoon-like result because the dumbbell's particles pass through each other, so the dumbbell actually bounces its surfaces inside out! Adding springs will make it hold its shape more firmly. trap Make sure you have set your playback options to play every frame, or the object's geometry might explode on playback. In all dynamics and particle systems, you should have your playback options set to play every frame, and you must rewind to zero before each test playback. Open the Outliner, expand the dumbbell entry, and select the dumbbellParticle item. Choose Soft/Rigid Bodies | Create Springs | option box. Reset the settings in the Spring Options dialog box, and click the Create button. The dumbbell will be covered in green lines, which represent the springs. You can see the springs in the Outliner, too. Use the Ctrl+h hotkey (hide selected objects) to hide the springs so that the display isn't slowed down. Click the Play button and observe the result. The dumbbell's motion is very gelatinous. To make it stiffer, go to the Outliner and select the springs named Spring1. The springs won't be displayed in the viewport because they're hidden, but they are selected. In the Channel Box, set Stiffness to 20 and Damping to 0.1, and observe the results on playback, as shown in Figure 15.17. The dumbbell is now quite stiff and realistic. Lowering the Damping setting allows the object to jiggle longer after a collision. Figure 15.17. The hidden springs can be selected in the Outliner and then adjusted in the Channel Box to produce varying levels of "boinginess." 
Try increasing the Stiffness setting to a much higher value, such as 50. The dumbbell will oscillate and explode into chaos on playback. You can fix this by setting the Solver Oversampling. Open Solvers | Edit Oversampling or Cache Settings, and set the Over Sampling value to 3. During playback, you'll see more controlled spring effects. Compare your results with the saved file on the DVD-ROM. On the DVD Chapter_15\ch15tut03end.mb |
Going Further Explore the results of changing objects' masses, initial direction, and spin and the friction of surfaces that collide. Try to create a simple pinball/pachinko animation that contains many different obstructions. Explore creating particle systems that mimic other effects, such as fireworks or dripping fluids. Try each field on a particle set of objects to see how the field works and what its capabilities are. Create a NURBS sheet and use soft-body dynamics to make it react like cloth. |
|