| With simple dynamics, also known as rigid-body dynamics, Maya simulates physics to create animation. Your scene elements are given mass and (optionally) initial velocities and spin. Then, you apply forces that can affect the objects. If the objects collide, they can deflect based on the mass and friction levels assigned to them. The values for these dynamic forces work much as they do in real-life physics calculations and can give you realistic results if you set things up to mimic forces found in nature. Dynamics in Maya can be applied to objects using rigid-body or soft-body settings. Soft-body dynamics, discussed later in this chapter, are more complex. For now, you'll work with objects that don't deform when they collide. You can use NURBS or polygonal objects in dynamics simulations, but you must consider the objects' surface directions. Objects collide from only one side the outward-facing direction of an object's surface normals. If you want one object to collide inside another, the outer surface must have its surface normals reversed. For example, if you put a bouncing ball inside a passive cube, you'd reverse the cube's normals (to face inward instead of outward, the default) by selecting the cube and choosing either Edit NURBS | Reverse Surface Direction (if the cube is NURBS) or Edit Polygons | Normals | Reverse (if the cube is Polygons). Active and Passive Bodies Objects that interact can be active or passive. Passive objects, although they can be keyframe-animated, remain stationary; they can cause collisions (if they're in the way of a moving active body), but aren't affected by them. Objects that are going to react to collisions must be set to active. You can switch an active object to passive and vice versa by setting the Active attribute in the Channel Box to on or off. You can also set animation keys to trigger when dynamics takes over from keyframed animation. The switch is handled by using Soft/Rigid Bodies | Set Active Key or Set Passive Key. This option lets you combine traditional keyframed animation with calculated dynamics animation. For example, you might have keyframed the animation for a ball to bounce, but you also want it to fall down a set of stairs. Setting an active key on the ball lets dynamics take over for that portion of the animation. You can set values for Initial Velocity (speed and direction) and Initial Spin for active objects (see Figure 15.1). For both passive and active objects, you can also set values for Impulse ("push") and Spin Impulse ("twist") from an arbitrary origin point. These settings create a sort of instant force on the object. For example, you can set the Impulse Position off-center on a billiard ball to set that object moving at the precise time and place that a cue stick strikes it off-center. Figure 15.1. Dynamics settings for active rigid bodies. 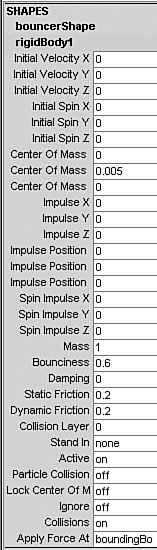
You can also set the following attributes for active objects: Mass The weight of the object. Heavy objects have more influence on the motion of lighter objects when they collide. Bounciness The amount of energy retained after a collision. Think in terms of a bean bag versus a superball, with the superball having a Bounciness factor of 1 and the bean bag, 0. Remember that passive objects also have bounciness, and Bounciness values are averaged between the colliding surfaces. A superball cannot bounce quickly off a bean bag, and a high-bounciness object doesn't bounce far from a low-bounciness object. Damping An effect that produces a "drag" on an object. Values higher than 0 make the object lose directional and angular momentum over time. Static Friction The amount of energy it takes to get a stationary object moving when it's resting against another surface. In the real world, it usually takes more energy to start an object sliding along the ground than it does to keep that object sliding at a constant speed because stationary objects form a slight "glue" (that is, atomic bonds) with the surface they're resting on. Smoother surfaces generate more of these bonds, so they usually have higher static friction. For example, it's hard to start a big rubber cube moving against a steel floor, but it's rather easy to start a wood cube moving against a concrete floor. Dynamic Friction The amount of energy it takes to keep an object moving when sliding against another surface. Remember that every surface has friction settings, and the surfaces affect each other. If you want to create the effect of a slippery surface, you need to lower the static and dynamic friction of the object with the slippery surface and the objects that come into contact with it. Stand In Normally, each polygon of a surface is tested at each fraction of an animation frame to see if it has touched another active or passive surface in the simulation. When objects bunch together or more complex models are used, the calculation can become so slow that it requires hours even days! The Stand In setting helps work around this problem by forcing the Dynamics engine to use a faster calculating surface in place of the current object. The options are cube and sphere. You should always set planar wall-type objects to use the cube stand-in. Instead of simplifying the wall to a cube, it uses the wall's bounding box to calculate dynamics, thus simplifying the test calculations that are required. Similarly, spherical objects are best replaced with a sphere stand-in. Note that the object's motions reflect the stand-in, so if you use a cube stand-in for an egg and apply gravity to it, it will fall over in the simulation as though it were a rectangular slab.
tip Complex objects that cannot be simplified to a cube or sphere can still be made to calculate much faster. Consider the option of creating a low-resolution, non-rendering proxy object that's used for the dynamics simulation (see Figure 15.2). The original high-resolution object is then parented to the stand-in proxy object so that it inherits all its motion. Figure 15.2. A non-rendering low-resolution proxy (on the left) for a complex object makes for fast-calculating dynamics. 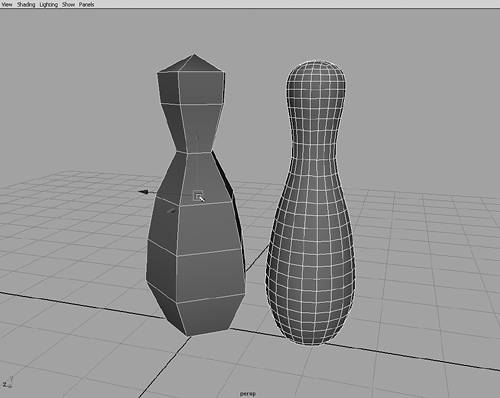
The first step in building a dynamics simulation is to set scene elements that will be part of the simulation to passive or active bodies by choosing Soft/Rigid Bodies | Create Active Rigid Body or Create Passive Rigid Body. After creating rigid bodies, you can adjust their settings later in the Channel Box, so you don't need to determine these values right away when you're applying rigid body attributes to an object. After you've set objects to passive or active and (optionally) specified their initial conditions, you need to determine whether external forces will act on the objects and whether the objects' motion is locked in any way. In Maya, external forces are created by using fields, and the motion-locking attributes are called constraints. Fields Fields are localized or global forces that act on objects. You might remember working with the Turbulence field in Chapter 4, "Diving In: Your First Animation," when you used it to create the ocean waves. Fields have their own icons in a scene, so it's easier to select them if you want to animate a field or change its attributes. For example, you could animate the gravity field to make gravity turn upside down during an animation, or attach an air field to a boat to create a wake as it moves through a particle field. When you create a field, it affects the currently selected objects. You can later edit which objects are assigned to an field with the Dynamics Relationships Editor. These fields are included with Maya: Air A "push" type of field, it comes with presets for Wind, Wake, and Fan. Drag A field that slows the momentum over time of objects within its reach. Gravity The most commonly used field, it causes objects to move and accelerate in a given direction. You can limit its reach to create localized gravity fields. Newton Similar to gravity, but operates in a spherical manner. Objects are attracted to Newton fields more strongly depending on their mass (set in rigid body attributes) and their distance from the Newton field. Radial Like the Newton field, but it doesn't take mass into account. It can be set to diminish with distance, as with the Gravity and Air fields, and it can be set to push or pull. Turbulence Makes the object's motion or deformations more random. Turbulence is usually applied to soft bodies or particles to create the impression of wind or waves. Uniform A field that pushes objects in a specified direction. Like the Gravity field, but without the progressive acceleration that Gravity includes. Vortex A kind of rotating gravity, the Vortex field pulls objects in a spiraling motion that's centered on the field's icon. Often used to create galaxies, whirlpools, or tornados with particle systems. Volume Axis A complex field that lets you specify a volume shape (cube, sphere, cylinder, cone, or torus) and then create effects that work within the shape. For example, to create an atomic bomb effect with a particle system, you might use a cylinder to create the vertical rise and a torus to create the cap of the mushroom cloud.
Constraints Along with the forces you apply as fields, you can add constraints, which restrict an object's motion. However, constraints are applied to single objects or pairs of objects instead of to groups of objects, as with fields. After you apply constraints, they are connected to the object they're associated with. They don't have their own icons, as fields do. Maya includes the following constraints: Nail Ties an object to a point in the scene. The object behaves as though it's tethered by a solid rod, but it can orbit anywhere around the tie point as it collides with objects or is affected by fields. Think of it as a chandelier hanger. Pin This type of constraint requires two objects that are tied together to a separate pivot point. Think of a rod coming from each object, with an intersecting point acting as a ball joint. Hinge As the name implies, you get free rotation constrained to an axis. You can make active objects hinge to a point in space, to another active object, or to a passive object. Spring This constraint is similar to the Nail constraint, but it also has a telescoping characteristic that allows it to extend its length. As with the Hinge, you can use the Spring to tie an active object to another active object, to a passive object, or to a point in space. Barrier Blocks objects from going beyond a planar boundary. You can assign this constraint to only one object. Objects can deflect, but not bounce, from the Barrier constraint, so it's recommended for objects that block other objects, such as walls or floors.
Rigid Body Setup The usual approach to creating a rigid-body dynamics simulation is to put objects in their starting positions for the animation, and then set them up as passive or active. You usually assign a Gravity field next while the active bodies are still selected, so that the field is automatically connected to them. You might want to add other fields, such as Drag or Turbulence. Finally, you can set some constraints for objects that are hinged or tethered in some way. You can view the playback during or after adjusting the objects' mass and other settings, but you shouldn't scrub the Time Slider when viewing these Dynamics simulations because each frame depends on the previous frame to calculate the simulation. When you're satisfied with the dynamics in the animation, you can cache or bake the animation (explained in the following tutorial) so that you can scrub the animation, play it backward, skip frames, and so forth. Tutorial: Exploring Rigid-Body Dynamics Now, you'll create some rigid dynamic effects with what you've learned. Exploring these effects is fun because Maya can respond to changes almost instantly and show you the resulting animation. On the DVD  Chapter_15\movies\ch15tut01.wmv |
After opening the scene file, make sure you're in Dynamics mode (select Dynamics in the drop-down list at the far left of the Status Line or use the F4 hotkey). Note that Dynamics might not be enabled; you can check this in Window | Settings/Preferences | Preferences by selecting Modules in the Categories list to the left. Notice in your scene that you have six plane objects and two balls suspended over the ground plane. You'll do several experiments with this scene to learn how rigid-body dynamics work. On the DVD  Chapter_15\ch15tut01start.mb |
tip You should always take care to reset the options dialog boxes for any action if you aren't sure of its previous settings. This is especially important for dynamics, when you're often changing the values in the options dialog boxes. Select the bottom plane, named bottom_plane, and make it a passive object (unaffected by dynamic collisions) with Soft/Rigid Bodies | Create Passive Rigid Body. Marquee-select all the other items in the scene (orbit the Perspective view, if necessary, for marquee selection), and make them active with Soft/Rigid Bodies | Create Active Rigid Body. While the objects are still selected, choose Fields | Gravity, and then click the Play button. All the objects will drop to the ground. Some or all of the falling planes will pass through the bottom plane because they are one-sided and the wrong side is hitting the ground. This won't be a problem, however, because you don't intend for these objects to fall. Stop playback, and click the Rewind to Start button. tip When playing back dynamics simulations, the calculations depend on each frame being calculated, so you should set Maya to play back each frame. Click the Animation Preferences button to the right of the Command Line. In the Preferences dialog box, select Play Every Frame in the Playback Speed list box, as shown in Figure 15.3. Figure 15.3. Setting playback speed to play every frame ensures smooth and correct dynamics playback. 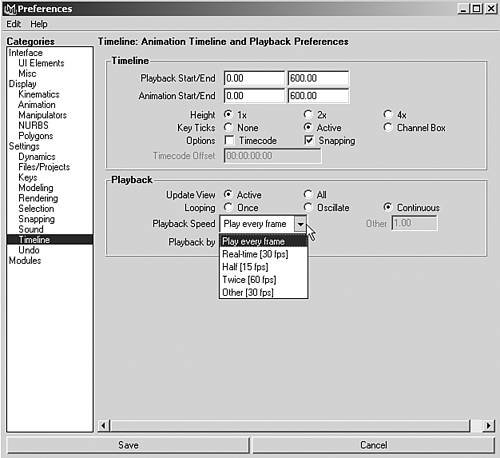
Now, you'll optimize the dynamics solution to speed it up by setting the objects to use stand-ins. Marquee-select both spheres, and in the Channel Box, set the Stand In attribute to Sphere. Next, marquee-select all the planes, and set their Stand In attribute to Cube. Select the bottom right plane, named right_swing. To give it a constraint, choose Soft/Rigid Bodies | Create Constraint | option box. In the Constraint Options dialog box, reset the settings, select Nail in the Constraint Type list box shown in Figure 15.4, and click the Create button. You'll see a small green spot at the center of the right_swing object. Switch to Move mode (hotkey: w) and move the selected object up 2 units; you can see the Translate Y value go up as you move the icon, taking it from 6 to 8. Figure 15.4. Select from several types of constraints in the Constraint Options dialog box. 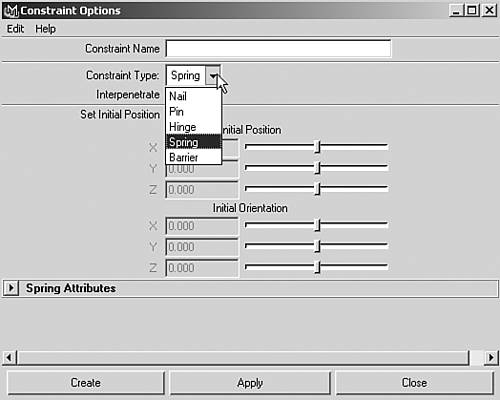
Select the bottom left plane, named left_swing, and use the g hotkey to repeat the application of the Nail constraint. Translate this Nail constraint 2 units in the Y direction also, as done in step 6. Select the center plane, named center_swing, and apply a constraint to it, as shown in step 6. Set the type to Hinge and click Create. Select the right_spinner object, the second plane down on the right. Press g to add a hinge to this object, too. Repeat on the left_spinner object directly to the left of this object. Select the top_paddle object (the top plane). Apply a constraint to it, as shown in step 6; however, this time set the type to Spring, and click Create. Now, click the Play button, and you can observe how the falling balls create the dynamics. While the animation is playing back, you can still rotate around the scene to observe it from different angles. Stop the animation and rewind it to the start. Select the two spheres above the planes by clicking one and then Shift-clicking to select the other. Use the Constraint Options dialog box to create another constraint, set it to Spring, and then click Create. Now, the two spheres are connected with a bungee cord type constraint. Play back the animation to see the effect. Stop it and rewind to frame 0. Select the line between the two spheres, and the spring settings should appear in the Channel Box. As a variation, try setting the Spring Stiffness to 10 and the Spring Rest Length to 10. Play this animation and observe how the bungee cord behaves more like a stiff spring now. Stop the animation, and set Spring Stiffness to 2 and Spring Rest Length to 6. Select ball1, and in the Channel Box, change the Mass value from the default 1 to 3, as shown in Figure 15.5. Play the animation and observe the evident weight difference between the connected balls. Stop and rewind to frame 0. Figure 15.5. Adjusting the mass of one of the spheres. 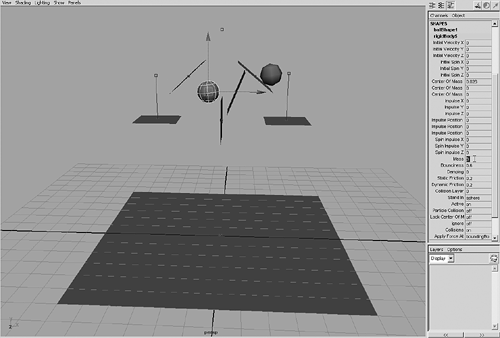
At this point, you might want to cache the dynamics calculation. This records the animation in RAM so that the dynamics do not have to be calculated after you've played back the animation once. To make this work, you must select all the moving objects, and then choose Solvers | Memory Cache | Enable to turn this record mode on, and then play the animation through. When it has played through once, you can scrub or reverse-play the animation. note If you want to change one of the dynamics variables now, you'll find it has no effect until you clear the cache. Do this by choosing Solvers | Memory Cache | Delete or by opening the Solver in the Attribute Editor (Solvers | Rigid Body Solver) and then clicking the Delete button in the Rigid Solver States section. When you like the way your animation looks, you can "bake" the solved animation so that it no longer needs to calculate. This method is helpful when you have dynamics solutions that are particularly slow to calculate. To bake the dynamics solution into keys, select all the active bodies, and then choose Edit | Keys | Bake Simulation. The animation will play, and when it's finished, you'll see that a key has been set for every frame for all the active objects. Now, you can easily scrub the Time Slider with no delay; previously, there would have been long delays for the scene to calculate the dynamics needed for each frame. You can also click the Reverse Play button (to the immediate left of the Play button) to see the dynamics in reverse! On the DVD Chapter_15\ch15tut01end.mb |
|