Creating Enterprise Templates
Enterprise templates are one means for an organization to help implement standards by way of policy files, custom help files, and prototype code modules and projects. Three distinct parts comprise enterprise templates, as shown in Table 8-2.
| Template Item | Description |
|---|---|
| Solution/project template | This is a predefined solution or project that contains all of the code module prototypes. |
| Project item template | This is a template for a single type of project item. These are the items that are displayed when you select Project Add New. |
| Policy file | This is an XML document that can be used to control the use of items within a project template. It can also be used to hook up custom help to the individual items in a project. The Template Descriptor Language is used when creating this document. |
In this section you will look briefly at creating a simple project template and then you will dive into creating individual Project Item templates. You will not be covering policy files here. The Template Descriptor Language is an extensive language and the policy file is a huge file with many intricacies. There is enough information needed to be able to create a good policy file to fill another book and it is beyond the scope of this book (see the sidebar "Enforcing Architecture in the Enterprise").
The goal of corporations in the current environment is to do things better, faster, and cheaper. That seems like common sense, but software development has largely been immune to two of these three things: better and cheaper. But what do better and cheaper mean? The definition of better has slowly evolved. Better used to mean that the product did cooler things or was more functional than a like product. In my experience, better has now come to mean simpler, standardized, and easy to maintain. The third part of that statement, easy to maintain, is where cheaper comes in. So how do enterprise templates affect this shift in thinking?
Enterprise templates allow for several things:
-
They provide a starting point for the application architecture.
-
They provide guidance for using that architecture.
-
In some cases they can solve basic problems based on the experiences of other developers.
-
They can also enforce enterprise standards and ensure conformity to the enterprise's chosen infrastructures.
Contrary to what some people may think, you do not need to have a different architecture for every n-tier application you build. You do not need to rethink the underlying portions of this architecture for every project. A handful of basic designs can be customized to your needs rather than having to build complete new designs. Using policy files, help that is specific to an architecture type and an organization can be included directly in the Integrated Development Environment (IDE), which means the learning curve for a particular architecture is smaller if the documentation is written correctly.
Finally, with policy files, an organization can say, "This is how we want our applications to be structured because it makes it easier to maintain." This is where you can save a great deal of headache. How many times have you been asked to work on a project temporarily (about two weeks) only to find out that it is going to take you two weeks to get up to speed on the project? Now what if you could move to a project and you understand the whole thing because it is the same architecture you were using on your other project? Corporations should be able to put policy files to good use, but I suspect it will not be until Microsoft comes up with a much easier way to create a policy file.
Creating a Solution/Project Template
To begin, you will create a generic template that outlines what you have worked up to at this point. Your solution template will contain a project for business rules, data-centric and user-centric business logic, shared objects, and a user interface. You will also add some basic, generic code to your application that can serve as the foundation for any other projects that choose to use your application design. Open Visual Studio and select File New Project. Next, expand the Other Projects node in the New Project dialog box and select the Enterprise Template Projects folder. From the Templates listed, select the Enterprise Template Project template and change the project name to NTierApplication. Finally, click OK.
This creates an empty solution with one node that has a different icon from those you have seen before, the template icon. This serves as the solution template to which you will add your projects. To add the projects, follow these steps:
-
Right-click this node and select Add New Project.
-
Select the Enterprise Template Project node.
-
Select the Enterprise Template Project template.
-
Name the Project DataCentricProjects and click OK.
Repeat these steps four more times using the following project names:
-
UserCentricProjects
-
SharedObjectsProjects
-
BusinessRuleProjects
-
UserInterfaceProjects
When you are finished, you should have a solution structure that looks like Figure 8-2.

Figure 8-2: The solution/project template structure
What you have done here is create a hierarchy of templates: one solution template with five project templates. You now need to flesh out the project templates so they contain actual projects. Before you start incorporating any of your code, you will just create some empty projects. To do this, follow these steps:
-
Right-click the BusinessRuleProjects node and select Add New Project.
-
Select the Visual Basic Projects node and select the Class Library template.
-
Name the project BusinessRules and click OK.
Repeat these steps for the DataCentricProjects node, the SharedObjectsProjects node, and the UserCentricProjects node. Name them as the nodes are, but with the word Projects at the end. For the UserInterfaceProjects node, follow the same steps but select the Windows Application template instead of the Class Library template. When you are done, your Solution Explorer pane should look like Figure 8-3.
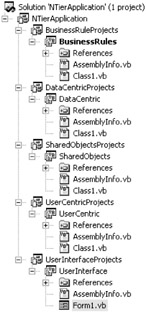
Figure 8-3: The template with all the projects
At this point you need to add some real functionality into these templates and create the correct relationships among them so that the developers who use this template do not have to do it themselves.
| Tip | Creating templates can be a time-consuming task. To make things easier, only include those items that do not require code changes to make them work. If code changes are going to be required, then you are wasting your time, but it is a good idea to put TODO comments in the code with instructions on how to complete a section. |
The BusinessRules project is going to remain empty at this point because you have not yet learned about reflection (you will in Chapter 10). You can come back and update this template once you have worked through Chapter 10. You will add some functionality that every application can use (and coincidentally it will be things you have already coded). You will add the following basic items to your template:
-
Error logging functionality
-
BrokenRules class
-
BusinessBase class
-
Application configuration file
-
Basic interfaces and structures
-
EditBase and ListBase forms
-
Contents of the UIUtilities and UIInterfaces code modules
Navigate to the NorthwindTraders folder in Windows Explorer and copy the following files to the \NTierApplication\UserInterfaceProjects\UserInterface folder (located with the other Visual Studio projects):
-
frmBusinessRules.vb and frmBusinessRules.resx
-
frmEditBase.vb and frmEditBase.resx
-
frmListBase.vb and frmListBase.resx
-
UIInterfaces.vb
-
UIUtilities.vb
-
App.config
Next, in the UserInterface project in the IDE, right-click the UserInterface node and select Add Add Existing Item. Make sure to change the Files of Type drop-down list to All Files, then select all of the files you just copied to this directory. This causes a few errors to be displayed in the Task List, but you will fix those in a little bit.
Now, navigate to the NorthwindUC folder in Windows Explorer and copy the following files to the \NTierApplication\UserCentricProjects\UserCentric folder:
-
AppConstants.vb
-
BrokenRules.vb
-
BusinessBase.vb
-
LogError.vb
Next, in the UserCentric project in the IDE, right-click the UserCentric node and select Add Add Existing Item, then select all of the files you just copied to this directory. Then delete the Class1.vb file from the project.
Now, navigate to the NorthwindShared folder in Windows Explorer and copy the following files to the \NTierApplication\SharedObjectsProjects\SharedObjects folder:
-
Structures.vb
-
Errors.vb
-
Interfaces.vb
Next, in the SharedObjects project in the IDE, right-click the SharedObjects node and select Add Add Existing Item, then select all of the files you just copied to this directory. Then delete the Class1.vb file from the project.
Finally, navigate to the NorthwindDC folder and copy the LogErrorDC.vb file to the \NTierApplication\DataCentricProjects\DataCentric folder. Add this file to the DataCentric project and delete the Class1.vb file associated with this project.
Now you have to clean up your code (which mostly consists of adding references and changing Imports statements) before you create a template out of your projects. Add the References for each project based on Table 8-3.
| Project | References These Projects/Assemblies |
|---|---|
| UserInterface | UserCentric, SharedObjects, System.Runtime.Remoting |
| UserCentric | SharedObjects, System.Web |
| DataCentric | SharedObjects, System.Runtime.Remoting |
You can get rid of most of the problems with the code fairly easily. Select Edit Find and Replace Replace in Files and enter NorthwindTraders.NorthwindShared in the Find box and enter SharedObjects in the Replace With box. Make sure to look in the entire solution. This leaves you with four errors. To fix these, perform a Find and Replace again and find NorthwindUC and replace it with UserCentric. Now you are error free, but you want to clean up a few more things.
In the Interfaces.vb code module, delete the ITerritory, IRegion, and IMenu interfaces. In the Structures.vb code module, delete the structRegion and structTerritories structures.
The last step you have to take is to associate a policy file with this template and these projects. You will take a shortcut and instead of creating your own, you will use one that already exists and just rename it. To do this, follow these steps:
-
Right-click the NTierApplication template node and select Properties.
-
Select the ellipsis next to the Policy File property.
-
Right-click the DAP.TDL file in the Select a TDL File dialog box and select Copy.
-
Right-click in the window and select Paste.
-
Rename the file to NTierApplication.TDL.
-
Double-click the icon of the NtierApplication.TDL file.
-
Click Yes when the dialog box to reload the projects is displayed and then save the solution.
Now that you have a clean project that has all the right references and a policy file, you can create your template.
| Tip | Before you create a template, it is a good idea to back up the solution so that you can come back and change it easily later. You will see that the generation of the template is troublesome enough, and you do not want to have to repeat the steps you just took. |
Close the IDE and navigate to the solution folder in Windows Explorer (this is usually My Documents\Visual Studio Projects\NTierApplication). Copy the entire folder and paste it in the EnterpriseFrameworks\Policy folder (located at C:\Program Files\Microsoft Visual Studio .NET 2003\ EnterpriseFrameworks\Projects). This is where you now have to follow these steps:
-
In the NTierApplication Solution folder, delete the .suo and .eto files.
-
In each of the project template folders, delete the .eto file.
-
In each of the project folders, delete the \bin and \obj folders.
-
Edit the NTierApplication.etp file using a text editor and delete all of the lines with the <GUIDPROJECTID> tag (there will be five in this file).
-
Edit each of the project .etp files using a text editor and delete the line with the <GUIDPROJECTID> tag (there will be only one line in these files).
| Note | The .suo extension stands for Solution User Options. This file contains all of the customizations you have made to the project solution. The .eto extension stands for Enterprise Template Options. But you cannot create any choices at this point that alter this file (at least, I have not been able to do so). |
Once you have finished all of those edits, you are done with the enterprise template; however, you need a way to be able to see it in the New Project dialog box in Visual Studio. To arrange that, navigate to the ProxyProjects folder (\Microsoft Visual Studio .NET 2003\EnterpriseFrameworks\ProxyProjects) and follow these steps:
-
Copy the proxyprojectsvb.vsdir file and paste it into the same folder.
-
Rename the file to a descriptive name, in this case customtemplates.vsdir.
-
Edit the file with Notepad.
-
Delete all the lines in the file except the first line.
-
Change the path on this line (which currently reads ..\Projects\Visual Basic Simple Distributed Application\Visual Basic Simple Distributed Application.etp) to ..\Projects\NTierApplication\NTierApplication.etp.
-
After the first GUID number you will see a vertical bar followed by another number (usually #5003). Change this number to #6000.
-
After this number is another vertical bar followed by a 1. Change this to 0. (This is the position that the template shows up in the templates list. Using 0 places it first). The file should now contain only the following line (without the line breaks), although your GUID number may be different:
..\Projects\NTierApplication\NTierApplication.etp| {AE77B8D0-6BDC-11d2-B354-0000F81F0C06}|#6000|0|#5004| {AE77B8D0-6BDC-11d2-B354-0000F81F0C06}|122|0|Project -
Save and close the file.
Just to make sure this worked, open Visual Studio and select New Project and select the NTierApplication template from the Enterprise Templates node. You will see the entire structure of the project.
Creating a Project Item Template
You can have a solution template, but what about all of those code modules you had to create? For that you have to do something slightly different.
| Note | It would be nice if Microsoft makes some changes in a later release of Visual Studio because adding in project item templates could be "wizardized." However, you can accomplish most of this with text editing and copying and pasting. |
The rest of this chapter walks you through creating a single user-centric template item. This will give you enough of an idea for you to create your own project item templates. To begin with, let's look at the items you can add to a VB project (see Figure 8-4).
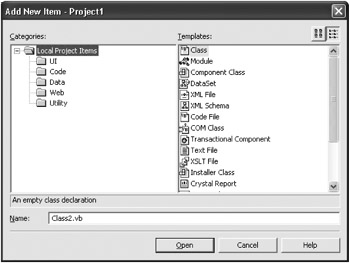
Figure 8-4: The Add New Item dialog box, VB project items
Next, Figure 8-5 shows the folder structure in the Microsoft Visual Studio .NET folder (this structure starts under the Microsoft Visual Studio .NET\VB7 folder).

Figure 8-5: Partial folder structure, Visual Studio .NET folders
Two things should be immediately obvious. First, the Local Project Items in the Add New Item dialog box in Figure 8-4 corresponds with the Local Project Items folder in Figure 8-5. Secondly, although the folder structure shows a partial list in Figure 8-4, the items on the Templates side of the Add New Item dialog box in Figure 8-4 correspond with the folders listed under the VBWizards folder in Figure 8-5.
Examining a Template Item
Look in the Local Project Items folder and you will see one file that has special importance—the LocalProjectItems.vsdir file. This is the same type of file as the one you modified earlier for the solution template, but now you will examine what one line from this file looks like and represents:
..\Class.vsz|{164B10B9-B200-11D0-8C61-00A0C91E29D5}|#3020|20|#3021|{164B10B9-B200- 11D0-8C61-00A0C91E29D5}|4510| |Class.vb Table 8-4 shows the breakdown of the line.
| Item | Description |
|---|---|
| ..\ | This shows a relative path from the file to the wizard parameter file. |
| Class.vsz | This is the name of the wizard parameter file. |
| GUID | This stands for Global Unique Identifier, which is used internally by .NET. It also can be blank. |
| #3020 | This points to a description for the item name, or it can be a string. |
| 20 | This is the order the item shows up in the list (10, 20, 30, 40, and so on). The lowest numbered item is first. |
| #3021 | This points to a description that shows in the gray box below the project items, or it can be a string. |
| GUID | This stands for Global Unique Identifier, which is used internally by .NET. It points to a DLL file that contains icons. |
| 4510 | This is the resource ID for the icon located in the file specified by the previous GUID. |
| [blank] | These are flags to indicate whether certain fields should be enabled or disabled in the Add New dialog box. |
| Class.vb | This is the default file name that is generated. |
|
[*]For more information on the vsdir file, see the MSDN help topic "VSdir files." | |
With the information in Table 8-4, you have enough knowledge to do some copying and pasting to achieve your desired template.
Creating the UserCentric Project Item Template
For the moment, create a new Windows application, which you will use to examine your templates as you create them. Next you are going to start making some edits to some files and directories. First, go to the Microsoft Visual Studio .NET\Vb7\VBProjectItems\Local Project Items folder and edit the LocalProjectItems.vsdir file. Take the following steps to modify the LocalProjectItems file:
-
Copy the line that starts with the word Resources and paste it as a new line on the next line.
-
Change the word Resources to Custom.
-
Change the #3109 entry on that line to Custom.
-
Change the order from 60 to 70.
-
Save and close the file.
This just created a new folder called Custom in the Add New Item dialog box in Visual Studio, which you will see after you make these next few changes. Now that you have your own folder that shows up in the Add New dialog box, it would probably be a good idea to actually create that folder so that Visual Studio has a folder to reference. Take these steps to create this folder:
-
Create a new folder in the Local Project Items folder and call it Custom.
-
Go into the Code folder located in the same directory and copy the LocalCodeProjectItems.vsdir file to the Custom folder.
-
Rename the LocalCodeProjectItems.vsdir file to LocalCustomProjectItems.vsdir.
-
Edit the LocalCustomProjectItems.vsdir file and delete everything in the file except the first line which begins with ..\..\Class.vsz.
-
Save and close the file.
To see what you have done so far, go into the IDE and select Add New Item from the project file. In the Add New Item dialog box, click the Custom folder. You will see the dialog box in Figure 8-6.
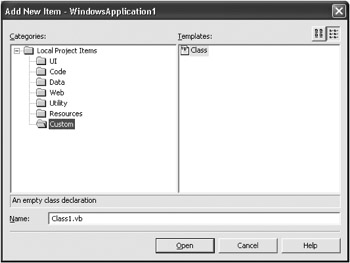
Figure 8-6: Your first customization to the project items
Before moving on, go back and edit the LocalCustomProjectItems.vsdir file and change Class.vsz to UserCentric.vsz. Then save and close the file.
Setting Up the UserCentric Template
Next, you need to actually create the template that you will place in this Custom folder. If you recall the relative path in front of the UserCentric.vsz line in the LocalCustomProjectItems.vsdir file (..\..\), you will notice that it points to two directories above your current folder. If you go to that directory (VBProjectItems), you will see one file for each class that shows up in the Project Items dialog box. To make your life easier, copy the Class.vsz file, paste it, and rename it to UserCentric.vsz. If you open this file for editing file (which you need to do), it will look like Figure 8-7.
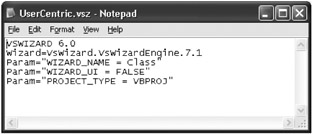
Figure 8-7: The UserCentric.vsz file
The only line you need to be concerned about is the first Param line. Change the value from Class to UserCentric. Then save and close the file.
| Note | For more information on this file, see the MSDN help topic "vsz files." |
Now, this file is pointing to a folder called UserCentric in the VBWizards folder (Microsoft Visual Studio .NET\Vb7\VBWizards). Because this folder does not exist yet, you need to create it. The easiest way to do this is to copy the Class folder, paste it, and rename it to UserCentric. If you look in this folder you will find two subfolders, the Scripts and Templates folders. You are interested in the Templates folder. In this folder you will find another folder named 1033 and in this folder you will find a file called Class.vb. This is the template you need to replace with your own template, but before you do, open the file and take a look. You will find the following two lines of code:
Public Class [!output SAFE_ITEM_NAME] End Class
The [!output SAFE_ITEM_NAME] code is the name you give the code module in Visual Studio when you add it to your project. As you will see next, it plays a large part when using templates (you can close this file when you are done).
So, to begin creating the actual file you will use, add a new class to the Windows application you created earlier. Next, open the Northwind solution and copy all of the Region code module, including the RegionMgr class (from the NorthwindUC project), and paste it into the empty class (deleting the default class that was created in this code module) in your new project. Now that you have done that, you should have a code module that is identical to the Region code (and a bunch of errors, but you are only using this temporarily). You need to edit this file so that it is useful as a template.
Now, you need to make some assumptions here that you should keep in mind as you are creating a template. The first is that you are creating these templates to help you with the rest of your application right now, but you want the project item template to be usable to anyone who creates a project based on your NTierApplication template that you created earlier in the chapter. To this extent, and knowing that you are following a common naming convention, you can create the code for the template by modifying the code you pasted so that it looks like Listing 8-7.
Listing 8-7: Code for the UserCentric Project Item Template
Option Strict On Option Explicit On Imports SharedObjects.Structures Imports SharedObjects.Interfaces Imports SharedObjects.Errors Public Class [!output SAFE_ITEM_NAME] Inherits BusinessBase 'TODO: Set this value to point to your Remote Object URI 'Private Const LISTENER As String = xxxx Dim ms[!output SAFE_ITEM_NAME] as struct[!output SAFE_ITEM_NAME] #Region " Private Attributes" #End Region #Region " Public Attributes" #End Region Public Sub New() MyBase.New(LISTENER) mobjRules = New BrokenRules 'TODO: Break any business rules here End Sub Public Sub New(ByVal intID As Integer) MyBase.New(LISTENER) mobjRules = New BrokenRules mint[!output SAFE_ITEM_NAME]ID = intID End Sub Public Overrides Function ToString() As String 'TODO: Return the value that is to be displayed when this 'item object is added to a list box End Function Public Sub LoadRecord() Dim objI[!output SAFE_ITEM_NAME] As I[!output SAFE_ITEM_NAME] objI[!output SAFE_ITEM_NAME] = _ CType(Activator.GetObject(GetType(I[!output SAFE_ITEM_NAME]), _ AppConstants.REMOTEOBJECTS & LISTENER), I[!output SAFE_ITEM_NAME]) ms[!output SAFE_ITEM_NAME] = _ objI[!output SAFE_ITEM_NAME].LoadRecord(mint[!output SAFE_ITEM_NAME]ID) objI[!output SAFE_ITEM_NAME] = nothing LoadObject() End Sub Private Sub LoadObject() 'TODO: Assign the values from the module level structure to the object End Sub Public Sub Rollback() LoadObject() End Sub Public Sub Delete() Dim objI[!output SAFE_ITEM_NAME] As I[!output SAFE_ITEM_NAME] objI[!output SAFE_ITEM_NAME] = _ CType(Activator.GetObject(GetType(I[!output SAFE_ITEM_NAME]), _ AppConstants.REMOTEOBJECTS & LISTENER), I[!output SAFE_ITEM_NAME]) objI[!output SAFE_ITEM_NAME].Delete(mint[!output SAFE_ITEM_NAME]ID) objI[!output SAFE_ITEM_NAME] = Nothing End Sub Public Sub Save() If mobjRules.Count = 0 Then 'TODO: Replace and uncomment as necessary If mblnDirty = True Then Dim objI[!output SAFE_ITEM_NAME] As I[!output SAFE_ITEM_NAME] Dim intID As Integer Dim s[!output SAFE_ITEM_NAME] as struct[!output SAFE_ITEM_NAME] 'Store the original ID of the object intID = mint[!output SAFE_ITEM_NAME]ID 'TODO: Assign the values from the object to the local structure 'variable objI[!output SAFE_ITEM_NAME] = _ CType(Activator.GetObject(GetType(I[!output SAFE_ITEM_NAME]), _ AppConstants.REMOTEOBJECTS & LISTENER), _ I[!output SAFE_ITEM_NAME]) 'TODO: Replace the local structure with the variable name objI[!output SAFE_ITEM_NAME].Save(s[!output SAFE_ITEM_NAME], _ mint[!output SAFE_ITEM_NAME] ID) objI[!output SAFE_ITEM_NAME] = Nothing If intID = 0 Then CallChangedEvent(Me, New _ ChangedEventArgs(ChangedEventArgs.eChange.Added)) Else CallChangedEvent(Me, New _ ChangedEventArgs(ChangedEventArgs.eChange.Updated)) End If mblnDirty = False End If End If End Sub End Class Public Class [!output SAFE_ITEM_NAME]Mgr Inherits System.Collections.DictionaryBase Private Shared mobj[!output SAFE_ITEM_NAME]Mgr As _ [!output SAFE_ITEM_NAME]Mgr Public Shared Function GetInstance() As [!output SAFE_ITEM_NAME]Mgr If mobj[!output SAFE_ITEM_NAME]Mgr Is Nothing Then mobj[!output SAFE_ITEM_NAME]Mgr = New [!output SAFE_ITEM_NAME]Mgr End If Return mobj[!output SAFE_ITEM_NAME]Mgr End Function Protected Sub New() Load() End Sub Public Sub Add(ByVal obj As [!output SAFE_ITEM_NAME]) dictionary.Add(obj.[!output SAFE_ITEM_NAME]ID, obj) End Sub Public Function Item(ByVal Key As Object) As [!output SAFE_ITEM_NAME] Return CType(dictionary.Item(Key), [!output SAFE_ITEM_NAME]) End Function Public Sub Remove(ByVal Key As Object) dictionary.Remove(Key) End Sub Private Sub Load() Dim objI[!output SAFE_ITEM_NAME] As I[!output SAFE_ITEM_NAME] Dim dRow As DataRow Dim ds As DataSet 'TODO: Replace the [Remote Object URI] with the actual URI objI[!output SAFE_ITEM_NAME] = _ CType(Activator.GetObject(GetType(I[!output SAFE_ITEM_NAME]), _ AppConstants.REMOTEOBJECTS & [Remote Object URI]), _ I[!output SAFE_ITEM_NAME]) ds = objI[!output SAFE_ITEM_NAME].LoadProxy() objI[!output SAFE_ITEM_NAME] = Nothing For Each dRow In ds.Tables(0).Rows 'TODO: Replace "Identiy Column" in the line below with the name of 'the identity column from the database Dim obj[!output SAFE_ITEM_NAME] As New _ [!output SAFE_ITEM_NAME](Convert.ToInt32(dRow.Item("IdentityColumn"))) With obj[!output SAFE_ITEM_NAME] .Loading = True 'TODO: Assign values from the datarow to the object .Loading = False End With Me.Add(obj[!output SAFE_ITEM_NAME]) Next ds = Nothing End Sub Public Sub Refresh() dictionary.Clear() Load() End Sub End Class That is quite a lot of code, but you will see how easy this makes your job once you implement the template. Of course, right now you have a boatload of errors, but do not worry about that as this is only a template! The one thing you should note is that you have used the [!output SAFE_ITEM_NAME] liberally here. Visual Studio will replace this tag wherever it is found in a code module when it is added. By using a standard naming convention you will only have to make one change and five additions once you actually use this template.
Finally, save this code module and exit Visual Studio. Navigate to the project folder you were just working in (if you did not rename the default project it is probably WindowsApplication1) and rename the code module from Class1.vb to Class.vb. Then, copy the file to the \VBWizards\User Centric\Templates\1033 folder you were working in earlier and overwrite the Class.vb file that is currently there.
Modifying the Policy File
There is only one little thing left that you need to do only one more little thing—modify the policy file. You will not see an in-depth explanation of what you are doing, but I am going to explain why because it is one of the great features of enterprise templates. Navigate to the \Microsoft Visual Studio .NET 2003\ EnterpriseFrameworks\Policy folder and double-click the NTierApplication.TDL file. This opens the file in Visual Studio's XML editor. The first thing you will notice is that this file is huge; the second thing you will notice if you try to switch to data view is that the file cannot be read correctly by Visual Studio! No matter, though. For your purposes you need to do a Find and look for projItemVBcodefile. Listing 8-8 shows the block of code you will find.
Listing 8-8: The projItemVBCodeFile Element
<ELEMENT> <ID>projItemVBCodeFile</ID> <IDENTIFIERS> <IDENTIFIER> <TYPE>PROJECTITEM</TYPE> <IDENTIFIERDATA> <NAME>FileExtension</NAME> <VALUE>.vb</VALUE> </IDENTIFIERDATA> </IDENTIFIER> </IDENTIFIERS> <PROTOTYPES> <PROTOTYPE>[VB]\VBProjectItems\CodeFile.vsz</PROTOTYPE> </PROTOTYPES> </ELEMENT>
Add the following prototype tag below the existing prototype tag:
<PROTOTYPE>[VB]\VBProjectItems\UserCentric.vsz</PROTOTYPE>
Then save and close the file. The policy file allows you to control the items that a developer can even add to a project. Because I have not gone into how to create elements that can be recognized by a policy file, you had to fake it by adding this in as another prototype of the CodeFile type.
| Note | For steps on how to add new elements that will be recognized by a policy file, see the MSDN documentation, "Walkthrough: Creating a New Enterprise Template." |
So, all that you have done here is to give the developer the ability to add the UserCentric prototype to a template project.
Testing the Project Item Template
To test this project item, perform the following steps:
-
Open a new instance of the Visual Studio IDE.
-
Select File New Project.
-
Select the NTierApplication template from the Other Projects\Enterprise Template Projects node.
-
Select the UserCentric node in the Solution Explorer.
-
Right-click the node and select Add Add New Item.
-
Select the Custom folder under the Local Project Items folder and select the UserCentric Class template item.
-
Rename the item from Class1.vb to Employee.vb and click OK.
Once you do that, you will have about 50 errors in the Task List, but let's see just how easy it is to clean these errors up. To start with, go the SharedObjects project and open the Structures.vb code module. Add the following structure in the Structures namespace:
<Serializable()> Public Structure structEmployee Public EmployeeID As Integer End Structure
Next, go to the Interfaces.vb code module and add the following interface to the Interfaces namespace:
Public Interface IEmployee Function LoadProxy() As DataSet Function LoadRecord(ByVal intID As Integer) As structEmployee Function Save(ByVal sEmployee As structEmployee, ByRef intID As Integer) _ As BusinessErrors Sub Delete(ByVal intID As Integer) Function GetBusinessRules() As BusinessErrors End Interface
Then, switch to the Employee.vb code module that you just added and uncomment the following line:
'Private Const LISTENER As String = xxxx
Enclose the xxxx in quotation marks so it looks like a string. Finally, in the Private Attributes region, add this declaration:
Private mintEmployeeID As Integer
And in the Public Attributes region, add this declaration:
Public ReadOnly Property EmployeeID() As Integer Get Return mintEmployeeID End Get End Property
When you are all done with this, there will be only one error left. If you look at it, you will see that you only need to replace the text with the Uniform Resource Indicator (URI) of the remote objects.
EAN: 2147483647
Pages: 148