Displaying Business Rules to the User
The entire purpose of returning your objects' rules to the user interface is so the user can see all of the possible rule combinations at once. It is too difficult to continually modify these rules in a help file or anywhere else, but as a developer makes changes to the rules in the classes, they should be able to easily update the GetBusinessRules routine. In this way, a user running the application will always have access to the latest rules that apply to a certain screen.
Creating the Business Rules Form
Now you need to create a form that you can use to display business rules from any object you create. To do this, add a new form to the NorthwindTraders project and call it frmBusinessRules. When you are done adding controls, your form should look like Figure 5-3.
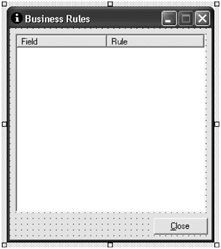
Figure 5-3: The Business Rules form
Add the controls listed in Table 5-1.
| Control | Name |
|---|---|
| Listview | lvwList |
| Button | btnClose |
Next, set the properties for the controls according to Table 5-2.
| Control | Property | Value |
|---|---|---|
| frmBusinessRules | Text | Business Rules |
| frmBusinessRules | MaximizeBox | False |
| frmBusinessRules | Icon | MSGBOX04.ICO |
| lvwList | View | Details |
| lvwList | Columns Collection | Add ColumnHeader1 |
| lvwList | Columns Collection | Add ColumnHeader2 |
| ColumnHeader1 | Text | Field |
| ColumnHeader2 | Text | Rule |
| lvwList | Anchor | Top, Left, Right, Bottom |
| btnClose | Text | &Close |
| btnClose | Anchor | Right, Bottom |
Add the following code to the top of the frmBusinessRules code module:
Option Explicit On Option Strict On Imports NorthwindTraders.NorthwindShared.Errors
Next, modify the constructor so that it reads as follows:
Public Sub New(ByVal objBE As BusinessErrors) MyBase.New() 'This call is required by the Windows Form Designer. InitializeComponent() 'Add any initialization after the InitializeComponent() call LoadListView(objBE) End Sub
The LoadListView method (shown in Listing 5-8) comes next. This method takes your BusinessErrors object and populates the listview with the contents.
Listing 5-8: The LoadListView Method
Private Sub LoadListView(ByVal objBusErr As BusinessErrors) Dim i As Integer For i = 0 To objBusErr.Count - 1 Dim lst As New ListViewItem(objBusErr.Item(i).errProperty) lst.SubItems.Add(objBusErr.Item(i).errMessage) lvwList.Items.Add(lst) Next End Sub
Next, add the two methods shown in Listing 5-9, one to respond to the Close button click event and the other to respond to the form Paint event. This event occurs when the user resizes the form—it resizes the listview columns for you.
Listing 5-9: Additional BusinessRules Methods
Private Sub frmBusinessRules_Paint(ByVal sender As Object, _ ByVal e As System.Windows.Forms.PaintEventArgs) Handles MyBase.Paint Dim i As Integer For i = 0 To lvwList.Columns.Count - 1 lvwList.Columns.Item(i).Width = CInt((lvwList.Size.Width / _ lvwList.Columns.Count) - 6) Next End Sub Private Sub btnClose_Click(ByVal sender As Object, _ ByVal e As System.EventArgs) Handles btnClose.Click Close() End Sub
You now have a form that can display business rules, regardless of which object generated the business rules that you are going to display.
Updating the Base Edit Form
Now let's edit the frmEditBase form so that you can display the business rules from any of the edit forms you will create. Add a new button to the frmEditBase form and set the following properties for it according to Table 5-3. The form should look like Figure 5-4 when you are done.
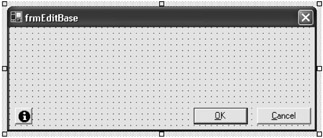
Figure 5-4: frmEditBase with the btnRules button
| Control | Property | Value |
|---|---|---|
| Button | Name | btnRules |
| btnRules | Modifiers | Protected |
| btnRules | Anchor | Bottom, Left |
| btnRules | Text | Empty String |
| btnRules | Size | 24,23 |
| btnRules | Image | MSGBOX04.ICO |
When you are done, rebuild the solution so that the changes are reflected in the frmRegionEdit form.
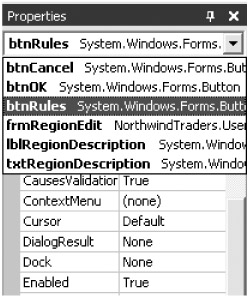
| Tip | One of the hazards of using a base form is that when you position a control on the form, it needs to be visible in any of the forms that are inheriting from it. When you look at the frmRegionEdit form, you will probably not be able to find the btnRules button. One simple solution to this problem is to go to the frmRegionEdit form, and select the btnRules from the object drop-down list (as shown in Figure 5-5). Then, set the location to 0,0 and you will be able to move it to the correct position. |
In the frmRegionEdit form, double-click the btnRules button to create the btnRules_Click method and modify the method to match the code in Listing 5-10.
Listing 5-10: The btnRules_Click Method
Private Sub btnRules_Click(ByVal sender As System.Object, _ ByVal e As System.EventArgs) Handles btnRules.Click Dim frmRules As New frmBusinessRules(mobjRegion.GetBusinessRules) frmRules.ShowDialog() frmRules = Nothing End Sub
You are all done. At this point you have finished making changes to the data-centric objects and shared objects so it is time to build the solution and deploy the server-side assemblies. To do this, simply build the application and copy the NorthwindDC.dll and NorthwindShared.dll files to the C:\inetpub\wwwroot\Northwind\bin folder—or wherever you placed the directory that links to the virtual directory in Internet Information Server (IIS). You can now run the application and test to see if the business rules form can be displayed. The result should be identical to what is shown in Figure 5-6.
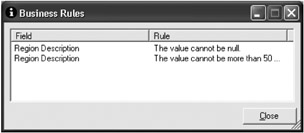
Figure 5-6: Completed Business Rules form
EAN: 2147483647
Pages: 148