Adding Some Basic Functionality
What would you expect to find on a form like this? You probably want the column drop-down to contain a list of columns and the find functionality to work. You might also like to have a list that can be sorted by clicking the column header. Because the Print button is going to be on all of these list forms, maybe you can find a way to have it print the contents of the list, regardless of what is contained in it. You will add all of these touches in the following sections to finish your coding of the base form.
Implementing the Find Functionality
To implement the find functionality, go into the frmListBase form and add the following code:
Private Sub frmListBase_Load(ByVal sender As Object, _ ByVal e As System.EventArgs) Handles MyBase.Load Dim i As Integer For i = 0 To lvwList.Columns.Count - 1 cboColumn.Items.Add(lvwList.Columns(i).Text) Next If cboColumn.Items.Count > 0 Then cboColumn.SelectedIndex = 0 End If End Sub
This code cycles through the columns in the listview and adds the column header text to the cboColumn drop-down list. Because the LoadList method is called during the execution of the constructor in the subclassed form, the listview is completely set up and filled by the time the Load method of the base class is called.
The actual code to perform the search is simplistic. If you wanted to make this more powerful, you could enhance it by using regular expressions, which provide a great deal of power.
| Note | The .NET Framework has an extremely powerful regular expression engine. The System.Text.RegularExpressions namespaces contain all of the classes that you can use to handle regular expressions. Regular expressions allow for pattern matches as well as other good features. A great e-book that explains regular expressions is Regular Expressions with .NET by Daniel Appleman, which is available from http://www.desaware.com. |
To implement the find functionality, which will be specific to the column that the user selects, you simply have to do the following:
-
Get the index number of the column the user wants to search
-
Check the specific subitem property that corresponds to the index of the column
-
Make the search case insensitive by converting everything to uppercase
-
Selecting the item
-
Making sure the item is visible
The code to actually do this is quite simple. Enter code in Listing 3-19 into the frmListBase form.
Listing 3-19: The Find Method
Private Sub btnFind_Click(ByVal sender As System.Object, _ ByVal e As System.EventArgs) Handles btnFind.Click Dim i As Integer Dim lst As ListViewItem i = cboColumn.SelectedIndex For Each lst In lvwList.Items If _ lst.SubItems(i).Text.ToUpper.StartsWith(txtSearch.Text.ToUpper) Then lst.Selected = True lst.EnsureVisible() Exit For End If Next lvwList.Focus() End Sub
Now, every form you create that displays lists of items can be searched by column. You can also extend this functionality to include filtering capabilities.
Adding Sorting Functionality to the ListView
Sorting a listview in .NET is not the same as it is in VB 6. In VB 6 the capability was built in to the listview. All you had to do was to make sure it was sorted in the right order based on the column clicked. In .NET, you have to provide your own sorting capability. This process involves creating a class that implements the IComparer interface. You will see how to implement the code in this section.
Add a new code module to the NorthwindTraders project and call it UIutilities. You will use this class as a repository for code that can be helpful in multiple locations. By placing your column sorting routine here, you can use this routine for any listview in your entire application. After you have added this module, delete the template declaration and enter the code in Listing 3-20 for your comparer class.
Listing 3-20: The ListViewColumnSorter Class
Public Class ListViewColumnSorter Implements System.Collections.IComparer Private mintSortCol As Integer = 0 Private mobjOrder As SortOrder = SortOrder.None Private mobjCompare As CaseInsensitiveComparer Public Sub New() mobjCompare = New CaseInsensitiveComparer() End Sub Public Function Compare(ByVal x As Object, ByVal y As Object) As Integer _ Implements _ IComparer.Compare Dim intResult As Integer Dim lvwItem1 As ListViewItem Dim lvwItem2 As ListViewItem lvwItem1 = CType(x, ListViewItem) lvwItem2 = CType(y, ListViewItem) intResult = mobjCompare.Compare(lvwItem1.SubItems(mintSortCol).Text, _ lvwItem2.SubItems(mintSortCol).Text) If (mobjOrder = SortOrder.Ascending) Then Return intResult Else If (mobjOrder = SortOrder.Descending) Then Return (-intResult) Else Return 0 End If End If End Function Public Property SortColumn() As Integer Get Return mintSortCol End Get Set(ByVal Value As Integer) mintSortCol = Value End Set End Property Public Property Order() As SortOrder Get Return mobjOrder End Get Set(ByVal Value As SortOrder) mobjOrder = Value End Set End Property End Class
In this code, the Compare function does all the work. It takes two values (which are listview items in this case), compares them (ignoring case), and returns a value indicating if the first value was equal to, larger, or smaller than the second value. It then returns this comparison value. The rest of the class is designed so that you know how to return the comparison result.
The SortColumn property is just a convenient way for you to store the last selected column so that you know whether to sort the column ascending or descending when it has been clicked.
Next, go back to the frmListBase form and add the following module-level declaration:
Private lvwColumnSorter As ListViewColumnSorter
Next, add the following to lines to the frmListBase constructor (below the InitializeComponent call):
lvwColumnSorter = New ListViewColumnSorter() Me.lvwList.ListViewItemSorter = lvwColumnSorter
| Note | Any code you add to a form constructor should always be added at the end of the constructor. Anytime a call to the base class new method is made (via the MyBase.New call), it must be the first call of the constructor or else you will receive a syntax error. The InitializeComponent call actually sets up all of the controls on the form, so it defeats the purpose to try to run any of your own code before the form's controls actually exist. |
Add the code in Listing 3-21 to the frmListBase form. This handles the ColumnClick method of the listview.
Listing 3-21: The ColumnClick Method
Private Sub lvwList_ColumnClick(ByVal sender As Object, _ ByVal e As System.Windows.Forms.ColumnClickEventArgs) _ Handles lvwList.ColumnClick If (e.Column = lvwColumnSorter.SortColumn) Then If (lvwColumnSorter.Order = SortOrder.Ascending) Then lvwColumnSorter.Order = SortOrder.Descending Else lvwColumnSorter.Order = SortOrder.Ascending End If Else lvwColumnSorter.SortColumn = e.Column lvwColumnSorter.Order = SortOrder.Ascending End If Me.lvwList.Sort() End Sub
This code is almost identical to what you would find in VB 6 to control the direction of the sort. You check to see if the column the user clicked has already been sorted. If it has been sorted, you check to see if it has been sorted as ascending or descending. Whatever it is, you reverse the sort order. If the column has not been sorted, you sort it in ascending order. The Sort method actually instructs the listview to sort itself.
Every form that inherits from the base list form now has a sortable listview.
Implementing the Print Functionality
In this section you will implement some basic printing functionality. It does not use Crystal Reports (the reporting tool that comes with VS). It is a generic routine to print the contents of the listview. The reason for it is that it is dynamic and does not have to be set up with all of the overhead that is needed for Crystal Reports.
| Note | I am not a graphics specialist and I am not in the habit of rolling my own print routines, but I think the knowledge comes in handy. You should be able to extend this routine fairly easily. |
Import the System.Drawing and System.Drawing.Printing namespaces in the header of the frmListBase form. Then add the following module-level declaration:
Private WithEvents mobjPD As PrintDocument Private mstrTitle As String Private mintPrintCount As Integer
The mstrTitle variable holds the title of the form for use in printing on the header of your custom report. The mintPrintCount variable holds the current record that you are printing and allows you to continue to the next record after you reach the bottom of the page. Next, add the code in Listing 3-22, which creates the btnPrint.Click method.
Listing 3-22: The Print Method
Protected Overridable Sub btnPrint_Click(ByVal sender As System.Object, _ ByVal e As System.EventArgs) Handles btnPrint.Click Dim PPD As PrintPreviewDialog = New PrintPreviewDialog() mobjPD = New PrintDocument() PPD.Document = mobjPD PPD.WindowState = FormWindowState.Maximized PPD.PrintPreviewControl.AutoZoom = False PPD.PrintPreviewControl.Zoom = 1.0 PPD.ShowDialog() End Sub
First you create a new Print Preview dialog box and then you create a new print document, which is the actual graphic rendered on the screen. Next, you associate the print document with the Print Preview dialog box.
| Tip | This method is declared as Protected Overridable as opposed to Private. The reason for this is that you might not want to print a generic report for all of your list screens. You might want a fancy Crystal Report or some other type of report. By declaring your method this way, you can alter the btnPrint_Click method to do something else in a subclassed form. |
This code causes the Print Preview dialog box to be displayed, but it has nothing to do with the actual printing of the information into the dialog box. The PrintDocument object raises an event called PrintPage. It is this event that you need to respond to print your custom information. Enter the code in Listing 3-23 into the frmListBase form. There is quite a bit of code, so let's go over it in detail in just a moment.
Listing 3-23: The PrintPage Method
Private Sub mPD_PrintPage(ByVal sender As Object, ByVal e As _ System.Drawing.Printing.PrintPageEventArgs) Handles mobjPD.PrintPage Try Dim printFont As New Font("Arial", 10) Dim titleFont As New Font("Arial", 12, CType(FontStyle.Underline + _ FontStyle.Bold, FontStyle), GraphicsUnit.Pixel) Dim headerFont As New Font("Arial", 24, FontStyle.Bold, _ GraphicsUnit.Pixel) Dim headerLineHeight As Single = headerFont.GetHeight(e.Graphics) Dim lineHeight As Single = printFont.GetHeight(e.Graphics) Dim lPos As Single = e.MarginBounds.Left Dim yPos As Single = e.MarginBounds.Top Dim intLength As Integer Dim i, j As Integer 'Print the header e.Graphics.DrawString("List Report", headerFont, Brushes.Black, _ lPos, yPos) yPos += headerLineHeight lPos += 3 'Print the Maintenance report type e.Graphics.DrawString(mstrTitle, printFont, Brushes.Black, lPos, yPos) yPos += lineHeight * 2 'Reset the left margin lPos = e.MarginBounds.Left 'Print the header columns For i = 0 To lvwList.Columns.Count - 1 e.Graphics.DrawString(lvwList.Columns(i).Text, titleFont, _ Brushes.Black, lPos, yPos, New StringFormat()) If i < lvwlist.Columns.Count 1 Then lPos += 150 End If Next 'Print the data to the report For i = mintPrintCount To lvwList.Items.Count - 1 yPos += lineHeight lPos = e.MarginBounds.Left If lvwList.Items(i).Text.Length > 20 Then intLength = 20 Else intLength = lvwList.Items(i).Text.Length End If e.Graphics.DrawString(lvwList.Items(i).Text.Substring(0, intLength), _ printFont, Brushes.Black, lPos, yPos, New StringFormat()) For j = 1 To lvwList.Columns.Count - 1 lPos += 150 If lvwList.Items(i).SubItems(j).Text.Length > 20 Then intLength = 20 Else intLength = lvwList.Items(i).SubItems(j).Text.Length End If e.Graphics.DrawString(_ lvwList.Items(i).SubItems(j).Text.Substring(0, intLength), printFont, _ Brushes.Black, lPos, yPos, New StringFormat()) Next 'If there are more pages, continue If yPos > e.MarginBounds.Bottom Then e.HasMorePages = True Exit For Else mintPrintCount += 1 End If Next Catch exc As Exception MessageBox.Show(exc.Message, "Print Error", MessageBoxButtons.OK, _ MessageBoxIcon.Error) End Try End Sub The real power in this routine is PrintPageEventArgs, which allows you to control virtually every aspect of the printed page—from the font you use to the page on which you print.
Now that you have all the code, let's examine the different parts of the code, so you understand what is going on:
Dim printFont As New Font("Arial", 10) Dim titleFont As New Font("Arial", 12, CType(FontStyle.Underline + _ FontStyle.Bold, FontStyle), GraphicsUnit.Pixel) Dim headerFont As New Font("Arial", 24, FontStyle.Bold, GraphicsUnit.Pixel) Dim headerLineHeight As Single = headerFont.GetHeight(e.Graphics) Dim lineHeight As Single = printFont.GetHeight(e.Graphics) Dim lPos As Single = e.MarginBounds.Left Dim yPos As Single = e.MarginBounds.Top Dim intLength As Integer Dim i, j As Integer The printFont, titleFont, and headerFont variables just store font information for printing. The Font constructor has several overloaded methods for creating fonts. (Refer to the MSDN documentation for additional information.) The headerLineHeight variable holds the height of a line in 1/100th-inch increments. It gets this height by calling the GetHeight method of the font object, which takes a Graphics object as its argument. The same operation happens for the lineHeight, which is the height of the line onto which you will print your data. The lPos and yPos variables hold the left-margin bounds and top-margin bounds, respectively. By default, the margin bounds are one inch, so these variables will both hold the value 100. The intLength variable holds the length in characters of a value that you want to write to a page. (I did not want to write a routine that examined the widths of columns and resized them on the fly. I wanted to use a standard width that will apply to everything.)
| Note | As mentioned earlier, you could improve a great deal about this routine, but it is a solid, generic starting point from which you can write your own print routines. Some improvements might include page numbers and additional header and footer information. |
The DrawString method of the Graphics object allows you to draw text onto the page:
'Print the header e.Graphics.DrawString("List Report", headerFont, Brushes.Black, lPos, yPos) yPos += headerLineHeight lPos += 3 'Print the Maintenance report type e.Graphics.DrawString(mstrTitle, printFont, Brushes.Black, lPos, yPos) yPos += lineHeight * 2 'Reset the left margin lPos = e.MarginBounds.Left In this case, you are simply drawing the words List Report using the font chosen as the headerFont (in this case, a 24-point Arial font in bold) with a black brush and the position specified. Then you increase your horizontal position on the page by adding the height of the line you just printed to your current location. Next, you add a slight indent to the page to print the report type because the alignment is slightly off. Then, you draw the report title using the printFont font. Next you move down horizontally on the page by the equivalent of two lines in height and you reset the left position to be equal to that of the left page margin.
The following block of code prints your column captions in the chosen font. After each column header is printed, the vertical position increases by 1.5 inches (this equates to about 20 characters):
'Print the header columns For i = 0 To lvwList.Columns.Count - 1 e.Graphics.DrawString(lvwList.Columns(i).Text, titleFont, Brushes.Black, _ lPos, yPos, New StringFormat()) If i < lvwlist.Columns.Count 1 Then lPos += 150 End If Next
Listing 3-24 prints your data to the page.
Listing 3-24: Printing Your Data
'Print the data to the report For i = mintPrintCount To lvwList.Items.Count - 1 yPos += lineHeight lPos = e.MarginBounds.Left If lvwList.Items(i).Text.Length > 20 Then intLength = 20 Else intLength = lvwList.Items(i).Text.Length End If e.Graphics.DrawString(lvwList.Items(i).Text.Substring(0, intLength), _ printFont, Brushes.Black, _ lPos, yPos, New StringFormat()) For j = 1 To lvwList.Columns.Count - 1 lPos += 150 If lvwList.Items(i).SubItems(j).Text.Length > 20 Then intLength = 20 Else intLength = lvwList.Items(i).SubItems(j).Text.Length End If e.Graphics.DrawString(lvwList.Items(i).SubItems(j).Text.Substring(0, _ intLength), _ printFont, Brushes.Black, lPos, yPos, New StringFormat()) Next 'If there are more pages, continue If yPos > e.MarginBounds.Bottom Then e.HasMorePages = True Exit For Else mintPrintCount += 1 End If Next
The mintPrintCount variable starts off the loop where the last run through the procedure left off. The first line increases the line position by one line and then resets the left print position to the left margin. Then you check to see how long the text that is in the listitem that you are trying to print is. If the text is greater than 20 characters, you set the length to 20 characters. If it is fewer than 20 characters, you get the actual length of the text. Then you print the text to the page. Then you loop through the subitems.
First, you increase the vertical position by one column, then you perform a text length check again, and finally you draw the text to the page. Next, you check the horizontal position to see if you are within the bounds of the bottom margin. If you are outside the bounds of the bottom margin, set the HasMorePages to true. This instructs the print document to add another page and begin the printing process for the next page. If you have more room on the page, increase the mintPrintCount variable so that when you eventually run out of lines to print on, you know where to continue in your list of records.
Finally, you have the error handler:
Catch exc As Exception MessageBox.Show(exc.Message, "Print Error", MessageBoxButtons.OK, _ MessageBoxIcon.Error) End Try
The last thing you need to add is the ability for your inheriting classes to set the title of the report. You can best accomplish this by creating a new constructor in the frmListBase form. Add the constructor shown in Listing 3-25.
Listing 3-25: The New frmListBase Constructor
Public Sub New(ByVal ReportTitle As String) MyBase.New() 'This call is required by the Windows Form Designer. InitializeComponent() 'Add any initialization after the InitializeComponent() call mstrTitle = ReportTitle lvwColumnSorter = New ListViewColumnSorter() Me.lvwList.ListViewItemSorter = lvwColumnSorter End Sub
Once you add this to the form, you can go back and edit the frmRegionList constructor so that the MyBase.New line reads as follows:
MyBase.New("Regions") The base list form now has the ability to print any information placed in it. This only works for about five or six columns of data. After that, you will run off the printed page. However, because of the need for application speed, you will not be adding more than five or six columns to any of the list forms. This will become more apparent when you begin developing more advanced classes. Running the print routine (by clicking the Print button) produces the result shown in Figure 3-12.
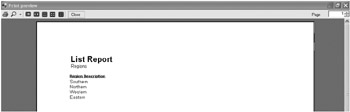
Figure 3-12: The list report
Adding Some Finishing Touches…
You need to handle the resizing of the listview columns when the form is resized. And you also add a line above the command buttons on your list form. To do this, add the code in Listing 3-26 to the frmListBase.Paint event.
Listing 3-26: The frmListBase Paint Method
Private Sub frmListBase_Paint(ByVal sender As Object, _ ByVal e As System.Windows.Forms.PaintEventArgs) Handles MyBase.Paint Dim i As Integer 'Resize the columns in the listview For i = 0 To lvwList.Columns.Count - 1 lvwList.Columns.Item(i).Width = CInt((lvwList.Size.Width / _ lvwList.Columns.Count) - 6) Next 'Clear the line that we drew previously Me.CreateGraphics.Clear(Me.BackColor) 'Draws the line above the buttons Me.CreateGraphics.DrawLine(New Pen(Color.Black, 1), _ lvwList.Location.X, btnDelete.Location.Y - 10, _ lvwList.Location.X + lvwList.Size.Width, _ btnDelete.Location.Y - 10) End Sub
Next you need to set the tab order for the form. In .NET this is a simple matter. Switch to the design view of frmListBase, then select View Tab Order from the main menu, and set the tab order as shown in Figure 3-13.
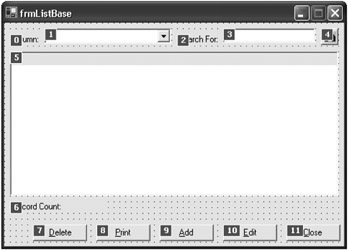
Figure 3-13: List base tab order
Finally, set the CancelButton property of the form to btnClose.
Next you need to group your buttons and context menus so they can be easily used by the forms that are going to inherit from this form. And you need to implement the Close button functionality.
The code to close the form is simple. Add this code to the frmListBase form:
Private Sub btnClose_Click(ByVal sender As Object, _ ByVal e As System.EventArgs) Handles btnClose.Click Close() End Sub
Add the following code for the btnAdd button click event:
Protected Overridable Sub AddButton_Click(ByVal sender As Object, _ ByVal e As System.EventArgs) Handles btnAdd.Click End Sub
Note here that you have made this routine Protected and Overridable so that it can be overridden by forms that inherit from this form.
| Tip | Technically, you should set this method as MustOverride because you are not actually implementing any functionality. However, because of the nature of visual inheritance, it is impossible for .NET to display an inherited form unless all of the MustOverride methods are overridden. It is easier to use the Overridable keyword. |
Add the following blocks of code to handle the Delete button and the Edit button click events (as well as the context menu versions of these buttons):
Protected Overridable Sub DeleteButton_Click(ByVal sender As Object, _ ByVal e As System.EventArgs) Handles btnDelete.Click, ctmDelete.Click End Sub Protected Overridable Sub EditButton_Click(ByVal sender As Object, _ ByVal e As System.EventArgs) Handles btnEdit.Click, ctmEdit.Click, _ lvwList.DoubleClick End Sub
Notice that each of these events handles the button click and the context menu click. Additionally, the EditButton_Click method handles the listview double-click event. This is possible because the same method signature is used for both events. At this point you have a fully working form that can display a list of information from the database and can print this list. You can search through the listview for a piece of information, and you can select that information and ensure that it is visible in the listview window. You can resize the form, and you can close the form. And all it took is 374 lines of code, with 200 of those lines having been generated by the .NET Framework!
This functionality never needs to be implemented ever again. That is the real power of what you have implemented so far. And if the user wants to see a change in the interface, you only need to make the change in the base form and it instantly spreads to all of the forms that inherit from the base form.
Now you need to add the functionality to add and edit your regions.
| Note | You need to add this functionality before you test the delete functionality because of the referential integrity that currently exists within the database. Do not worry—you will get to this functionality eventually! |
Creating the Add/Edit Form
You will create a base edit form from which all of your other edit forms will inherit. As with the base list form, this form will implement some functionality that you want all of your edit forms to implement but that you do not want to write the same code for again and again. A typical edit form has a collection of textboxes, combo boxes, check boxes, and so on from which the user can make selections. Edit forms typically have OK and Cancel buttons as well. Some edit forms have Help buttons, others do not. Most support the concept of cut, copy, and paste and other standard operations. You need to code some of this functionality for every edit form; it just is not generic enough. But other things are generic enough to work with any control or layout; you will put this functionality into your base edit form.
Creating the Base Edit Form
To start, add a new form to the NorthwindTraders project and call the form frmEditBase. For the moment you are only going to add a couple of buttons and set some basic properties. You will come back and add additional functionality once you have your edit form working. When you are done adding the controls in Table 3-3, the form should look like the form in Figure 3-14.
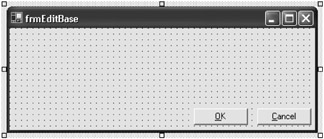
Figure 3-14: The frmEditBase form
| Control | Control Name | Control Text |
|---|---|---|
| Button | btnCancel | &Cancel |
| Button | btnOK | &OK |
Next, set the properties of the controls as shown in Table 3-4.
| Control | Property | Value |
|---|---|---|
| btnOK | Anchor | Bottom, Right |
| btnCancel | Anchor | Bottom, Right |
| btnOK | Modifiers | Protected |
| btnCancel | Modifiers | Protected |
| frmEditBase | AcceptButton | btnOK |
| frmEditBase | CancelButton | btnCancel |
| frmEditBase | FormBorderStyle | FixedSingle |
| frmEditBase | MaximizeBox | False |
| frmEditBase | MinimizeBox | False |
| frmEditBase | StartPosition | CenterParent |
| Note | When dealing with visual inheritance, you should set all of the controls to Protected. .NET exhibits some interesting behavior when it comes to resizing forms that inherit from another form (in terms of control positions). Although setting the control modifiers to Protected allows the inheriting form to modify the controls, it helps avoid several problems with the positioning of controls. |
Add the following code in frmEditBase to close the form:
Private Sub btnCancel_Click(ByVal sender As System.Object, _ ByVal e As System.EventArgs) Handles btnCancel.Click Close() End Sub
Now you have a basic, generic edit form with which you can work. Select Build Build Solution from the main menu so that you can inherit from the frmEditBase form.
Creating the Region Edit Form
In the NorthwindTraders project, add an inherited form. Call it frmRegionEdit and select frmEditBase to be the form from which it will be inheriting. Your Region object is simple in that it only has one property that you can edit—the region description—so this will be a simple form (which is always a good place to start).
| Note | As a technical architect, I have found that it is easier to have developers new to the language perform simple tasks . By having a form from which they can inherit, they pick up the visual standards easily, and they can examine the base form to see some coding standards that are in use throughout the application. Too often I have seen projects take the new guys, who know little about anything, and throw them into the deep end of the application. Building them up a little at a time allows them to become grounded in the application standards. |
Change the form text to read Region [Detail] and then add a label and a textbox to the frmRegionEdit form, with the properties shown in Table 3-5.
Make sure when you are placing the label and the textbox on the form that you leave about a quarter inch of space between the label and the textbox. You will not use this space now, but you will take advantage of it in Chapter 5, "Building Business Objects." When you are done, your form should look like the form in Figure 3-15.
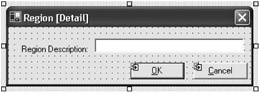
Figure 3-15: Region edit form
Normally you should set the tab order, in relation to the buttons, so that the OK button gets the focus before the Cancel button. However, because you only have one textbox on this form, that will prove to cause a problem later. So for this particular form, you will set the tab order according to Table 3-6.
| Control | Tab Order |
|---|---|
| lblRegionDescription | 0 |
| txtRegionDescription | 1 |
| btnOK | 3 |
| btnCancel | 2 |
Implementing the Edit Form
Now it is time to implement the form. Go to the code module of the frmRegionList form. Add two module-level variables to the frmRegionList class—one for the edit form and another for the region class—as in the following:
Private WithEvents mfrmEdit As frmRegionEdit Private WithEvents mobjRegion As Region
Next, from the Class Name drop-down, select the (Overrides) entry. This provides you with a list of all of the methods that your form can override. From the list, select the AddButton_Click method. Now modify the AddButton_Click method to look like method in Listing 3-27.
Listing 3-27: The AddButton_Click Method
Protected Overrides Sub AddButton_Click(ByVal sender As Object, _ ByVal e As System.EventArgs) If mfrmEdit Is Nothing Then Cursor = Cursors.WaitCursor mobjRegion = New Region() mfrmEdit = New frmRegionEdit(mobjRegion) mfrmEdit.MdiParent = Me.MdiParent mfrmEdit.Show() Cursor = Cursors.Default End If End Sub
This code checks to see if the mfrmEdit variable has been instantiated, and, if it has not been instantiated, you instantiate it and display it after passing in a reference to the mobjRegion variable. You only want to have one edit form open at a time.
| Note | This is basically a design issue. For forms that maintain simple lists of information, users rarely need to have more than one form open at a time. When you build more complicated parts of an application that require side-by-side comparisons, then this method will not work. But why deal with the complexity when you do not have to? |
For the moment, this generates a syntax error for frmRegionEdit(mobjRegion). This is because you have not altered the constructor for the frmRegionEdit form yet, but you will do that in a moment. When you do alter it, you will be passing in the mobjRegion variable ByRef. your list form needs to know that a region has been added or edited so that you can update the list (and the manager class) appropriately. Next, select mfrmEdit from the Class Name drop-down list and select the Closed method from the Method Name drop-down list. In the Closed method, add the single line of code to make it appear like the following code:
Private Sub mfrmEdit_Closed(ByVal sender As Object, _ ByVal e As System.EventArgs) Handles mfrmEdit.Closed mfrmEdit = Nothing End Sub
You are simply setting the mfrmEdit variable to Nothing because even though the frmRegionEdit form may have been closed by way of the edit form, your list form still has a reference to it, so it is not removed from memory until you make this call. Next, select the mobjRegion entry from the Class Name drop-down, and select ObjectChanged from the Method Name drop-down. Edit the method so that it looks like Listing 3-28.
Listing 3-28: The ObjectChanged Method
Private Sub mobjRegion_ObjectChanged(ByVal sender As Object, _ ByVal e As NorthwindTraders.NorthwindUC.ChangedEventArgs) Handles _ mobjRegion.ObjectChanged Dim lst As ListViewItem Dim objRegion As Region = CType(sender, Region) Select Case e.Change Case ChangedEventArgs.eChange.Added mobjRegionMgr.Add(objRegion) lst = New ListViewItem(objRegion.RegionDescription) lst.Tag = objRegion.RegionID lvwList.Items.Add(lst) lblRecordCount.Text = "Record Count: " & lvwList.Items.Count Case ChangedEventArgs.eChange.Updated For Each lst In lvwList.Items If Convert.ToInt32(lst.Tag) = objRegion.RegionID Then lst.Text = objRegion.RegionDescription Exit For End If Next End Select End Sub
If the region has been added, you simply add the Region object to the manager, and then you add the item to the listview and reset the record count. If the region has been updated, you need to loop through the listview looking for the item that was updated. Once you find it, you update the text to be equal to the new value of RegionDescription.
Switch to the frmRegionEdit code module and add the following Imports statement:
Imports NorthwindTraders.NorthwindUC
Add the following declaration to the frmRegionEdit class:
Private mobjRegion As Region
Next, alter the constructor so that it reads as follows:
Public Sub New(ByRef objRegion As Region) MyBase.New() 'This call is required by the Windows Form Designer. InitializeComponent() 'Add any initialization after the InitializeComponent() call mobjRegion = objRegion End Sub
Your constructor now accepts an object of type Region ByRef so that any events raised by your object can be reported back to the list form. Add the code in Listing 3-29 to the frmRegionEdit form.
Listing 3-29: The frmRegionEdit_Load Method
Private Sub frmRegionEdit_Load(ByVal sender As Object, _ ByVal e As System.EventArgs) Handles MyBase.Load If mobjRegion.RegionID > 0 Then txtRegionDescription.Text = mobjRegion.RegionDescription.Trim End If End Sub
First you check to see if the ID is greater than zero. If it is, then the object actually contains some information, so you should load your form. Otherwise, you need to skip this code because it will cause errors when you try to assign Nothing to the text property of the textbox. You should note that you need to call the Trim method on the region description because the database field is set up as an nchar field.
| Note | I have never been able to figure out why the Northwind database is set up in the fashion that it is. In the case of the RegionDescription field, this field should be a varchar field—and, in most cases, character fields should be varchar fields. They take up less space in the database, and it alleviates the need to trim all of the strings. The only real reason to use a char field is when the value will always be the same length. |
| Tip | The n in front of a variable type in SQL Server indicates that the value will be stored as a Unicode value. This is crucial for international applications or for any applications that will hold characters from a character set other than the default character set on the machine. |
At this point, you should be able to run the application and click the Add button while on the frmRegionList form. This should open your edit form, albeit empty at this point. Go back to the frmRegionList form, select the (Overrides) option from the Class Name drop-down, and select the EditButton_Click method from the Method Name drop-down list. Edit this method so that it looks like the method shown in Listing 3-30.
Listing 3-30: The EditButton_Click Method
Protected Overrides Sub EditButton_Click(ByVal sender As Object, _ ByVal e As System.EventArgs) If mfrmEdit Is Nothing Then If lvwList.SelectedItems.Count > 0 Then mobjRegion = mobjRegionMgr.Item(lvwList.SelectedItems(0).Tag) mobjRegion.LoadRecord() mfrmEdit = New frmRegionEdit(mobjRegion) mfrmEdit.MdiParent = Me.MdiParent mfrmEdit.Show() End If End If End Sub
First you are checking to see if the edit form has already been instantiated. If it has not been, you get a reference to the region that the user selected. Next you check to see if the user has selected an item to edit; if they have, then you call the LoadRecord routine, which refreshes the data from the database to ensure that the user is editing the latest record.
| Note | For the moment, this does not seem smart. You already have the data in memory, why load it again? When you get to some of the larger objects for which you will only partially instantiate them, this LoadRecord method will be the only way you have of getting all of the information about an object from the database. |
You then instantiate the edit form and pass it in the fully loaded Region object.
Saving the Object's Changes
Now you can open the form in an edit or add mode; it is time to actually be able to add records and edit records. Before you can save a record, you have to be able to update the object with information from the form. You do this in the Validated event for each of the controls. In this case you are working with only one control, the txtRegionDescription textbox, so you only need one method. Add this method and the OK button click method, as shown in Listing 3-31, to the frmRegionEdit form.
Listing 3-31: The txtRegionDescription_Validated Method
Private Sub txtRegionDescription_Validated(ByVal sender As Object, _ ByVal e As System.EventArgs) Handles txtRegionDescription.Validated Dim txt As TextBox txt = CType(sender, TextBox) mobjRegion.RegionDescription = txt.Text End Sub Private Sub btnOK_Click(ByVal sender As System.Object, _ ByVal e As System.EventArgs) Handles btnOK.Click If mobjRegion.IsDirty Then mobjRegion.Save() End If Close() End Sub
The txtRegionDescription.Validated event occurs just before the control loses focus. At this point you are just setting the RegionDescription property of the object with the value in the textbox. In later chapters you will modify this behavior. The btnOk.Click event checks to see if the object is dirty. If it is, you call the Save method on the object and the value saves to the database. Then the form closes.
Deleting an Object
At this point, the edit form is working, and you can add and edit values in the region form. The last thing you need to implement before moving on is the ability to delete a region. In the code module for the frmRegionList form, select the (Overrides) entry from the Class Name drop-down list and then select the DeleteButton_Click method from the Method Name drop-down. Edit the DeleteButton_Click method so that it looks like the method in Listing 3-32.
Listing 3-32: The DeleteButton_Click Method
Protected Overrides Sub DeleteButton_Click(ByVal sender As Object, _ ByVal e As System.EventArgs) Dim objRegion As Region Dim dlgResult As DialogResult If lvwList.SelectedItems.Count > 0 Then objRegion = mobjRegionMgr.Item(lvwList.SelectedItems(0).Tag) dlgResult = MessageBox.Show("Do you want to delete the " _ & objRegion.RegionDescription & " region?", _ "Confirm Delete", MessageBoxButtons.YesNo, MessageBoxIcon.Question) If dlgResult = DialogResult.Yes Then objRegion.Delete() mobjRegionMgr.Remove(objRegion.RegionID) lvwList.SelectedItems(0).Remove() lblRecordCount.Text = "Record Count: " & lvwList.Items.Count End If End If End Sub First you check to see if an object has been selected, and if one has, then you get a reference to the selected item in the listview. Then you check to see if the user really wanted to delete the object. If they do, then you call the Delete method on the Region object. This is the actual call that will delete the object from the database. Next you remove the Region from the RegionMgr object. Then you remove the item from the listview and reset the record count.
Now you can add, edit, and delete records from the database. However, if you try to delete one of the original values, you will get a SQL Exception error. Do not worry about this yet; you will handle it in the next chapter, which covers error handling in an enterprise application.
EAN: 2147483647
Pages: 148