Organizing Your Correspondence
A mail program is more than just a way to read and write messages, it is also a filing system. Over time, the records of your correspondence may become a valuable asset. Although you can leave all of your mail in your Inbox, it's a lot easier to find messages if you file messages by sender or topic.
Windows Mail allows you to create folders and move messages from one folder to another.
Working with Folders
The Windows Mail filing system resembles the filing system that Windows itself uses, but the Windows Mail files and folders can't be seen by other programs (see Chapter 8)-you must use Windows Mail to manipulate them.
Creating and Deleting Folders
To create a new folder in Windows Mail:
-
Click the Local Folders icon in the folder list.
-
Select either File Folder New or File New Folder. The Create Folder window opens.
-
Type the name of your folder in the Folder Name line.
-
In the bottom half of the Create Folder window, select the folder into which you want to place the new folder.
-
Click OK.
To delete a folder, select it in the folder list of the Windows Mail window and select File Folder Delete.
Moving and Copying
To move or copy a message from one folder to another:
-
Select the folder that contains the message in the folder list of the Windows Mail window. You may need to expand some folders (by clicking the plus boxes in the margin) to find it.
-
Find the message in the message list and right-click it.
-
Select either Move To Folder or Copy To Folder from the right-click menu. A window appears displaying a folder list.
-
Select the folder into which you want the message moved or copied .
-
Click OK.
You can also move a message by dragging it from the message list and dropping it onto the icon of the target folder in the folder list.
To move a folder, drag-and-drop its icon on the folder list to the location you want it to be located. You can move several messages or folders at the same time by holding down the CTRL key while you select the items to move.
Finding Messages in Your Files
A filing system isn't worth much unless you can find what you put there. Windows Mail gives you a search tool that lets you search for messages based on
-
The sender
-
The recipient
-
The subject
-
A word or phrase in the message body
-
Whether the message has attachments
-
Whether the message is flagged
-
The date received
-
A folder containing the message
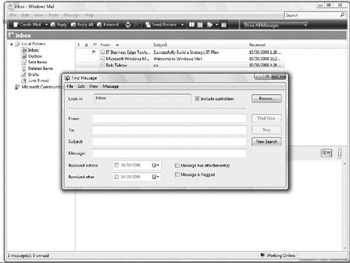
Begin your search by selecting Edit Find Message. The Find Message dialog box appears, as shown in Figure 25-7. You also can click the Find button on the toolbar and select Message. Enter as much information as you know about the message and click Find Now. Windows Mail lists at the bottom of the window all the messages that fit the description you've given. Open any message on this list by double-clicking it.

Figure 25-7: The Find Message dialog box.
Type any string of characters into the From, To, Subject, or Message lines of the Find Message dialog box. This restricts your search to messages whose corresponding parts contain those character strings.
To specify the date of a message, check either the Received Before or Received After check box. Enter a date in MM/DD/YY format into the corresponding line or click the drop-down arrow to locate the date you want on a calendar. (Change months on the calendar by clicking the left or right arrows at the top of the calendar.) You can use Before and After together to specify a range of dates.
The Look In box specifies a folder in which to search. Click the Browse button to locate a new folder to look in. The Include Subfolders check box does just what it says-if the box is checked, the search includes all the subfolders of the specified folder; if it is not checked, the subfolders are not included.
If the message you wanted didn't show up, check the View Current View menu in the Find dialog box. Make sure it is set to Show All Messages.
Filtering Your Mail with Message Rules
Windows Mail can do some secretarial work to help you manage your POP e-mail messages automatically. It can do the following:
-
File messages to the appropriate folders, rather than letting them pile up in the Inbox
-
Forward messages to another e-mail address
-
Send a stock reply message
| Tip | An easy way to delete messages from a particular person automatically is to add his or her name to your Blocked Senders list (see "Blocking a Sender" later in the chapter). |
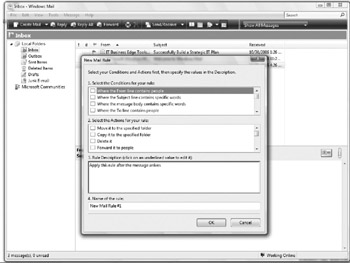
You tell Windows Mail to do these things by establishing message rules or mail rules , which specify a kind of message and a type of action to take when such a message arrives. To establish a message rule for your e-mail, select Tools Message Rules Mail. The New Mail Rule dialog box appears, shown in Figure 25-8.

Figure 25-8: Defining a new message rule.
The upper portion of the New Mail Rule dialog box lists the rules you have created. A rule is active if its check box is checked, and inactive otherwise , so turning a rule on and off is easy. The lower portion of the dialog box gives a description of the currently selected rule. Some parts of the description are underlined in blue; these are links to other dialog boxes that allow you to edit these particular portions of the rule.
The New Mail Rule dialog box has four sections.
-
Select The Conditions For Your Rule Enables you to define the messages that the rule should apply to. These conditions are vague, but you specify their details in the Rule Description section.
-
Select The Actions For Your Rule Enables you to specify what Windows Mail should do when such messages arrive . As in the first section, these actions are also vague, but are spelled out in the Rule Description section.
-
Rule Description Gives a description of the rule as you have defined it so far; when more information is needed, the description contains a placeholder phrase that is linked to a dialog box for specifying the information. Clicking these phrases opens additional dialog boxes that allow you to specify which people, which words, and what message. The word "and" is also linked; clicking it opens the And/Or dialog box, described in the next section.
-
Name Of The Rule Enables you to specify a name for your rule. Otherwise, the rule will be numbered, such as New Mail Rule #1, shown in Figure 25-8.
Defining Conditions for Message Rules
You define conditions for your message rules by checking the appropriate boxes in the Select The Conditions For Your Rule section of the New Mail Rule dialog box. As you check boxes, the text next to those boxes appears in the Rule Description section, in which you click the linked phrases to specify any additional information that the condition requires.
If you check more than one box, the conditions are connected with an "and"-in other words, all checked conditions need to be true before the action you specify is taken. You can change this "and" to an "or" by clicking an "and" in the rule description and selecting the Messages Match Any One Of The Criteria radio button. There is no way to create more complicated conditions than to mix "ands" and "ors."
You can choose from 12 conditions listed in section 1 of the New Mail Rule dialog box:
-
For All Messages The rule works on all messages.
-
Where The From Line Contains People, Where The To Line Contains People, Where The CC Line Contains People , and Where The To Or CC Line Contains People Any of these four conditions requires you to specify which people the condition applies to. Click the phrase "contains people" in the Rule Description section to display the Select People dialog box. Add people to your list either by typing their e-mail addresses into the top line and clicking the Add button, or by clicking the Address Book button and selecting them from your address book. By default, the rule applies to a message in which any of the selected people are included in the specified line. You can require that the condition apply only if all of the people are included or if none of the people are included by clicking the Options button and choosing the appropriate radio button in the Rule Condition Options dialog box.
-
Where The Subject Line Contains Specific Words and Where The Message Body Contains Specific Words Either of these conditions requires you to specify which words or phrases the rule is looking for. Click the phrase "contains specific words" in the Rule Description section. When the Type Specific Words dialog box appears, type a word or phrase and click the Add button. If you specify more than one word or phrase, click the Options button to specify whether all words/phrases must be present or just one of them.
-
Where The Message Is Marked As Priority, Where The Message Is From The Specified Account, Where The Message Size Is More Than Size , Where The Message Has An Attachment , and Where The Message Is Secure These five conditions require you to specify which priority, which account, what size, and what kind of security. Click the highlighted phrase in the Rule Description section and choose the appropriate radio button from the dialog box that appears.
Specifying Actions for Message Rules
By setting conditions in the Select The Conditions For Your Rule section of the New Mail Rule dialog box, you have picked out a particular class of messages. Now you need to tell Windows Mail what to do with those messages by filling out the Select The Actions For Your Rule section. Select actions by checking the check boxes. You may select as many actions as you like. You have 12 choices:
-
Move It To The Specified Folder or Copy It To The Specified Folder Either of these actions requires you to specify a folder to put the message into. Click the word "specified" in the Rule Description section and choose a folder from the dialog box that appears.
-
Forward It To People This action requires you to specify which people to forward the message to. Click the word "people" in the Rule Description section and enter an e-mail address into the Select People dialog box, or click the Contacts button to choose an address from Windows Contacts.
-
Delete It, Flag It, Mark It As Read, Do Not Download It From The Server , and Delete It From The Server These actions are self-explanatory. No highlighted words or phrases appear in the Rule Description.
Tip Test a Delete rule using the Flag It action first to verify the rule works as expected. If the rule works fine by flagging messages you want deleted, change the rule to the Delete It action.
-
Stop Processing More Rules If more than one rule applies to a message, the message may get processed twice, and may even be duplicated . If you find this happening, add Stop Processing More Rules to the rules that are causing the problem.
-
Highlight It With Color After you select this check box, click the word "color" in the Rule Description section and make your choice from the Select Color dialog box.
-
Mark The Message As Watched Or Ignored Click "watched or ignored" in the Rule Description section and choose the Watch Message or Ignore Message radio button. Windows Mail watches a message by displaying an icon (a pair of glasses ) by it, and ignores a message by flagging it with the international "forbidden" icon.
-
Reply With Message This action requires you to tell it which message to use as your automatic reply. Click the word "message" and identify a message file when the Open dialog box appears. (Prior to defining the rule, you should compose your reply and select File Save As to save it as an EML file.)
Blocking a Sender
You can't stop annoying people or organizations from writing to you, but you can have Windows Mail send their e-mail messages straight to the Deleted Items folder or refuse to display their newsgroup messages. Make this happen by adding their names to the Blocked Senders list as follows :
-
Select Tools Junk E-mail Options from the Windows Mail menu bar. The Junk E-mail Options dialog box appears.
-
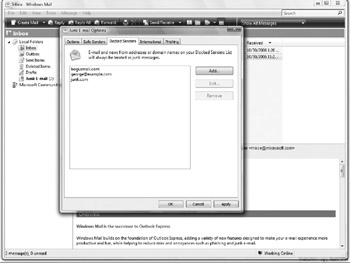
Click the Blocked Senders tab, shown in Figure 25-9.

Figure 25-9: Blocking a few selected senders can lower your blood pressure. -
Click the Add button. The Add Address Or Domain dialog box appears.
-
Enter the e-mail address that you want to block in the Address field. If you want to block all messages from an entire Internet domain (the part of the address after the @), type only the domain name.
-
Click OK. The Blocked Senders list now includes the new entry, with check boxes that say whether the blocking applies to the sender's e-mail or newsgroup messages.
| Tip | Spammers keep changing names and addresses, so adding them to the Blocked Senders list will work only once and eventually you'll fill up the Blocked Senders list. Use the Blocked Senders list to block addresses that regularly send you mail, such as from mailing lists that you cannot seem to get unsubscribed from or from an annoying Internet acquaintance who forwards you a lot of junk. |
Remove a sender from your Blocked Senders list by choosing Tools Junk E-mail Options Blocked Senders List tab, select the sender in the Message Rules dialog box, and click the Remove button.
Managing Your Message Rules
All your message rules are listed by name in the upper section of the Message Rules dialog box. Windows Mail only applies rules whose check boxes are checked, so you can turn rules on and off easily by checking or unchecking their boxes. When you click a rule's name, its description appears in the Rule Description section of the dialog box. You can edit any of the highlighted phrases in the rule description, or you can rewrite the rule completely by clicking the Modify button. The Edit Mail Rule dialog box appears; it behaves in the same manner as the New Rule dialog box.
You can put the rules into a different order by selecting rules in the Message Rules dialog box and clicking the Move Up or Move Down button. To get rid of a rule completely, select its name and click Remove.
Using Message Rules to Sort Old Messages
Message rules are applied automatically to new messages as they arrive, but you can also apply message rules to the messages stored in a folder. This technique can help you organize your correspondence. To do this:
-
Define a rule as described in the earlier section "Filtering Your Mail with Message Rules," or identify an already-defined rule that you want to apply.
-
If the Message Rules dialog box is not already open, select Tools Message Rules Mail to make it appear.
-
Select the rule you want to apply.
-
Click the Apply Now button. The Apply Mail Rules Now dialog box opens.
-
Select the folder that the rule should be applied to. Inbox is the default, but if you want to apply the rule to a different folder, you can click the Browse button and find the folder you want.
-
Click the Apply Now button. Windows Mail opens a confirmation box to tell you when it has finished.
EAN: 2147483647
Pages: 296