Creating Client-Side Imagemaps
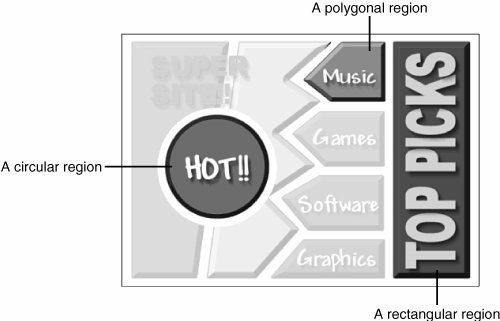
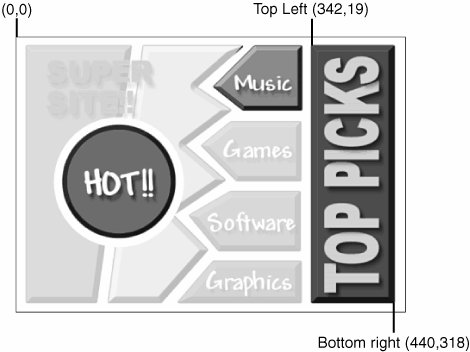
| As mentioned previously, client-side imagemaps offer several improvements over serverside imagemaps. The most significant improvement is that the link doesn't need to be processed on the server. All modern browsers process the imagemap locally on the users' computers. Getting an ImageTo create an imagemap, you'll need an image (of course). This image will be the most useful if it has several discrete visual areas that can be selected individually. For example, use an image that contains several symbolic elements or that can be easily broken down into polygons. Photographs generally don't make good imagemaps because their various elements tend to blend together or are of unusual shapes. Figures 7.18 and 7.19 show examples of good and poor images for imagemaps. Figure 7.18. A good image for an imagemap. Figure 7.19. A not-so-good image for an imagemap. Determining Your CoordinatesClient-side imagemaps consist of two parts; the first is the image used for the imagemap. The second is the set of HTML tags used to define the regions of the imagemap that serve as links. To define these tags, you must determine the exact coordinates on your image that define the regions you'll use as links. You can determine these coordinates either by sketching regions and manually noting the coordinates or by using an imagemap creation program. The latter method is easier because the program automatically generates a map file based on the regions you draw with the mouse. The Mapedit program for Windows, Linux, and the Mac OS can help you create clientside imagemaps. (See Appendix A, "Sources for Further Information," for a full list of related FTP sites.) In addition, many of the latest WYSIWYG editors for HTML pages and web graphics enable you to generate imagemaps. Table 7.1 lists the current tools for generating imagemaps.
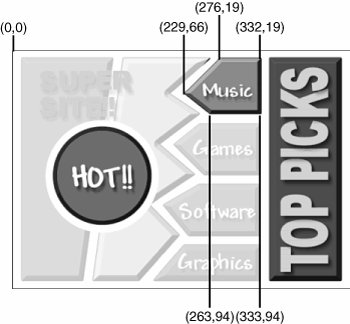
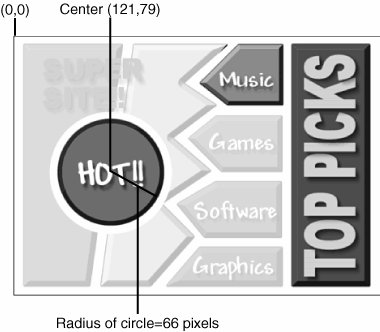
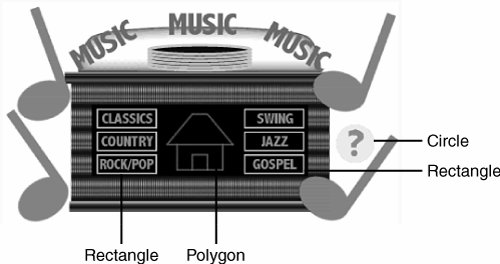
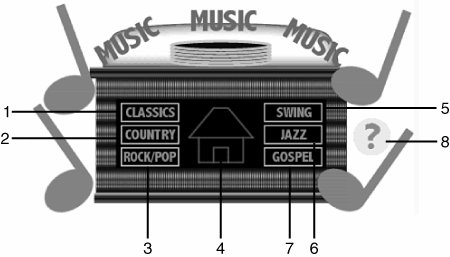
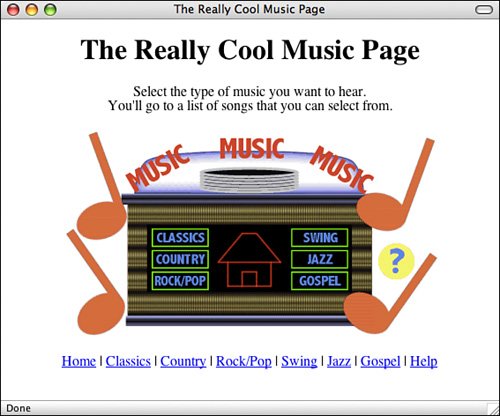
If you must create your imagemaps by hand, here's how. First, make a sketch of the regions that will be active on your image. Figure 7.20 shows the three types of shapes that you can specify in an imagemap: circles, rectangles, and polygons. Figure 7.20. There are three types of shapes available for creating imagemaps. You next need to determine the coordinates for the endpoints of those regions. Most image-editing programs have an option that displays the coordinates of the current mouse position. Use this feature to note the appropriate coordinates. (All the mapping programs mentioned previously will create a map file for you, but for now, following the steps manually will help you better understand the processes involved.) Defining a PolygonFigure 7.21 shows the x,y coordinates of a polygon region. These values are based on their positions from the upper-left corner of the image, which is coordinate 0,0. The first number in the coordinate pair indicates the x value and defines the number of pixels from the extreme left of the image. The second number in the pair indicates the y measurement and defines the number of pixels from the top of the image. Figure 7.21. Getting the coordinates for a polygon. Note The 0,0 origin is in the upper-left corner of the image, and positive y is down. Defining a CircleFigure 7.22 shows how to get the coordinates for circles. Here you note the coordinates for the center point of the circle and the radius, in pixels. The center point of the circle is defined as the x,y coordinate from the upper-left corner of the image. Figure 7.22. Getting the coordinates for a circle. Defining a RectangleFigure 7.23 shows how to obtain coordinates for rectangle regions. Note the x,y coordinates for the upper-left and lower-right corners of the rectangle. Figure 7.23. Getting the coordinates for a rectangle. The <map> and <area> TagsIf you're creating your imagemap manually and you've written down all of the coordinates for your regions and the URLs they'll point to, you can include this information in the client-side imagemap tags on a web page. To include a client-side imagemap inside an HTML document, use the <map> tag, which looks like the following: <map name="mapname"> coordinates and links </map> The value assigned to the name attribute is the name of this map definition. This is the name that will be used later to associate the clickable image with its corresponding coordinates and hyperlink references. So, if you have multiple imagemaps on the same page, you can have multiple <map> tags with different names. Between the <map> and the </map> tags, enter the coordinates for each area in the imagemap and the destinations of those regions. The coordinates are defined inside yet another new tag: the <area> tag. To define a rectangle, for example, you would write the following: <area shape="rect" coords="41,16,101,32" href="test.html">The type of shape to be used for the region is declared by the shape attribute, which can have the values rect, poly, circle, and default. The coordinates for each shape are noted using the coords attribute. For example, the coords attribute for a poly shape appears as follows: <area shape="poly" coords="x1,y1,x2,y2,x3,y3,...,xN,yN" href="URL">Each x,y combination represents a point on the polygon. For rect shapes, x1,y1 is the upper-left corner of the rectangle, and x2,y2 is the lower-right corner: <area shape="rect" coords="x1,y1,x2,y2" href="URL">For circle shapes, x,y represents the center of a circular region of size radius: <area shape="circle" coords="x,y,radius" href="URL">The default shape is different from the othersit doesn't require any coordinates to be specified. Instead, the link associated with the default shape is followed if the user clicks anywhere on the image that doesn't fall within another defined region. Another attribute you need to define for each <area> tag is the href attribute. You can assign href any URL you usually would associate with an <a> link, including relative pathnames. In addition, you can assign HRef a value of "nohref" to define regions of the image that don't contain links to a new page. Note When you're using client-side imagemaps with frames, you can include the target attribute inside an <area> tag to open a new page in a specific window, as in this example: <area shape="rect" coords="x1,y1,x2,y2" href="URL" target= "window_name">You need to include one more attribute in HTML 4.01. Earlier in this lesson, you learned how to specify alternate text for images. In HTML 4.01, the alt attribute is an additional requirement for the <area> tag that displays a short description of a clickable area on a client-side imagemap when you pass your cursor over it. Using the <area> example that I cited, the alt attribute appears as shown in the following example: <area shape="rect" coords="41,16,101,32" href="test.html" alt="test link"> The usemap AttributeAfter you've created your <map> tag and defined the regions of your image using <area> tags, the next step is to associate the map with the image. To do so, the usemap attribute of the <img> tag is used. The map name that you specified using the name attribute of the <map> tag, preceded by a #, should be used as the value of the usemap attribute, as shown in this example: <img src="/books/2/631/1/html/2/image.gif" usemap="#mapname">Note The value assigned to usemap is a standard URL. This is why mapname has a pound symbol (#) in front of it. As with links to anchors inside a web page, the pound symbol tells the browser to look for mapname in the current web page. If you have a very complex imagemap, however, you can store it in a separate HTML file and reference it using a standard URL. Task: Exercise 7.3. A Clickable Jukebox
|


EAN: 2147483647
Pages: 305