The DrugHistory Application
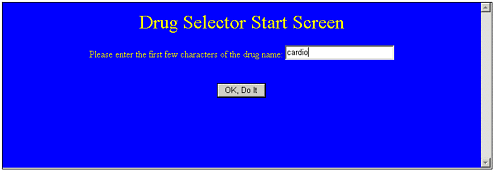
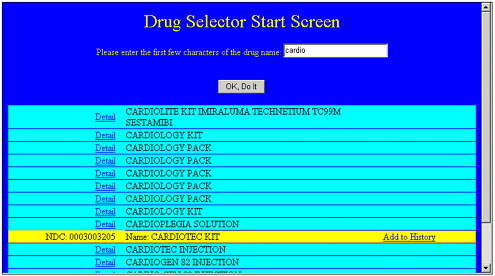
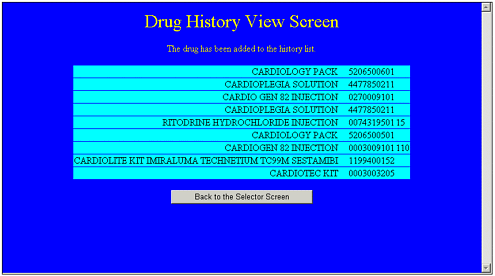
| To demonstrate the use of a DataList control, I have created an application that uses the DataList control. It enables users to search for pharmaceuticals . Users can then select a drug and see some details on it. When the drug is selected, an option enables users to add that particular drug to their drug histories. Users can then keep track of the drugs that they are currently taking. Two database tables are at work in this application. One table contains information that lists pharmaceutical products. The other table saves information for users so that they can keep track of the drugs they are currently taking. The first part of the application is simple. The user is presented with a text box into which they can type a drug or a partial drug name . When they click on the button, the database is queried and all matches are found and listed in a DataList object. You can see the starting screen in Figure 10.5. Figure 10.5. Users first must search the database for matches to what they type in. After they click the button, any matches found in the database are shown in a DataList object. Another button enables them to see details about any given pharmaceutical product. They simply click on the Detail button, and the details are shown for that row. You can see the details shown for one row in Figure 10.6. Note that an Add to History button has appeared. Figure 10.6. The row selected here gives details, and a button offers users the capability to add selections to their histories by selecting a drug. If they click the Add to History button, they are brought to a second screen in which they can see everything that has been inserted into the history to this point. The history data is displayed in a DataList object. You can see this in Figure 10.7. Figure 10.7. The user's history can be seen here in a DataList . The code for this application can be seen in Listings 10.3 through 10.6. I will go through each listing now and explain them. Listing 10.3 contains the code that is used in the main screen to determine the appearance of the DataList control. If you look at it, you can see that it starts off very simply with the DataList object. The next thing you will notice is the ItemTemplate. The ItemTemplate, though, includes a lot of extra code that formats the table so that its appearance is nice. Each column width is specifically set, the alignment is set when it makes a difference, and the row color is set. The next thing you will notice is a SelectedItemStyle template. This sets the background color of any selected item to light green. You will then see a SelectedItemTemplate. This is the template that the DataList control uses to determine how the data is rendered to the screen when the item is selected. And finally, the DataList control is closed with a closed tag. Listing 10.3 The Presentation Code (in the .aspx File) for the Main DrugHistory Screen<asp:DataList id="DataList1" runat="server" Width="100%"> <ItemTemplate> <tr bgcolor="cyan"> <td width="25%" align="right"> <asp:LinkButton id="Linkbutton1" Text="Detail" CommandName="select" runat="server" /> </td> <td width="55%"> <%# DataBinder.Eval(Container, "DataItem.Name") %> </td> <td width="20%"> </td> </tr> </ItemTemplate> <SelectedItemStyle BackColor="lightgreen"></SelectedItemStyle> <SelectedItemTemplate> <tr bgcolor="yellow"> <td width="25%" align="right"> NDC: <asp:Label id="Label1" Text='<%# DataBinder.Eval(Container, "DataItem.NDC") %>' runat="server" /> </td> <td width="55%"> Name: <asp:Label id="Label3" Text='<%# DataBinder.Eval(Container, "DataItem.Name") %>' runat="server" /> </td> <td width="20%"> <a href='WebForm2.aspx?NDC=<%# DataBinder.Eval(Container,"DataItem.NDC")%>'> Add to History</a> </td> </tr> </SelectedItemTemplate> </asp:DataList> Listing 10.4 contains the C# code that operates behind the scenes to control the application's behavior. The Button1_Click() method is fairly straightforward. It simply queries the database with the string that the user has typed in. This returns a recordset containing items that match the user's input. After the recordset has been retrieved, it is bound to the DataList control. The next method that you will see is the DataList1_SelectedIndexChanged() method. This method starts off by getting the DataList control that has fired off the SelectIndexChanged event. It does this by declaring a DataList object and then casting it to the Sender parameter that was passed into this method. The next line retrieves the selected index. (I am not using this selected index in this method actually because I don't need it, but I have that code there so you can see how you would retrieve the selected index should you need it.) What follows is some straightforward database code. It creates a connection, creates a query, executes the query, and then data binds the recordset to the DataList . The last thing that happens in this method is that the name of the selected drug is extracted from the Label3 control. This drug name is then set into Label2 , which appears at the bottom of the screen. Listing 10.4 The C# Code that Shows the Code Used to Bind Data to the DataList Control in the Main Screen private void Button1_Click(object sender, System.EventArgs e) { String strConnectString = "user id=sa;password=;initial catalog=Drugs;data source=localhost"; SqlConnection myConnection = new SqlConnection(strConnectString); myConnection.Open(); SqlCommand myCommand = new SqlCommand( "select * from DrugList where Name like '" + TextBox1.Text + "%'", myConnection ); SqlDataReader myReader; myReader = myCommand.ExecuteReader(); DataList1.DataSource = myReader; DataList1.DataBind(); myConnection.Close(); } private void DataList1_SelectedIndexChanged(object sender, System.EventArgs e) { DataList dl = (DataList) sender; int nSelectedItem = dl.SelectedIndex; String strConnectString = "user id=sa;password=;initial catalog=Drugs;data source=localhost"; SqlConnection myConnection = new SqlConnection(strConnectString); myConnection.Open(); SqlCommand myCommand = new SqlCommand( "select * from DrugList where Name like '" + TextBox1.Text + "%'", myConnection ); SqlDataReader myReader; myReader = myCommand.ExecuteReader(); DataList1.DataSource = myReader; DataList1.DataBind(); myConnection.Close(); Label TempLabel = (Label) dl.SelectedItem.FindControl( "Label3" ); string strSelectedName = TempLabel.Text; Label2.Text = strSelectedName; } The code in Listing 10.5 is the DataList that is used to display the user's history. Actually, two methods are called even before the DataList . The first is the GetDrugInfo() method, which is used to obtain the drug name that the user is adding. The GetDrugInfo() method can retrieve the drug name and all the other information about the drug because the NDC number of the selected drug was passed in as a query parameter when this page was called up. The GetDrugHistory() method simply does a database query, or calls code behind an .aspx page that does a database query, and retrieves the history for this user. Then the DataList code follows, and it is a straightforward rendering. Listing 10.5 The Presentation Code (in the .aspx File) for the Screen in Which Users Can View Their Histories<P align="center"> <FONT color="yellow" size="6">Drug History View Screen</FONT> </P> <P align="center"> <FONT color="yellow">The drug <%GetDrugInfo();%> has been added to the history list.</FONT> </P> <P align="center"> <%GetDrugHistory();%> <asp:DataList id="DataList1" runat="server"> <ItemTemplate> <tr bgcolor="cyan"> <td align="right"> <%# DataBinder.Eval(Container, "DataItem.Name") %> </td> <td> <%# DataBinder.Eval(Container, "DataItem.NDC") %> </td> <td> <%# DataBinder.Eval(Container, "DataItem.Strength") %> </td> </tr> </ItemTemplate> </asp:DataList> </P> <p align="center"> <asp:Button id="Button1" runat="server" Text="Back to the Selector Screen"></asp:Button> </p> The code in Listing 10.6 is fairly straightforward. The first method that you see is Button1_Click() . This sends the user back to the main page. The AddHistoryRecord() method is used to add whatever drug was selected into the user's history database. It creates a connection, it creates a SQL string, and then executes the SQL command. The GetHistory() method performs a SQL select command from the drug history info table to get all records that have been stored in that table. It then binds these records to the DataList object. The GetDrugInfo() method takes the NDC number that was passed as a query string and retrieves all the other information about that particular drug so that it can be displayed in the main page. It creates a query string, executes the query, and then sets three string variables to the relevant values. These three string variables then are passed into the AddHistoryRecord() method, where they are stored in the database. Listing 10.6 The C# Code that Shows the Code Used to Bind Data to the DataList Control in the User History Screen private void Button1_Click(object sender, System.EventArgs e) { Response.Redirect( "WebForm1.aspx" ); } public void AddHistoryRecord( string strName, string strNDC, string strStrength ) { String strConnectString = "user id=sa;password=;initial catalog=UserDrugHist;data source=localhost"; SqlConnection myConnection = new SqlConnection(strConnectString); myConnection.Open(); string strSql = "insert into DrugHistoryInfo (Name,NDC,Strength,UserID) VALUES ('" + strName + "','" + strNDC + "','" + strStrength + "',1)"; SqlCommand myCommand = new SqlCommand( strSql, myConnection ); myCommand.ExecuteNonQuery(); } public void GetDrugHistory() { String strConnectString = "user id=sa;password=;initial catalog=UserDrugHist;data source=localhost"; SqlConnection myConnection = new SqlConnection(strConnectString); myConnection.Open(); SqlCommand myCommand = new SqlCommand( "select * from DrugHistoryInfo", myConnection ); SqlDataReader myReader; myReader = myCommand.ExecuteReader(); DataList1.DataSource = myReader; DataList1.DataBind(); } public void GetDrugInfo() { String strConnectString = "user id=sa;password=;initial catalog=Drugs;data source=localhost"; SqlConnection myConnection = new SqlConnection(strConnectString); myConnection.Open(); SqlCommand myCommand = new SqlCommand( "select * from DrugList where NDC = '" + Convert.ToString( Request.QueryString["NDC"] ) + "'", myConnection ); SqlDataReader myReader; myReader = myCommand.ExecuteReader(); String strName = ""; String strNDC = ""; String strStrength = ""; if( myReader.Read() ) { strName = myReader.GetString( 3 ); strNDC = myReader.GetString( 1 ); if( !myReader.IsDBNull( 4 ) ) { strStrength = myReader.GetString( 4 ); } } myReader.Close(); myConnection.Close(); // Now let's insert the record... AddHistoryRecord( strName, strNDC, strStrength ); } As you can see, you can easily create rich applications with the data bound controls. Creating this particular application did not take me very long, but without the data bound controls it would have taken me at least two to three times as long. This is a great example of where the data bound controls have saved me a great deal of time because they are flexible and easy to use. And they give you lots of power to do more advanced things. I plan to post more examples using data bound controls on www.UsingASP.net. Check there in the future for more examples. |
EAN: 2147483647
Pages: 233