DataList Control
DataList ControlThe DataList control is used to display data that is in some sort of collection. As with the Repeater , the DataList supports a number of templates. These can be seen in Table 10.2. The DataList control has a richer feature set than the Repeater control. It supports selecting and editing. If you use a DataList control, you must at least define an ItemTemplate. Within the ItemTemplate, you can set the attributes with which the DataList is to render the data. The other templates determine other aspects of the DataList appearance. Table 10.2. The DataList Templates
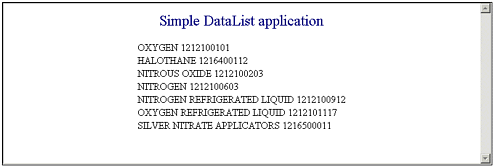
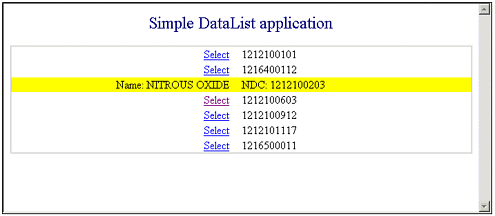
DataList objects normally render their bound data into tables. You can change the DataList output type with the RepeatLayout property. The two values that are supported are flow (where data is simply output to the HTML stream) and table (where data is rendered as a table). The following five lines of code show you how to set the DataList output type: // Set to Flow layout DataList1.RepeatLayout = RepeatLayout.Flow; // Set to Table layout DataList1.RepeatLayout = RepeatLayout.Table; You also can set the repeat direction for the DataList control. In other words, you can set in which direction the DataList sorts: horizontal or vertical. To do this, you set the RepeatDirection property to one of two values: either horizontal or vertical. The following five lines of code show you how it can be done: // Set to Horizontal DataList1.RepeatDirection = RepeatDirection.Horizontal; // Set to Vertical DataList1.RepeatDirection = RepeatDirection.Vertical; I very easily changed the ShowData application, which I created earlier in this chapter, to use a DataList rather than a Repeater control. All that was necessary was to remove the Repeater control, add a DataList control, insert an ItemTemplate into the DataList control, and alter the code that binds the data slightly so that the recordset was bound to a DataList rather than to a Repeater . The following code shows the DataList that was inserted into the .aspx code: <asp:datalist id="DataList1" runat="server"> <ItemTemplate> <%# DataBinder.Eval(Container, "DataItem.Name") %> <%# DataBinder.Eval(Container, "DataItem.NDC") %> </ItemTemplate> </asp:datalist> As I have already said, the next thing to do was to data bind to the DataList control rather than to the Repeater control. The following code shows the simple change made to switch from using a Repeater to a DataList : String strConnectString = "user id=sa;password=;initial catalog=Drugs;data source=localhost"; SqlConnection myConnection = new SqlConnection(strConnectString); myConnection.Open(); SqlCommand myCommand = new SqlCommand("select * from DrugList where NDC like '121%'", myConnection); SqlDataReader myReader; myReader = myCommand.ExecuteReader(); DataList1.DataSource = myReader; DataList1.DataBind(); myConnection.Close(); You can see the ShowData application executing in Figure 10.3. In this figure the application is using a DataList and not a Repeater . Figure 10.3. This DataList application is bound to the same data as the program shown in Figure 10.1. One of the things you might want to do to give your DataList a more attractive appearance is to add a SeparatorTemplate. A SeparatorTemplate enables you to control the look of the separation object that is between each rendered data item in the DataList . The following code uses a simple HR tag as the separator, which is inside a SeparatorTemplate: <asp:datalist id="DataList1" runat="server"> <ItemTemplate> <%# DataBinder.Eval(Container, "DataItem.Name") %> <%# DataBinder.Eval(Container, "DataItem.NDC") %> </ItemTemplate> <SeparatorTemplate> <hr> </SeparatorTemplate> </asp:datalist> To make the lines of your DataList selectable, you must add a SelectedItemTemplate to your DataList . The SelectedItemTemplate determines what a row of data will look like when it is selected. Inside the ItemTemplate you need to provide a way for users to select items. The easiest way to add the capability to select items is with a LinkButton object. If you use a LinkButton , be sure to specify the CommandName attribute as select . The following code shows how to add an ItemTemplate and a SelectedItemTemplate so that users can select a row of data in a DataList : <ItemTemplate> <asp:LinkButton id="button1" Text="Select" CommandName="select" runat="server" /> <%# DataBinder.Eval(Container, "DataItem.NDC") %> </ItemTemplate> <SelectedItemTemplate> NDC: <%# DataBinder.Eval(Container, "DataItem.NDC") %> Name: <%# DataBinder.Eval(Container, "DataItem.Name") %> </SelectedItemTemplate> If you want to be able to edit an item, you need to add an EditItemTemplate. The EditItemTemplate normally has a TextBox in which users can edit some data. Many times, EditItemTemplates also have LinkButtons , which enable them to issue some kind of command to the underlying code. The following code shows a typical ItemTemplate that can be used to edit some data in a DataList object: <EditItemTemplate> NDC: <asp:Label id="Label3" Text='<%# DataBinder.Eval(Container, "DataItem.NDC") %>' runat="server" /> Name: <asp:TextBox id="Text1" Text='<%# DataBinder.Eval(Container, "DataItem.Name") %>' runat="server" /> <asp:LinkButton id="button2" Text="Update" CommandName="update" runat="server" /> <asp:LinkButton id="button3" Text="Delete" CommandName="delete" runat="server" /> <asp:LinkButton id="button4" Text="Cancel" CommandName="cancel" runat="server" /> </EditItemTemplate> To capture a selection event from a DataList object, you must create a SelectedIndexChanged() event method. This is the method that gets fired off when the user selects an item in a DataList . In essence, everything is managed for you automatically. The control figures out which item is selected and renders it in the manner that you have specified in the SelectedItemTemplate. Look at Listing 10.1. What you should note is a method called QueryDatabase() . The QueryDatabase() method simply goes to the database, performs a query, and then binds the data to the DataList control. This method is being called from two different places. It is being called from the Page_Load() method the first time this page is loaded up. The IsPostBack property is used to make sure that the QueryDatabase() method is not called on subsequent postbacks. You also can see the QueryDatabase() method being called from the DataList 's SelectIndexChanged() method. Listing 10.1 The Complete C# Code Enabling Users to Select a Line from a DataList Control using System; using System.Collections; using System.ComponentModel; using System.Data; using System.Drawing; using System.Web; using System.Web.SessionState; using System.Web.UI; using System.Web.UI.WebControls; using System.Web.UI.HtmlControls; using System.Data.SqlClient; namespace ShowData { /// <summary> /// Summary description for WebForm1. /// </summary> public class WebForm1 : System.Web.UI.Page { protected System.Web.UI.WebControls.DataGrid DataGrid1; protected System.Web.UI.WebControls.DataList DataList1; protected System.Web.UI.WebControls.Repeater Repeater1; public WebForm1() { Page.Init += new System.EventHandler(Page_Init); } public void QueryDatabase() { String strConnectString = "user id=sa;password=;initial catalog=Drugs;data source=localhost"; SqlConnection myConnection = new SqlConnection(strConnectString); myConnection.Open(); SqlCommand myCommand = new SqlCommand( "select * from DrugList where NDC like '121%'", myConnection ); SqlDataReader myReader; myReader = myCommand.ExecuteReader(); DataList1.DataSource = myReader; DataList1.DataBind(); myConnection.Close(); } private void Page_Load(object sender, System.EventArgs e) { if( !IsPostBack ) { QueryDatabase(); } } private void Page_Init(object sender, EventArgs e) { // // CODEGEN: This call is required by the ASP.NET // Web Form Designer. // InitializeComponent(); } #region Web Form Designer generated code /// <summary> /// Required method for Designer support - do not modify /// the contents of this method with the code editor. /// </summary> private void InitializeComponent() { this.DataList1.SelectedIndexChanged += new System.EventHandler( this.DataList1_SelectedIndexChanged); // this.DataList1.ItemCommand += new System.EventHandler( this.DataList1_ItemCommand); this.Load += new System.EventHandler(this.Page_Load); } #endregion private void DataList1_SelectedIndexChanged(object sender, System.EventArgs e) { QueryDatabase(); } } } It is time now to take the DataList control in this application and make it look better. Listing 10.2 shows presentation code that gives a nicer effect than the simple code shown earlier. Listing 10.2 10.2 ”Presentation Code for the .aspx File Found in the ShowData Application<asp:DataList id="DataList1" runat="server" BorderStyle="Solid" BorderWidth="1px" Width="100%"> <SelectedItemTemplate> <tr bgcolor="yellow"> <td width="50%" align="right"> Name: <asp:Label id="Label1" Text='<%# DataBinder.Eval(Container, "DataItem.Name") %>' runat="server" /> </td> <td width="50%"> NDC: <asp:Label id="Label2" Text='<%# DataBinder.Eval(Container, "DataItem.NDC") %>' runat="server" /> </td> </tr> </SelectedItemTemplate> <ItemTemplate> <tr> <td width="50%" align="right"> <asp:LinkButton id="button1" Text="Select" CommandName="select" runat="server" /> </td> <td width="50%"> <%# DataBinder.Eval(Container, "DataItem.NDC") %> </td> </tr> </ItemTemplate> </asp:DataList> You can see this application running in Figure 10.4, where one of the lines is highlighted. Figure 10.4. This DataList application has one row selected. Datalist controls are easy to use, and even more powerful than Repeaters . You will find that they often make their way into your applications. Of all of the data bound controls, I use them the most. That's because there's a little more work to use them than the Repeater , but I often need the ability to offer users selectable items. |
EAN: 2147483647
Pages: 233