Creating the Certificate
| Listing 23.2 has the code that creates and draws the certificate. There are seven methods in the listing, and they are all explained in this section. The CreateImage() MethodThe CreateImage() method is a high-level method that creates the Bitmap object, gets a Graphics object from the Bitmap object, and then calls five methods that do all of the drawing. Each of the five methods must have a Graphics object, so the Graphics object that was retrieved by using the Graphics.FromImage() method is passed to each of these methods. Creating the Bitmap object is simple: The constructor used needs the width, the height, and the pixel format. The following code shows how the Bitmap object is created: C#m_objImage = new Bitmap( m_nWidth, m_nHeight, PixelFormat.Format24bppRgb );VB m_objImage = New Bitmap(m_nWidth, m_nHeight, _ PixelFormat.Format24bppRgb) The DrawCornerImages() MethodThe DrawCornerImages() method draws images in the corner of the certificate. As we saw in Listing 23.1, four member variables contain strings with the file names of corner images. These strings are initially empty, and therefore the corner images won't be drawn. But if the user selects a corner image for any of the corners, then the selected corner image will be drawn in the appropriate corner. Figure 23.1 shows images in the corners. Figure 23.1. You Can Add Images in the Corners of the Certificate.
The first thing, though, that must be done before drawing a corner image into the certificate is to load the image from disk and create another Bitmap object. The newly created Bitmap object will contain the image data for the image that is loaded from disk, and it can be used to draw into the certificate image. In the CreateImage() method, a Bitmap object was created that was empty. But here, we're going to create a Bitmap object from disk, and the only parameter to the Bitmap constructor is the file name. The following simplified example would load an image from the root of the C: drive: It loads an image named Temp.gif from the root of C: into the Bitmap object. C#Bitmap objBitmap = new Bitmap( "C:\\Temp.Gif" );VB Dim objBitmap As New Bitmap("C:\Temp.Gif") Loading the image is a little more complicated in the DrawCorner Images() method because we need to use the path of the directory of the application, plus the directory named CornerImages that's underneath the application directory, plus the file name. The following code shows how the upper left image is loaded: C#Bitmap objCorner = new Bitmap( m_strPath + "\\CornerImages\\" + m_strULImage + ".gif" );VB Dim objCorner As New Bitmap(m_strPath + _ "\CornerImages\" + m_strULImage + ".gif") There are four blocks of code in the DrawCornerImages() method, one for each corner. The TileCertificate() MethodIf you look at this method in Listing 23.2, you'll see 11 lines of code inside the method. Simple, right? Yes, it's simple for many. But I can't tell you how much time I have spent in class teaching this very thing to professional programmers, only to have them scratch their heads and give me a blank stare. Of course, you might think that, after all this time, I could have figured out a way to get the point across. I think I have, but you need to work through the explanation in this section. For starters, a new Bitmap object is created in this method from a disk file. The object is the specified background tile image, and it is in a directory named BackgroundTiles under the current application directory. The following code shows how it is loaded: C#Bitmap objBackgroundTile = new Bitmap( m_strPath + _ "\\BackgroundTiles\\" + m_strBackgroundTile );VB Dim objBackgroundTile As New Bitmap(m_strPath + _ "\BackgroundTiles\" + m_strBackgroundTile) Once the Bitmap object is created from the disk file, we can tile the background image into the certificate Bitmap object. We start by going across the top of the image, drawing the tile, and skipping over to the right. When we get to the right side of the certificate, and the next tile image we draw will be outside the bounds of the certificate Bitmap object, we go down a row and start back on the left side of the certificate to repeat the process. We do this until all rows have been drawn. The tile image has a width and height. For now, I'll refer to these units as TW (for tile width) and TH (for tile height). Figure 23.2 shows the certificate with a single tile drawn in the upper left corner. The initial x- and y-coordinates are both 0. Figure 23.2. The First Tile That's Drawn Is in the Upper Left Corner.
After each tile is drawn, the width of the tile is added to the x-coordinate so that the next tile will be drawn to the right of the last tile. For instance, if a tile is 50 pixels wide, the second tile drawn in the first row would be drawn to the x, y coordinates 50, 0. The third tile would be drawn to 100, 0, and so forth. Figure 23.3 shows the first five tiles drawn at 0, TX, 2*TX, 3*TX, and 4*TX. Figure 23.3. After Each Tile Is Drawn, TX Is Added to the X-Coordinate.
Two while loops are actually in action in the TileCertificate() method. The inner loop is the one that draws the tiles across each row. If you take a look at the code, the value I have been referring to as TX is actually objBackgroundTile.Width in the code. The following code is the inner loop that draws a row: C# x = 0; while( x < m_objImage.Width ) { g.DrawImage( objBackgroundTile, x, y ); x += objBackgroundTile.Width; } VBx = 0 While x < m_objImage.Width g.DrawImage(objBackgroundTile, x, y) x += objBackgroundTile.Width End While After each row is drawn, the x-coordinate is set to 0. The process is kind of like using the old electric typewriters: When you get to the end of the row, you hit Return, and the carriage goes back to the left. Those old typewriters also advance the page one line, and the same is true for the code in the TileCertificate() method. Advancing to the next row is simple; just add TY to the y-coordinate, as shown in Figure 23.4, and get ready to draw another row. Figure 23.4. To Draw the Next Row, the X-Coordinate Is Reset to 0 and the Tile Image Height Is Added to the Y-Coordinate.
This process continues down the certificate, as shown in Figure 23.5, until the entire certificate is tiled. Figure 23.5. As Each New Row Is Drawn, TY Is Added to the Y-Coordinate.
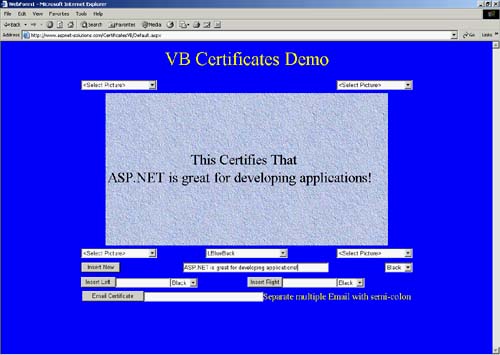
The DrawMainText() MethodThe DrawMainText() method draws the string contained in the m_strMainText variable into the certificate. If the string has a length greater than 0, the method also draws "This Certifies That" above it. Figure 23.6 shows the main text in the certificate. Figure 23.6. The Main Text Shows Up in the Middle of the Certificate.
Two GDI+ objects are created with which the strings will be drawn into the certificate. One is a Font object, and one is a SolidBrush object. The Font object is hard coded at a size of 25, and you may want to add a property so that users can change the font size. The color of the solid brush is obtained by using the index in the m_nMainTextColor member variable. To center the strings (the m_strMainText and "This Certifies That" strings), we'll need to get the pixel width and height of the strings. Knowing the contents of the m_strMainText string isn't enough, though, because we need to get its size in the context of the certificate Bitmap object. Besides getting the width in the context of the certificate Bitmap object, we must factor in the font as well. The following code uses the Graphics class MeasureString() method to get the pixel width and height of the text that's contained in the m_stMainText variable (please note that the g class is a Graphics class): C#SizeF size2 = g.MeasureString( m_strMainText, objFont );VB Dim size2 As SizeF = _ g.MeasureString(m_strMainText, objFont) For each string, we need to calculate the x-coordinate with a call to the Graphics class DrawString() method before drawing. Here again is an item that I have spent a great deal of time teaching, only to get blank stares. For that reason, I'm going to take some extra time to make sure you understand. Let's start with the fact that we have two widths to work with: the width of the certificate Bitmap object and the width of the string both in pixel values. The difference between these two values gives us the extra space that we'll have after drawing the string into the certificate (providing, of course, that the certificate width is greater than the text width). What I mean is that if the certificate is 650 pixels wide, and the text is 150 pixels wide, an extra 500 pixels are left over. If you drew the text at the left side of the certificate, there would be 500 pixels past the text until you get to the right side of the certificate, as shown in Figure 23.7. Figure 23.7. The String Is 150 Pixels Wide, and the Certificate Is 650 Pixels Wide, Which Leaves 500 Pixels Remaining.
The math we use in the DrawMainText() method to get the difference is simple subtraction, as shown here: m_objImage.Width size2.Width Once we know the left-over amount, we know how much to put in front of the text and how much to leave behind the text to center the text. Keeping with the same example, in which we have a 500-pixel excess, we know that we need 250 pixels in front of and 250 pixels behind the text, as shown in Figure 23.8. Figure 23.8. Splitting the Difference of the Left-Over Pixels Gives Us 250 Pixels, and This Is the Amount of Space We Leave before and after the Text.
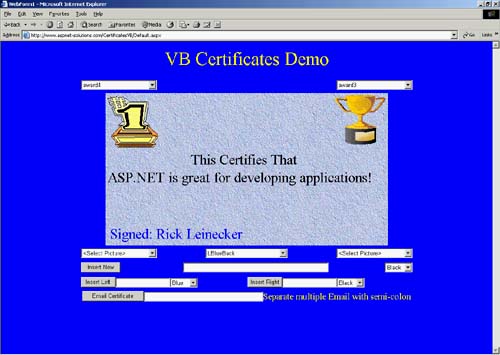
The math for calculating half of the difference is easy, and it gives us the x-coordinate, as shown here: (m_objImage.Width size2.Width) / 2 With the x-coordinate calculated, the only thing left to do is make a call to the Graphics.DrawText() method. The following code uses this method to draw the main text: C#g.DrawString( m_strMainText, objFont, objBrush, x, m_objImage.Height / 2 );VB g.DrawString(m_strMainText, objFont, objBrush, _ x, m_objImage.Height / 2) The DrawLeftText() and DrawRightText() MethodsThese two methods draw text in the lower left and lower right corners of the certificate. If the strings (m_strLeftText and m_strRightText) are empty, nothing will be drawn. But if text needs to be drawn in either bottom corner, two GDI+ objects are created for the drawing operations. The two objects are a Font and a SolidBrush object. As with the DrawMainText() method, the font size is hard coded at 25. The SolidBrush object that's created has a single parameter to its constructor: a Color object. The Color object is part of the m_Colors array, and it is indexed by the m_nLeftTextColor and m_nRightTextColor integer variables. For instance, m_nLeftTextColor might contain the value of 1. This means that the Color object that's in the second array slot is Color.White. (The m_Colors array is shown here for completeness, although in the actual source code module it doesn't immediately precede the code as shown here.) The following code shows how the color array indexing works: C# // Class member array of the colors used for drawing text. // The index value can range from 0 (for Color.Black) to 5 // (for Color.Yellow). Color m_Colors[] = { Color.Black, Color.White, _ Color.Blue, Color.Green, Color.Red, Color.Yellow }; // Set the index to 2 m_nLeftTextColor = 2; // m_Colors(m_nLeftTextColor) will now contain Color.Blue. // Creating the SolidBrush object. SolidBrush objBrush = new SolidBrush( m_Colors[m_nLeftTextColor] ); // When m_nLeftTextColor is 2, the above line is the same as: // SolidBrush objBrush = new SolidBrush( Color.Blue ); VB ' Class member array of the colors used for drawing text. ' The index value can range from 0 (for Color.Black) to 5 ' (for Color.Yellow). Dim m_Colors() As Color = {Color.Black, Color.White, _ Color.Blue, Color.Green, Color.Red, Color.Yellow} ' Set the index to 2 m_nLeftTextColor = 2 ' m_Colors(m_nLeftTextColor) will now contain Color.Blue. ' Creating the SolidBrush object. Dim objBrush As New SolidBrush(m_Colors(m_nLeftTextColor)) ' When m_nLeftTextColor is 2, the above line is the same as: ' Dim objBrush As New SolidBrush(Color.Blue) Before we can draw the left or right strings, we need to measure them to find out their pixel width and height. We do this with the Graphics.MeasureString() method, which returns a SizeF object. The two properties of the SizeF object that we'll be interested in are the Width and Height properties. The text in the left corner is drawn at a fixed x-coordinate of 4. The y-coordinate is calculated by taking the height of the certificate and subtracting the height of the text string, minus an additional 4 pixels to elevate it above the very bottom of the Bitmap. The following calculation shows how the y-coordinate is calculated: m_objImage.Height size.Height 4 The text in the right corner is drawn using the same y-coordinate calculation as the text in the left corner. But the x-coordinate is not fixed as it is when the text is drawn in the left corner. The x-coordinate is calculated for the text in the right corner by subtracting the width of the text from the width of the certificate, minus an additional 4 pixels to move it slightly to the left of the right-most pixel of the certificate. The following code shows how the x-coordinate is calculated for the text in the right corner: m_objImage.Width size.Width 4 The last thing that both methods do is to store the y-coordinate in the m_nLeftImageBottom and m_nRightImageBottom integer variables. These variables are used when (and if) images are drawn in the bottom left and bottom right corners to make sure that the images aren't drawn on top of the text. You can see text in the corner in Figure 23.9, but note that the images in this example figure are in the upper left and right corners. Figure 23.9. You Can Put Text on the Lower Left or Lower Right Portions of the Certificate.
The SaveImage() MethodThis method saves the certificate Bitmap image to disk. It makes a call to the Bitmap.Save() method with the full path name to which the certificate image will be saved. The image is saved as a GIF image so that the image crispness won't be lost because .GIF images use a lossless compression algorithm. Listing 23.2 Certificate Creation Code ' This method creates the image and saves it to disk. Sub CreateImage() ' Create a Bitmap object. m_objImage = New Bitmap(m_nWidth, m_nHeight, _ PixelFormat.Format24bppRgb) ' Get a Graphics object for draw operations. Dim g As Graphics = Graphics.FromImage(m_objImage) ' Call the methods that perform individual draw ' operations. TileCertificate(g) DrawMainText(g) DrawLeftText(g) DrawRightText(g) DrawCornerImages(g) End Sub ' This method draws the images in the corner of the certificate. Sub DrawCornerImages(ByVal g As Graphics) ' If there is a string for the upper left image, ' load it in and draw it. If m_strULImage.Length > 0 Then Dim objCorner As New Bitmap(m_strPath + _ "\CornerImages\" + m_strULImage + ".gif") g.DrawImage(objCorner, 4, 4) End If ' If there is a string for the upper right image, ' load it in and draw it. If m_strURImage.Length > 0 Then Dim objCorner As New Bitmap(m_strPath + _ "\CornerImages\" + m_strURImage + ".gif") g.DrawImage(objCorner, _ m_objImage.Width - 4 - objCorner.Width, 4) End If ' If there is a string for the bottom left image, ' load it in and draw it. If m_strBLImage.Length > 0 Then Dim objCorner As New Bitmap(m_strPath + _ "\CornerImages\" + m_strBLImage + ".gif") g.DrawImage(objCorner, 4, _ m_nLeftImageBottom - 4 - objCorner.Height) End If ' If there is a string for the bottom right image, ' load it in and draw it. If m_strBRImage.Length > 0 Then Dim objCorner As New Bitmap(m_strPath + _ "\CornerImages\" + m_strBRImage + ".gif") g.DrawImage(objCorner, _ m_objImage.Width - 4 - objCorner.Width, _ m_nRightImageBottom - 4 - objCorner.Height) End If End Sub ' This method tiles the background image into the certificate. Sub TileCertificate(ByVal g As Graphics) ' Create the Bitmap object for the background tile. Dim objBackgroundTile As New Bitmap(m_strPath + _ "\BackgroundTiles\" + m_strBackgroundTile) Dim x As Integer, y As Integer = 0 ' The outer loop will proceed down the certificate. While y < m_objImage.Height x = 0 ' The inner loop will proceed across the certificate. While x < m_objImage.Width ' Draw the image. g.DrawImage(objBackgroundTile, x, y) ' Move to the right. x += objBackgroundTile.Width End While ' Move down. y += objBackgroundTile.Height End While End Sub ' This method draws the text in the middle of the certificate. Sub DrawMainText(ByVal g As Graphics) ' If there is no text entered, simply return. If m_strMainText.Length = 0 Then Return End If ' Create the font and brush for drawing. Dim objFont As New Font("Times New Roman", 25) Dim objBrush As New _ SolidBrush(m_Colors(m_nMainTextColor)) ' Get the width and height of the strings that'll be drawn. Dim size1 As SizeF = _ g.MeasureString("This Certifies That", objFont) Dim size2 As SizeF = _ g.MeasureString(m_strMainText, objFont) Dim x As Integer ' Calculate the x coordinate for the top string. x = (m_objImage.Width - size1.Width) / 2 g.DrawString("This Certifies That", objFont, _ objBrush, x, (m_objImage.Height / 2) - size1.Height) ' Calculate the x coordinate for the bottom string. x = (m_objImage.Width - size2.Width) / 2 g.DrawString(m_strMainText, objFont, objBrush, _ x, m_objImage.Height / 2) End Sub ' This method draws the text in the lower left corner of the ' certificate. Sub DrawLeftText(ByVal g As Graphics) ' Set the coordinate for drawing the image based on the image ' height. m_nLeftImageBottom = m_objImage.Height ' If there is no string entered, simply return. If m_strLeftText.Length = 0 Then Return End If ' Create the font and brush for drawing. Dim objFont As New Font("Times New Roman", 25) Dim objBrush As New _ SolidBrush(m_Colors(m_nLeftTextColor)) ' Get the size of the string. Dim size As SizeF = _ g.MeasureString(m_strLeftText, objFont) ' Draw the string. g.DrawString(m_strLeftText, objFont, objBrush, _ 4, m_objImage.Height - size.Height - 4) m_nLeftImageBottom = _ m_objImage.Height - size.Height - 4 End Sub ' This method draws the text in the lower right corner of the ' certificate. Sub DrawRightText(ByVal g As Graphics) ' Set the coordinate for drawing the image based on the image ' height. m_nRightImageBottom = m_objImage.Height ' If there is no string entered, simply return. If m_strRightText.Length = 0 Then Return End If ' Create the font and brush for drawing. Dim objFont As New Font("Times New Roman", 25) Dim objBrush As New _ SolidBrush(m_Colors(m_nRightTextColor)) ' Get the size of the string. Dim size As SizeF = _ g.MeasureString(m_strRightText, objFont) ' Draw the string. g.DrawString(m_strRightText, objFont, _ objBrush, m_objImage.Width - size.Width - 4, _ m_objImage.Height - size.Height - 4) m_nRightImageBottom = _ m_objImage.Height - size.Height - 4 End Sub ' This method saves the image to disk. Sub SaveImage(ByVal strImageDir As String) m_objImage.Save(m_strPath + "\" + strImageDir + _ "\" + m_strFilename, ImageFormat.Gif) End Sub |


EAN: N/A
Pages: 175