Application Architecture
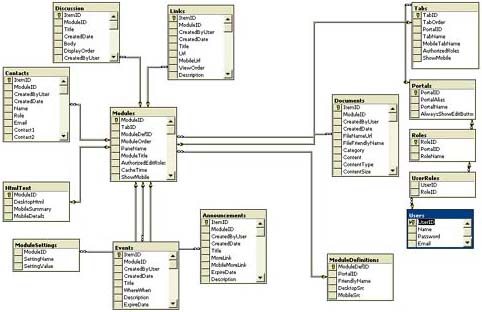
| The IBuySpy Portal is superbly separated into multiple tiers. This is one of the design goals of distributed applications, and this application accomplishes that design goal admirably. The data tier consists of a SQL Server database and a number of stored procedures. There's an intermediate layer between the application and the stored procedures that provides an abstraction that in turn provides an easy way for the application to access the data tier. This abstraction allows the business logic to be separate from the database-access details. Several of the modules fall into the category of business components because they provide the business logic for the application. Other modules that handle security, configuration, and user interaction comprise the rest of the application. The user interaction is done with Web Forms, and this falls into the category of the presentation layer. This section talks about the IBuySpy database, the stored procedures that provide data access, the portal settings, the portal tabs, and security. Several demonstration programs have been written to illustrate the discussion topic isolated from the IBuySpy Portal application. The IBuySpy DatabaseThe database platform used for the IBuySpy application is SQL Server 2000. The database is named Portal. It has 15 tables for the application and 66 stored procedures. All of the application configuration settings are stored in SQL Server. This allows the application to be set up in a server farm because the configuration data can be pulled from a number of servers that are connected to the unique data store. The database schema can be seen in Figure 18.1 Figure 18.1. A Diagram of the IBuySpy Portal Database Schema
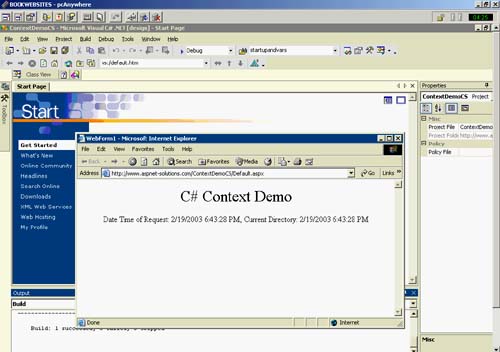
TIP: The code for logging users in is in the stored procedure UserLogin. This stored procedure takes the Email and Password as parameters. The problem is that the database is not case sensitive, so it doesn't matter whether the parameters are uppercase or lowercase. Fortunately, you can turn case sensitivity on at the field level. In Enterprise Manager, select the Users table and go into design mode. Select the field you want to set as case sensitive. Select Collation from the Columns tab at the bottom of the design window. On the collation screen, select Windows Collation, Dictionary Sort, and then Case Sensitive. You might want to do this for both the email/password fields and the login/password, which will make them become case sensitive. Normally, though, a recommended practice is to have the login name not case sensitive and the password case sensitive. Stored ProceduresStored procedures are used for all database queries. There are several reasons for this. The first is to separate the data logic from the middle-tier logic. The second is the performance gains that stored procedures provide. The third is the capability to make database changes along with the necessary stored-procedure changes without breaking the application. Portal SettingsThere are a number of settings that determine the behavior and appearance of the portal. They include the portal ID, the portal name, the desktop tabs collection, the mobile tabs collection, and the currently active tab. These settings all reside in a class named PortalSettings. This class is placed into the Context object upon each Web request of the portal application. The PortalSettings object is placed into the Context upon page request so that the settings are easily accessible from any module that might need the settings. The page request always fires the Application_BeginRequest() method found in the Global.asax. That's where the PortalSettings are created and saved. Using this object gives you a great way to access, in the same way, some context that is unique to your application. That's the purpose of the Context.Items collection. It holds your application's request-specific values in a way that is available to every part of your code that participates in the processing of a request. C#Context.Items.Add( "PortalSettings", new PortalSettings( tabIndex, tabId ) );VB Context.Items.Add("PortalSettings", _ New PortalSettings(tabIndex, tabId)) To use the settings that were saved in the Application_BeginRequest() method, we can simply use the HttpContext.Current.Items. HttpContext.Current is a static property that conveniently returns the context for the current request. C#PortalSettings objSettings = HttpContext.Current.Items["PortalSettings"];VB Dim objSettings As PortalSettings = _ HttpContext.Current.Items("PortalSettings") I created a simple program that shows how to use the Context and HttpContext classes. The program can be accessed from the www.ASPNET-Solutions.com/Chapter_18.htm page. The C# version is live on the Web site, but both C# and VB versions are available for download. The application has a simple class named AppSettings with two public string members. They contain the time and date of the request, and the current directory of the application. In the Application_BeginRequest() method, an AppSettings class is created and added to the Context. In the Page_Load() method of the code behind the Default.aspx page, the AppSettings class is retrieved from the HttpContext.Current.Items collection. A label in the Default.aspx page is then populated with the time and date of the request, and the current directory. You can see the application running in Figure 18.2. Figure 18.2. The ContextDemoCS Application Running
You're probably wondering why you'd want to use the Context class instead of a Session or Application variable. That's a good question, and its answer involves the persistence of the data. A Context is created for each request and discarded at the end of the request cycle. That means the memory is discarded at the end of the request. OK, so that might not give you a performance boost like a Session or Application variable (the performance boost coming from persistence of data) does, but it gives you the capability to access information throughout in all of the application's modules during the life cycle of the request. If the configuration settings may change often, then it's probably best to discard them after the page request is done anyway. Portal TabsCentral to the application's user interface (or presentation layer) is the set of tabs that can be seen in the upper left portion of the screen. When users first open the portal main page, they see five tabs: Home, Employee Info, Product Info, Discussions, and About the Portal. Clicking these tabs brings a content page into view for the subject that's been selected. The beauty of this system of tabs is that they are very configurable, and different users may see different tabs, depending on what their security role has access to. A Simple Program with TabsTo illustrate how the tabs work, I've created a simple application that has a bare-bones set of tabs. This will let you understand how the tabs function outside the user controls. I have another application in the section entitled "A Program with Tabs in a User Control" in which I add the tabs into a user control similar to how it's done in the portal. This will get you closer to a more complete understanding of how the portal is organized. Finally, the Tip on page 678 explains how everything fits together in the IBuySpy Portal application. The first thing I did was to create a project with a single page named Default.aspx. Because the portal has a table on the main page into which the tabs as well as the content are placed, I pasted the same table into my Default.aspx page. Into the first table row, I pasted the IBuySpy DataList that contains the tabs. The ItemTemplate tag contains a link back to the Default.aspx page (DesktopDefault.aspx for IBuySpy) with parameters indicating the tab ID and order. The SelectedItemTemplate tag contains the text of the tab (for a more complete explanation see Chapter 5) but does not have a link since that tab is selected. The following code shows the DataList as it appears in my simple program: <asp:datalist css repeatdirection="horizontal" ItemStyle-Height="25" SelectedItemStyle-Css ItemStyle-BorderWidth="1" EnableViewState="false" runat="server"> <ItemTemplate> <a href='<%= Request.ApplicationPath %> /Default.aspx?tabindex=<%# Container.ItemIndex %> &tabid=<%# ((TabStripDetails) Container.DataItem).TabId %>' > <%# ((TabStripDetails) Container.DataItem).TabName %></a> </ItemTemplate> <SelectedItemTemplate> <span > <%# ((TabStripDetails) Container.DataItem).TabName %></span> </SelectedItemTemplate> </asp:datalist> I created a class into which the TabStripDetails class was added. The name of the file is Configuration.cs (and Configuration.vb for the VB version). The TabStringDetails class is shown below: C# public class TabStripDetails { public int TabId; public String TabName; public int TabOrder; public String AuthorizedRoles; } VBPublic Class TabStripDetails Public TabId As Integer Public TabName As String Public TabOrder As Integer Public AuthorizedRoles As String End Class In the Page_Load() method (which is found in the Default.aspx.cs or Default.aspx.vb files), I added simple code that created four instances of the TabStringDetails class, populated its members, added them to an ArrayList, and then bound the ArrayList to the DataList. In addition, I added some very simple code that displayed in one of the table columns a single sentence of text explaining what content should go in the column. The following code shows how I created the data and bound it to the DataList:
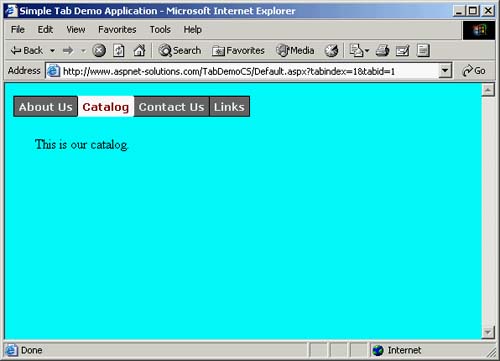
The last thing I had to do to get the program working correctly was to create a style sheet in which the IBuySpy Portal styles were re-created. There were several styles that determined the appearances of the tabs, and without the style sheet the tabs didn't have the appearance that they should. I'll talk more about style sheets in the section entitled "Effective Use of Style Sheets." The simple demo program can be seen at http://www.ASPNET-Solutions.com/TabDemoCS/Default.aspx. This demo allows you to select the tabs, and then it shows some simple text in the table, as shown in Figure 18.3. Figure 18.3. This Program Shows How the Tabs Work.
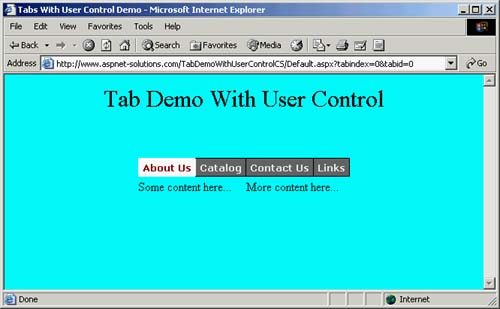
A Program with Tabs in a User ControlNow that we've seen a simplified version of the tabs, let's move to something closer to the architecture of the IBuySpy Portal. I created a second demo program in which the tabs are contained in a user control named TabControl. This user control is then consumed from the Default.aspx page similar to the IBuySpy Portal. The TabControl.ascx file contains the source code for the user control. The reason for using the ASCX/User Control is that the tab control inherits and extends the TabControl class. At the top of the file are two directives: one to import the TabDemoWithUserControlCS namespace (or TabDemoWithUserControlVB for the VB version), and a Control directive. Below the directives is the DataList, which renders the tabs. The following source code shows the TabControl.ascx file: <%@ Import Namespace="TabDemoWithUserControlCS" %> <%@ Control Language="c#" AutoEventWireup="false" Codebehind="TabControl.ascx.cs" Inherits="TabDemoWithUserControlCS.TabControl" TargetSchema="http://schemas.microsoft.com/intellisense/ie5"%> <asp:DataList css repeatdirection="horizontal" ItemStyle-Height="25" SelectedItemStyle-Css ItemStyle-BorderWidth="1" EnableViewState="false" runat="server"> <ItemTemplate> <a href='<%=Request.ApplicationPath%> /Default.aspx?tabindex=<%# Container.ItemIndex %>&tabid= <%# ((TabStripDetails) Container.DataItem).TabId %>' > <%# ((TabStripDetails) Container.DataItem).TabName %></a> </ItemTemplate> <SelectedItemTemplate> <span > <%# ((TabStripDetails) Container.DataItem).TabName %></span> </SelectedItemTemplate> </asp:datalist> The TabControl user control is then consumed by the Default.aspx page. At the top of the page is a directive registering the user control and specifying the TagPrefix and TagName attributes, as follows: <%@ Register TagPrefix="demo" TagName="TabControl" src="/books/2/627/1/html/2/TabControl.ascx" %> Then, to use the control, it is added declaratively to the .aspx code as any other control, as follows: <demo:TabControl SelectedTabIndex="0" runat="server" /> You can see the TabDemoWithUserControl application in Figure 18.4. Figure 18.4. This Demo Application Places the Tabs in a User Control.
The IBuySpy Tab ArchitectureSimilarly to the demo application that contains the tabs in a user control, IBuySpy does the same thing. This section talks about the architecture of the presentation layer, especially how the tabs work. The first thing I need to point out is that there are two default pages: DesktopDefault.aspx for desktop computers that access the portal, and MobileDefault.aspx for mobile devices that access the portal. The file Default.aspx does only one thing: that's redirect to either DesktopDefault.aspx or MobileDefault.aspx, depending on the type of devices that's accessing the portal. This discussion will focus on the desktop files. The DesktopDefault.aspx page consumes a user control named DesktopPortalBanner (found in the DesktopPortalBanner.ascx file). This user control contains a welcome message, a link to the portal home, a link to the documentation, a site name label, and the tabs. As we've already seen in the two demo programs in this section, the tabs are rendered as part of a DataList. If you take a look at the DesktopPortalBanner.ascx.cs (or DesktopPortalBanner.ascx.vb for the VB version), you can see how the user interface objects are populated. The PortalSettings object is first retrieved from the HttpContext, as we've already discussed. From this, the site name (siteName label) is populated. The welcome message (WelcomeMessage label) is populated with the user's identity, which is retrieved from the Context.User.Identity.Name property. The tabs are contained in a collection of TabStripDetail objects, which are all added to an ArrayList object. The ArrayList object is bound to the DataList, and the tabs are then rendered. One thing to note, though, with regard to adding the Tabs to the ArrayList. Before a Tab is added, a check is made to the PortalSecurity.IsInRoles() method to ensure that the user has the right to see the tab. The Portal ModulesAlthough the tabs control what content is to be displayed in the main portion of the screen, a set of user controls determines what content appears. The content is rendered by user controls that inherit from the PortalModuleControl base class. This base class gives the necessary communication between the modules and the underlying portal framework. There are 11 built-in portal modules, as shown in Table 18.1.
We'll talk about creating custom modules and adding them to your portal in the section entitled "Enhancing and Extending the Portal." SecurityThe IBuySpy Portal application can be configured for either Forms-based or Windows-based authentication. This is configurable in the Web.config file, as shown below: Forms-based <authentication mode="Forms"> <forms name=".ASPXAUTH" protection="All" timeout="60" /> </authentication> Windows-based <authentication mode="Windows" /> <authorization> <deny users="?" /> </authorization> For Forms-based authentication, the user names and passwords are validated against the User table in the database. The User table contains UserID, Name, Password, and Email fields. The UserLogin stored procedure provides the data-access layer with which logins can be attempted. Once a user has been logged in, the User.Identity.Name property will contain the user name. The application also must keep track of which users are in which roles. This allows the application to adjust the presentation layer according to the role that the user is in. For instance, unless a user is in the Admins role, the administrative pages won't be displayed. The roles for a user are retrieved from the UserRoles table with the GetRolesByUser stored procedure. The calling of the GetRolesByUser stored procedure is encapsulated in the UsersDB class (found in the Security.cs or Security.vb files). Immediately after a user has been authenticated, the Application_AuthenticateRequest() method (which is found in the Global.asax file) is called. This method does a number of things that allow the application to easily maintain security. The following is a summary of what happens: First time
Subsequent times (when a cookie can be loaded)
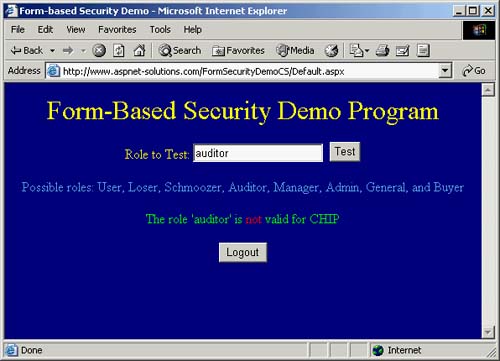
Finally, for both situations, a GenericPrincipal object is instantiated and saved into the Context. This can then be accessed from the entire application. I've created a demonstration application that performs Forms-based authentication, and which also stores roles for the users. It's named FormSecurityDemoCS (or FormSecurityDemoVB for the VB version), and it is shown in Figure 18.5. Figure 18.5. This Page Checks the Role That Users Belong To.
The first thing I had to do, so that the application would enforce Forms-based authentication, was to edit the Web.config file, as follows: <authorization> <deny users="?" /> </authorization> <authentication mode="Forms"> <forms name=".SECURITYDEMO" loginUrl="login.aspx" protection="All" timeout="30" path="/"> </forms> </authentication> I then created a page named Login.aspx in which users enter their names and passwords to become authenticated. Behind the Login button is a simple method that looks for one of three user name and password pairs. If they are found, the user is authenticated with the FormsAuthentication.RedirectFromLoginPage() method. The following in Listing 18.1 shows the LogUserIn_Click() method: Listing 18.1 The Code That Authenticates the UserC# > private void LogUserIn_Click(object sender, System.EventArgs e) { // Process the user name and password so // that they're easier to work with. string strName = Name.Text.Trim().ToUpper(); // Security is lowered somewhat since password checking is case // insensitive. string strPassword = Password.Text.Trim().ToUpper(); // Check for our three hard-coded pairs. if( ( strName == "JOE" && strPassword == "SMITH" ) || ( strName == "CHIP" && strPassword == "MUNK" ) || ( strName == "CHUCK" && strPassword == "WAGON" ) ) { // Perform the authentication. FormsAuthentication.RedirectFromLoginPage( strName, false ); } else { // Alert user to error. ErrorMessage.Text = "Name/Password combination is invalid."; } } VB Private Sub LogUserIn_Click(ByVal sender As System.Object, _ ByVal e As System.EventArgs) Handles LogUserIn.Click ' Process the user name and password so ' that they're easier to work with. Dim strName As String = Name.Text.Trim().ToUpper() Dim strPassword As String = Password.Text.Trim().ToUpper() ' Check for our three hard-coded pairs. If (strName = "JOE" And strPassword = "SMITH") Or _ (strName = "CHIP" And strPassword = "MUNK") Or _ (strName = "CHUCK" And strPassword = "WAGON") Then ' Perform the authentication. FormsAuthentication.RedirectFromLoginPage(strName, False) Else ' Alert user to error. ErrorMessage.Text = "Name/Password combination is invalid." End If End Sub In the Global.asax is a method named Application_AuthenticateRequest(). It's in this method that the roles are saved to the Context so that all of the pages in the application can check to see whether the current user has the proper rights for different things. Listing 18.2 shows the code that performs this function. Note that it also saves an encrypted cookie so that it doesn't have to fetch the roles (which would ordinarily come from a data store) each time. Listing 18.2 The Code in the Global.asax That Stores the Roles in the ContextC# protected void Application_AuthenticateRequest(Object sender, EventArgs e) { // Bail out if we're not authenticated yet. We don't have // to do the redirection ourselves since ASP.NET does it. if( Request.IsAuthenticated == false ) { return; } string[] roles; // See if the cookie can be loaded, if not // do this code. if( Request.Cookies["DemoRoles"] == null ) { // Here we're going to add some hard-coded roles. if( Context.User.Identity.Name == "CHUCK" ) { roles = new string[]{ "User", "Loser", "Schmoozer" }; } else if( Context.User.Identity.Name == "CHIP" ) { roles = new string[]{ "Auditor", "Manager", "Admin" }; } else { roles = new string[]{ "General", "User", "Buyer" }; } // Put the roles into one string for the cookie. string strRoles = ""; for( int i=0; i<roles.Length; i++ ) { strRoles += ( roles[i] + ";" ); } // Create a cookie authentication ticket. FormsAuthenticationTicket ticket = new FormsAuthenticationTicket( 1, Context.User.Identity.Name, DateTime.Now, DateTime.Now.AddHours( 1 ), false, strRoles ); // Encrypt the ticket. string strCookie = FormsAuthentication.Encrypt( ticket ); // Send the cookie to the client. Response.Cookies["DemoRoles"].Value = strCookie; Response.Cookies["DemoRoles"].Path = "/"; Response.Cookies["DemoRoles"].Expires = DateTime.Now.AddMinutes( 10 ); } // We came here when we were able to // load the cookie. else { // Create the Forms authentication ticket // and decrypt it. FormsAuthenticationTicket ticket = FormsAuthentication.Decrypt( Context.Request.Cookies["DemoRoles"].Value ); // Create an array of strings from the ticket. ArrayList objRoles = new ArrayList(); foreach( string role in ticket.UserData.Split( ';' ) ) { objRoles.Add( role ); } // Convert the ArrayList to a string array. roles = new string [objRoles.Count]; for( int i=0; i<objRoles.Count; i++ ) { roles[i] = (string) objRoles[i]; } } // Store the roles in the context. Context.User = new GenericPrincipal( Context.User.Identity, roles ); } VB Sub Application_AuthenticateRequest(ByVal sender As Object, _ ByVal e As EventArgs) ' Bail out if we're not authenticated yet. If Request.IsAuthenticated = False Then Return End If Dim roles As String() ' See if the cookie can be loaded, if not ' do this code. If Request.Cookies("DemoRoles") Is Nothing Then ' Here we're going to add some hard-coded roles. If Context.User.Identity.Name = "CHUCK" Then roles = New String() {"User", "Loser", "Schmoozer"} ElseIf Context.User.Identity.Name = "CHIP" Then roles = New String() {"Auditor", "Manager", "Admin"} Else roles = New String() {"General", "User", "Buyer"} End If ' Put the roles into one string for the cookie. Dim strRoles As String = "" Dim i As Integer For i = 0 To roles.Length - 1 strRoles += (roles(i) + ";") Next ' Create a cookie authentication ticket. Dim ticket As FormsAuthenticationTicket = _ New FormsAuthenticationTicket(1, _ Context.User.Identity.Name, DateTime.Now, _ DateTime.Now.AddHours(1), False, strRoles) ' Encrypt the ticket. Dim strCookie As String = FormsAuthentication.Encrypt(ticket) ' Send the cookie to the client. Response.Cookies("DemoRoles").Value = strCookie Response.Cookies("DemoRoles").Path = "/" Response.Cookies("DemoRoles").Expires = _ DateTime.Now.AddMinutes(10) Else ' We came here when we were able to ' load the cookie. ' Create the Forms authentication ticket ' and decrypt it. Dim ticket As FormsAuthenticationTicket = _ FormsAuthentication.Decrypt( _ Context.Request.Cookies("DemoRoles").Value) ' Create an array of strings from the ticket. Dim objRoles As New ArrayList() Dim role As String For Each role In ticket.UserData.Split(New Char() {";"c}) objRoles.Add(role) Next role ' Convert the ArrayList to a string array. roles = CType(objRoles.ToArray(GetType(String)), String()) End If ' Store the roles in the context. Context.User = New GenericPrincipal(Context.User.Identity, roles) End Sub The last thing I did in the application was to check the roles that the user types in. Once the roles have been stored into the Context, it's a simple matter of using the HttpContext.Current.User.IsInRole() method to see whether a user is in a given role. The following code shows how you might use this method: C# if(HttpContext.Current.User.IsInRole(RoleToTest.Text.Trim().ToUpper()) ) { // User is OK for this role. } else { // User is not authorized for this role. } VBIf HttpContext.Current.User.IsInRole(RoleToTest.Text.Trim().ToUpper()) Then ' User is OK for this role. Else ' User is not authorized for this role. End If
TIP: Whenever a user tries to log in, if she hits enter, instead of clicking the Login button, nothing happens. The page reloads and the user is not logged in. To fix this, do the following:
Dynamically Loaded User ControlsAs I've already mentioned, there are 11 user controls that comprise the content which appears in the portal's main screen (see Table 18.1 for a list of these). A class named ModuleSettings determines the .ascx file that is associated with the selected tab. When a tab is clicked, the PortalSettings object is examined. The PortalSettings object has a property named ActiveTab that contains a collection of ModuleSettings objects. These ModuleSettings objects determine the user control that is associated with the selected tab, and therefore they should be displayed in the application's main window area. The following summary shows the sequence to determine which user controls will be used:
Loading a user control is done with the Page.LoadControl() method. This method takes a single string containing the user control's source file name and returns a loaded user control. The following shows how to load a user control named MyControl.ascx: C#Control objMyControl = Page.LoadControl( "MyControl.ascx" );VB Dim objMyControl As Control = Page.LoadControl("MyControl.ascx") The next thing that must happen, before the control gets served to the client, is that it must be added to a user interface object. The IBuySpy portal adds loaded user controls to the appropriate table pane from the DesktopDefault.aspx page (or MobileDefault.aspx page). The table pane is found by using the Page.FindControl() method. The following shows how to find a control on the page named MyPane: C#Control objMyPane = Page.FindControl( "MyPane" );VB Dim objMyPane As Control = Page.FindControl("MyPane") The final thing is to add the loaded user control to the found user-interface control. The following adds the loaded control named objMyControl to the found control named objMyPane: C#objMyPane.Add( objMyControl );VB objMyPane.Add(objMyControl) |
EAN: N/A
Pages: 175