Creating Your Own Assembly
| for RuBoard |
To create a new assembly in your application, perform the following steps:
-
In your Web project directory, create a new directory called components . This directory will contain the code that makes up the assembly.
-
Create a new file called ProductsDB.vb. This file will contain the code implementing the middle tier .

The classes that will be necessary for our middle layer are organized into namespaces. A namespace is just a code container; an organizational device. You're already familiar with namespacesremember that System.Data.SqlClient is just a namespace with various classes implementing data access to SQL Server.
-
Place the code from Listing 21.1 into the ProductsDB.vb file to create the new namespace.
Listing 21.1 Providing a Product Listing Through the ProductsDB Assembly
Imports System Imports System.Configuration Imports System.Data Imports System.Data.SqlClient Namespace ADO24HRS End Namespace
In the next section, you'll see how to add some classes into this namespace that will perform the data access for the product list page.
Creating Your Own Classes
The next step is to add a class to the ADO24HRS namespace in the ProductsDB.vb file. The new class, named ProductsDB , can be seen in Listing 21.2. This class name does not have to match the filename. However, because all of the objects you will be working with are products, ProductsDB is a logical choice.
The first Web form we will use to implement this middle tier is the product list Web form. If you recall, its job is to retrieve a list of all products in the database and then display them using a DataList control. Therefore, the name of the method that will perform the data access is called GetAllProducts . This method is also present in Listing 21.2. As you can see, it performs the same data access tasks currently being performed from the product list Web form.
Listing 21.2 Providing a Product Listing Through the ProductsDB Assembly
Imports System Imports System.Configuration Imports System.Data Imports System.Data.SqlClient Namespace ADO24HRS Public Class ProductsDB Public Function GetAllProducts() As SqlDataReader 'Create Instance of Connection and Command Objects Dim conn as New SqlConnection(_ ConfigurationSettings.AppSettings("ConnectionString")) Dim cmd as New SqlCommand("Products_GetAll", conn) 'Mark the Command as a Stored Procedure cmd.CommandType = CommandType.StoredProcedure 'Return Results conn.Open() Return cmd.ExecuteReader(CommandBehavior.CloseConnection) End Function End Class End Namespace | | Instead of having a connection string present every time you make a call to the database, it makes a lot of sense to place the connection string into some sort of global constant for your application. In the case of this component layer in a Web forms application, the connection string is stored in a section of the Web.Config file called AppSettings and then retrieved from that single location each time it is used. This makes it much easier to make changes to the connection string. |
Compiling the ADO24HRS Namespace
Before we can use this new assembly, it must be compiled. This can be done most easily through the use of a batch file (or, if you are using Visual Studio .NET, just build your project). Place the following code into a file named mk.bat in the same component directory as your ProductsDB.vb file:
vbc /t:library /out:..\bin\ProductsDB.dll /r:System.dll /r:System.Web.dll /r:System.Xml.dll /r:System.Data.dll ProductsDB.vb
The preceding line of code calls the Visual Basic .NET compiler (vbc.exe) and compiles the ProductsDB.vb file into a usable assembly. It compiles the file directly to the /bin directory of the Web forms application.
After you've placed the preceding code into the mk.bat file, execute the batch file either from a DOS prompt or by double-clicking on the file from Windows Explorer. You will not see any error messages if you double-click on the batch file from Explorer.
 | In order to use the compiled assembly, a bin folder must be present in the application root for your Web forms project. In most cases, this means that the bin directory must be located in the main directory of your Web project. |
After running the mk.bat file, check the bin directory of your Web project and make sure a file named ProductsDB.dll is present. This is your compiled assembly.
Wiring Up the Product List Page to the ProductsDB Assembly
With the assembly now in place and accessible by the pages in your application, you can remove the old data access code from the product list and replace it with the code in Listing 21.3. Alternatively, you can just create a new Web form in your application and place the code from Listing 21.3 in the new Web form.
Listing 21.3 Retrieving Product Data through an Assembly
<% @Page Language="VB" %> <%@ Import Namespace="System.Data" %> <%@ Import Namespace="System.Data.SqlClient" %> <HTML> <HEAD> <LINK rel="stylesheet" type="text/css" href="Main.css"> <!-- End Style Sheet --> <script language="VB" runat="server" > Sub Page_Load(Source as Object, E as EventArgs) LoadGridData(products) End Sub Private Sub LoadGridData(_ myDataList as System.Web.UI.WebControls.DataList) 'Declare new instance of ProductsDB Dim products as New ADO24HRS.ProductsDB() myDataList.DataSource = products.GetAllProducts() myDataList.DataBind() End Sub </script> </HEAD> <BODY> <h1>Product List</h1> <hr> <form runat="server" id=form1 name=form1> <asp:DataList id="products" RepeatColumns="2" AlternatingItemStyle-backcolor="#DDDDDD" SelectedItemStyle-backcolor="CadetBlue" runat="server"> <ItemTemplate> <table border="0" width="300"> <tr> <td width="25">   </td> <td width="72" valign="middle" align="right"> <a href='productdetails.aspx?productID= <%# DataBinder.Eval(Container.
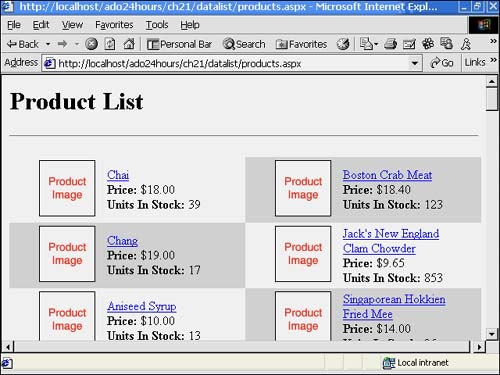
As you can see, the code in Listing 21.3 is not much different from the original example in Hour 11. Instead of using ADO.NET directly, the new middle layer performs all data access. As you can see in lines 2024 of Listing 21.3, the Web form now only needs to create an instance of the ProductsDB class and then call the GetAllProducts() method of that class. This method returns a SqlDataReader , which is indistinguishable from a SqlDataReader created directly in the Web form. You can use it to bind to the DataList . When this page is run, it will look much like the one in Figure 21.2.
Figure 21.2. The appearance of the product list Web form loaded with data from an assembly.
| | Notice that you're returning a SqlDataReader object from the new data access layer. If you recall, the SqlDataReader is a forward-only, read-only view of data that maintains a connection to the database for as long as it is open. Because you're opening a database connection for the SqlDataReader in an assembly, you must take special action to ensure that the connection is closed when the SqlDataReader is done. If you look at the Return statement in the GetAllProducts() method, you'll notice that we're calling the ExecuteReader() method with a special option. CommandBehavior.CloseConnection makes sure the database connection is closed after the SqlDataReader is done with its connection. |
Using Custom Objects Instead of Single Rows of Data
If you look at the Web form in Listing 21.3 in the preceding section, you'll notice that the Web form links to a page that will provide more details for the selected product. This is referred to as a master-detail set of Web form screens. When implementing the product detail screen, you have a number of options.
You can retrieve a single row of data from your data source as in a SqlDataReader or a DataSet . However, this creates some unnecessary overhead. Why generate an entire DataSet or DataReader object for just a single row of data?
A more efficient method of retrieving data in this case is to create a custom class in your assembly, and then use an instance of that class to send data back to the Web form. This will require some special coding in your stored procedure, data layer, and Web form.
The first change you'll notice is that the stored procedure (seen in Listing 21.4) doesn't actually return any records. It returns a set of six values to the data layer using output parameters. For a review of stored procedures and output parameters, please see Hour 15, "Working with Stored Procedures."
Listing 21.4 Retrieving Product Data Through an Assembly
CREATE PROCEDURE Product_Get (@ProductID int, @ProductName nvarchar(40) OUTPUT, @QuantityPerUnit nvarchar(20) OUTPUT, @UnitPrice money OUTPUT, @UnitsInStock smallint OUTPUT, @Discontinued bit OUTPUT, @ImagePath nvarchar(50) OUTPUT) AS SELECT @ProductName = ProductName, @QuantityPerUnit = QuantityPerUnit, @UnitPrice = UnitPrice, @UnitsInStock = UnitsInStock, @Discontinued = Discontinued, @ImagePath =ImagePath FROM Products WHERE ProductID = @ProductID
The next step is to add a method to your data layer in order to access the data. Add the GetProductDetails() method in Listing 21.6 to the ProductsDB class in the ADO24HRS namespace from Listing 21.2. The only difference between this data access method and other methods you've seen is that this one doesn't return a DataSet or a SqlDataReader . It returns an object of type ProductDetails . This object is defined by the code in Listing 21.5. The class consists of six variables that will be used to package the results from the stored procedure and transfer to the Web form. Make sure to add the code from Listing 21.5 to your ADO24HRS namespace as well.
Listing 21.5 The ProductDetails Custom Class
Public Class ProductDetails Public ProductName As String Public QuantityPerUnit As String Public UnitPrice As Decimal Public UnitsInStock As Int16 Public Discontinued as Boolean Public ImagePath As String End Class
Listing 21.6 Retrieving Product Data Through an Assembly
Public Function GetProductDetails(ByVal productID As Integer) _ As ProductDetails 'Create Instance of Connection and Command Objects Dim conn as New SqlConnection(_ ConfigurationSettings.AppSettings("ConnectionString")) Dim cmd as New SqlCommand("Product_Get", conn) 'Mark the Command as a Stored Procedure cmd.CommandType = CommandType.StoredProcedure ' Add Parameters to SPROC Dim parameterProductID As SqlParameter = _ New SqlParameter("@ProductID", SqlDbType.Int, 4) parameterProductID.Value = productID cmd.Parameters.Add(parameterProductID) Dim parameterProductName As SqlParameter = _ New SqlParameter("@ProductName", SqlDbType.NVarChar, 40) parameterProductName.Direction = ParameterDirection.Output cmd.Parameters.Add(parameterProductName) Dim parameterQuantityPerUnit As SqlParameter = _ New SqlParameter("@QuantityPerUnit", SqlDbType.NVarChar, 20) parameterQuantityPerUnit.Direction = ParameterDirection.Output cmd.Parameters.Add(parameterQuantityPerUnit) Dim parameterUnitPrice As SqlParameter = _ New SqlParameter("@UnitPrice", SqlDbType.Money, 8) parameterUnitPrice.Direction = ParameterDirection.Output cmd.Parameters.Add(parameterUnitPrice) Dim parameterUnitsInStock As SqlParameter = _ New SqlParameter("@UnitsInStock", SqlDbType.SmallInt, 2) parameterUnitsInStock.Direction = ParameterDirection.Output cmd.Parameters.Add(parameterUnitsInStock) Dim parameterDiscontinued As SqlParameter = _ New SqlParameter("@Discontinued", SqlDbType.SmallInt, 2) parameterDiscontinued.Direction = ParameterDirection.Output cmd.Parameters.Add(parameterDiscontinued) Dim parameterImagePath As SqlParameter = _ New SqlParameter("@ImagePath", SqlDbType.NVarChar, 50) parameterImagePath.Direction = ParameterDirection.Output cmd.Parameters.Add(parameterImagePath) ' Open the connection and execute the Command conn.Open() cmd.ExecuteNonQuery() conn.Close() 'Create and Populate ProductDetails Struct using 'Output Params from the SPROC Dim myProductDetails As ProductDetails = New ProductDetails() myProductDetails.ProductName = _ Convert.ToString(parameterProductName.Value).Trim() myProductDetails.QuantityPerUnit = _ Convert.ToString(parameterQuantityPerUnit.Value).Trim() myProductDetails.UnitPrice = _ Convert.ToDecimal(parameterUnitPrice.Value) myProductDetails.UnitsInStock = _ Convert.ToInt16(parameterUnitsInStock.Value) myProductDetails.Discontinued = _ Convert.ToBoolean(parameterDiscontinued.Value) myProductDetails.ImagePath = _ Convert.ToString(parameterImagePath.Value).Trim() Return myProductDetails End Function Now the data layer for the product details Web form is done! All that remains is to add the necessary code to the Web form that will actually display the information. In the next example, you'll create the product details Web form, and wire it up to the GetProductDetails() method in the ProductsDB class. Listing 21.7 contains the code for the product details Web form.
Listing 21.7 Retrieving Product Data Through an Assembly
<% @Page Language="VB" %> <%@ Import Namespace="System.Data" %> <%@ Import Namespace="System.Data.SqlClient" %> <HTML> <HEAD> <LINK rel="stylesheet" type="text/css" href="Main.css"> <!-- End Style Sheet --> <script language="VB" runat="server" > Sub Page_Load(Source as Object, E as EventArgs) 'Get OrderID Dim ProductID As Integer = Int32.Parse(Request.Params("ProductID")) LoadData(ProductID) End Sub Private Sub LoadData(productID as Int32) 'Declare new instance of ProductsDB Dim products as New ADO24HRS.ProductsDB() 'Declare new instance of custom class Dim myProductDetails as ADO24HRS.ProductDetails 'Fill custom class with data myProductDetails = products.GetProductDetails(productID) lblProductName.Text = myProductDetails.ProductName lblQuantityPerUnit.Text = myProductDetails.QuantityPerUnit lblUnitPrice.Text = myProductDetails.UnitPrice.ToString() lblUnitsInStock.Text = myProductDetails.UnitsInStock.ToString() ProductImage.Src = "/ADO24HOURS" + myProductDetails.ImagePath if(myProductDetails.Discontinued) then lblDiscontinued.Visible = false end if End Sub </script> </HEAD> <BODY> <h1>View Product Details</h1> <hr> <form runat="server"> <table cellpadding=5> <tr> <td> <img id="ProductImage" height=144 width=144 runat="server"> </td> <td valign="center"> <strong><asp:label id="lblProductName" runat="server" /></strong> <br> Quantity Per Unit: <asp:label id="lblQuantityPerUnit" runat="server" /> <br> In Stock: <strong><asp:label id="lblUnitsInStock" runat="server" /></strong> <br> Price Per Unit:<asp:label id="lblUnitPrice" runat="server" /> <br> <strong> <asp:label id="lblDiscontinued" Color="red" runat="server" /> </strong> </td> </tr> </table> Here would typically go a detailed product description. </form> <hr> </BODY> </HTML> Accessing the product data is done a little bit differently than in the preceding example in this hour because you're accessing the public members of a class, rather than binding directly to a SqlDataReader object. In the LoadData() method in Listing 21.7, a new instance of the ProductsDB class is created. Then an instance of the ProductDetails class is created. Finally, the data from the GetProductDetails() method is loaded into the ProductDetails class. Then the individual members of the class are used to assign values to the correct labels on the page. Figure 21.3 shows the Web form when loaded in a Web browser.
Figure 21.3. The appearance of the product detail Web form.
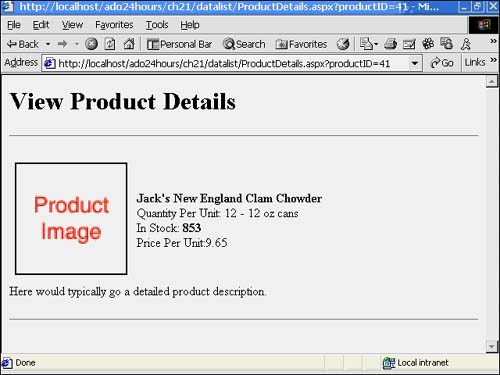
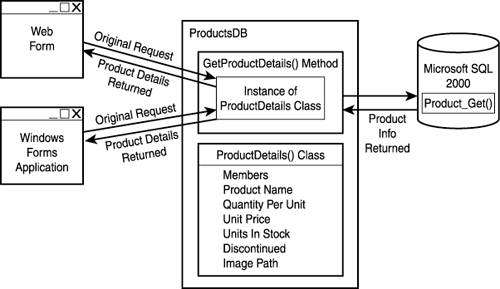
Figure 21.4 represents where the data moves in each of the examples in this chapter. This can be hard to keep track of, at first. However, the benefits to code readability and manageability far outweigh the extra time and effort necessary to implement additional physical layers in your application.
Figure 21.4. A visual representation of data movements in the examples from this chapter.
| for RuBoard |
EAN: 2147483647
Pages: 237