| You can use Bluetooth to synchronize your Bluetooth-equipped Pocket PC with your computer. If you have a Bluetooth-equipped Pocket PC, you can use the Bluetooth connection as an ActiveSync connection. You can then synchronize your Pocket PC with your computer wirelessly.  | Even if your Pocket PC does not have built-in Bluetooth, you should be able to find a Bluetooth adapter for little more than $100 if your Pocket PC has a Compact Flash slot. |
|
To connect to a Pocket PC, take the following steps: First, you must establish a partnership with your computer through ActiveSync. You need to use a USB sync cable or the cradle that comes with your Pocket PC. If you are using a third-party Bluetooth adapter, you may need to install Bluetooth support software on your Pocket PC. Follow the instructions that came with your Bluetooth adapter to install the Bluetooth software. Next, invoke the Bluetooth Manager on your Pocket PC and search for the host computer running Microsoft ActiveSync. (Some Pocket PC Bluetooth adapters, such as the Socket Bluetooth Connection Kit, do not require this step). Tap on the host computer (LWM-1, in my case) icon and check the ActiveSync Partner checkbox to establish the host computer as an ActiveSync partner (see Figure 6-18). Figure 6-18. Configuring a Bluetooth device as an ActiveSync partner 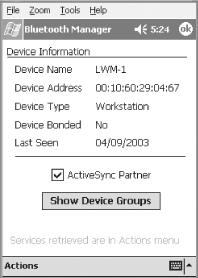 On the host computer running Microsoft ActiveSync, right-click on the Bluetooth icon in the tray and select Setup  Configuration. Select the Local Services tab and double-click on the Bluetooth Serial Port item (see Figure 6-19). Verify the virtual COM port number used by the Bluetooth serial port. In my case, it is using COM port 4. Configuration. Select the Local Services tab and double-click on the Bluetooth Serial Port item (see Figure 6-19). Verify the virtual COM port number used by the Bluetooth serial port. In my case, it is using COM port 4. Figure 6-19. Using a virtual COM port for Bluetooth communication 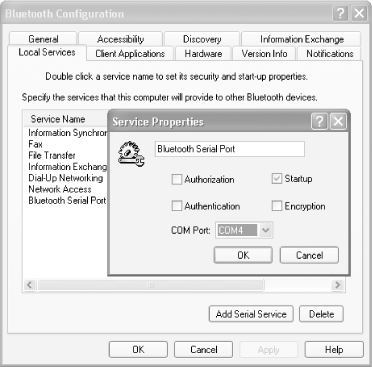 Next, launch Microsoft ActiveSync and select File  Connection Settings.... Turn on the "Allow serial cable or infrared connection to the COM port" checkbox and select the COM port number that you used for the Bluetooth serial port. In this case, it is COM port 4 (see Figure 6-20). Click OK. Connection Settings.... Turn on the "Allow serial cable or infrared connection to the COM port" checkbox and select the COM port number that you used for the Bluetooth serial port. In this case, it is COM port 4 (see Figure 6-20). Click OK. Figure 6-20. Setting a COM port for ActiveSync operation 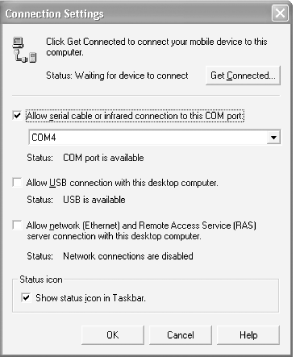 To activate ActiveSync, go to the Today screen of the Pocket PC and tap on the Bluetooth icon (located at the bottom right) and select Start ActiveSync (see Figure 6-21). (Some Bluetooth adapters, such as the Socket Bluetooth Connection Kit, use a menu option titled Bluetooth ActiveSync.)
Figure 6-21. Starting ActiveSync on the Pocket PC 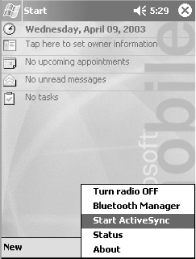 Your Pocket PC and host computer should start synchronizing now. 6.5.1 Troubleshooting ActiveSync If you have trouble making the connection, try the following:
- Try it with a cable
-
Be sure that you can use ActiveSync with a USB or serial port connection (whichever the Pocket PC's cradle supports). You must first establish a Standard or Guest partnership between the PC and Pocket PC before you can perform a Bluetooth ActiveSync.
- Reset your Pocket PC
-
Many times resetting the Pocket PC will solve the connection problem.
- Pair (or bond) your PC and Pocket PC
-
This ensures that the two can see one another, and avoids the need to search for one another each time you perform an ActiveSync.
- Check the ActiveSync Partner box
-
Ensure that you have turned on the ActiveSync Partner checkbox, as shown in Figure 6-18. Some Bluetooth adapters, such as the Socket Bluetooth Connection Kit, do not require this.
- Verify your COM port
-
Double-check that the COM port used by ActiveSync (right-click on the ActiveSync tray icon and choose Connection Settings) is the same as the one used by your Bluetooth serial port (right-click on the Bluetooth tray icon, choose Setup  Configuration, and then double-click Bluetooth Serial Port in the Local Services tab). Configuration, and then double-click Bluetooth Serial Port in the Local Services tab).
- Make sure ActiveSync can see the COM port
-
If the ActiveSync Connection Settings dialog's Status field (see Figure 6-20) claims that the Bluetooth Serial Port is not available, ActiveSync may not know the serial port exists. If this is the case, click Get Connected in the Connection Settings dialog, and allow ActiveSync to look for your Pocket PC. Make sure that your Bluetooth adapter is connected and active and that your Pocket PC is cradled before you perform this step. This won't cause ActiveSync to locate your Pocket PC over the Bluetooth serial port, but it will let ActiveSync know about all the Bluetooth serial ports available on your PC.
In my testing, I had occasional problems in getting ActiveSync to use the Bluetooth serial port. My best advice is to restart both the computer and the Pocket PC if such a connection problem arises, and try these steps again. 6.5.2 Connecting to a Palm You can use Bluetooth with Palm Handhelds that have an SDIO slot (such as the Palm m500, m505, m130, or m125 Handhelds) or built-in Bluetooth (such as the Tungsten T). To connect to a Palm, follow these steps: Before you try to connect your Palm and computer over Bluetooth, be sure to get the latest Palm Desktop and Palm Bluetooth software from http://www.palm.com/software and install it according to the instructions. Verify that you can perform a HotSync using the Palm cradle or cable before trying to make a Bluetooth connection. (You'll need to do this to install all the Palm Bluetooth software, anyhow.) Remove the Palm from the cradle and, if you are using a Palm with a Bluetooth SDIO adapter, insert the adapter. You should hear a beep when the card is inserted properly. Configure your Palm to use Bluetooth for HotSync: Tap the Home icon on your Palm to bring up the list of Applications. Tap the Prefs icon. This brings up the Preferences application. Tap the menu in the upper-right corner and select Connection. This brings up the Available Connections dialog, shown in Figure 6-22. Figure 6-22. Viewing the Palm Connection Preferences 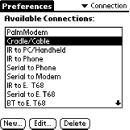 Tap the New button to bring up the Edit Connection dialog. Specify a name, select PC from the Connect To drop-down menu, and choose Bluetooth in the Via drop-down menu (see Figure 6-23). Figure 6-23. Editing the Bluetooth Connection in Preferences 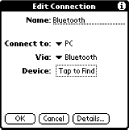 Tap the button labeled Tap to Find. This begins the Bluetooth discovery process (see Figure 6-24). Figure 6-24. Discovering Bluetooth devices 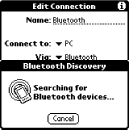 After a few seconds, the Discovery Results appear. Select your computer from the list. Figure 6-25 shows the discovery results with a Windows XP notebook (CAM-FRANCIUM) and a Mac OS X PowerBook (Brian Jepson's computer). Select your Windows XP computer and tap OK. If the computer is not already paired with the Palm, you'll be asked if you want to add it to your trusted device list. Tap Yes to continue. You'll be asked to enter a passkey on both the Palm and Windows XP computer. Figure 6-25. Viewing the list of Bluetooth devices 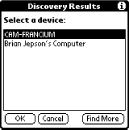 When you have selected the Windows XP PC and paired successfully, you'll be back at the Edit Connection dialog. Click OK to dismiss this dialog.
Configure your PC to use Bluetooth for HotSync: Click the HotSync icon in the system tray and select Local Serial (see Figure 6-26). Figure 6-26. Clicking the HotSync system tray icon 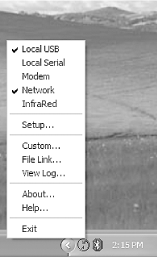 Click the HotSync icon in the system tray and select Setup, then select the Local tab (see Figure 6-27). Figure 6-27. Selecting a COM port in Palm Desktop setup 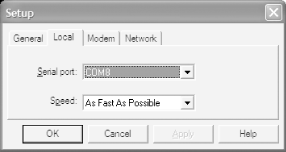 Select the same COM port used for the Bluetooth Serial Port (right-click on the Bluetooth tray icon, choose Setup  Configuration, and double-click Bluetooth Serial Port in the Local Services tab), and click OK. Configuration, and double-click Bluetooth Serial Port in the Local Services tab), and click OK.
Next time you perform a HotSync from your Palm Handheld, choose Bluetooth from the drop-down menu (see Figure 6-28).
Figure 6-28. Performing a Bluetooth HotSync operation 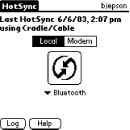 6.5.3 Connecting to the Internet Through a Mobile Phone If you have a Bluetooth-equipped mobile phone, such as the Sony Ericsson T68i, you can use it as a modem to connect to the Internet (see Section 8.1 in Chapter 8 for more information on pricing). Best of all, with Bluetooth, you can simply leave the phone in your pocket or briefcase and still be able to connect to the Internet (as long as the phone is powered up and your briefcase is within range). In this section, I show you how to connect to the Internet using the Sony Ericsson T68i. First, turn on the Sony Ericsson T68i's Bluetooth radio (press the joystick button and select Connect  Bluetooth Bluetooth  Options Options  Operation Mode Operation Mode  On) and make the phone discoverable (press the joystick button and select Connect On) and make the phone discoverable (press the joystick button and select Connect  Bluetooth Bluetooth  Discoverable). Discoverable).
 | Turning on the Bluetooth radio on your phone will drain its battery. If you are not using the Bluetooth connection, it is advisable to turn off the Bluetooth radio. |
|
In Windows XP, go to My Bluetooth Places and select "View devices in range" (you may also click the Bluetooth menu and select "Search for devices" or open the Entire Bluetooth Neighborhood and press F5). After the discovery process, you should be able to see the Sony Ericsson T68i icon. Right-click on the icon and select Discover Available Services (see Figure 6-29). Figure 6-29. Discovering the services offered by the T68i 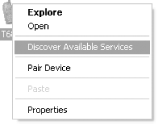 The Sony Ericsson T68i supports the services shown in Figure 6-30. Figure 6-30. Services offered by the T68i 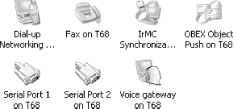 To connect to the T68i, right-click on the Dial-up Networking on T68 service and select Connect Dial-up Networking (see Figure 6-31). Figure 6-31. Using the Dial-up Networking service on the T68i 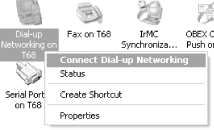 The phone asks you whether you want to accept the connection request, decline it, or "add to paired." This last step pairs the phone and the PC and performs the connection request. Pairing the phone and the computer ensures that the connection can be established whenever you need it (even though you have not used the connection for some time). If your phone is not paired, you need to make it discoverable every time you need to use the connection. See Pairing, later in this chapter, for more details. You will be prompted to supply a PIN code to pair up the phone with your computer (see Figure 6-32). You need to enter the same PIN code on your phone. Figure 6-32. Supplying a PIN code for pairing 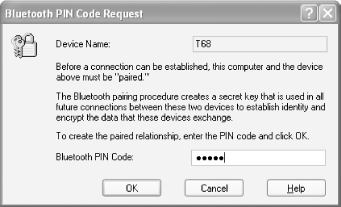 Next, a dialog box will be displayed, prompting you to enter the username, password, and phone number to dial (see Figure 6-33). You can get all this information from your ISP.
 | Some ISPs do not require a username or password, just the dialing sequence for the T68i. For example, AT&T Wireless's dial string is *99*CID#, where CID is your connection ID (typically 1, as in *99*1#). This uses the connections defined on your phone (#1 is usually configured by AT&T for your GPRS data connection). |
|
Click on the Dial button to complete the connection process (see Figure 6-33).
Figure 6-33. Dialing using the T68i 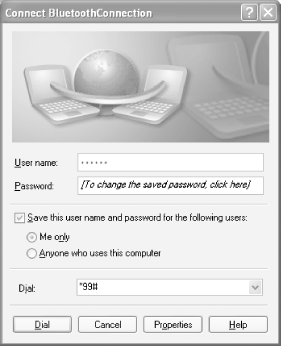 Pairing In Bluetooth, you have the option to pair two devices. When you pair with a Bluetooth device, this device will be remembered and trusted. The next time you need to use the device, you need not search for it again. When pairing with a device, the device requesting the pairing will need to supply a PIN code to establish the link. The other device needs the same PIN to complete the pairing process. You can still use a Bluetooth device without pairing, but you need to search for the device every time you need to use it. Note that some devices use the word "bonding" to mean pairing. To pair your computer with a phone (such as the T68): Turn on the Bluetooth radio on T68 and assign a name to it, such as T68. On your Windows XP computer, go to My Bluetooth Places and click on "View devices in range". Right-click on the T68 icon and select Pair Device (see Figure 6-34). Key in the PIN code to be used for pairing on the computer. On the T68, you have three choices: Accept, Add to Paired, or Decline. Select Accept to allow the computer to pair with the phone. Select Add to Paired if you want the phone to add the computer to its paired collection. Select Decline if you do not wish to pair.
If you are pairing your computer with a phone, take care to use numbers only, or else you may have problems keying in alphabetic characters using your phone's PIN code dialog! |
Figure 6-34. Pairing with the T68 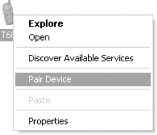 6.5.4 File Transfers Between Computers Bluetooth was popularly touted as a cable replacement technology. File transfers are a common chore that typically depends on a network cable. (Wi-Fi networking also allows you to create ad-hoc networks for file transfers. See Section 5.5 in Chapter 5 for more details.) Bluetooth can be useful in situations when there are no cables or networks available, and you need to transfer files between computers and/or other Bluetooth-enabled devices. For Bluetooth file transfer, you can typically expect transfer rates ranging from 100 Kbps to a maximum of 750 Kbps. File transfers between computers are generally much faster than between Pocket PCs. To transfer files between computers, follow these steps: Open up My Bluetooth Places and click on "View devices in range". Figure 6-35 shows that two devices have been found: a Bluetooth access point and another computer (equipped with Bluetooth capability) named Jupiter. Right-click on Jupiter and select Discover Available Services to list the various services that the computer Jupiter provides (see Figure 6-36).
Figure 6-35. Finding the Bluetooth devices nearby  Figure 6-36. Discovering the services offered by another computer 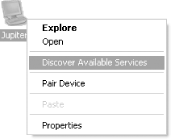 Figure 6-37 shows the services that Jupiter provides. Figure 6-37. Services that Jupiter offers 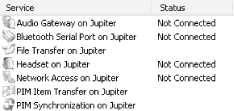 To initiate a file transfer between Jupiter and your computer, double-click on the File Transfer on Jupiter icon (this may also appear as an icon called Public Folder). Depending on the security settings of the remote machine (Jupiter), you may be prompted to enter a PIN code (see Figure 6-38). Once this PIN code is entered, you will also need to enter the same code on Jupiter.
Figure 6-38. Connecting to Jupiter   | In some releases of the Bluetooth software, you may need to click on the Bluetooth tray icon to bring up dialogs for PIN codes (clicking the bubble shown in Figure 6-38 will only make it disappear). |
|
When connected, you will see Jupiter in My Bluetooth Places as shown in Figure 6-39. Figure 6-39. You can copy files to Jupiter after connecting 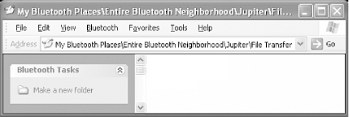 You can treat this as just a normal folder. However, when you try to copy files or create a folder on Jupiter, the dialog box shown in Figure 6-40 may appear on Jupiter's screen.
Not Seeing an Authorization Prompt? Whether you are prompted for authorization depends on the security settings on the remote machine (Jupiter), which you can adjust by right-clicking the Bluetooth tray icon, selecting Setup  Configuration, and then double-clicking the File Transfer in the Local Services tab of the Bluetooth Configuration dialog (check the Authorization box to require Authorization before a transfer). Configuration, and then double-clicking the File Transfer in the Local Services tab of the Bluetooth Configuration dialog (check the Authorization box to require Authorization before a transfer). |
Figure 6-40. Giving the rights for the remote computer 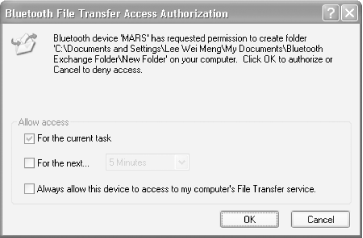 There are three permission settings that Jupiter can grant:
- For the current task
-
You allow the operation to be performed once only. Subsequent operations require your explicit consent.
- For the next...x minutes
-
You allow operations to be performed within the specified amount of time. After the time limit, all operations require your explicit consent.
- Always allow this device to access to my computer's File Transfer service
-
You allow all operations to be performed. Subsequent operations do not require your explicit consent.
 | The files transferred using Bluetooth are stored in the Bluetooth Exchange Folder. To locate this folder, go to My Bluetooth Places in Jupiter and select View My Bluetooth Services. Right-click on My File Transfer and select Bluetooth Exchange Folder (see Figure 6-41). If this option is not available, go to the Bluetooth configuration, right-click the Bluetooth tray icon, select Setup  Configuration, and go to the Information Exchange tab. The folder listed as My Shared Directory (see Figure 6-42) contains files transferred to your computer. Configuration, and go to the Information Exchange tab. The folder listed as My Shared Directory (see Figure 6-42) contains files transferred to your computer. |
|
Figure 6-41. Viewing the Bluetooth Exchange Folder  Figure 6-42. Viewing the location of the Bluetooth exchange folder 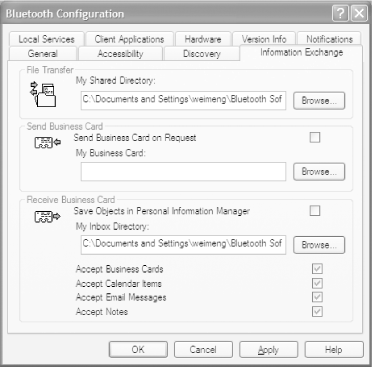 6.5.5 Sharing an Internet Connection Using Bluetooth Using Bluetooth, two computers can share an Internet connection (see Figure 6-43). Assuming that one computer (equipped with Bluetooth) is connected to the Internet via an Ethernet (or Wi-Fi) connection, another computer that is also equipped with Bluetooth can establish a Bluetooth connection with it and share the connection to the Internet. Figure 6-43. Sharing an Internet connection 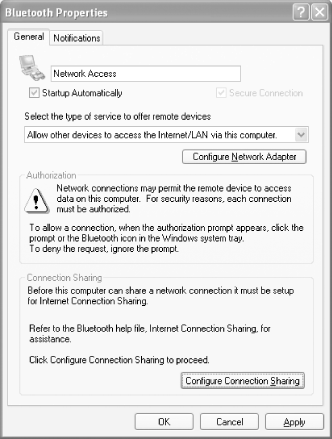 6.5.5.1 On the computer providing the Internet connection To share an Internet connection and set it up on the computer that is providing the connection, follow the steps described in the list shown next. Go to My Bluetooth Places and select View My Bluetooth Services (or navigate to My Bluetooth Places  My Device in Windows Explorer). Right-click on Network Access and select Properties. My Device in Windows Explorer). Right-click on Network Access and select Properties. Change the type of service to offer remote devices to "Allow other devices to access the Internet/LAN via this computer" (see Figure 6-43). If your Bluetooth software does not offer this option, you may proceed to the next step without changing this setting. Click on the Configure Connection Sharing button. The Network connections window will be displayed. (If your Bluetooth software does not support this option, you can also bring up this window by opening Windows Explorer  My Computer My Computer  Control Panel Control Panel  Network and Internet Connections Network and Internet Connections  Network Connections.) Select the network connection that you want to share with other computers that connect to you via Bluetooth. For example, you may have an Ethernet connection for Internet access, or you may have a wireless connection. Right-click on the connection of your choice and select Properties. Network Connections.) Select the network connection that you want to share with other computers that connect to you via Bluetooth. For example, you may have an Ethernet connection for Internet access, or you may have a wireless connection. Right-click on the connection of your choice and select Properties. To enable Internet connection sharing, click on the Advanced tab (see Figure 6-44). Turn on the "Allow other network users to connect through this computer's Internet connection" checkbox (if it is already checked, uncheck it, click OK to dismiss the Connection Properties dialog, and start over at step 3). In the drop-down list box, select Bluetooth Network. (If this connection is not available, look for the network connection listed as Bluetooth LAN Access Server in Network connections, which may be named something cryptic such as Local Area Connection 7.) Click the OK button.
Figure 6-44. Configuring the connection to be used for Internet connection sharing 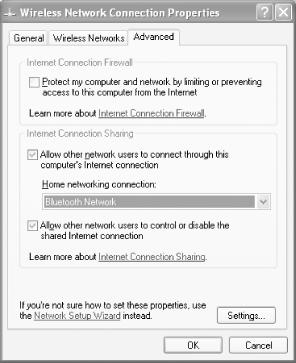 6.5.5.2 On the computer using the shared Internet connection To share an Internet connection and set it up on the computer that is using the connection, follow the steps described in the list shown next. On the computer using the shared Internet connection, go to My Bluetooth Places and select "View devices in range". Select the computer providing the Internet connection and right-click on the Network Access Service. Select Connect to Network Access Point, as shown in Figure 6-45. You may be prompted for a user ID and password, in which case you must use a user ID and password that are valid on the remote computer. Figure 6-45. Connecting to the shared Internet connection 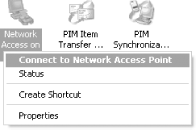 On the host computer providing the Internet connection, a dialog box may prompt for permission to share the network (see Figure 6-46), depending on that computer's security settings. Figure 6-46. Giving permission to the remote computer for Internet sharing 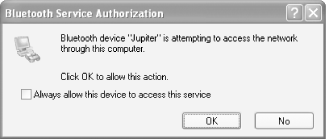 Click on the OK button to complete the connection.
That's it! Both computers should now be able to connect to the Internet by using the host's Internet connection. 6.5.5.3 Troubleshooting connection sharing One common problem in sharing an Internet computer on a host computer is IP address conflict. One easy way to prevent this error is to use DHCP to assign IP addresses. On the computer using the shared Internet connection, ensure that you obtain an IP address dynamically using DHCP. This can be done by right-clicking on My Network Places and selecting Properties. Choose the Bluetooth Network icon and configure the property of Internet Protocol (TCP/IP) to obtain an IP address automatically. Here are some troubleshooting tips:
- Make sure you have an IP address
-
Use ipconfig to check whether an IP address has been allocated to your computer. If you do not have an IP address, then the connection has not been established correctly.
- Check your connection
-
Use ping to verify that you can reach other computers. Open a Windows XP Command Prompt, and type ping computername, as in ping jupiter (always try the computer that's sharing the Internet connection first). Then you might want to try to ping a remote host, such as www.oreilly.com.
- Check your name servers
-
Use nslookup to resolve the hostname of a remote computer, such as www.oreilly.com. This can help you to verify whether you are able to connect to the Internet.
- Make sure the host computer is still connected
-
Go to the computer that's sharing its Internet connection, and check to see whether it's lost its connection to the Internet.
6.5.6 Bluetooth Printing Printing wirelessly is another popular use of Bluetooth technology. This is especially useful in a small office environment where many coworkers need to share a single printer. Instead of buying a more expensive network printer, you can purchase a Bluetooth printer adapter and connect it to your printer. Users can then print wirelessly using Bluetooth. Figure 6-47 shows the Bluetake BT200 Bluetooth printer adapter (other vendors offering Bluetooth printer adapters include MPI Tech and Anycom), which connects to the parallel port on your printer. It is a Class 2 Bluetooth device and supports the Serial Port Profile. Figure 6-47. The Bluetake BT200 Bluetooth Printer Adapter 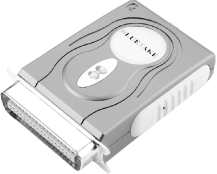 In the following, I show you how I use the BT200 to connect to my HP 5L laser printer. First, establish a connection between your computer and the printer using a parallel cable. Once you can print correctly using the parallel cable, power down the computer and printer, disconnect the parallel cable, and connect the Bluetooth printer adapter to the printer.
 | The Bluetake Bluetooth printer adapter that I used in this chapter connects only to a parallel port printer. But if you have a USB printer, you can get the Bluetooth printer adapter for it from MPI Tech at http://www.mpitech.com/. |
|
Right-click on the Bluetooth icon in the System Tray and select Advanced Configuration. Click on the Client Applications tab (see Figure 6-48). Figure 6-48. Verifying the COM port used as a serial port 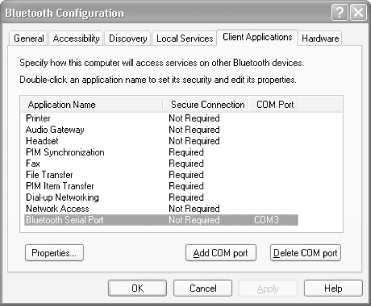 Confirm the COM port used for the Bluetooth Serial Port. In my case, the port number is COM3. We will use COM3 to connect to the printer using Bluetooth. Also, double-click on Bluetooth Serial Port to ensure that the Secure Connection checkbox is unchecked. Since our printer is going to connect to this virtual COM3, we need to configure our printer to connect to this COM port, not the parallel port. Go to Start  Settings Settings  Printers and Faxes. Locate your printer and right-click on it. Select Properties. Turn off the LPT port checkbox and turn on the COM3 checkbox. Click OK (see Figure 6-49). Printers and Faxes. Locate your printer and right-click on it. Select Properties. Turn off the LPT port checkbox and turn on the COM3 checkbox. Click OK (see Figure 6-49). Figure 6-49. Configuring the printer to print to a virtual COM port 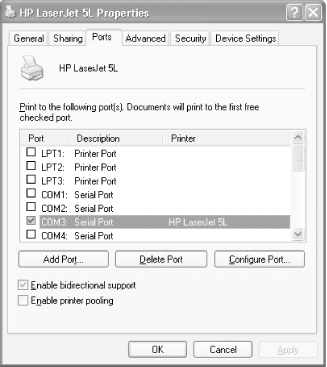 Next, go to My Bluetooth Places and select Bluetooth Setup Wizard. In the Bluetooth Setup window, select "I know the service I want to use and I want to find a Bluetooth device that provides that service" (see Figure 6-50). Click Next. Figure 6-50. Using the Bluetooth setup wizard to set up the printer 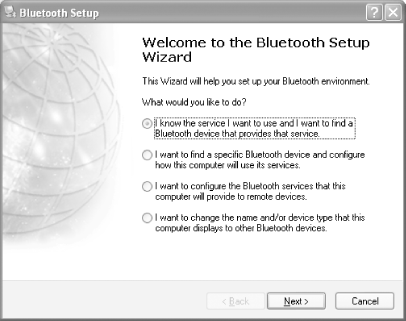 In the next window, select Bluetooth Serial Port (see Figure 6-51) and click Next. Figure 6-51. Using the Bluetooth serial port to connect to the printer 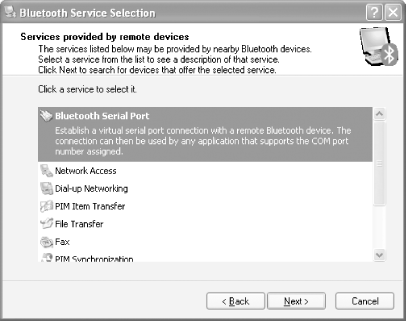 Bluetooth will now search for other Bluetooth devices. Select "Show printers, cameras and scanners" from the drop-down list (see Figure 6-52). You should be able to find a device call BT200. Select it and click Next. Figure 6-52. Locating the printer 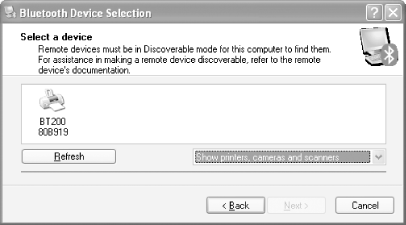 Finally, a Cable Replacement icon will be created in My Bluetooth Places. Click Configure to confirm the settings for this connection (see Figure 6-53).
Figure 6-53. A Cable Replacement icon to link to the printer 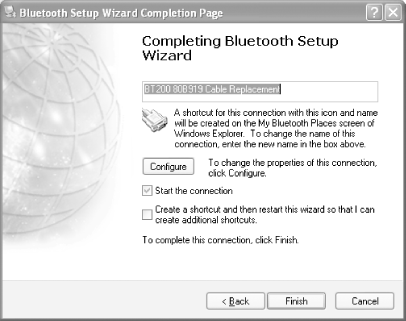 That's it! You can now print normally to your printer, and Bluetooth will perform its magic wirelessly in the background. 6.5.6.1 Troubleshooting Bluetooth printing Here are two solutions to common problems in getting your printer to print wirelessly: Ensure that your printer is configured to print to the Bluetooth Serial Port. Because different vendors have different setup instructions, follow the installation instructions provided by the vendor.
|


 Configuration. Select the Local Services tab and double-click on the Bluetooth Serial Port item (see Figure 6-19). Verify the virtual COM port number used by the Bluetooth serial port. In my case, it is using COM port 4.


