5.4 Configuring an Access Point
| To connect your access point to the Internet, use a straight-through Ethernet cable to plug the access point's WAN port into your cable modem, DSL modem, router, or whatever piece of equipment in your home or office that is responsible for providing Internet access. After you plug it in, turn on the access point's switch (assuming it has one some access points can only be powered down by unplugging them), and it will power up, perform its initialization, and then request a DHCP address from the cable or DSL modem or router.
5.4.1 Web-Based ConfigurationTo configure the wireless router, connect your computer to one of the wireless router's LAN ports using a straight-through Ethernet cable (if your computer has an autosensing Ethernet port, you can use either a straight-through or crossover cable). For the Linksys BEFW11S4, load the following URL in your web browser: http://192.168.1.1/. For the D-Link DI-714P+, use http://192.168.0.1/. When prompted for a username and password, use "admin" as your username and leave the password field empty.
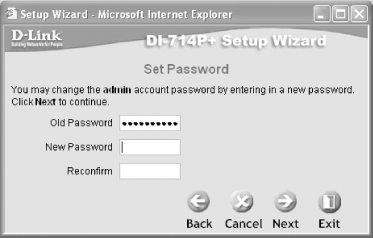
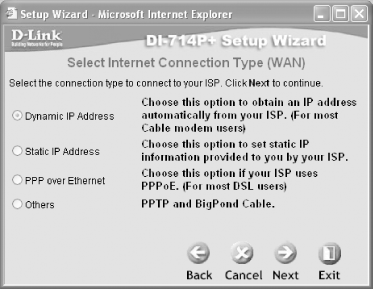
Figure 5-19 shows the web-based configuration utility of the BEFW11S4. Figure 5-19. The BEFW11S4 configuration utility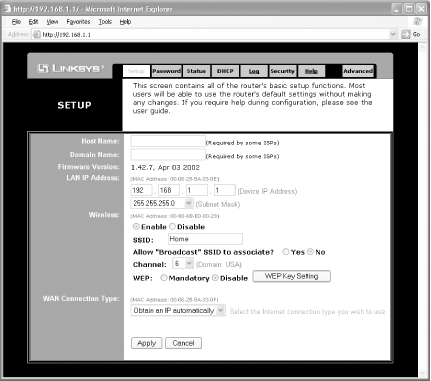 Figure 5-20 shows the web-based configuration utility of the DI-714P+. There are several tabs displayed horizontally: Home, Advanced, Tools, Status, and Help. Corresponding to each tab are various functions displayed vertically. For example, in the Home tab there are five functions: Wizard, Wireless, WAN, LAN, and DHCP. Figure 5-20. The configuration utility of the DI-714P+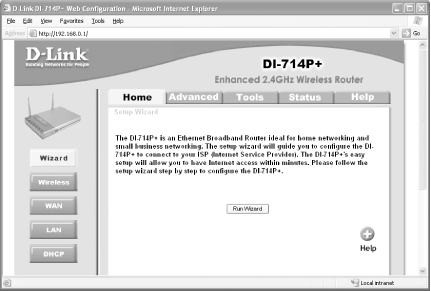 5.4.1.1 DI-714P+ setup wizardTo quickly set up the DI-714P+, I suggest you run the wizard. Click on the Run Wizard button and take the following steps:
Figure 5-23. Setting the MAC address of the DI-714P+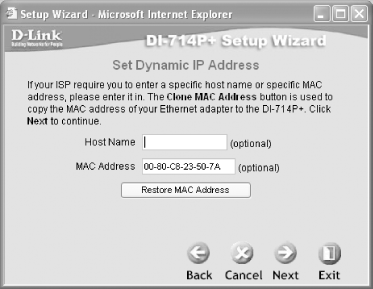
Figure 5-24. Using WEP encryption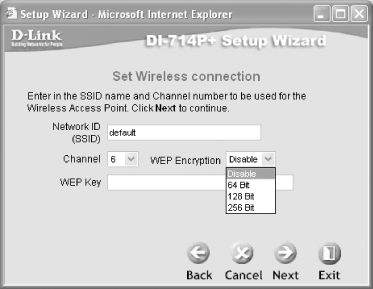
That's it! Restart (switch off and switch on the router) the DI-714P+ for the new settings to take effect. Now, use an Ethernet cable and connect the WAN port of the DI-714P+ to the switch (or directly to the customer premise equipment supplied by your ISP, in case the DI-714P+ is the only switch you plan to use). You should now be able to use your computer with a wireless card (see Chapter 2) to connect to the Internet through the DI-714P+. The configuration screen for different access point models, as well as access points from other manufacturers, will vary somewhat. The remaining sections explain how to accomplish common tasks with the web-based configuration. 5.4.2 Setting the SSIDThe SSID (Service Set Identifier) gives your access point a name (see Section 2.2.2 in Chapter 2). If you intend to let strangers connect to your access point, I suggest you give your SSID a friendly name such as "welcome." (If you don't, be sure to see Section 5.4.4 and Section 5.4.11 in this chapter). To change the SSID of the BEFW11S4, click on the Setup tab, enter the new SSID, and select the appropriate channel number. To change the SSID of the DI-714P+, click on the Home tab and select the Wireless option. 5.4.3 Setting the Channel NumberIf you have multiple access points in close proximity to one another, you should set them to broadcast on different channels. To change the channel number of the BEFW11S4, click on the Setup tab, enter the new SSID, and select the appropriate channel number. To change the SSID of the DI-714P+, click on the Home tab and select the Wireless option. 5.4.4 Enabling WEPYou can also enable WEP encryption to secure your wireless network. If you use WEP, users will not be able to connect to your network unless they know (or can obtain) the WEP key. Chapter 4 goes into more detail about using WEP (and stronger systems) to secure your wireless network. To enable WEP on the BEFW11S4 (64- and 128-bit keys are supported), click on the WEP Key Setting button. You can specify up to four keys for WEP. You can also enter a passphrase to get the router to generate the four keys required. To enable WEP on the DI-714P+ (64-, 128-, and 256-bit WEP keys are supported), click the Home tab and select the Wireless option. As with the BEFW11S4, you can specify up to four keys.
5.4.5 Changing the Access Point's Default IP AddressBy default, when a wireless client connects to the access point, it is assigned an IP address by the access point. The default LAN IP address for the BEFW11S4 itself is 192.168.1.1. The default IP address for the DI-714P+ is 192.168.0.1.
You can modify the default LAN IP address of the BEFW11S4 by clicking the Setup tab and selecting the LAN IP Address option. You can modify the default IP address of the DI-714P+ by clicking on the Home tab and selecting the LAN option. When the default IP address is changed, the range of allocatable IP addresses also changes. To learn how to change the range, see Section 5.4.7.
5.4.6 Setting the WAN IP AddressThe BEFW11S4 supports five ways to obtain a WAN IP address:
If your ISP allocates an IP address to you automatically, choose "Obtain an IP address automatically". If you use a static IP address, choose "Static IP". For most ADSL/DSL modem users, choose "PPPoE". The DI-714P+ also supports Dynamic IP Address, Static IP Address, PPPoE, and PPTP. 5.4.7 Configuring DHCPDHCP automatically assigns IP addresses to machines that connect to your access point (for more information, see the earlier DHCP and NAT). To enable or disable the DHCP server on the BEFW11S4, click on the DHCP tab. For the DI-714P+, click on the Home tab and then click on the DHCP option. The BEFW11S4 assigns IP addresses (if the DHCP server is enabled on the router) to all its wireless clients from a default range of 192.168.1.100 to 192.168.1.149 (50 users). The DI-714P+ assigns IP addresses to its clients from a default range of 192.168.0.100 to 192.168.0.199 (customizable). Disabling the DHCP server on the access point requires all clients that connect to the router to have their own static IP addresses. This makes it slightly harder for unwanted users to connect to your network. 5.4.8 Changing the Administrator PasswordA hacker who knows the default password on your access point and who can manage to connect to your network will have full control over your network, and all the other security precautions that you have taken (such as using WEP and disabling DHCP) could come to naught. To change the Administrator password on the BEFW11S4, click the Password tab. To change it on the DI-714P+, click the Tools tab. I suggest you change the Administrator password frequently. 5.4.9 Disabling SSID BroadcastBy default, the access point will broadcast its SSID to all wireless clients. Anyone in the vicinity with a wireless-enabled computer now knows that you have a wireless network. In order to minimize the chances of allowing uninvited people to connect to your wireless network, it is advisable that you disable the SSID broadcast feature. To disable the SSID broadcast on the BEFW11S4, select the Setup tab and choose "No" in the "Allow `Broadcast' SSID to associate?" option. As of this writing, the DI-714P+ does not have the option to turn off the SSID broadcast. 5.4.10 Viewing the Status of the Access PointIf you need to check on the status of the BEFW11S4, click the Status tab. The Status tab will display information on the following options: LAN and WAN Information such as IP addresses and subnet mask will also be displayed. This is a useful option to troubleshoot network problems that may sometimes occur when you connect the BEFW11S4 to the network. You can also renew your IP address and see the IP addresses in use by computers on your network (these are assigned by the BEFW11S4's built-in DHCP server) in the Status tab. If you need to check on the status of the DI-714P+, click the Status tab. The Status tab will display information on the following options: LAN, WAN, Wireless, and Peripheral. Information such as IP addresses and subnet mask will be displayed. This is a useful option to troubleshoot network problems that may sometimes occur when you connect the DI-714P+ to the network. 5.4.10.1 SNMP monitoringSNMP (Simple Network Management Protocol) is a protocol used to monitor network devices. Some access points, such as the DI-714P+, will send SNMP messages (known as traps) across the network. You can configure the DI-714P+ to send SNMP messages by clicking Tools and then clicking SNMP. To receive SNMP messages, you'll need an SNMP monitoring program such as SNMP Trap Watcher (a freeware SNMP trap receiver available from http://www.bttsoftware.co.uk/snmptrap.html). For a comprehensive list of SNMP tools as well as more information about SNMP, see http://www.snmplink.org/. 5.4.11 MAC Address FilteringOne of the security measures you can take for your wireless network is to enable MAC address filtering. MAC address filtering ensures that only computers with the specified MAC addresses are allowed (or denied) access to the network. This can prevent wandering users from accessing the network.
You can use the ipconfig /all command to check for the MAC address of your wireless card. Most wireless cards have the MAC address directly printed on it. Figure 5-25 shows the MAC address printed on my Cisco Aironet 350. Figure 5-25. The MAC address printed on the Cisco Aironet 350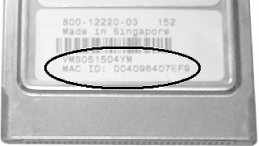 To enable MAC address filtering on the BEFW11S4:
Figure 5-26. Specifying the MAC addresses for enabling wireless access (BEFW11S4)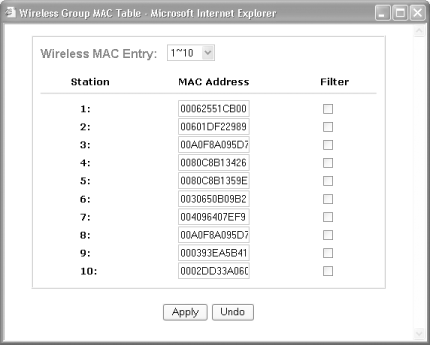 To enable MAC address filtering on the DI-714P+ (see Figure 5-27):
Figure 5-27. Specifying the MAC addresses for enabling wireless access (DI-714P+)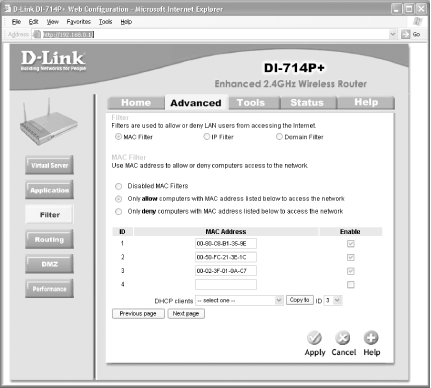 5.4.12 Opening a PortIn some cases, you may want to punch a hole in your firewall to let users on the Internet access a service on one of your computers. For example, you may want to run a public web server on your network. However, when a remote user tries to connect to your public IP address, she'll be stopped dead in her tracks by your access point's firewall.
You can configure the access point to accept connections on a particular port and let one of your computers inside your network handle it. For this to be effective, you should configure that computer with a fixed IP address (otherwise, the access point's DHCP server may assign a different IP address each time). If you do this, make sure the fixed IP address is outside the range of DHCP addresses used by your router (see Section 5.4.7 earlier in this chapter), or you could end up with two computers on your LAN with the same IP address. To open a port on the BEFW11S4:
To open a port on the DI-714P+:
|
EAN: N/A
Pages: 92
- Challenging the Unpredictable: Changeable Order Management Systems
- ERP System Acquisition: A Process Model and Results From an Austrian Survey
- Enterprise Application Integration: New Solutions for a Solved Problem or a Challenging Research Field?
- Context Management of ERP Processes in Virtual Communities
- Data Mining for Business Process Reengineering

 Internet Options...